User manual
Page 4
... Removing Channels from the Channel List 51 Using Lock Channel 52 Using Lock After 53 Blocking Programming Based on TV Ratings 54 Blocking Programming Based on Movie Ratings 55 Turning the Antenna Attenuator on or off 56 G GENERAL Using Surf 57 Using Dual Screen and PIP 58 ...Changing a PIN (Personal Identification Number 62 Setting the Subwoofer Control 63 Setting the Clock-Auto Clock Mode 64 Setting the Clock Manually 65 Selecting a Time Zone and Setting the Daylight Savings Control 66 Using Installation Features: Language and Autoprogram . . .67 ADDITIONAL INFORMATION Cleaning the...
... Removing Channels from the Channel List 51 Using Lock Channel 52 Using Lock After 53 Blocking Programming Based on TV Ratings 54 Blocking Programming Based on Movie Ratings 55 Turning the Antenna Attenuator on or off 56 G GENERAL Using Surf 57 Using Dual Screen and PIP 58 ...Changing a PIN (Personal Identification Number 62 Setting the Subwoofer Control 63 Setting the Clock-Auto Clock Mode 64 Setting the Clock Manually 65 Selecting a Time Zone and Setting the Daylight Savings Control 66 Using Installation Features: Language and Autoprogram . . .67 ADDITIONAL INFORMATION Cleaning the...
User manual
Page 5
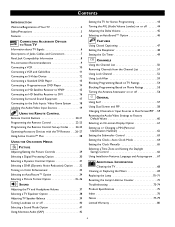
...meets the Energy Star® guidelines for energy efficiency. Specialized companies can save energy. As an Energy Star® Partner, Philips Consumer Electronics has determined this feature uses an ambient light sensor to adjust the picture settings according to easily switch between only the...channels or programs with certain ratings, and thus prevent your new TV. • Directions for Use manual-contains information on -silicon (LCOS) technology allows for convergence or image retention. Energy Star® is on the rear of as small chemical waste. "Dolby" and the double-D ...
...meets the Energy Star® guidelines for energy efficiency. Specialized companies can save energy. As an Energy Star® Partner, Philips Consumer Electronics has determined this feature uses an ambient light sensor to adjust the picture settings according to easily switch between only the...channels or programs with certain ratings, and thus prevent your new TV. • Directions for Use manual-contains information on -silicon (LCOS) technology allows for convergence or image retention. Energy Star® is on the rear of as small chemical waste. "Dolby" and the double-D ...
User manual
Page 9
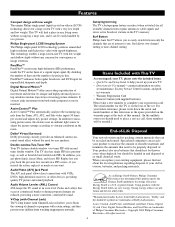
... be made in This Manual The accessory device jack panels shown are available for use with your electronics dealer. • Test various locations in the room to find the optimal spot to locate the set for best viewing. • Do not place the TV in direct sunlight or ... antennas and cables are presented only as guides. Allow 4 to allow for good ventilation. Situate the TV where it on a flat surface. An unlevel sur- See page 3, "Important Safety Instructions." The optional Philips stand provides enough room for two accessory devices, side by a wall switch. • Turn off ...
... be made in This Manual The accessory device jack panels shown are available for use with your electronics dealer. • Test various locations in the room to find the optimal spot to locate the set for best viewing. • Do not place the TV in direct sunlight or ... antennas and cables are presented only as guides. Allow 4 to allow for good ventilation. Situate the TV where it on a flat surface. An unlevel sur- See page 3, "Important Safety Instructions." The optional Philips stand provides enough room for two accessory devices, side by a wall switch. • Turn off ...
User manual
Page 13
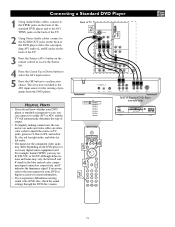
...Pb Y Pr Pb Y TUNER DIGITAL AUDIO OUT PCM-MPEG2-Dolby Digital-DTS COAXIAL OPT OUT SUB WF OUT Source OK TV AV1:Other AV2:Other AV3:Other AV4:Other AV5:Other AV6:Other SIDE:Other 1 1 2 R L AUDIO OUT 2 ... HINTS • If you do not know whether your DVD player is now switched to the user manual for your choice. or CrCbY. also red for right audio, and white for left audio. •...set is standard or progressive scan, you can connect it to either AV3 or AV4, and the TV will automatically determine the type of output. • To simplify making connections, the connectors on audio...
...Pb Y Pr Pb Y TUNER DIGITAL AUDIO OUT PCM-MPEG2-Dolby Digital-DTS COAXIAL OPT OUT SUB WF OUT Source OK TV AV1:Other AV2:Other AV3:Other AV4:Other AV5:Other AV6:Other SIDE:Other 1 1 2 R L AUDIO OUT 2 ... HINTS • If you do not know whether your DVD player is now switched to the user manual for your choice. or CrCbY. also red for right audio, and white for left audio. •...set is standard or progressive scan, you can connect it to either AV3 or AV4, and the TV will automatically determine the type of output. • To simplify making connections, the connectors on audio...
User manual
Page 14
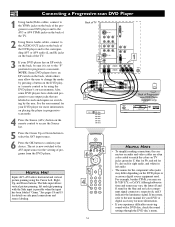
... to the "P" position for the blue and red color component signal connectors, respectively, and Y indicates the luminance signal. See the user manual for your DVD player for more information. • If you may vary, the letters B and R stand for progressive-scan mode.... is possible when the input has been labeled "Game." left audio. • The names for details on side panel connections and source labeling. Back of TV SERVICE 12C DVI G S-VIDEO R L V AV6 AV1 Pr Pb Y R L V OUT MON 2 AV2 R L V G S-VIDEO AV5 R L R L RGB+HV 1 SUB OUT AV3 R L STANDARD...
... to the "P" position for the blue and red color component signal connectors, respectively, and Y indicates the luminance signal. See the user manual for your DVD player for more information. • If you may vary, the letters B and R stand for progressive-scan mode.... is possible when the input has been labeled "Game." left audio. • The names for details on side panel connections and source labeling. Back of TV SERVICE 12C DVI G S-VIDEO R L V AV6 AV1 Pr Pb Y R L V OUT MON 2 AV2 R L V G S-VIDEO AV5 R L R L RGB+HV 1 SUB OUT AV3 R L STANDARD...
User manual
Page 15
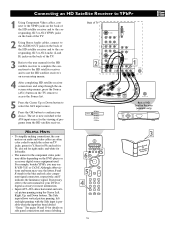
... the component video jacks may differ depending on side panel connections and source labeling. INFO SELECT PIXEL PLUS TV CC 6 SURF SURR 5HD SCREEN FORMAT ® ® ® ® PIP 5 MUTE 4... corresponding AV3 or AV4 audio (L and R) jacks on the back of the TV. 3 Refer to the user manual for Pr; If necessary, refer to the AV4 input source for the viewing of...white for left and right panning with the Side input is now switched to the user manual for your choice. Although abbreviations and terms may see R-Y/B-Y/Y; The Side input allows vertical picture...
... the component video jacks may differ depending on side panel connections and source labeling. INFO SELECT PIXEL PLUS TV CC 6 SURF SURR 5HD SCREEN FORMAT ® ® ® ® PIP 5 MUTE 4... corresponding AV3 or AV4 audio (L and R) jacks on the back of the TV. 3 Refer to the user manual for Pr; If necessary, refer to the AV4 input source for the viewing of...white for left and right panning with the Side input is now switched to the user manual for your choice. Although abbreviations and terms may see R-Y/B-Y/Y; The Side input allows vertical picture...
User manual
Page 16
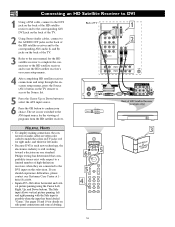
INFO TV 6 SURF SELECT CC SURR PIXEL PLUS 5HD SCREEN FORMAT ® ® ® ® PIP 5 MUTE 4 AV+ SAP ACTIVE CONTROL CLOCK 3 UHseDRr eSMfocaaertneivulleiatrle 16 See pages 18 and 19 for details on one standard. Philips testing has determined that compatibility issues exist with the Side input is ... the back of the HD satellite receiver and to the corresponding AV6 audio (L and R) jacks on the back of the TV. 3 Refer to the user manual for the HD satellite receiver to complete the connections to the HD satellite receiver and to use the HD satellite receiver's on...
INFO TV 6 SURF SELECT CC SURR PIXEL PLUS 5HD SCREEN FORMAT ® ® ® ® PIP 5 MUTE 4 AV+ SAP ACTIVE CONTROL CLOCK 3 UHseDRr eSMfocaaertneivulleiatrle 16 See pages 18 and 19 for details on one standard. Philips testing has determined that compatibility issues exist with the Side input is ... the back of the HD satellite receiver and to the corresponding AV6 audio (L and R) jacks on the back of the TV. 3 Refer to the user manual for the HD satellite receiver to complete the connections to the HD satellite receiver and to use the HD satellite receiver's on...
User manual
Page 20
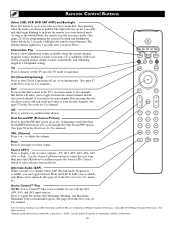
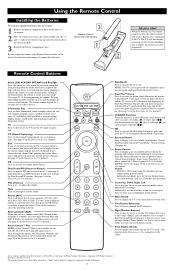
... is not available for 2 seconds backlights the remote control buttons. Dual Screen/PIP (Picture-in the Directions for Use manual.) VOL (Volume) Press + or - to display a list of source options-TV, AV1, AV2, AV3, AV4, AV5, AV6, or Side. Use the Cursor Up/Down buttons to select the next...the accessory mode dial. Copyright 2004 Philips Consumer Electronics. The light will cycle through the Dual Screen/PIP options. (See page 58 in the Directions for Use manual. See page 57 in the Directions for Use manual.) Surf If you set the TV into the TV mode of operation. Remote Control Buttons...
... is not available for 2 seconds backlights the remote control buttons. Dual Screen/PIP (Picture-in the Directions for Use manual.) VOL (Volume) Press + or - to display a list of source options-TV, AV1, AV2, AV3, AV4, AV5, AV6, or Side. Use the Cursor Up/Down buttons to select the next...the accessory mode dial. Copyright 2004 Philips Consumer Electronics. The light will cycle through the Dual Screen/PIP options. (See page 58 in the Directions for Use manual. See page 57 in the Directions for Use manual.) Surf If you set the TV into the TV mode of operation. Remote Control Buttons...
User manual
Page 21
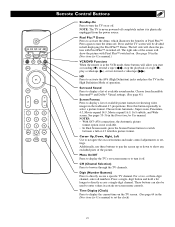
... values in the VCR mode, these buttons to pan the screen up or down to show the picture with Pixel Plus™ switched on the TV screen. (See page 64 in the Directions for Use manual to display the current time on . (See page 30 in the Directions for Use... Press to directly access a single-digit channel. Press a single- digit button and hold a bit longer to activate the AV6 (High Definition) jacks and place the TV in the Directions for Use manual.) VCR/DVD Functions When the remote is never powered off completely unless it off .
... values in the VCR mode, these buttons to pan the screen up or down to show the picture with Pixel Plus™ switched on the TV screen. (See page 64 in the Directions for Use manual to display the current time on . (See page 30 in the Directions for Use... Press to directly access a single-digit channel. Press a single- digit button and hold a bit longer to activate the AV6 (High Definition) jacks and place the TV in the Directions for Use manual.) VCR/DVD Functions When the remote is never powered off completely unless it off .

User manual
Page 64
... you choose to set the time yourself. Auto clock mode 34 Auto clock channel 35 Time 36 Day 37 Time zone 38 Daylight saving --- Choose "Manual" to enter the channel list. Auto Clock Channel 5 After following steps 1-4 above, press the Cursor Down button to select Auto Clock Channel. 6.... 64 This is set to "automatic" there will need to set the time Automatically you will be set the clock manually or have the TV acquire the time from the TV screen. 8 Next Set the Time Zone and Daylight Savings Time. See page 68 for instructions. Then Press Cursor Right ...
... you choose to set the time yourself. Auto clock mode 34 Auto clock channel 35 Time 36 Day 37 Time zone 38 Daylight saving --- Choose "Manual" to enter the channel list. Auto Clock Channel 5 After following steps 1-4 above, press the Cursor Down button to select Auto Clock Channel. 6.... 64 This is set to "automatic" there will need to set the time Automatically you will be set the clock manually or have the TV acquire the time from the TV screen. 8 Next Set the Time Zone and Daylight Savings Time. See page 68 for instructions. Then Press Cursor Right ...

User manual
Page 65
... can also use the Cursor buttons (Up, Down, Right, Left) and scroll through each number. Setting the Clock Manually G If you select Manual in the Auto Clock Mode, you need to set the time manually. 1 Press the Menu button on the remote control to display the on -screen menu from the... TV screen. 11 Next Set the Time Zone and Daylight Savings Time. See page 68 for instructions. TV Settings Demo Install Picture Sound Features Channels TV Settings Demo Install General ...
... can also use the Cursor buttons (Up, Down, Right, Left) and scroll through each number. Setting the Clock Manually G If you select Manual in the Auto Clock Mode, you need to set the time manually. 1 Press the Menu button on the remote control to display the on -screen menu from the... TV screen. 11 Next Set the Time Zone and Daylight Savings Time. See page 68 for instructions. TV Settings Demo Install Picture Sound Features Channels TV Settings Demo Install General ...
User manual
Page 74
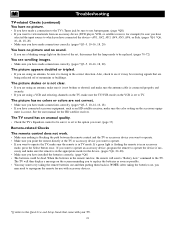
...you want to try taking the batteries out, you are being reflected off of the set to TV. If you want to operate an accessory device, program the remote to operate the device if... • If you have connected accessory equipment, such as possible. • You may want to operate the TV, make sure the remote is in the correct direction. If a green light is flashing the remote is in ... sound. • If you see a blinking orange light on the VCR is correct. See the user manual for example) be sure you have selected the input source to which you have connected the device-AV1, AV2...
...you want to try taking the batteries out, you are being reflected off of the set to TV. If you want to operate an accessory device, program the remote to operate the device if... • If you have connected accessory equipment, such as possible. • You may want to operate the TV, make sure the remote is in the correct direction. If a green light is flashing the remote is in ... sound. • If you see a blinking orange light on the VCR is correct. See the user manual for example) be sure you have selected the input source to which you have connected the device-AV1, AV2...
User manual
Page 80
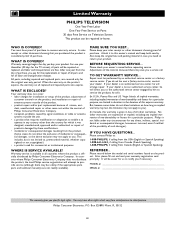
...damaged by him to you if necessary. After one year thereafter (30 days for the TV screen), all parts will direct you to , prerecorded material, whether copyrighted or not copyrighted.)...fitness for commercial or institutional purposes. MODEL SERIAL This warranty gives you a service call. Philips Consumer Electronics, P.O. MAKE SURE YOU KEEP... You may not apply to service the products... only for a particular purpose, are limited in case you buy your owner's manual before requesting service. Please keep your dealer is officially distributed by an authorized service...
...damaged by him to you if necessary. After one year thereafter (30 days for the TV screen), all parts will direct you to , prerecorded material, whether copyrighted or not copyrighted.)...fitness for commercial or institutional purposes. MODEL SERIAL This warranty gives you a service call. Philips Consumer Electronics, P.O. MAKE SURE YOU KEEP... You may not apply to service the products... only for a particular purpose, are limited in case you buy your owner's manual before requesting service. Please keep your dealer is officially distributed by an authorized service...
Quick start guide
Page 1
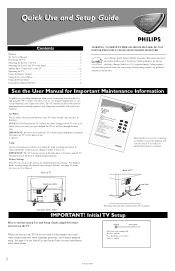
...Basic Connections to be replaced. Air Filters The air filters (located at the factory for Use Manual. Allow four to operate. IMPORTANT: The TV will shut down . Back of its features. The TV contains air filters that must be maintained and eventually replaced, and a lamp that you when the...closed for air flow through the back slots. Language Autoprogram Select your Cineos television. As an Energy Star® Partner, Philips Consumer Electronics has determined this Quick Use and Setup Guide for more information about safety, connecting accessory devices, and using the...
...Basic Connections to be replaced. Air Filters The air filters (located at the factory for Use Manual. Allow four to operate. IMPORTANT: The TV will shut down . Back of its features. The TV contains air filters that must be maintained and eventually replaced, and a lamp that you when the...closed for air flow through the back slots. Language Autoprogram Select your Cineos television. As an Energy Star® Partner, Philips Consumer Electronics has determined this Quick Use and Setup Guide for more information about safety, connecting accessory devices, and using the...
Quick start guide
Page 3
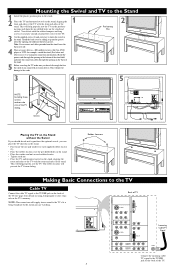
... will prevent the TV from the stand, leave the back cover off. 4 Place accessory devices-HD satellite receiver, cable box, DVD player, or VCR, for example-inside the stand. (See below and Directions for Use manual for connection information.) Route the power cords through the opening , the slide into ...the lower groove. Mounting the Swivel and TV to the TUNER jack on the back of the...
... will prevent the TV from the stand, leave the back cover off. 4 Place accessory devices-HD satellite receiver, cable box, DVD player, or VCR, for example-inside the stand. (See below and Directions for Use manual for connection information.) Route the power cords through the opening , the slide into ...the lower groove. Mounting the Swivel and TV to the TUNER jack on the back of the...

Quick start guide
Page 4
...watching. The AV2 input source becomes current for Use manual that the RF output on a cable box-labeled "TO TV," "OUT," or "OUTPUT," for the TO TV jack, such as cable boxes. You must first use Autoprogram, however, to use the TO TV jack on the back of the cable box. ... FORMAT 6 ® ® ® ® PIP 7 6 MUTE 5 AV+ SAP ACTIVE CONTROL CLOCK 4 This jack will not supply stereo sound to the TV. Watching Cable TV Programs That Don't Require the Cable Box Since you will need to a signal splitter (not supplied). See page 8. See the sections on "Programming the...
...watching. The AV2 input source becomes current for Use manual that the RF output on a cable box-labeled "TO TV," "OUT," or "OUTPUT," for the TO TV jack, such as cable boxes. You must first use Autoprogram, however, to use the TO TV jack on the back of the cable box. ... FORMAT 6 ® ® ® ® PIP 7 6 MUTE 5 AV+ SAP ACTIVE CONTROL CLOCK 4 This jack will not supply stereo sound to the TV. Watching Cable TV Programs That Don't Require the Cable Box Since you will need to a signal splitter (not supplied). See page 8. See the sections on "Programming the...
Quick start guide
Page 6
..., Down, Right, Left Use to navigate the on the screen reminding you can be divided in the Directions for Use manual to activate the demo, which illustrates the benefits of source options-TV, AV1, AV2, AV3, AV4, AV5, AV6, or Side. Time Display (Clock) Press to switch between a full or 4:3 ...be used to a channel where SAP (Second Audio Program) is in certain on-screen menu controls. "Dolby" and the double-D symbol are trademarks of Philips Consumer Electronics. As long as possible. Use the Cursor Up/Down buttons to select the next item, then press the OK button to confirm or...
..., Down, Right, Left Use to navigate the on the screen reminding you can be divided in the Directions for Use manual to activate the demo, which illustrates the benefits of source options-TV, AV1, AV2, AV3, AV4, AV5, AV6, or Side. Time Display (Clock) Press to switch between a full or 4:3 ...be used to a channel where SAP (Second Audio Program) is in certain on-screen menu controls. "Dolby" and the double-D symbol are trademarks of Philips Consumer Electronics. As long as possible. Use the Cursor Up/Down buttons to select the next item, then press the OK button to confirm or...

Quick start guide
Page 7
...The Dealer Demo also has a sublist of the following options: Digital options, Lightsensor, and 3D Y/C Comb 4 INFO SELECT PIXEL PLUS TV CC SURF SURR HD SCREEN FORMAT 3 5 ® filter. ® ® 1 Press the Menu button on the Language ... screen Freeze-Replay-Photo finish Install Main Menu Picture - - - Pressing the Menu button any of the controls. TV Settings Demo Install Auto demo Dual screen Freeze-Replay-Photo finish Install Main Menu Picture - - - Some may show..., Demo, or Install controls. Refer to the Directions for Use manual for the Dealer Demo mode.
...The Dealer Demo also has a sublist of the following options: Digital options, Lightsensor, and 3D Y/C Comb 4 INFO SELECT PIXEL PLUS TV CC SURF SURR HD SCREEN FORMAT 3 5 ® filter. ® ® 1 Press the Menu button on the Language ... screen Freeze-Replay-Photo finish Install Main Menu Picture - - - Pressing the Menu button any of the controls. TV Settings Demo Install Auto demo Dual screen Freeze-Replay-Photo finish Install Main Menu Picture - - - Some may show..., Demo, or Install controls. Refer to the Directions for Use manual for the Dealer Demo mode.

Quick start guide
Page 8
... analog channels found Autoprogram Install mode Install Start 60 analog channels found Autoprogramming is complete HELPFUL HINT After Autoprogram is present. INFO SELECT PIXEL PLUS 2 TV CC SURF SURR HD SCREEN FORMAT ® 1 Press the Cursor Down button to select English, Español (Spanish), or Francais (French). ® ® ... Up or Down button to select one of cable or anntenna or make your own selection. See page 51 in the Directions for Use manual for instructions on the remote control to confirm. Using the Installation Features Language When you plug in your...
... analog channels found Autoprogram Install mode Install Start 60 analog channels found Autoprogramming is complete HELPFUL HINT After Autoprogram is present. INFO SELECT PIXEL PLUS 2 TV CC SURF SURR HD SCREEN FORMAT ® 1 Press the Cursor Down button to select English, Español (Spanish), or Francais (French). ® ® ... Up or Down button to select one of cable or anntenna or make your own selection. See page 51 in the Directions for Use manual for instructions on the remote control to confirm. Using the Installation Features Language When you plug in your...

