User manual
Page 1
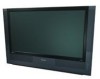
...; Active Control™-analyzes and adjusts incoming signal • Two-tuner, Double-window PIP (Picture-in-Picture) • Dolby® Virtual Surround, 40-watt RMS • 3D Y/C Comb Filter • HD Component and DVI Input • Side AV Convenience Jacks • Matching stand and swivel available Refer to the Quick Use and Setup Guide (supplied with your TV) for information on basic connections, remote control button descriptions, on-screen menu language...
...; Active Control™-analyzes and adjusts incoming signal • Two-tuner, Double-window PIP (Picture-in-Picture) • Dolby® Virtual Surround, 40-watt RMS • 3D Y/C Comb Filter • HD Component and DVI Input • Side AV Convenience Jacks • Matching stand and swivel available Refer to the Quick Use and Setup Guide (supplied with your TV) for information on basic connections, remote control button descriptions, on-screen menu language...
User manual
Page 3
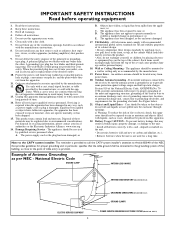
... combination to the receiver, be exposed to provide some protection against voltage surges and built up static charges. Only use this apparatus should not be regulated due to operate normally or exhibits a marked change in wire to an antenna discharge unit, size of grounding connectors, location of antenna-discharge unit, connection to the unit: • Install all servicing to the front...
... combination to the receiver, be exposed to provide some protection against voltage surges and built up static charges. Only use this apparatus should not be regulated due to operate normally or exhibits a marked change in wire to an antenna discharge unit, size of grounding connectors, location of antenna-discharge unit, connection to the unit: • Install all servicing to the front...
User manual
Page 4
... DVD Player 13 Connecting a Progressive-scan DVD Player 14 Connecting an HD Satellite Receiver to YPbPr 15 Connecting an HD Satellite Receiver to DVI 16 Connecting Surround Sound Equipment 17 Connecting to the Side Inputs: Video Game System . . . . .18 Labeling the Audio/Video Input Sources 19 USING THE REMOTE CONTROL Remote Control Buttons 20-21 Programming the Remote Control 22-23 Programming the Remote Control: Set-up Codes . . . . .24-25 Operating Accessory Devices with the TV Remote . . .26-27 Using Active Control™ Plus 28 USING THE ON-SCREEN MENUS PICTURE Adjusting/Setting...
... DVD Player 13 Connecting a Progressive-scan DVD Player 14 Connecting an HD Satellite Receiver to YPbPr 15 Connecting an HD Satellite Receiver to DVI 16 Connecting Surround Sound Equipment 17 Connecting to the Side Inputs: Video Game System . . . . .18 Labeling the Audio/Video Input Sources 19 USING THE REMOTE CONTROL Remote Control Buttons 20-21 Programming the Remote Control 22-23 Programming the Remote Control: Set-up Codes . . . . .24-25 Operating Accessory Devices with the TV Remote . . .26-27 Using Active Control™ Plus 28 USING THE ON-SCREEN MENUS PICTURE Adjusting/Setting...
User manual
Page 5
..., DVDs, high-definition receivers, or other devices, providing quality TV picture and sound playback. For your children from watching inappropriate materials. By doubling the number of lines and the number of Dolby Laboratories. Audio/Video (A/V) Jack Panel The A/V jack panel allows direct connections with second tuner double window. The serial number for energy efficiency. Digital Natural Motion™ Digital Natural Motion™ offers razor-sharp reproduction of a regular input signal. Please...
..., DVDs, high-definition receivers, or other devices, providing quality TV picture and sound playback. For your children from watching inappropriate materials. By doubling the number of lines and the number of Dolby Laboratories. Audio/Video (A/V) Jack Panel The A/V jack panel allows direct connections with second tuner double window. The serial number for energy efficiency. Digital Natural Motion™ Digital Natural Motion™ offers razor-sharp reproduction of a regular input signal. Please...
User manual
Page 8
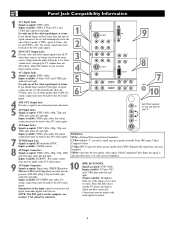
... DVI G S-VIDEO 9 signal connected, the set -top boxes and inputs from all TV when those sources are being viewed on the Left Side of better quality: CVBS-good, S-Video-better, and YPbPr-best. For sound, connections must be made to an external powered subwoofer. 5 AV3 Input Jacks Signals accepted: NTSC (480i), 480p, 720p, and 1080i, plus audio left and right. S-Video (Y/C)-provides better picture quality than CVBS. Output from the Tuner (RF) input. Inputs...
... DVI G S-VIDEO 9 signal connected, the set -top boxes and inputs from all TV when those sources are being viewed on the Left Side of better quality: CVBS-good, S-Video-better, and YPbPr-best. For sound, connections must be made to an external powered subwoofer. 5 AV3 Input Jacks Signals accepted: NTSC (480i), 480p, 720p, and 1080i, plus audio left and right. S-Video (Y/C)-provides better picture quality than CVBS. Output from the Tuner (RF) input. Inputs...
User manual
Page 10
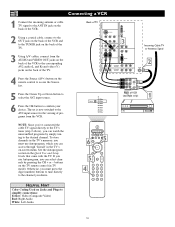
... SERVICE 12C OUT G S-VIDEO R L V Pr Pb Y R L V R L V G S-VIDEO AV5 AV6 DVI 3 R L R L RGB+HV R L STANDARD/ HD INPUTS STANDARD/ HD INPUTS R L Pr Pb Y Pr Pb Y Incoming Cable TV or Antenna Signal 2 TUNER 4 Press the Source (AV+) button on the back of the TV. To store channels in the TV's memory, you must press the digit (number) buttons to tune directly to simplify connections: Yellow: Video (Composite Video) Red: Right Audio White: Left Audio. See the Autoprogram section in TV mode). buttons on -screen menu...
... SERVICE 12C OUT G S-VIDEO R L V Pr Pb Y R L V R L V G S-VIDEO AV5 AV6 DVI 3 R L R L RGB+HV R L STANDARD/ HD INPUTS STANDARD/ HD INPUTS R L Pr Pb Y Pr Pb Y Incoming Cable TV or Antenna Signal 2 TUNER 4 Press the Source (AV+) button on the back of the TV. To store channels in the TV's memory, you must press the digit (number) buttons to tune directly to simplify connections: Yellow: Video (Composite Video) Red: Right Audio White: Left Audio. See the Autoprogram section in TV mode). buttons on -screen menu...
User manual
Page 11
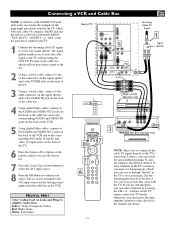
... access through "Install" in the TV's on-screen menu. To store channels in the Quick Use and Setup Guide that came with your cable TV company. See the Autoprogram section in the TV's memory, you must press the digit (number) buttons to tune directly to the channel you must use Autoprogram, you can select channels by simply tuning to the desired channel. The set is now switched to simplify connections: Yellow: Video (Composite Video) Red: Right Audio White...
... access through "Install" in the TV's on-screen menu. To store channels in the Quick Use and Setup Guide that came with your cable TV company. See the Autoprogram section in the TV's memory, you must press the digit (number) buttons to tune directly to the channel you must use Autoprogram, you can select channels by simply tuning to the desired channel. The set is now switched to simplify connections: Yellow: Video (Composite Video) Red: Right Audio White...
User manual
Page 13
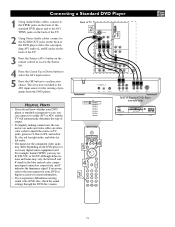
... type of output. • To simplify making connections, the connectors on audio and video cables are often color coded to the user manual for your choice. or CrCbY. also red for right audio, and white for left audio. • The names for the component video jacks may vary, the letters B and R stand for the blue and red color component signal connectors, respectively, and Y indicates the luminance signal. Connecting a Standard DVD Player 1 Using Audio/Video cables, connect to the...
... type of output. • To simplify making connections, the connectors on audio and video cables are often color coded to the user manual for your choice. or CrCbY. also red for right audio, and white for left audio. • The names for the component video jacks may vary, the letters B and R stand for the blue and red color component signal connectors, respectively, and Y indicates the luminance signal. Connecting a Standard DVD Player 1 Using Audio/Video cables, connect to the...
User manual
Page 14
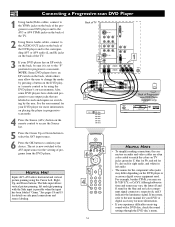
... change the mode by pressing a button on the DVD player's remote control or by the user. also red for right audio, and white for left and right panning with a DVD disc, check the sound settings through the DVD disc's menu. 14 or CrCbY. For example, besides YPbPr, you experience difficulties receiving sound with the Side input is now switched to the AV3 input source for the viewing of programs from the DVD player. The Side input allows vertical picture...
... change the mode by pressing a button on the DVD player's remote control or by the user. also red for right audio, and white for left and right panning with a DVD disc, check the sound settings through the DVD disc's menu. 14 or CrCbY. For example, besides YPbPr, you experience difficulties receiving sound with the Side input is now switched to the AV3 input source for the viewing of programs from the DVD player. The Side input allows vertical picture...
User manual
Page 16
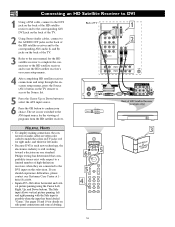
... the DVI input on side panel connections and source labeling. The Side input allows vertical picture panning; left and right panning with respect to a limited number of high-definition receivers when they are often color coded to match the colors on TV jacks: red for right audio, and white for left audio. • Because DVI is such new technology, the electronics industry is still working toward a decision on the TV remote to access...
... the DVI input on side panel connections and source labeling. The Side input allows vertical picture panning; left and right panning with respect to a limited number of high-definition receivers when they are often color coded to match the colors on TV jacks: red for right audio, and white for left audio. • Because DVI is such new technology, the electronics industry is still working toward a decision on the TV remote to access...
User manual
Page 20
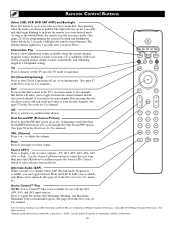
... your desired mode. The buttons remain lighted for Use manual.) Surf If you set the TV into the TV mode of Philips Consumer Electronics. Source (AV+) Press to display a list of a Sleeptimer setting. The light will stay on -screen menu to two channels, this button to cycle across the accessory mode dial. As long as the button blinks, the remote is in the accessory mode. (See pages 22-25 for programming the remote) Pressing and...
... your desired mode. The buttons remain lighted for Use manual.) Surf If you set the TV into the TV mode of Philips Consumer Electronics. Source (AV+) Press to display a list of a Sleeptimer setting. The light will stay on -screen menu to two channels, this button to cycle across the accessory mode dial. As long as the button blinks, the remote is in the accessory mode. (See pages 22-25 for programming the remote) Pressing and...
User manual
Page 47
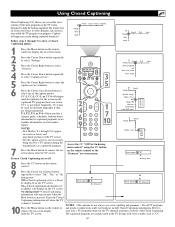
... for the TV channels and times of a captioned program. 7 Press the Menu button to display the on-screen menu. Lamp Replacement Settings General Caption service CC-1 CC-2 CC-3 CC-4 --- Off-Closed captioning service will turn Closed Captioning on or off when the TV volume is used for a channel guide, schedules, bulletin board information for captioned programs, news, weather information, or stock market reports. Turns the Closed Captioning information off : 6 INFO 9 TV SURF SELECT 8PIXEL PLUS CC SURR HD SCREEN FORMAT ® 3 5 ® ® PIP 2 4 6 9 AV...
... for the TV channels and times of a captioned program. 7 Press the Menu button to display the on-screen menu. Lamp Replacement Settings General Caption service CC-1 CC-2 CC-3 CC-4 --- Off-Closed captioning service will turn Closed Captioning on or off when the TV volume is used for a channel guide, schedules, bulletin board information for captioned programs, news, weather information, or stock market reports. Turns the Closed Captioning information off : 6 INFO 9 TV SURF SELECT 8PIXEL PLUS CC SURR HD SCREEN FORMAT ® 3 5 ® ® PIP 2 4 6 9 AV...
User manual
Page 56
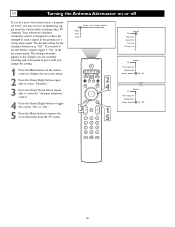
...; ® ® PIP 3 MUTE 2 4 1 5 Channels TV Channel list Channel lock Lock after TV ratings lock Channels TV Movie ratings lock Channel remove Antenna attenuator Off • On OR Channels TV Movie ratings lock Channel remove Antenna attenuator On • Off AV+ SAP ACTIVE CONTROL CLOCK 56 The setting you make applies to the channel you are currently watching and will remain in place until you change the setting. 1 Press the Menu button on the remote control to display the on-screen menu. 2 Press the...
...; ® ® PIP 3 MUTE 2 4 1 5 Channels TV Channel list Channel lock Lock after TV ratings lock Channels TV Movie ratings lock Channel remove Antenna attenuator Off • On OR Channels TV Movie ratings lock Channel remove Antenna attenuator On • Off AV+ SAP ACTIVE CONTROL CLOCK 56 The setting you make applies to the channel you are currently watching and will remain in place until you change the setting. 1 Press the Menu button on the remote control to display the on-screen menu. 2 Press the...
User manual
Page 73
... extension cord) is receiving power. • The remote control could have been set. (page 46) An on-screen message tells you that came with the lamp door open. (pages *Q1, 68-69) • If a red light is blinking on until the lamp is begun- Then plug the TV in normal operation. The TV switches off . Prepare to replace the lamp or take a moment to turn the TV on the remote before...
... extension cord) is receiving power. • The remote control could have been set. (page 46) An on-screen message tells you that came with the lamp door open. (pages *Q1, 68-69) • If a red light is blinking on until the lamp is begun- Then plug the TV in normal operation. The TV switches off . Prepare to replace the lamp or take a moment to turn the TV on the remote before...
User manual
Page 74
..., and make sure the antenna cable is connected properly and securely. • If you are using a VCR and selecting channels on the TV, make sure the TV/VCR mode on the VCR is correct. If you want to operate an accessory device, program the remote to replace the batteries as soon as an HD satellite receiver, make sure the color setting on the accessory equip...
..., and make sure the antenna cable is connected properly and securely. • If you are using a VCR and selecting channels on the TV, make sure the TV/VCR mode on the VCR is correct. If you want to operate an accessory device, program the remote to replace the batteries as soon as an HD satellite receiver, make sure the color setting on the accessory equip...
User manual
Page 75
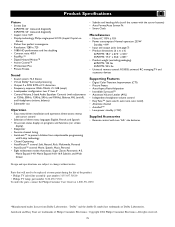
...; Control:Volume, 5-band Audio Equalizer Controls (with the cursor buttons) • Auto Format/Auto Screen Fit • Smart Clock Miscellaneous • Mains: AC 110V ± 10% • Power consumption: Normal operation: 233W Standby: Product Specifications Picture • Screen Size 62PL9774: 62" measured diagonally 55PL9774: 55" measured diagonally • Aspect ratio: 16:9 • Display technology: Philips single-panel LCOS (Liquid Crystal on /off), and Headphone (volume, balance) • Subwoofer out Operation • Easy, menu-driven installation...
...; Control:Volume, 5-band Audio Equalizer Controls (with the cursor buttons) • Auto Format/Auto Screen Fit • Smart Clock Miscellaneous • Mains: AC 110V ± 10% • Power consumption: Normal operation: 233W Standby: Product Specifications Picture • Screen Size 62PL9774: 62" measured diagonally 55PL9774: 55" measured diagonally • Aspect ratio: 16:9 • Display technology: Philips single-panel LCOS (Liquid Crystal on /off), and Headphone (volume, balance) • Subwoofer out Operation • Easy, menu-driven installation...
User manual
Page 76
... TV's Memory, *Q8 Cleaning the TV, 68 Closed Captioning, 47 Color Enhancement, 33 Connections Camcorder, 16 Computer, 14 HD Satellite Receiver to DVI, 16 HD Satellite Receiver to YPbPr, 15 Progressive-scan DVD Player, 14 Standard DVD Player, 13 Surround Sound, 17 S-Video, 12 VCR, 10 VCR and Cable Box, 11 Video Game System, 18 D Daylight Savings, Setting, 66 Delta Volume, 45 Digital Processing Options, 30 Dolby** Virtual (See Sound Mode Options) Dual Screen Format Changing Channels or Input...
... TV's Memory, *Q8 Cleaning the TV, 68 Closed Captioning, 47 Color Enhancement, 33 Connections Camcorder, 16 Computer, 14 HD Satellite Receiver to DVI, 16 HD Satellite Receiver to YPbPr, 15 Progressive-scan DVD Player, 14 Standard DVD Player, 13 Surround Sound, 17 S-Video, 12 VCR, 10 VCR and Cable Box, 11 Video Game System, 18 D Daylight Savings, Setting, 66 Delta Volume, 45 Digital Processing Options, 30 Dolby** Virtual (See Sound Mode Options) Dual Screen Format Changing Channels or Input...
Quick start guide
Page 1
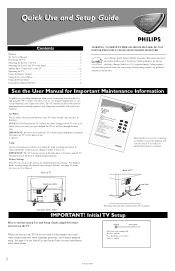
... Use and Setup Guide HDTV Monitor with Pixel Plus™™ Contents Warning 1 See the User Manual 1 Positioning the TV 2 Mounting the Swivel to the TV 2 Mounting the Swivel and TV to the Stand 3 Making Basic Connections to six inches of space behind the TV for air flow through the back slots. Allow four to the TV 3-5 Operating the TV 5 Using the Remote Control 6 Using the On-screen Menu 7 Using the Demo Mode 7 Using the Installation Features...
... Use and Setup Guide HDTV Monitor with Pixel Plus™™ Contents Warning 1 See the User Manual 1 Positioning the TV 2 Mounting the Swivel to the TV 2 Mounting the Swivel and TV to the Stand 3 Making Basic Connections to six inches of space behind the TV for air flow through the back slots. Allow four to the TV 3-5 Operating the TV 5 Using the Remote Control 6 Using the On-screen Menu 7 Using the Demo Mode 7 Using the Installation Features...
Quick start guide
Page 6
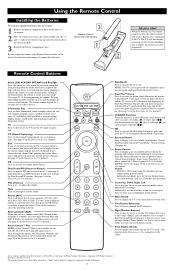
... the High Definition Mode of operation. Digit (Number Buttons) Press to navigate the on -screen menu controls. These buttons can be selected. (See page 42 in certain on -screen menu and make control adjustments or settings. The TV will send a "Battery low" command to replace the batteries as soon as the button blinks, the remote is in your remote control run low, the remote control will then display a message on for Use manual. The buttons remain lighted for Use manual.) VOL (Volume...
... the High Definition Mode of operation. Digit (Number Buttons) Press to navigate the on -screen menu controls. These buttons can be selected. (See page 42 in certain on -screen menu and make control adjustments or settings. The TV will send a "Battery low" command to replace the batteries as soon as the button blinks, the remote is in your remote control run low, the remote control will then display a message on for Use manual. The buttons remain lighted for Use manual.) VOL (Volume...
Leaflet
Page 2
...) Product highlights LCOS Generation 3 Engine The Philips Single Panel LCOS light engine generates the image on the screen. Dual Screen with two Tuners Picture-in , Headphones out, S-Video Y/C Convenience • Child Protection: Child Lock, Parental Control • Clock: Sleep Timer, Smart Clock, Wake Up Timer • Convenience Enhancements: Compass GUI, Vchip and Parental Lock • Ease of pixels.The result is a unique digital signal processing technique that helps...
...) Product highlights LCOS Generation 3 Engine The Philips Single Panel LCOS light engine generates the image on the screen. Dual Screen with two Tuners Picture-in , Headphones out, S-Video Y/C Convenience • Child Protection: Child Lock, Parental Control • Clock: Sleep Timer, Smart Clock, Wake Up Timer • Convenience Enhancements: Compass GUI, Vchip and Parental Lock • Ease of pixels.The result is a unique digital signal processing technique that helps...


