
User manual (English)
Page 1
LEER ATENTAMENTE ESTAS INSTRUCCIONES DE USO ANTES DE UTILIZAR LA MÁQUINA. FOR HOUSEHOLD USE ONLY POUR VOTRE SÉCURITÉ, LISEZ SOIGNEUSEMENT LES INSTRUCTIONS D'EMPLOI. TYPE SUP 025 PYR OPERATING INSTRUCTIONS MODE D'EMPLOI INSTRUCCIONES DE USO FOR YOUR SAFETY CAREFULLY READ THE OPERATING INSTRUCTIONS.
LEER ATENTAMENTE ESTAS INSTRUCCIONES DE USO ANTES DE UTILIZAR LA MÁQUINA. FOR HOUSEHOLD USE ONLY POUR VOTRE SÉCURITÉ, LISEZ SOIGNEUSEMENT LES INSTRUCTIONS D'EMPLOI. TYPE SUP 025 PYR OPERATING INSTRUCTIONS MODE D'EMPLOI INSTRUCCIONES DE USO FOR YOUR SAFETY CAREFULLY READ THE OPERATING INSTRUCTIONS.

User manual (English)
Page 6
...be used if care is used by an authorized service center. Use cold water only. 3 Keep your coffee, use and before cleaning the appliance. 6 Do not operate any appliance with a damaged cord or plug or after the appliance malfunctions or has been damaged in any way. Your appliance will still need descaling every ... is provided to OFF, then remove plug from the table to the nearest authorized service center for other than cleaning and user maintenance, should be performed by or near a hot gas or electric burner, or in a heated oven. 11 Always turn switch to reduce risks of getting...
...be used if care is used by an authorized service center. Use cold water only. 3 Keep your coffee, use and before cleaning the appliance. 6 Do not operate any appliance with a damaged cord or plug or after the appliance malfunctions or has been damaged in any way. Your appliance will still need descaling every ... is provided to OFF, then remove plug from the table to the nearest authorized service center for other than cleaning and user maintenance, should be performed by or near a hot gas or electric burner, or in a heated oven. 11 Always turn switch to reduce risks of getting...
User manual (English)
Page 7
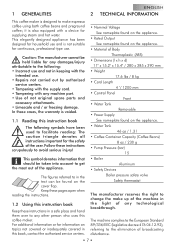
.... In these cases, the warranty is voided. 1.1 Reading this instruction book Keep these instructions in keeping with the intended use . The figures referred to in the light of any damages/injury attributable to the following symbols have been used to any machine part. • Use of the user. For additional information or for supplying steam and hot water. 1 GENERALITIES ENGLISH 2 TECHNICAL INFORMATION This coffee maker is designed to avoid...
.... In these cases, the warranty is voided. 1.1 Reading this instruction book Keep these instructions in keeping with the intended use . The figures referred to in the light of any damages/injury attributable to the following symbols have been used to any machine part. • Use of the user. For additional information or for supplying steam and hot water. 1 GENERALITIES ENGLISH 2 TECHNICAL INFORMATION This coffee maker is designed to avoid...
User manual (English)
Page 9
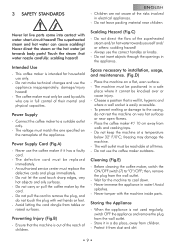
... appliance and remove the plug from children. - Do not pull the cord to "O"/OFF; Scalding Hazard (Fig.C) - Choose a position that the machine is easily accessible. - Never immerse the appliance in the appliance. Never direct the steam or the hot water jet towards yourself and/ or others: scalding hazard! - Do not make technical changes and use the coffee maker outdoors. Do...
... appliance and remove the plug from children. - Do not pull the cord to "O"/OFF; Scalding Hazard (Fig.C) - Choose a position that the machine is easily accessible. - Never immerse the appliance in the appliance. Never direct the steam or the hot water jet towards yourself and/ or others: scalding hazard! - Do not make technical changes and use the coffee maker outdoors. Do...
User manual (English)
Page 10
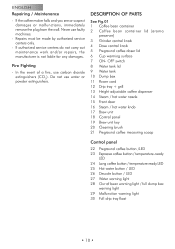
... panel 19 Brew unit key 20 Cleaning brush 21 Preground coffee measuring scoop Control panel 22 Preground coffee button /LED 23 Espresso coffee button / temperature-ready LED 24 Long coffee button / temperature ready LED 25 Hot water button / LED 26 Descale button / LED 27 Water warning light 28 Our of a fire, use carbon dioxide extinguishers (CO2). ENGLISH Repairing / Maintenance - If the coffee maker falls and you see or suspect damages or malfunctions, immediately remove the...
... panel 19 Brew unit key 20 Cleaning brush 21 Preground coffee measuring scoop Control panel 22 Preground coffee button /LED 23 Espresso coffee button / temperature-ready LED 24 Long coffee button / temperature ready LED 25 Hot water button / LED 26 Descale button / LED 27 Water warning light 28 Our of a fire, use carbon dioxide extinguishers (CO2). ENGLISH Repairing / Maintenance - If the coffee maker falls and you see or suspect damages or malfunctions, immediately remove the...
User manual (English)
Page 11
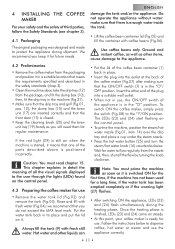
... the coffee maker for regular maintenance. To switch ON the coffee maker, simply press the switch (Fig.08) to dispense coffee, hot water or steam and use • Remove the water tank lid (Fig.02) and remove the tank (Fig.03). The original packaging was designed and made to the user through the lights (LEDs) found on the control panel. • To prime the machine, position the steam/hot water...
... the coffee maker for regular maintenance. To switch ON the coffee maker, simply press the switch (Fig.08) to dispense coffee, hot water or steam and use • Remove the water tank lid (Fig.02) and remove the tank (Fig.03). The original packaging was designed and made to the user through the lights (LEDs) found on the control panel. • To prime the machine, position the steam/hot water...
User manual (English)
Page 12
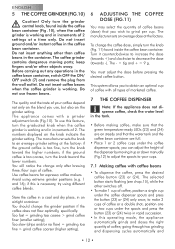
... button starts flashing (see chap.15), while the other switches off. • To make sure that the water tank and the coffee bean container are on the knob indicate the grinder setting. To use frozen beans. if the ground coffee is necessary, try using extreme grinder positions (e.g. 1 and 16); You will notice the change the grinder position if the coffee does not flow optimally, specifically: Too fast = grinding...
... button starts flashing (see chap.15), while the other switches off. • To make sure that the water tank and the coffee bean container are on the knob indicate the grinder setting. To use frozen beans. if the ground coffee is necessary, try using extreme grinder positions (e.g. 1 and 16); You will notice the change the grinder position if the coffee does not flow optimally, specifically: Too fast = grinding...
User manual (English)
Page 13
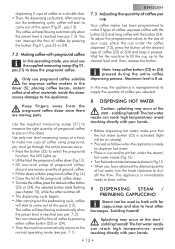
... coffee dispensing process. Use only one level scoop of coffee using preground, you selected. 8 DISPENSING HOT WATER Caution: splashing may occur at the start - the selected button starts flashing (see chapter 15), while the other switches off the flow. Wait for espresso coffee makers in the doser (5); scalding hazard! Splashing may occur at the start scalding hazard! After carrying out the prebrewing cycle, coffee will stop flowing automatically...
... coffee dispensing process. Use only one level scoop of coffee using preground, you selected. 8 DISPENSING HOT WATER Caution: splashing may occur at the start - the selected button starts flashing (see chapter 15), while the other switches off the flow. Wait for espresso coffee makers in the doser (5); scalding hazard! Splashing may occur at the start scalding hazard! After carrying out the prebrewing cycle, coffee will stop flowing automatically...
User manual (English)
Page 14
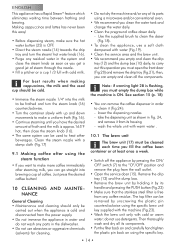
...) 9.1 Making coffee after steaming milk, you can empty and clean all the components. Remove the drip tray (12) and the dump box. • Remove the brew unit by holding it by its parts using the specific key. • 14 • Making cappuccinos and lattes has never been this operation you empty and clean the drip tray (12) and the dump box (10) daily; then, you clean the water tank and change...
...) 9.1 Making coffee after steaming milk, you can empty and clean all the components. Remove the drip tray (12) and the dump box. • Remove the brew unit by holding it by its parts using the specific key. • 14 • Making cappuccinos and lattes has never been this operation you empty and clean the drip tray (12) and the dump box (10) daily; then, you clean the water tank and change...
User manual (English)
Page 15
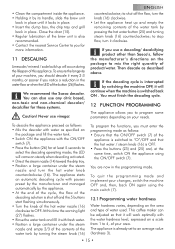
If you use a descaling/ decalcifying product other than Saeco's, follow the manufacturer's directions on a scale from 1 to 4, of your needs. If the descaling cycle is switched back ON . You must enter the programming mode as specified on your area. The appliance starts an automatic descaling cycle with water as follows: • Ensure that the hot water / steam knob (16) is shut off the flow, turn the...
If you use a descaling/ decalcifying product other than Saeco's, follow the manufacturer's directions on a scale from 1 to 4, of your needs. If the descaling cycle is switched back ON . You must enter the programming mode as specified on your area. The appliance starts an automatic descaling cycle with water as follows: • Ensure that the hot water / steam knob (16) is shut off the flow, turn the...
User manual (English)
Page 16
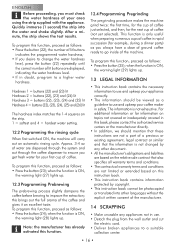
... (25) lit Hardness 4 = buttons (22), (23), (24), (25) and (26) lit The hardness index matches the 1-4 squares on this book, please contact the authorized service centers or the manufacturer directly. • In addition, we should be photocopied or translated into the water and shake slightly. For additional information or for your coffee maker in use. • Detach the plug...
... (25) lit Hardness 4 = buttons (22), (23), (24), (25) and (26) lit The hardness index matches the 1-4 squares on this book, please contact the authorized service centers or the manufacturer directly. • In addition, we should be photocopied or translated into the water and shake slightly. For additional information or for your coffee maker in use. • Detach the plug...

User manual (English)
Page 17
... machine or dispense hot water. RED LED (26), FLASHING - Descaling cycle must be completed before machine is heating up to brew coffee. • 17 • Steam function selected. Appliance is ready to dispense coffee, hot water or steam GREEN LED (23), SLOW FLASHING - Appliance dispensing 1 espresso coffee GREEN LED (23), FAST FLASHING - Hot water function selected. RED LED (26), FIXED - The descaling function has been selected To descale as described in par. 11, turn the hot water...
... machine or dispense hot water. RED LED (26), FLASHING - Descaling cycle must be completed before machine is heating up to brew coffee. • 17 • Steam function selected. Appliance is ready to dispense coffee, hot water or steam GREEN LED (23), SLOW FLASHING - Appliance dispensing 1 espresso coffee GREEN LED (23), FAST FLASHING - Hot water function selected. RED LED (26), FIXED - The descaling function has been selected To descale as described in par. 11, turn the hot water...
User manual (English)
Page 18
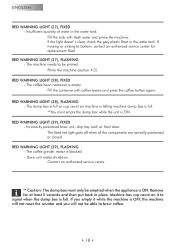
... and then put back in the water tank. Machine has cup count on machine is telling machine dump box is full. RED WARNING LIGHT (28), FLASHING - ENGLISH RED WARNING LIGHT (27), FIXED - The coffee bean container is blocked - The fixed red light goes off when all the components are correctly positioned or closed. Incorrectly positioned brew unit, drip tray and/ or front door. The coffee grinder motor is empty Fill the...
... and then put back in the water tank. Machine has cup count on machine is telling machine dump box is full. RED WARNING LIGHT (28), FLASHING - ENGLISH RED WARNING LIGHT (27), FIXED - The coffee bean container is blocked - The fixed red light goes off when all the components are correctly positioned or closed. Incorrectly positioned brew unit, drip tray and/ or front door. The coffee grinder motor is empty Fill the...
User manual (English)
Page 19
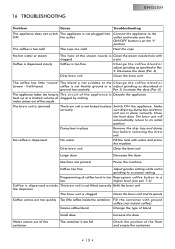
... the brew unit the dispenser The brew unit is clogged Clean the brew unit and its initial position Dump box in place Remove the drip tray and dump box before removing the brew unit. No coffee is dispensed No water Fill the tank with water and prime the machine Dirty brew unit Clean the brew unit Large dose Decrease the dose Machine not primed Prime the machine Coffee too fine Adjust grinder setting while unit is grinding to a coarser setting Programming of...
... the brew unit the dispenser The brew unit is clogged Clean the brew unit and its initial position Dump box in place Remove the drip tray and dump box before removing the brew unit. No coffee is dispensed No water Fill the tank with water and prime the machine Dirty brew unit Clean the brew unit Large dose Decrease the dose Machine not primed Prime the machine Coffee too fine Adjust grinder setting while unit is grinding to a coarser setting Programming of...


