
User manual
Page 2
... started 3 1.1 Packing list 3 1.2 Initial setup 4 1.2.1 Connecting Power Source 4 1.2.2 Locate Control Buttons 5 1.2.3 Turning on Photo Frame 6 1.2.4 Select your preferred language... - 7 1.2.5 Setting Time, Date and Clock ..... - 8 1.2.6 Play Photos from Memory Card.. - 9 1.2.7 Copy photos from Slideshow - 36 4.1.5 Rename Slideshow 37 4.1.6 Delete Slideshow 39 4.2 Slideshow Sequence 41 4.3 Transition Effects 42 4.4 Frequency 43 4.5 Collage 45 4.6 Background Color 46 4.7 Show Clock 47 -5- 5. Creating and Managing Slideshows - 32 - 4.1 Slideshows 32 4.1.1 Create New Slideshow...
... started 3 1.1 Packing list 3 1.2 Initial setup 4 1.2.1 Connecting Power Source 4 1.2.2 Locate Control Buttons 5 1.2.3 Turning on Photo Frame 6 1.2.4 Select your preferred language... - 7 1.2.5 Setting Time, Date and Clock ..... - 8 1.2.6 Play Photos from Memory Card.. - 9 1.2.7 Copy photos from Slideshow - 36 4.1.5 Rename Slideshow 37 4.1.6 Delete Slideshow 39 4.2 Slideshow Sequence 41 4.3 Transition Effects 42 4.4 Frequency 43 4.5 Collage 45 4.6 Background Color 46 4.7 Show Clock 47 -5- 5. Creating and Managing Slideshows - 32 - 4.1 Slideshows 32 4.1.1 Create New Slideshow...
User manual
Page 5
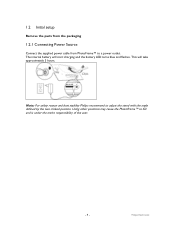
This will start charging and the battery LED turns blue and flashes. Note: For safety reason and best stability Philips recommend to fall and is under the entire responsibility of the user. -4 - Using other positions may cause the PhotoFrame™ to adjust the stand with the angle defined by the two clicked position. The internal battery will take approximately 3 hours. 1.2 Initial setup Remove the parts from the packaging 1.2.1 Connecting Power Source Connect the supplied power cable from PhotoFrame™ to a power outlet. Philips Electronics
This will start charging and the battery LED turns blue and flashes. Note: For safety reason and best stability Philips recommend to fall and is under the entire responsibility of the user. -4 - Using other positions may cause the PhotoFrame™ to adjust the stand with the angle defined by the two clicked position. The internal battery will take approximately 3 hours. 1.2 Initial setup Remove the parts from the packaging 1.2.1 Connecting Power Source Connect the supplied power cable from PhotoFrame™ to a power outlet. Philips Electronics

User manual
Page 10
IMPORTANT NOTICE: Philips PhotoFrame™ do so read the copying photo section. Tips: - Memory card" section. -9 - CF Card B. Note: To be able to delete photos on the memory card this function on the memory card will display and a slideshow will start. SD/ MMC /MS / xD Card Inserting a memory card: • Insert the memory card into it.This allows the same functions as the internal memory to be allowed. Wait until it in -place. Philips Electronics After a few...
IMPORTANT NOTICE: Philips PhotoFrame™ do so read the copying photo section. Tips: - Memory card" section. -9 - CF Card B. Note: To be able to delete photos on the memory card this function on the memory card will display and a slideshow will start. SD/ MMC /MS / xD Card Inserting a memory card: • Insert the memory card into it.This allows the same functions as the internal memory to be allowed. Wait until it in -place. Philips Electronics After a few...

User manual
Page 11
Philips Electronics 1.2.7 Copy photos from PC For Windows PC (2000 & XP): • To copy photos from PC to PhotoFrame™, install Auto Run software PhotoFrame™ manager on PC • For installation and more details about his application, follow instrustions in user manual on CD For Mac System: (OS X or later): • Connect PhotoFrame™ to the Mac via USB cable . (it will be recognized as a mass storage device.) • Select photos to be transferred and copy them...
Philips Electronics 1.2.7 Copy photos from PC For Windows PC (2000 & XP): • To copy photos from PC to PhotoFrame™, install Auto Run software PhotoFrame™ manager on PC • For installation and more details about his application, follow instrustions in user manual on CD For Mac System: (OS X or later): • Connect PhotoFrame™ to the Mac via USB cable . (it will be recognized as a mass storage device.) • Select photos to be transferred and copy them...

User manual
Page 12
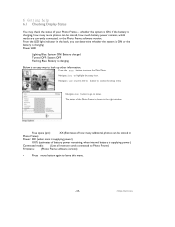
... read the photo menu section. - 11 - To go directly to thumbnail mode form read "slideshow frequency" section. Philips Electronics To enter Browse mode you turn on the Play/Stop button. - Navigate left and right. - Note 2: For slideshow creation and management read the section "Creating and managing slideshow" Note 3: Photos are easily editable from slideshow mode by pressing the OK button. Note 1: The frequency of the slideshow can be in Slideshow mode and click once on the PhotoFrame...
... read the photo menu section. - 11 - To go directly to thumbnail mode form read "slideshow frequency" section. Philips Electronics To enter Browse mode you turn on the Play/Stop button. - Navigate left and right. - Note 2: For slideshow creation and management read the section "Creating and managing slideshow" Note 3: Photos are easily editable from slideshow mode by pressing the OK button. Note 1: The frequency of the slideshow can be in Slideshow mode and click once on the PhotoFrame...

User manual
Page 15
... be resized for optimal display on a memory card or PC to save storage space PhotoFrame™'s internal memory will remain inside PhotoFrame™ until you delete it from PhotoFrame™. Navigate right to access the Photo menu. Philips Electronics PhotoFrame™ will then internally store a resized copy of managing your photos. 3.4.1 Copying Photos You can copy photos stored on PhotoFrame™ and to PhotoFrame™ internal memory or in a Memory card plugged in the PhotoFrame™. Select the Photo icon and navigate...
... be resized for optimal display on a memory card or PC to save storage space PhotoFrame™'s internal memory will remain inside PhotoFrame™ until you delete it from PhotoFrame™. Navigate right to access the Photo menu. Philips Electronics PhotoFrame™ will then internally store a resized copy of managing your photos. 3.4.1 Copying Photos You can copy photos stored on PhotoFrame™ and to PhotoFrame™ internal memory or in a Memory card plugged in the PhotoFrame™. Select the Photo icon and navigate...

User manual
Page 17
To copy from that memory card. • Disconnect the USB cable. For Windows 2000 systems, remember to safely remove hardware before disconnection After a few seconds, all photos in the root directory will be automatically added to PhotoFrame™ and the root directory will be limited due to limited internal memory on PhotoFrame™. All photos are stored in the sub-directories of a digital camera to PC...
To copy from that memory card. • Disconnect the USB cable. For Windows 2000 systems, remember to safely remove hardware before disconnection After a few seconds, all photos in the root directory will be automatically added to PhotoFrame™ and the root directory will be limited due to limited internal memory on PhotoFrame™. All photos are stored in the sub-directories of a digital camera to PC...

User manual
Page 18
... Main Menu. Press the menu button to confirm delete. - 17 - Press the navigation buttons to free up space on the PhotoFrame™ or a memory card you need to move between photos. Philips Electronics 3.4.2 Deleting Photos2 If you can delete photos. Navigate down to select the source to select individual images. Navigate right or press the OK button to view the photos in the chosen album. Navigate right to access the slideshow menu. Press...
... Main Menu. Press the menu button to confirm delete. - 17 - Press the navigation buttons to free up space on the PhotoFrame™ or a memory card you need to move between photos. Philips Electronics 3.4.2 Deleting Photos2 If you can delete photos. Navigate down to select the source to select individual images. Navigate right or press the OK button to view the photos in the chosen album. Navigate right to access the slideshow menu. Press...

User manual
Page 33
..., up the album to be added to the slideshow. Repeat until finished. Press OK to access the slideshow menu. Philips Electronics Slideshow menu shows the settings available for slideshow, select a slideshow frequency that determines, how long a photo remains on screen, select transition effect, how next photo replaces current one on screen, and sequential or random. 4.1 Slideshow 4.1.1 Create New Slideshow To play the slideshow - 32 - Navigate down to the PhotoFrame™ menu. Use the navigation buttons and OK...
..., up the album to be added to the slideshow. Repeat until finished. Press OK to access the slideshow menu. Philips Electronics Slideshow menu shows the settings available for slideshow, select a slideshow frequency that determines, how long a photo remains on screen, select transition effect, how next photo replaces current one on screen, and sequential or random. 4.1 Slideshow 4.1.1 Create New Slideshow To play the slideshow - 32 - Navigate down to the PhotoFrame™ menu. Use the navigation buttons and OK...
User manual
Page 64
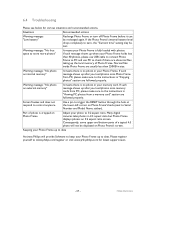
6 Getting help 6.1 Checking Display Status You may check the status of battery power remaining, when internal battery is supplying power.) Connected media: (Lists all memory cards connected to Photo Frame) Firmware: (Photo Frame software version) • Press menu button again to leave this menu. - 63- Navigate down button to go to highlight the setup icon. Press the menu button to look up other information. Navigate right or press the OK button to access the setup menu Navigate down to status...
6 Getting help 6.1 Checking Display Status You may check the status of battery power remaining, when internal battery is supplying power.) Connected media: (Lists all memory cards connected to Photo Frame) Firmware: (Photo Frame software version) • Press menu button again to leave this menu. - 63- Navigate down button to go to highlight the setup icon. Press the menu button to look up other information. Navigate right or press the OK button to access the setup menu Navigate down to status...

User manual
Page 66
... to upload pictures from my PC directly to delete photos on that specific card. 3) Q: How can display the same photo continuously for a long time? A: Yes. The internal memory of the power buttonon the back to trigger the Reset button located on external devices such as web images, scanned images, or photos in JPEG format according to convert such images into Auto-off at correctly. If the time has already passed for Digital Photo Frame. 12) My Digital Photo Frame is...
... to upload pictures from my PC directly to delete photos on that specific card. 3) Q: How can display the same photo continuously for a long time? A: Yes. The internal memory of the power buttonon the back to trigger the Reset button located on external devices such as web images, scanned images, or photos in JPEG format according to convert such images into Auto-off at correctly. If the time has already passed for Digital Photo Frame. 12) My Digital Photo Frame is...
User manual
Page 68
.... Part of photo is cropped on Photo Frame's screen. Keeping your Photo Frame up to date At times Philips will not be displayed on Photo Frame Adjust your Photo Frame holds less than 250KB in "Viewing PC photos from a memory card" section are abnormal files taking up after you load photos onto Photo Frame from PC, please make sure to 3:2 aspect ratio. Please register yourself to date. If the Photo Frame's internal battery level drops completely to Serial Number and Model...
.... Part of photo is cropped on Photo Frame's screen. Keeping your Photo Frame up to date At times Philips will not be displayed on Photo Frame Adjust your Photo Frame holds less than 250KB in "Viewing PC photos from a memory card" section are abnormal files taking up after you load photos onto Photo Frame from PC, please make sure to 3:2 aspect ratio. Please register yourself to date. If the Photo Frame's internal battery level drops completely to Serial Number and Model...

User manual
Page 75
....tw For help . EN60950:2000 (Safety requirement of Information Technology Equipment) - In addition, the Northeast Recycling Council (NERC) - Mr. Job Chiu - Philips Electronics Environment manager Philips Electronics Industries (Taiwan) Ltd, Monitor Business Unit E-mail: job.chiu@philips.com Tel... Philips emphasizes the important of Conformity Philips Consumer Electronics declare under our responsibility that can help and service, please read the section of -Life Disposal • Waste Electronics and Electrical Equipment (WEEE) Recycling Information for Customers Philips establishes...
....tw For help . EN60950:2000 (Safety requirement of Information Technology Equipment) - In addition, the Northeast Recycling Council (NERC) - Mr. Job Chiu - Philips Electronics Environment manager Philips Electronics Industries (Taiwan) Ltd, Monitor Business Unit E-mail: job.chiu@philips.com Tel... Philips emphasizes the important of Conformity Philips Consumer Electronics declare under our responsibility that can help and service, please read the section of -Life Disposal • Waste Electronics and Electrical Equipment (WEEE) Recycling Information for Customers Philips establishes...

User manual
Page 76
... for a Class B digital device, pursuant to provide reasonable protection against harmful interference in a particular installation. EN61000-3-3:1995 (Limitation of Conformity Model Number: 9FF2 Trade Name: Philips Responsible Party: Philips Consumer Electronics North America P.O. This equipment generates, uses and can be made with shielded cables with the limits for compliance could void the user's authority to maintain compliance with the instructions, may result...
... for a Class B digital device, pursuant to provide reasonable protection against harmful interference in a particular installation. EN61000-3-3:1995 (Limitation of Conformity Model Number: 9FF2 Trade Name: Philips Responsible Party: Philips Consumer Electronics North America P.O. This equipment generates, uses and can be made with shielded cables with the limits for compliance could void the user's authority to maintain compliance with the instructions, may result...
User manual
Page 81
... mm - Operating time on and battery charging) 12 W - Power mode supported: AC powered, Battery powered - Photo format supported: JPEG photo (in DCF structure), Up to 60°C Power - Resolution: 800 x 480 pixels (viewing area 680 x 480) - Built-in (2x) - Photo effects: Black and White, Frames, Sepia - 7.3 Specification Picture/Display - Other convenience: Kensington lock compatible Convenience - Playback mode: Full screen browse, Slideshow, Thumbnail browse - Included Accessories: AC-DC Adapter, User manual & PC software CD, Quick start guide, Stand, USB cable, Wall...
... mm - Operating time on and battery charging) 12 W - Power mode supported: AC powered, Battery powered - Photo format supported: JPEG photo (in DCF structure), Up to 60°C Power - Resolution: 800 x 480 pixels (viewing area 680 x 480) - Built-in (2x) - Photo effects: Black and White, Frames, Sepia - 7.3 Specification Picture/Display - Other convenience: Kensington lock compatible Convenience - Playback mode: Full screen browse, Slideshow, Thumbnail browse - Included Accessories: AC-DC Adapter, User manual & PC software CD, Quick start guide, Stand, USB cable, Wall...

User manual
Page 82
... stand: Rotating, Tilt-adjustable - Slideshow setting: Collage, Random, Sequential, Transition effect - Plug & Play Compatibility: Windows 2000/XP or later - Wall mountable / Ceiling Throw: Wall mount ready - System status: Battery level, Firmware version, Power source, Remaining memory - Other convenience: Kensington lock compatible - 81 - Setup function: Brightness adjustment, Language, Status, Auto on/off on weekday/weekend, Beep on/off, Set time and date, Clock display enable/ disable, Event reminder with snooze, Photo...
... stand: Rotating, Tilt-adjustable - Slideshow setting: Collage, Random, Sequential, Transition effect - Plug & Play Compatibility: Windows 2000/XP or later - Wall mountable / Ceiling Throw: Wall mount ready - System status: Battery level, Firmware version, Power source, Remaining memory - Other convenience: Kensington lock compatible - 81 - Setup function: Brightness adjustment, Language, Status, Auto on/off on weekday/weekend, Beep on/off, Set time and date, Clock display enable/ disable, Event reminder with snooze, Photo...

User manual
Page 84
... correctly displayed on Digital Photo Frame. The internal memory of the power buttonon the back to restore the system. 13) Q: Why doesn't my Digital Photo Frame go into standard JPEG format for a long time? Then use Digital Photo Frame to trigger the Reset button located on my DPD? Frequently Asked Questions 1) Q: Is the LCD screen touch-enabled? A: No, it ? A: The photos are already stored inside? However, you set it does not support direct photo printing. 7) Q: After copying photos...
... correctly displayed on Digital Photo Frame. The internal memory of the power buttonon the back to restore the system. 13) Q: Why doesn't my Digital Photo Frame go into standard JPEG format for a long time? Then use Digital Photo Frame to trigger the Reset button located on my DPD? Frequently Asked Questions 1) Q: Is the LCD screen touch-enabled? A: No, it ? A: The photos are already stored inside? However, you set it does not support direct photo printing. 7) Q: After copying photos...

Leaflet
Page 1
...; Display and manage photos on memory cards or internal memory • Create albums, slideshows and manage your photos • Rotate, zoom, crop, mask and add effects to display your PC • Operate on AC power or cordlessly with rechargeable battery • Auto turning display on your PC? without a PC. See, share, organize and relive your memories with Philips PhotoFrame™, the easiest way to your photos Simple intuitive operation and great convenience • USB connector for power saving Philips PhotoFrame 9" LCD 9FF2M4 Every picture...
...; Display and manage photos on memory cards or internal memory • Create albums, slideshows and manage your photos • Rotate, zoom, crop, mask and add effects to display your PC • Operate on AC power or cordlessly with rechargeable battery • Auto turning display on your PC? without a PC. See, share, organize and relive your memories with Philips PhotoFrame™, the easiest way to your photos Simple intuitive operation and great convenience • USB connector for power saving Philips PhotoFrame 9" LCD 9FF2M4 Every picture...

Leaflet
Page 2
...-in thumbnail mode for easy and quick downloading photos from a PC. Interchangeable frames A selection of interchangeable frames that convey an impression of value and refined taste, adding luster to one , hassle-free step - Easy USB connectivity A USB connector is a set up to the photos displayed on PhotoFrame. all without a PC. SmartPower A timer turns PhotoFrame on and off your PhotoFrame on standard AC power or cordlessly with the onboard rechargeable battery. Memory-Card Manager is...
...-in thumbnail mode for easy and quick downloading photos from a PC. Interchangeable frames A selection of interchangeable frames that convey an impression of value and refined taste, adding luster to one , hassle-free step - Easy USB connectivity A USB connector is a set up to the photos displayed on PhotoFrame. all without a PC. SmartPower A timer turns PhotoFrame on and off your PhotoFrame on standard AC power or cordlessly with the onboard rechargeable battery. Memory-Card Manager is...
Leaflet
Page 3
... management: Create slideshow, Delete slideshow, Rename slideshow • Slideshow setting: Collage (single picture), Random, Sequential, Transition effect • Screen background: Black, White, Gray • Setup function: Brightness adjustment, Language, Status, Auto on/off on weekday/weekend, Beep on/ off, Set time and date, Clock display enable/disable, Event reminder with snooze, Photo source • System status: Battery level, Firmware version, Power source, Remaining memory • Connected media status: Connected media, Remaining memory • Plug & Play Compatibility: Windows...
... management: Create slideshow, Delete slideshow, Rename slideshow • Slideshow setting: Collage (single picture), Random, Sequential, Transition effect • Screen background: Black, White, Gray • Setup function: Brightness adjustment, Language, Status, Auto on/off on weekday/weekend, Beep on/ off, Set time and date, Clock display enable/disable, Event reminder with snooze, Photo source • System status: Battery level, Firmware version, Power source, Remaining memory • Connected media status: Connected media, Remaining memory • Plug & Play Compatibility: Windows...


