
Leaflet
Page 1
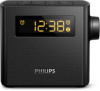
Philips Clock Radio Bluetooth® FM, Digital tuning USB port for charging Dual alarm Enjoy wireless music and charge your smartphone Wake up ensures memory of time during power failure • Adjustable display brightness for comfort viewing • USB port to charge any mobile device. Enrich your sound experience • Wireless music streaming via Bluetooth Start the day your way • Wake up to your favorite radio tune or a buzzer • Repeat alarm for additional snooze • Dual alarm to...
Philips Clock Radio Bluetooth® FM, Digital tuning USB port for charging Dual alarm Enjoy wireless music and charge your smartphone Wake up ensures memory of time during power failure • Adjustable display brightness for comfort viewing • USB port to charge any mobile device. Enrich your sound experience • Wireless music streaming via Bluetooth Start the day your way • Wake up to your favorite radio tune or a buzzer • Repeat alarm for additional snooze • Dual alarm to...
Leaflet
Page 2
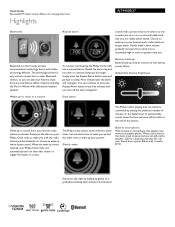
... of time during power failure Adjustable display brightness Wake up your Philips Clock radio to wake you with the radio station you can continue to sleep. Wake up to wake up and the other Bluetooth devices, so you . Set one alarm time to wake you up with a buzzer sound. When a call your friend from subtly low to reasonably high in microphone, this speaker also works as a speaker phone. Normal alarm Call for easy wireless connection to a gradually escalating alarm volume...
... of time during power failure Adjustable display brightness Wake up your Philips Clock radio to wake you with the radio station you can continue to sleep. Wake up to wake up and the other Bluetooth devices, so you . Set one alarm time to wake you up with a buzzer sound. When a call your friend from subtly low to reasonably high in microphone, this speaker also works as a speaker phone. Normal alarm Call for easy wireless connection to a gradually escalating alarm volume...
Leaflet
Page 3
... subject to change without notice. or their respective owners. talk handsfree • Volume control: Rotary USB Charging • 5V, 1A • Yes • Issue date 2015-08-14 Version: 3.0.3 12 NC: 8670 001 28025 UPC: 8 89446 00168 6 © 2015 Koninklijke Philips N.V. Clock Radio Bluetooth® FM, Digital tuning, USB port for charging, Dual alarm Specifications AJT4400B/37 Clock • Type: Digital • Display: LED • Time format: 24H, 12H Alarm • No...
... subject to change without notice. or their respective owners. talk handsfree • Volume control: Rotary USB Charging • 5V, 1A • Yes • Issue date 2015-08-14 Version: 3.0.3 12 NC: 8670 001 28025 UPC: 8 89446 00168 6 © 2015 Koninklijke Philips N.V. Clock Radio Bluetooth® FM, Digital tuning, USB port for charging, Dual alarm Specifications AJT4400B/37 Clock • Type: Digital • Display: LED • Time format: 24H, 12H Alarm • No...
User manual
Page 1
Always there to help you Register your product and get support at www.philips.com/support Question? Contact Philips AJT4400B User manual
Always there to help you Register your product and get support at www.philips.com/support Question? Contact Philips AJT4400B User manual
User manual
Page 3
... battery 6 Connect power 6 Set clock 6 4 Listen to FM radio 7 Tune to FM radio stations 7 Store FM radio stations automatically 7 Store FM radio stations manually 7 Select a preset radio station 7 Adjust volume 7 5 Use Bluetooth devices 8 Connect a device 8 Play audio from Bluetooth-enabled device 8 Bluetooth icon status 9 Clear the pairing information 9 Control your phone call 9 6 Set alarm timer 10 Set alarm 10 Activate/deactivate alarm timer 10 Snooze the alarm 10 7 Other features 11 Set sleep timer 11 Charge your device 11 Adjust display brightness...
... battery 6 Connect power 6 Set clock 6 4 Listen to FM radio 7 Tune to FM radio stations 7 Store FM radio stations automatically 7 Store FM radio stations manually 7 Select a preset radio station 7 Adjust volume 7 5 Use Bluetooth devices 8 Connect a device 8 Play audio from Bluetooth-enabled device 8 Bluetooth icon status 9 Clear the pairing information 9 Control your phone call 9 6 Set alarm timer 10 Set alarm 10 Activate/deactivate alarm timer 10 Snooze the alarm 10 7 Other features 11 Set sleep timer 11 Charge your device 11 Adjust display brightness...
User manual
Page 4
... instructions. 2 EN h Do not install near water. liquid filled objects, lighted candles). q Where the MAINS plug or an appliance coupler is used as power-supply cord or plug is not used for a long time. To prevent battery ...www.eiae.org. c Heed all instructions. e Do not use attachments/accessories specified by the manufacturer. as radiators, heat registers, stoves, or other apparatus (including amplifiers) that produce heat. p This product may result in your household, please do not remove product covering. m Battery usage CAUTION - i Protect the power cord...
... instructions. 2 EN h Do not install near water. liquid filled objects, lighted candles). q Where the MAINS plug or an appliance coupler is used as power-supply cord or plug is not used for a long time. To prevent battery ...www.eiae.org. c Heed all instructions. e Do not use attachments/accessories specified by the manufacturer. as radiators, heat registers, stoves, or other apparatus (including amplifiers) that produce heat. p This product may result in your household, please do not remove product covering. m Battery usage CAUTION - i Protect the power cord...
User manual
Page 6
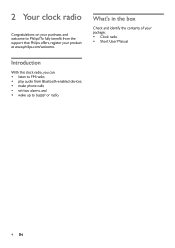
To fully benefit from Bluetooth-enabled devices; • make phone calls; • set two alarms, and • wake up to Philips! 2 Your clock radio Congratulations on your product at www.philips.com/welcome. What's in the box Check and identify the contents of your package: • Clock radio • Short User Manual Introduction With this clock radio, you can: • listen to FM radio; • play audio from the support that Philips offers, register your purchase, and welcome to buzzer or radio. 4 EN
To fully benefit from Bluetooth-enabled devices; • make phone calls; • set two alarms, and • wake up to Philips! 2 Your clock radio Congratulations on your product at www.philips.com/welcome. What's in the box Check and identify the contents of your package: • Clock radio • Short User Manual Introduction With this clock radio, you can: • listen to FM radio; • play audio from the support that Philips offers, register your purchase, and welcome to buzzer or radio. 4 EN
User manual
Page 7
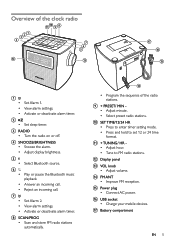
... Set Alarm 1. • View alarm settings. • Activate or deactivate alarm timer. j SET TIME/12/24 HR • Press to enter timer setting mode. • Press and hold to FM radio stations. Overview of the radio stations. c RADIO • Turn the radio on or off. i + PRESET/ MIN • Adjust minute. • Select preset radio stations. d SNOOZE/BRIGHTNESS • Snooze the alarm. • Adjust display brightness. h SCAN/PROG • Scan and store FM radio stations automatically. q Battery compartment EN 5 o Power plug • Connect AC power. b • Set sleep timer...
... Set Alarm 1. • View alarm settings. • Activate or deactivate alarm timer. j SET TIME/12/24 HR • Press to enter timer setting mode. • Press and hold to FM radio stations. Overview of the radio stations. c RADIO • Turn the radio on or off. i + PRESET/ MIN • Adjust minute. • Select preset radio stations. d SNOOZE/BRIGHTNESS • Snooze the alarm. • Adjust display brightness. h SCAN/PROG • Scan and store FM radio stations automatically. q Battery compartment EN 5 o Power plug • Connect AC power. b • Set sleep timer...

User manual
Page 8
... fire. Make sure that the power voltage corresponds to activate clock setting mode. »» The hour and minute digits blink. 2 Press + TUNING/ HR - You can only back up clock and alarm settings. • Install two AA batteries (not supplied) as power supply. to select 12/24 hour format. to set minute. 4 Press SET TIME/12/24 HR to confirm. 5 Press and hold SET TIME /12/24 HR to set hour. 3 Press + PRESET/ MIN - Install battery Caution •...
... fire. Make sure that the power voltage corresponds to activate clock setting mode. »» The hour and minute digits blink. 2 Press + TUNING/ HR - You can only back up clock and alarm settings. • Install two AA batteries (not supplied) as power supply. to select 12/24 hour format. to set minute. 4 Press SET TIME/12/24 HR to confirm. 5 Press and hold SET TIME /12/24 HR to set hour. 3 Press + PRESET/ MIN - Install battery Caution •...

User manual
Page 9
... preset number begins to blink. 3 Press + PRESET/ MIN - Tip •• To turn on FM radio. »» is displayed. 2 Press and hold SCAN/PROG. »» The clock radio stores all the available FM radio stations, and then broadcasts the first available station automatically. Store FM radio stations automatically • In FM tuner mode, press and hold + TUNING/ HR - Adjust volume • Rotate the VOL knob to select a preset radio station. repeatedly...
... preset number begins to blink. 3 Press + PRESET/ MIN - Tip •• To turn on FM radio. »» is displayed. 2 Press and hold SCAN/PROG. »» The clock radio stores all the available FM radio stations, and then broadcasts the first available station automatically. Store FM radio stations automatically • In FM tuner mode, press and hold + TUNING/ HR - Adjust volume • Rotate the VOL knob to select a preset radio station. repeatedly...
User manual
Page 10
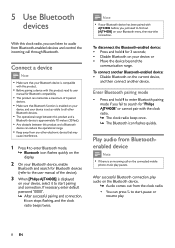
...;• This product can reduce the operational range. •• Keep away from Bluetoothenabled device Note •• If there is displayed on your Bluetooth menu, then start pairing and connection. If necessary, enter default password "0000". »» After successful pairing and connection, icon stops flashing, and the clock radio beeps twice. To connect another device. After successful Bluetooth connection, play audio on the...
...;• This product can reduce the operational range. •• Keep away from Bluetoothenabled device Note •• If there is displayed on your Bluetooth menu, then start pairing and connection. If necessary, enter default password "0000". »» After successful pairing and connection, icon stops flashing, and the clock radio beeps twice. To connect another device. After successful Bluetooth connection, play audio on the...

User manual
Page 11
... call . Button Function Press to reject an incoming call . Control your phone call After Bluetooth connection, you can control your incoming phone call with single beep) Solid Bluetooth icon Bluetooth icon off Description Connecting or waiting for 10 seconds. »» [BT RESET] scrolls on the display panel, then all the Bluetooth pairing information is erased. »» The clock radio returns...
... call . Button Function Press to reject an incoming call . Control your phone call After Bluetooth connection, you can control your incoming phone call with single beep) Solid Bluetooth icon Bluetooth icon off Description Connecting or waiting for 10 seconds. »» [BT RESET] scrolls on the display panel, then all the Bluetooth pairing information is erased. »» The clock radio returns...
User manual
Page 12
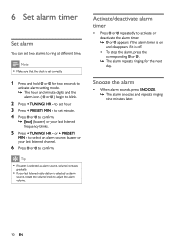
... to adjust the alarm volume. Tip •• If buzzer is off. • To stop the alarm, press the corresponding or . »» The alarm repeats ringing for two seconds to activate alarm setting mode. »» The hour and minute digits and the alarm icon ( or ) begin to set hour. 3 Press + PRESET/ MIN - to blink. 2 Press + TUNING/ HR - Snooze the alarm • When alarm sounds, press SNOOZE. »» The alarm snoozes and repeats ringing...
... to adjust the alarm volume. Tip •• If buzzer is off. • To stop the alarm, press the corresponding or . »» The alarm repeats ringing for two seconds to activate alarm setting mode. »» The hour and minute digits and the alarm icon ( or ) begin to set hour. 3 Press + PRESET/ MIN - to blink. 2 Press + TUNING/ HR - Snooze the alarm • When alarm sounds, press SNOOZE. »» The alarm snoozes and repeats ringing...
User manual
Page 13
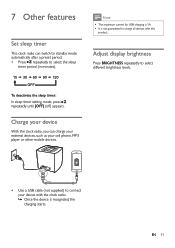
..., the charging starts. Adjust display brightness Press BRIGHTNESS repeatedly to select different brightness levels. • Use a USB cable (not supplied) to connect your device with the clock radio. »» Once the device is not guaranteed to select the sleep timer period (in minutes). 15 30 60 90 120 OFF To deactivate the sleep timer: In sleep timer setting mode, press repeatedly until [OFF] (off) appears. Charge your cell phone, MP3 player or other...
..., the charging starts. Adjust display brightness Press BRIGHTNESS repeatedly to select different brightness levels. • Use a USB cable (not supplied) to connect your device with the clock radio. »» Once the device is not guaranteed to select the sleep timer period (in minutes). 15 30 60 90 120 OFF To deactivate the sleep timer: In sleep timer setting mode, press repeatedly until [OFF] (off) appears. Charge your cell phone, MP3 player or other...
User manual
Page 14
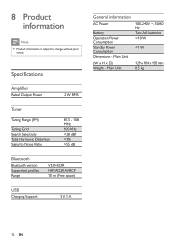
Specifications Amplifier Rated Output Power 2 W RMS Tuner Tuning Range (FM) Tuning Grid Search Selectivity Total Harmonic Distortion Signal to change without prior notice. 8 Product information Note •• Product information is subject to Noise Ratio 87.5 - 108 MHz 100 KHz
Specifications Amplifier Rated Output Power 2 W RMS Tuner Tuning Range (FM) Tuning Grid Search Selectivity Total Harmonic Distortion Signal to change without prior notice. 8 Product information Note •• Product information is subject to Noise Ratio 87.5 - 108 MHz 100 KHz
User manual
Page 15
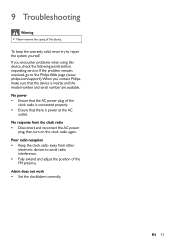
... before requesting service. Alarm does not work •• Set the clock/alarm correctly. philips.com/support).When you encounter problems when using this device. EN 13 If you contact Philips, make sure that there is nearby and the model number and serial number are available. 9 Troubleshooting Warning •• Never remove the casing of the FM antenna. Poor radio reception •• Keep the clock radio away from the clock radio ••...
... before requesting service. Alarm does not work •• Set the clock/alarm correctly. philips.com/support).When you encounter problems when using this device. EN 13 If you contact Philips, make sure that there is nearby and the model number and serial number are available. 9 Troubleshooting Warning •• Never remove the casing of the FM antenna. Poor radio reception •• Keep the clock radio away from the clock radio ••...
User manual
Page 16
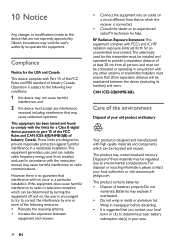
... installed and used for the USA and Canada This device complies with the instruction manual, may cause undesired operation. This product may void the user's authority to operate the equipment. Wrap in newspaper before discarding. • It is connected. • Consult the dealer or an experienced radio/TV technician for a Class B digital device, pursuant to determine proper battery redemption site(s) in a particular installation...
... installed and used for the USA and Canada This device complies with the instruction manual, may cause undesired operation. This product may void the user's authority to operate the equipment. Wrap in newspaper before discarding. • It is connected. • Consult the dealer or an experienced radio/TV technician for a Class B digital device, pursuant to determine proper battery redemption site(s) in a particular installation...

User manual
Page 17
... information All unnecessary packaging has been omitted. The making of unauthorized copies of copyprotected material, including computer programs, files, broadcasts and sound recordings, may be an infringement of their respective owners. EN 15 Other trademarks and trade names are...used for rechargeable batteries. We have tried to make the packaging easy to separate into three materials: cardboard (box), polystyrene foam (buffer) and polyethylene (bags, protective foam sheet.) Your system consists of packaging materials, exhausted batteries and old equipment. • Please visit www...
... information All unnecessary packaging has been omitted. The making of unauthorized copies of copyprotected material, including computer programs, files, broadcasts and sound recordings, may be an infringement of their respective owners. EN 15 Other trademarks and trade names are...used for rechargeable batteries. We have tried to make the packaging easy to separate into three materials: cardboard (box), polystyrene foam (buffer) and polyethylene (bags, protective foam sheet.) Your system consists of packaging materials, exhausted batteries and old equipment. • Please visit www...

User manual
Page 18
Philips and the Philips Shield Emblem are used under the responsibility of Koninklijke Philips N.V. 2015 © Gibson Innovations Limited. All rights reserved. This product has been manufactured by, and is the warrantor in relation to this product. is sold under license from Koninklijke Philips N.V. AJT4400B_37_UM_V1.0 and are registered trademarks of Gibson Innovations Ltd., and Gibson Innovations Ltd.
Philips and the Philips Shield Emblem are used under the responsibility of Koninklijke Philips N.V. 2015 © Gibson Innovations Limited. All rights reserved. This product has been manufactured by, and is the warrantor in relation to this product. is sold under license from Koninklijke Philips N.V. AJT4400B_37_UM_V1.0 and are registered trademarks of Gibson Innovations Ltd., and Gibson Innovations Ltd.


