
Leaflet
Page 1
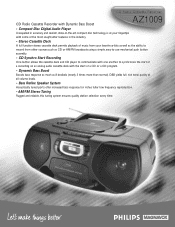
...-of-the-art compact disc technology is at all volume levels. • Bass Reflex Speaker System Acoustically tuned ports offer increased bass response for richer, fuller low frequency reproduction. • AM/FM Stereo Tuning Rugged and reliable, this tuning system ensures quality station selection every time. CD Radio Cassette Recorder CD Radio Cassette Recorder with Dynamic Bass Boost AZ1009 • Compact Disc Digital Audio Player Unequalled in the industry. • Stereo Cassette Deck A full function stereo cassette deck permits playback of music from your favorite...
...-of-the-art compact disc technology is at all volume levels. • Bass Reflex Speaker System Acoustically tuned ports offer increased bass response for richer, fuller low frequency reproduction. • AM/FM Stereo Tuning Rugged and reliable, this tuning system ensures quality station selection every time. CD Radio Cassette Recorder CD Radio Cassette Recorder with Dynamic Bass Boost AZ1009 • Compact Disc Digital Audio Player Unequalled in the industry. • Stereo Cassette Deck A full function stereo cassette deck permits playback of music from your favorite...

Leaflet
Page 2
... left at a glance. • Stereo Headphone Jack Enjoy your favorite CD, cassette, or radio station with full, rich stereo separation without notice. Listen to your favorite artists any time or anywhere using a simple, easy-to-use mechanical push button assembly. • CD Synchro Start Recording One button allows the cassette deck and CD player to communicate with one disc, or a pre-selected program. Printed in ferrite antenna improves portability and surpasses AM reception...
... left at a glance. • Stereo Headphone Jack Enjoy your favorite CD, cassette, or radio station with full, rich stereo separation without notice. Listen to your favorite artists any time or anywhere using a simple, easy-to-use mechanical push button assembly. • CD Synchro Start Recording One button allows the cassette deck and CD player to communicate with one disc, or a pre-selected program. Printed in ferrite antenna improves portability and surpasses AM reception...
User manual
Page 8
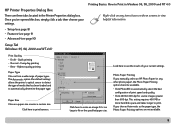
...screens to view helpful information. Once you manually select an HP Photo Paper (or any item shown on the specified paper size. Highest quality printing Paper Type Choose from a wide range of your current settings. Paper Size Choose a paper size or enter a custom size. If you... dpi for source images greater than 600 dpi. Photo Paper Printing If you 've opened this box, simply click a tab, then choose your settings. • Setup (see page 8) • Features (see page 9) • Advanced (see the results of paper types. HP Printer Properties Dialog Box There are not available. 8
...screens to view helpful information. Once you manually select an HP Photo Paper (or any item shown on the specified paper size. Highest quality printing Paper Type Choose from a wide range of your current settings. Paper Size Choose a paper size or enter a custom size. If you... dpi for source images greater than 600 dpi. Photo Paper Printing If you 've opened this box, simply click a tab, then choose your settings. • Setup (see page 8) • Features (see page 9) • Advanced (see the results of paper types. HP Printer Properties Dialog Box There are not available. 8
User manual
Page 31
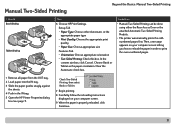
.... 5 Open the HP Printer Properties dialog box (see page 7). Check Two-Sided Printing, then select Book or Tablet. 7 Begin printing. 8 Carefully follow the reloading instructions displayed on your computer screen. 9 When the paper is properly reloaded, click Continue. 31 Guidelines... • Manual Two-Sided Printing can be done using either Automatic or the appropriate paper type •...
.... 5 Open the HP Printer Properties dialog box (see page 7). Check Two-Sided Printing, then select Book or Tablet. 7 Begin printing. 8 Carefully follow the reloading instructions displayed on your computer screen. 9 When the paper is properly reloaded, click Continue. 31 Guidelines... • Manual Two-Sided Printing can be done using either Automatic or the appropriate paper type •...
User manual
Page 32
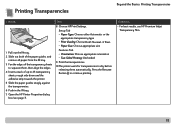
...guides snugly against the transparencies. 6 Push in the IN tray 7 Open the HP Printer Properties dialog box (see page 7). Setup Tab • Paper Type: Choose either Automatic or the appropriate transparency type • Print Quality: Choose Draft, Normal, or Best. • Paper Size: Choose appropriate size Features...... • For best results, use HP Premium Inkjet Transparency Film. 32 Then... 8 Choose HP Print Settings. Printing Transparencies Beyond the Basics: Printing Transparencies I should... 1 Pull out the IN tray. 2 Slide out both of the paper guides, and remove all ...
...guides snugly against the transparencies. 6 Push in the IN tray 7 Open the HP Printer Properties dialog box (see page 7). Setup Tab • Paper Type: Choose either Automatic or the appropriate transparency type • Print Quality: Choose Draft, Normal, or Best. • Paper Size: Choose appropriate size Features...... • For best results, use HP Premium Inkjet Transparency Film. 32 Then... 8 Choose HP Print Settings. Printing Transparencies Beyond the Basics: Printing Transparencies I should... 1 Pull out the IN tray. 2 Slide out both of the paper guides, and remove all ...
User manual
Page 33
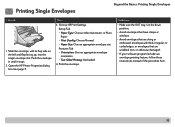
... stops. 2 Open the HP Printer Properties dialog box (see page 7). Push the envelope in the down position. • Avoid envelopes that have clasps or windows. • Avoid envelopes that are wrinkled, torn, or otherwise damaged. • If your software program includes an envelope-printing feature, follow those instructions instead of the procedure here. 33 Setup Tab...
... stops. 2 Open the HP Printer Properties dialog box (see page 7). Push the envelope in the down position. • Avoid envelopes that have clasps or windows. • Avoid envelopes that are wrinkled, torn, or otherwise damaged. • If your software program includes an envelope-printing feature, follow those instructions instead of the procedure here. 33 Setup Tab...
User manual
Page 34
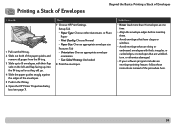
Then... 7 Choose HP Print Settings. Setup Tab • Paper Type: Choose either Automatic or Plain Paper • Print Quality: Choose Normal • Paper Size: Choose appropriate envelope size Features Tab • Orientation: Choose appropriate ...34 Guidelines... • Never load more than 15 envelopes at one time. • Align the envelope edges before inserting them. • Avoid...• If your software program includes an envelope-printing feature, follow those instructions instead of the envelopes. 5 Push in the IN tray. 6 Open the HP Printer Properties dialog box (see page 7).
Then... 7 Choose HP Print Settings. Setup Tab • Paper Type: Choose either Automatic or Plain Paper • Print Quality: Choose Normal • Paper Size: Choose appropriate envelope size Features Tab • Orientation: Choose appropriate ...34 Guidelines... • Never load more than 15 envelopes at one time. • Align the envelope edges before inserting them. • Avoid...• If your software program includes an envelope-printing feature, follow those instructions instead of the envelopes. 5 Push in the IN tray. 6 Open the HP Printer Properties dialog box (see page 7).

User manual
Page 35
...tray. Then push the paper width guide in. 5 Push in the IN tray. Then... 7 Choose HP Print Settings. Setup Tab • Paper Type: Choose either Automatic or the appropriate paper type • Print Quality: Choose Draft, Normal, or Best • Paper Size: Choose appropriate media size Features Tab • Orientation: Choose ... you get an "out of paper" message, make sure the media is positioned properly in the IN tray. 6 Open the HP Printer Properties dialog box (see page 7). The IN tray should ... 1 Pull out the IN tray. 2 Slide out both paper guides and remove all paper from the IN tray. ...
...tray. Then push the paper width guide in. 5 Push in the IN tray. Then... 7 Choose HP Print Settings. Setup Tab • Paper Type: Choose either Automatic or the appropriate paper type • Print Quality: Choose Draft, Normal, or Best • Paper Size: Choose appropriate media size Features Tab • Orientation: Choose ... you get an "out of paper" message, make sure the media is positioned properly in the IN tray. 6 Open the HP Printer Properties dialog box (see page 7). The IN tray should ... 1 Pull out the IN tray. 2 Slide out both paper guides and remove all paper from the IN tray. ...
User manual
Page 36
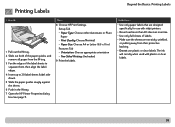
...Make sure the sheets are designed specifically for use plastic or clear labels. Setup Tab • Paper Type: Choose either Automatic or Plain Paper • Print Quality: Choose Normal • Paper Size: Choose A4 or Letter (8.5 x 11 in the IN tray. 7 Open the HP Printer Properties dialog box (see page 7). Guidelines... • Use... sheets (label side down). 5 Slide the paper guides snugly against the sheets. 6 Push in .) Features Tab • Orientation: Choose appropriate orientation • Two-Sided Printing: Unchecked 9 Print the labels. Then... 8 Choose HP Print Settings.
...Make sure the sheets are designed specifically for use plastic or clear labels. Setup Tab • Paper Type: Choose either Automatic or Plain Paper • Print Quality: Choose Normal • Paper Size: Choose A4 or Letter (8.5 x 11 in the IN tray. 7 Open the HP Printer Properties dialog box (see page 7). Guidelines... • Use... sheets (label side down). 5 Slide the paper guides snugly against the sheets. 6 Push in .) Features Tab • Orientation: Choose appropriate orientation • Two-Sided Printing: Unchecked 9 Print the labels. Then... 8 Choose HP Print Settings.
User manual
Page 37
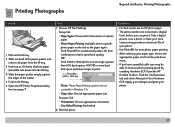
... For best results use an HP photo paper. • The photo needs to be in electronic (digital) form, before you may be able to increase photo printing speed by enabling Hardware ECP. Take a digital picture, scan a photo, or have a parallel cable, you can print it. Open the ... paper size Features Tab • Orientation: Choose appropriate orientation • Two-Sided Printing: Unchecked 8 Print the photo. Apply your changes and print your paper type, choose the appropriate paper size from the IN tray. 3 Insert up to Use Hardware ECP. Then... 7 Choose HP Print Settings.
... For best results use an HP photo paper. • The photo needs to be in electronic (digital) form, before you may be able to increase photo printing speed by enabling Hardware ECP. Take a digital picture, scan a photo, or have a parallel cable, you can print it. Open the ... paper size Features Tab • Orientation: Choose appropriate orientation • Two-Sided Printing: Unchecked 8 Print the photo. Apply your changes and print your paper type, choose the appropriate paper size from the IN tray. 3 Insert up to Use Hardware ECP. Then... 7 Choose HP Print Settings.
User manual
Page 38
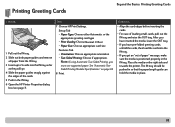
.... 38 Setup Tab • Paper Type: Choose either Automatic or the appropriate greeting card type • Print Quality: Choose Normal or Best • Paper Size: Choose appropriate card size Features Tab • Orientation: Choose appropriate orientation • Two-Sided Printing: Choose if appropriate. Place the media on page 83. 8 Print. See "Automatic TwoSided Printing Module Specifications...
.... 38 Setup Tab • Paper Type: Choose either Automatic or the appropriate greeting card type • Print Quality: Choose Normal or Best • Paper Size: Choose appropriate card size Features Tab • Orientation: Choose appropriate orientation • Two-Sided Printing: Choose if appropriate. Place the media on page 83. 8 Print. See "Automatic TwoSided Printing Module Specifications...

User manual
Page 39
... HP Print Settings. Setup Tab • Paper Type: Choose either Automatic or HP Iron-On T-Shirt Transfers • Print Quality: Choose Normal or Best • Paper Size: Choose A4 or Letter (8.5 x 11 in the IN tray. 6 Open the HP Printer Properties dialog box (see on transfer paper with printable side down. 4 Slide the paper guides snugly against...
... HP Print Settings. Setup Tab • Paper Type: Choose either Automatic or HP Iron-On T-Shirt Transfers • Print Quality: Choose Normal or Best • Paper Size: Choose A4 or Letter (8.5 x 11 in the IN tray. 6 Open the HP Printer Properties dialog box (see on transfer paper with printable side down. 4 Slide the paper guides snugly against...

User manual
Page 40
...Choose HP Print Settings. Setup Tab • Paper Type: Choose either Automatic or Plain Paper • Print Quality: Choose Normal • Paper Size: Choose appropriate size Features Tab • Orientation: Choose appropriate orientation • Two-Sided Printing: Unchecked • Poster Printing: Check this box and choose size...each sheet and tape the sheets together. Printing Posters Beyond the Basics: Printing Posters I should... 1 Load paper in the IN tray. 2 Slide the paper guides snugly against the sheets. 3 Push in the IN tray. 4 Open the HP Printer Properties dialog box (see page ...
...Choose HP Print Settings. Setup Tab • Paper Type: Choose either Automatic or Plain Paper • Print Quality: Choose Normal • Paper Size: Choose appropriate size Features Tab • Orientation: Choose appropriate orientation • Two-Sided Printing: Unchecked • Poster Printing: Check this box and choose size...each sheet and tape the sheets together. Printing Posters Beyond the Basics: Printing Posters I should... 1 Load paper in the IN tray. 2 Slide the paper guides snugly against the sheets. 3 Push in the IN tray. 4 Open the HP Printer Properties dialog box (see page ...
User manual
Page 41
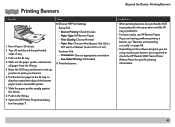
...Banner [Letter (8.5 x 11 in the IN tray. 9 Open the HP Printer Properties dialog box (see "Banners aren't printing correctly" on page 68. • Depending on the software program you are using to print your banner, you may need to 20 sheets. 2 Tear off and discard the perforated ... is toward the printer. 7 Slide the paper guides snugly against the sheets. 8 Push in .)] Features Tab • Orientation: Choose appropriate orientation • Two-Sided Printing: Unchecked 11 Print the banner. Then... 10 Choose HP Print Settings. Beyond the Basics: Printing Banners Guidelines... •...
...Banner [Letter (8.5 x 11 in the IN tray. 9 Open the HP Printer Properties dialog box (see "Banners aren't printing correctly" on page 68. • Depending on the software program you are using to print your banner, you may need to 20 sheets. 2 Tear off and discard the perforated ... is toward the printer. 7 Slide the paper guides snugly against the sheets. 8 Push in .)] Features Tab • Orientation: Choose appropriate orientation • Two-Sided Printing: Unchecked 11 Print the banner. Then... 10 Choose HP Print Settings. Beyond the Basics: Printing Banners Guidelines... •...

User manual
Page 61
... paper type is set to the computer, rather than using the Power button. 61 d Apply your changes and try printing your document again. • If you are in use. c Check Attempt to print a photo. The printer is the problem? Be patient. This may be trying to Use Hardware ECP. See "Setup Tab" on the Configuration tab. Reconnect the power cord and turn on...
... paper type is set to the computer, rather than using the Power button. 61 d Apply your changes and try printing your document again. • If you are in use. c Check Attempt to print a photo. The printer is the problem? Be patient. This may be trying to Use Hardware ECP. See "Setup Tab" on the Configuration tab. Reconnect the power cord and turn on...
User manual
Page 72
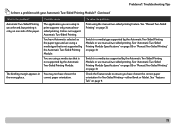
... Two-Sided Printing Module or use manual two-sided printing. Switch to a media type supported by the Automatic Two-Sided Printing Module or use manual two-sided printing. Check the Features tab to ensure you are using the manual two-sided printing feature. To solve the problem... See "Automatic Two-Sided Printing Module Specifications" on page 83 or "Manual Two-Sided Printing" on page...
... Two-Sided Printing Module or use manual two-sided printing. Switch to a media type supported by the Automatic Two-Sided Printing Module or use manual two-sided printing. Check the Features tab to ensure you are using the manual two-sided printing feature. To solve the problem... See "Automatic Two-Sided Printing Module Specifications" on page 83 or "Manual Two-Sided Printing" on page...
User manual
Page 73
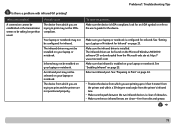
... infrared. Make sure the device is the problem? See "Setting up to the user's guide for Infrared" on the Microsoft Windows 98/2000 software CD or downloaded from dirt and grease. 73 Your laptop or notebook may not be selected on your laptop or notebook. See "Enabling Infrared" on your laptop or notebook. Select an infrared port. A connection...
... infrared. Make sure the device is the problem? See "Setting up to the user's guide for Infrared" on the Microsoft Windows 98/2000 software CD or downloaded from dirt and grease. 73 Your laptop or notebook may not be selected on your laptop or notebook. See "Enabling Infrared" on your laptop or notebook. Select an infrared port. A connection...

User manual
Page 95
... while ensuring proper functionality and reliability. More About Your Printer: Environmental Statement Product Longevity: To ensure the longevity of your local HP Sales or Service Office for efficient disassembly and repair. To return this printer have been designed to access quickly for instructions. Not only does this save natural resources, but it also saves money without affecting the...
... while ensuring proper functionality and reliability. More About Your Printer: Environmental Statement Product Longevity: To ensure the longevity of your local HP Sales or Service Office for efficient disassembly and repair. To return this printer have been designed to access quickly for instructions. Not only does this save natural resources, but it also saves money without affecting the...
User manual
Page 100
... accessories 87 buttons 4 cable, parallel 53, 87 cable, USB 55, 60, 61, 87 calibration 14 cleaning 29 connections 56 driver updates, see printer software, updates drivers, see printer software Lights 4 maintenance 29 paper trays 82 parts 87 repair 77 settings 6 smudges on 29 software 6, 76 software updates 76 specifications 81 trays 5 Printer Properties dialog box Windows 3.1x 11 Windows 95, 98, 200, NT 4.0 7 Printer Services tab...
... accessories 87 buttons 4 cable, parallel 53, 87 cable, USB 55, 60, 61, 87 calibration 14 cleaning 29 connections 56 driver updates, see printer software, updates drivers, see printer software Lights 4 maintenance 29 paper trays 82 parts 87 repair 77 settings 6 smudges on 29 software 6, 76 software updates 76 specifications 81 trays 5 Printer Properties dialog box Windows 3.1x 11 Windows 95, 98, 200, NT 4.0 7 Printer Services tab...
User manual
Page 101
... printer 59 CD, not reading 51 didn't use printer default settings 69 error writing to USB port 60 fax 59 flashing lights 62 help 50 infrared light flashing 64 infrared printing 73-74 ink streaks 46 installing printer software 52 jam 57, 62, 63 LPT1 error 60 missing lines or dots 46 no page came out 56, 57, 58 output 65, 66...
... printer 59 CD, not reading 51 didn't use printer default settings 69 error writing to USB port 60 fax 59 flashing lights 62 help 50 infrared light flashing 64 infrared printing 73-74 ink streaks 46 installing printer software 52 jam 57, 62, 63 LPT1 error 60 missing lines or dots 46 no page came out 56, 57, 58 output 65, 66...


