

User manual
Page 1
CD Radio Cassette Recorder AZ 1605 1 P L AY HIGHSPEEDDUBBING PAUSE STOP OPEN SEARCH PLAY STOP PLAY PAUSE CD SYNCHRO START RECORDING PAUSE STOP OPEN SEARCH OPEN PLAY RECORD SEARCH REPEAT SHUFFLE CD RADIO CASSETTE RECORDER PROGRAM BASS REFLEX SPEAKER SYSTEM HIGH SPEED DUBBING 2 RECORD 530 155 630 175 800 200 88 92 13001000 225 96 FM kHz 1k6H02z075 255 MH1z08104 100 Toll Free Help Line Ligne d'assistance en service libre Linea de ayuda telefónica sin cargo 800-531-0039
CD Radio Cassette Recorder AZ 1605 1 P L AY HIGHSPEEDDUBBING PAUSE STOP OPEN SEARCH PLAY STOP PLAY PAUSE CD SYNCHRO START RECORDING PAUSE STOP OPEN SEARCH OPEN PLAY RECORD SEARCH REPEAT SHUFFLE CD RADIO CASSETTE RECORDER PROGRAM BASS REFLEX SPEAKER SYSTEM HIGH SPEED DUBBING 2 RECORD 530 155 630 175 800 200 88 92 13001000 225 96 FM kHz 1k6H02z075 255 MH1z08104 100 Toll Free Help Line Ligne d'assistance en service libre Linea de ayuda telefónica sin cargo 800-531-0039
User manual
Page 2
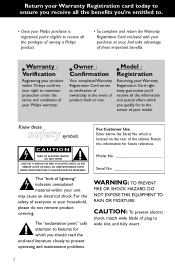
...prevent operating and maintenance problems. For Customer Use Enter below the Serial No. Return your Warranty Registration card today to ensure you receive all the benefits you're entitled to. • Once your Philips ...USER-SERVICEABLE PARTS INSIDE. CAUTION: To prevent electric shock, match wide blade of plug to maximum protection under the terms and conditions of owning a Philips product. • So complete and return the Warranty Registration Card enclosed with your household, please do not remove product covering. Warranty Verification Registering your product within your model...
...prevent operating and maintenance problems. For Customer Use Enter below the Serial No. Return your Warranty Registration card today to ensure you receive all the benefits you're entitled to. • Once your Philips ...USER-SERVICEABLE PARTS INSIDE. CAUTION: To prevent electric shock, match wide blade of plug to maximum protection under the terms and conditions of owning a Philips product. • So complete and return the Warranty Registration Card enclosed with your household, please do not remove product covering. Warranty Verification Registering your product within your model...
User manual
Page 4
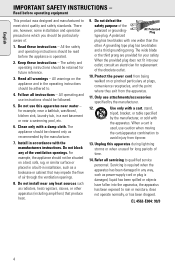
All the safety and operating instructions should be retained for replacement of time. 14. The safety and operating instructions should be cleaned only as power-supply cord or plug is used, use attachments/accessories specified by the manufacturer. 12. The appliance should be read before operating equipment This product was designed and manufactured to meet strict quality and safety standards. Do not block any of...
All the safety and operating instructions should be retained for replacement of time. 14. The safety and operating instructions should be cleaned only as power-supply cord or plug is used, use attachments/accessories specified by the manufacturer. 12. The appliance should be read before operating equipment This product was designed and manufactured to meet strict quality and safety standards. Do not block any of...

User manual
Page 5
... contact Philips at no charge to the address listed below . No other cause not within the control of -warranty exchange. Philips is officially distributed by signal conditions or cable or antenna systems outside the unit. • a product that you . In Canada, call the phone number listed above ). MODEL SERIAL BEFORE REQUESTING EXCHANGE... Please check your warranty registration card promptly. Adjustments of the controls discussed...
... contact Philips at no charge to the address listed below . No other cause not within the control of -warranty exchange. Philips is officially distributed by signal conditions or cable or antenna systems outside the unit. • a product that you . In Canada, call the phone number listed above ). MODEL SERIAL BEFORE REQUESTING EXCHANGE... Please check your warranty registration card promptly. Adjustments of the controls discussed...

User manual
Page 6
..., TUNER, TAPE...selects the sound source 2 DBB enhances the bass frequencies 3 VOLUME adjusts the volume level 4 p 3.5 mm headphone jack Note: Inserting the plug will switch off the speakers. 5 Display Window for showing different CD playing modes 6 CD PLAYER / OPEN opens the CD lid STOP 9 stops CD play and erases the program PLAY·PAUSE 2; ...starts and interrupts CD play SEARCH skips and searches forward and backward PROGRAM programs track numbers and reviews the program SHUFFLE plays CD tracks in random order REPEAT repeats a track, the entire CD or the program 7 RADIO TUNING...
..., TUNER, TAPE...selects the sound source 2 DBB enhances the bass frequencies 3 VOLUME adjusts the volume level 4 p 3.5 mm headphone jack Note: Inserting the plug will switch off the speakers. 5 Display Window for showing different CD playing modes 6 CD PLAYER / OPEN opens the CD lid STOP 9 stops CD play and erases the program PLAY·PAUSE 2; ...starts and interrupts CD play SEARCH skips and searches forward and backward PROGRAM programs track numbers and reviews the program SHUFFLE plays CD tracks in random order REPEAT repeats a track, the entire CD or the program 7 RADIO TUNING...
User manual
Page 7
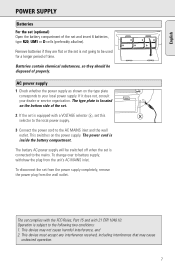
... local power supply. 3 Connect the power cord to your dealer or service organization. Operation is connected to be used for a longer period of time. Batteries contain chemical substances, so they are flat or the set is subject to battery supply, withdraw the plug from the wall outlet. This switches on the power supply. Remove batteries if they should be switched off when the set is inside the battery compartment. The power cord...
... local power supply. 3 Connect the power cord to your dealer or service organization. Operation is connected to be used for a longer period of time. Batteries contain chemical substances, so they are flat or the set is subject to battery supply, withdraw the plug from the wall outlet. This switches on the power supply. Remove batteries if they should be switched off when the set is inside the battery compartment. The power cord...
User manual
Page 8
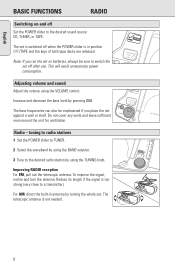
... MHz 8 CD TUNER TAPE HIGH OFF SPEED DUBBING ON Adjusting volume and sound Adjust the volume using the TUNING knob. Do not cover any vents and leave sufficient VOLUME room around the unit for ventilation. CD SYNCHRO ST Radio - tuning to radio stations 1 Set the POWER slider to TUNER. 2 Select the waveband by using the BAND selector. 3 Tune to switch the DBB MIC ASS set off Set the POWER slider to a transmitter). The set on and...
... MHz 8 CD TUNER TAPE HIGH OFF SPEED DUBBING ON Adjusting volume and sound Adjust the volume using the TUNING knob. Do not cover any vents and leave sufficient VOLUME room around the unit for ventilation. CD SYNCHRO ST Radio - tuning to radio stations 1 Set the POWER slider to TUNER. 2 Select the waveband by using the BAND selector. 3 Tune to switch the DBB MIC ASS set off Set the POWER slider to a transmitter). The set on and...
User manual
Page 9
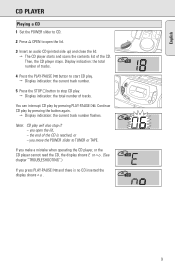
... open the lid. 3 Insert an audio CD (printed side up) and close the lid. ™ The CD player starts and scans the contents list of the CD is no CD inserted the display shows no . (See chapter "TROUBLESHOOTING".) If you move the POWER slider to stop if: - button to start CD play. ™ Display indication: the current track number. 5 Press the STOP 9 button to TUNER or TAPE. Then, the CD player stops...
... open the lid. 3 Insert an audio CD (printed side up) and close the lid. ™ The CD player starts and scans the contents list of the CD is no CD inserted the display shows no . (See chapter "TROUBLESHOOTING".) If you move the POWER slider to stop if: - button to start CD play. ™ Display indication: the current track number. 5 Press the STOP 9 button to TUNER or TAPE. Then, the CD player stops...

User manual
Page 10
During play: SEARCH CD play the entire CD or program CD in a forward or backward direction. ™ CD play continues at a low volume. 2 Release the button when you can activate the different playing modes at the same time, e. Repeating the entire CD or one track of the CD 1 Before or during CD play 1 Hold down the SEARCH ∞ or § button to normal CD play . ™ Display indication: the selected track number. STOP ™ All the tracks of...
During play: SEARCH CD play the entire CD or program CD in a forward or backward direction. ™ CD play continues at a low volume. 2 Release the button when you can activate the different playing modes at the same time, e. Repeating the entire CD or one track of the CD 1 Before or during CD play 1 Hold down the SEARCH ∞ or § button to normal CD play . ™ Display indication: the selected track number. STOP ™ All the tracks of...
User manual
Page 11
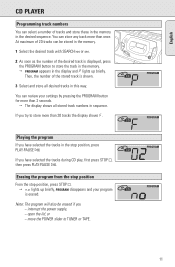
... CD PLAYER Programming track numbers You can select a number of the desired track is displayed, press the PROGRAM button to store the track in the memory. ™ PROGRAM appears in the display and P lights up briefly, PROGRAM disappears and your settings by pressing the PROGRAM button for more than once. Then, the number of 20 tracks can be erased if you try to store more than 20 tracks the display shows F. CD Playing the program If...
... CD PLAYER Programming track numbers You can select a number of the desired track is displayed, press the PROGRAM button to store the track in the memory. ™ PROGRAM appears in the display and P lights up briefly, PROGRAM disappears and your settings by pressing the PROGRAM button for more than once. Then, the number of 20 tracks can be erased if you try to store more than 20 tracks the display shows F. CD Playing the program If...
User manual
Page 12
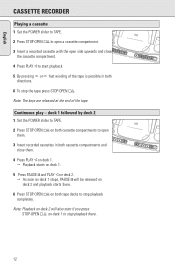
... deck 1 stops, PAUSE ; OPEN SEARCH 3 Insert recorded cassettes in both cassette compartments and close the cassette compartment. Note: The keys are released at the end of the tape is possible in both directions. 6 To stop the tape press STOP·OPEN 9/. CD SYNCHRO START RECORDING PLAY OPEN PAUSE STOP OPEN SEARCH PLAY RECORD 4 Press PLAY 1 on deck 1. ™ Playback starts on both cassette compartments to open a cassette compartment. will also start...
... deck 1 stops, PAUSE ; OPEN SEARCH 3 Insert recorded cassettes in both cassette compartments and close the cassette compartment. Note: The keys are released at the end of the tape is possible in both directions. 6 To stop the tape press STOP·OPEN 9/. CD SYNCHRO START RECORDING PLAY OPEN PAUSE STOP OPEN SEARCH PLAY RECORD 4 Press PLAY 1 on deck 1. ™ Playback starts on both cassette compartments to open a cassette compartment. will also start...
User manual
Page 13
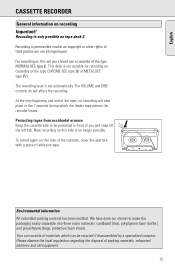
... materials, exhausted batteries and old equipment. 13 Environmental information All redundant packing material has been omitted. We have done our utmost to be protected in the 7 seconds during which can be recycled if disassembled by a specialized company. The VOLUME and DBB controls do not affect the recording. Your set consists of you should use a cassette of the tape, no...
... materials, exhausted batteries and old equipment. 13 Environmental information All redundant packing material has been omitted. We have done our utmost to be protected in the 7 seconds during which can be recycled if disassembled by a specialized company. The VOLUME and DBB controls do not affect the recording. Your set consists of you should use a cassette of the tape, no...
User manual
Page 14
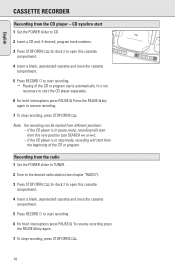
... from the radio 1 Set the POWER slider to TUNER. 2 Tune to the desired radio station (see chapter "RADIO"). 3 Press STOP·OPEN 9/ for deck 2 to open this cassette compartment. 4 Insert a blank, unprotected cassette and close the cassette compartment. 5 Press RECORD 0 to start recording. ™ Playing of the CD or program. It is in stop mode, recording will start from the CD player - if the CD player is not necessary to start the CD player separately. 6 For...
... from the radio 1 Set the POWER slider to TUNER. 2 Tune to the desired radio station (see chapter "RADIO"). 3 Press STOP·OPEN 9/ for deck 2 to open this cassette compartment. 4 Insert a blank, unprotected cassette and close the cassette compartment. 5 Press RECORD 0 to start recording. ™ Playing of the CD or program. It is in stop mode, recording will start from the CD player - if the CD player is not necessary to start the CD player separately. 6 For...
User manual
Page 15
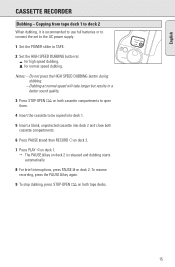
... button to TAPE. key again. 9 To stop dubbing, press STOP·OPEN 9/ on deck 2 is recommended to use full batteries or to connect the set to the AC power supply. 1 Set the POWER slider to : VOLUME x for high speed dubbing, w for normal speed dubbing. and then RECORD 0 on deck 2. 7 Press PLAY 1 on deck 2. English CASSETTE RECORDER Dubbing - key on both cassette compartments. 6 Press PAUSE ; To resume recording...
... button to TAPE. key again. 9 To stop dubbing, press STOP·OPEN 9/ on deck 2 is recommended to use full batteries or to connect the set to the AC power supply. 1 Set the POWER slider to : VOLUME x for high speed dubbing, w for normal speed dubbing. and then RECORD 0 on deck 2. 7 Press PLAY 1 on deck 2. English CASSETTE RECORDER Dubbing - key on both cassette compartments. 6 Press PAUSE ; To resume recording...
User manual
Page 16
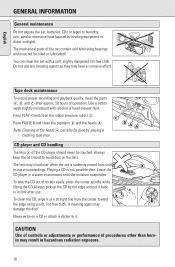
... rubber pressure rollers C. Playing a CD is suddenly moved from the center toward the edge using a soft, lint-free cloth. English GENERAL INFORMATION General maintenance Do not expose the set, batteries, CDs or tapes to humidity, rain, sand or excessive heat (caused by playing a cleaning tape once. Do not use . CASSETTE RECORDER AM BASS REFLEX SPEAKER SYSTEM C HIGH SPEED DUBBING 2 RECORD BAA CD player and CD handling The lens X of...
... rubber pressure rollers C. Playing a CD is suddenly moved from the center toward the edge using a soft, lint-free cloth. English GENERAL INFORMATION General maintenance Do not expose the set, batteries, CDs or tapes to humidity, rain, sand or excessive heat (caused by playing a cleaning tape once. Do not use . CASSETTE RECORDER AM BASS REFLEX SPEAKER SYSTEM C HIGH SPEED DUBBING 2 RECORD BAA CD player and CD handling The lens X of...
User manual
Page 17
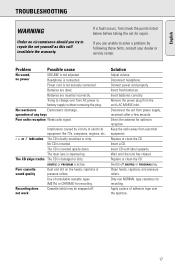
... lens has cleared. If you try to battery supply without removing the plug. Problem Possible cause No sound, no or E indication The CD is steamed up. Power cord is damaged or dirty. Batteries are unable to Electrostatic discharge. Interference caused by following these hints, consult your dealer or service center. Recording does Cassette tab(s) may be snapped off SHUFFLE or PROGRAM play. Disconnect headphone. Replace or clean...
... lens has cleared. If you try to battery supply without removing the plug. Problem Possible cause No sound, no or E indication The CD is steamed up. Power cord is damaged or dirty. Batteries are unable to Electrostatic discharge. Interference caused by following these hints, consult your dealer or service center. Recording does Cassette tab(s) may be snapped off SHUFFLE or PROGRAM play. Disconnect headphone. Replace or clean...
User manual
Page 48
philips.com 3140 115 2718.1 CLASS 1 LASER PRODUCT Printed in Hong Kong CD Radio Cassette Recorder PHILIPS CONSUMER ELECTRONICS COMPANY A Division of Philips Electronics North America Corporation Knoxville, Tennessee 37914-1810, U.S.A. English Français Español Meet PHILIPS at the Internet http://www. AZ 1605 -
philips.com 3140 115 2718.1 CLASS 1 LASER PRODUCT Printed in Hong Kong CD Radio Cassette Recorder PHILIPS CONSUMER ELECTRONICS COMPANY A Division of Philips Electronics North America Corporation Knoxville, Tennessee 37914-1810, U.S.A. English Français Español Meet PHILIPS at the Internet http://www. AZ 1605 -


