
Leaflet
Page 1
... you to finalize only when needed • Headphone output with MP3 music (for over 12 hours of music) • CD Text display, edit and recording • 2 disc changer mode for true copies • Plays computer CDs with level control • Easy to set up, easy to use also available in CD player • Simple "COPY CD" button for making a quick copy • Audio Core drive with Bit...
... you to finalize only when needed • Headphone output with MP3 music (for over 12 hours of music) • CD Text display, edit and recording • 2 disc changer mode for true copies • Plays computer CDs with level control • Easy to set up, easy to use also available in CD player • Simple "COPY CD" button for making a quick copy • Audio Core drive with Bit...

Leaflet
Page 2
... components that no matter what the source. Split, High Performance Audio Converters This set switches itself off. The display can be started automatically with a sync start reliability to 320 kbps or even variable bit-rates) General Audio CD Recorder + CD Player • Power supply : 220-240V • Power consumption : 18W : One Touch Timer recoding from external source When you can adjust the recrd level digitally...
... components that no matter what the source. Split, High Performance Audio Converters This set switches itself off. The display can be started automatically with a sync start reliability to 320 kbps or even variable bit-rates) General Audio CD Recorder + CD Player • Power supply : 220-240V • Power consumption : 18W : One Touch Timer recoding from external source When you can adjust the recrd level digitally...
User manual
Page 2
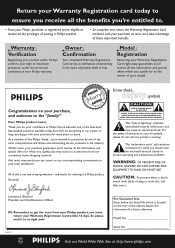
... electrical shock. And we'll do everything in your model. NO USER-SERVICEABLE PARTS INSIDE. REFER SERVICING TO QUALIFIED SERVICE PERSONNEL. tThis "bolt of everyone in our power to get the most comprehensive warranties and outstanding service networks in the event of plug to protection by one of your household, please do not remove product covering. CAUTION: To prevent electric shock, match...
... electrical shock. And we'll do everything in your model. NO USER-SERVICEABLE PARTS INSIDE. REFER SERVICING TO QUALIFIED SERVICE PERSONNEL. tThis "bolt of everyone in our power to get the most comprehensive warranties and outstanding service networks in the event of plug to protection by one of your household, please do not remove product covering. CAUTION: To prevent electric shock, match...

User manual
Page 5
...180;s instructions. 8. A grounding type plug has two blades and a third grounding prong.The wide blade or the third prong are provided for your outlet, consult an electrician for replacement of the obsolete outlet. 10.Protect the power cord from the apparatus. 11.Only use attachments/...being walked on the unit. G Remove batteries when the unit is used for long periods of the polarized or grounding-type plug. Read these instructions. 3. Servicing is required when the apparatus has been damaged in any ventilation openings. To prevent battery leakage which may...
...180;s instructions. 8. A grounding type plug has two blades and a third grounding prong.The wide blade or the third prong are provided for your outlet, consult an electrician for replacement of the obsolete outlet. 10.Protect the power cord from the apparatus. 11.Only use attachments/...being walked on the unit. G Remove batteries when the unit is used for long periods of the polarized or grounding-type plug. Read these instructions. 3. Servicing is required when the apparatus has been damaged in any ventilation openings. To prevent battery leakage which may...

User manual
Page 6
... 8 Connections Connections 9 Setup information 9 Connections general 9 Installations Analog connections 10 Digital connections 10-11 Power 11 Controls 12 Remote control Remote control usage 13 Remote control keys 13 Basic functions Switching on, switching to standby 14 Demonstration mode 14 Loading discs 14 Playback 14 Selecting and searching (on all discs except MP3-CDs 15 Selecting and searching (on MP3-CDs only) ______ 15 SHUFFLE and REPEAT 16 CD text display 16 ID3-tag 16 Programming track numbers 16...
... 8 Connections Connections 9 Setup information 9 Connections general 9 Installations Analog connections 10 Digital connections 10-11 Power 11 Controls 12 Remote control Remote control usage 13 Remote control keys 13 Basic functions Switching on, switching to standby 14 Demonstration mode 14 Loading discs 14 Playback 14 Selecting and searching (on all discs except MP3-CDs 15 Selecting and searching (on MP3-CDs only) ______ 15 SHUFFLE and REPEAT 16 CD text display 16 ID3-tag 16 Programming track numbers 16...

User manual
Page 7
..., Part 15 and with red and white plugs) - Your unit consists of materials which can be recycled if disassembled by the edge and put it in its box easily, press the center spindle while lifting the CD(RW). Supplied accessories - 2 analog audio cables (with 21 CFR 1040.10. Disc handling If the CD player/recorder fails to read discs correctly, use...
..., Part 15 and with red and white plugs) - Your unit consists of materials which can be recycled if disassembled by the edge and put it in its box easily, press the center spindle while lifting the CD(RW). Supplied accessories - 2 analog audio cables (with 21 CFR 1040.10. Disc handling If the CD player/recorder fails to read discs correctly, use...

User manual
Page 8
... following formats are CDRW compatible. All audio CDR and audio CDRW discs - To achieve a good MP3 quality a bit rate of this CD player/recorder you can use a computer CDR or CDRW as copyright or other programs simultaneously on your MP3-CD on this user manual may sometimes result in this CD player/recorder. In compliance with the SDMI (Secure Digital Music Initiative) the digital outputs...
... following formats are CDRW compatible. All audio CDR and audio CDRW discs - To achieve a good MP3 quality a bit rate of this CD player/recorder you can use a computer CDR or CDRW as copyright or other programs simultaneously on your MP3-CD on this user manual may sometimes result in this CD player/recorder. In compliance with the SDMI (Secure Digital Music Initiative) the digital outputs...
User manual
Page 9
...;er/receiver or directly to the user manuals for your audio equipment offers and how you are going to use a turntable with the unit, you make or change connections with the power supply switched on. receiver or amplifier). If the unit is not possible. For playback the following inputs are present: - Digital coaxial output (DIGITAL OUT) - Digital coaxial input (DIGITAL IN) - The connections you have been made, connect the power cord...
...;er/receiver or directly to the user manuals for your audio equipment offers and how you are going to use a turntable with the unit, you make or change connections with the power supply switched on. receiver or amplifier). If the unit is not possible. For playback the following inputs are present: - Digital coaxial output (DIGITAL OUT) - Digital coaxial input (DIGITAL IN) - The connections you have been made, connect the power cord...
User manual
Page 10
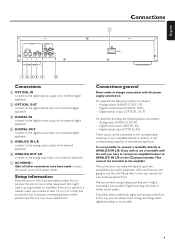
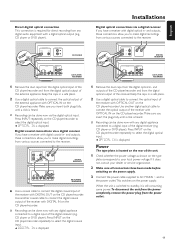
... analog input of the amplifier/receiver. Digital connections Direct digital coaxial connection This connection is no longer possible to connect the coaxial output of the amplifier/receiver (CD IN,TUNER IN, AUX IN, PHONO IN, etc.). 0 Recording can be done now with any digital audio equipment with DIGITAL IN on tape. DIGITAL ANALOG OPTICAL IN OUT IN OUT L R IN OUT CD PLAYER/ RECORDER G Use a digital coaxial cable to...
... analog input of the amplifier/receiver. Digital connections Direct digital coaxial connection This connection is no longer possible to connect the coaxial output of the amplifier/receiver (CD IN,TUNER IN, AUX IN, PHONO IN, etc.). 0 Recording can be done now with any digital audio equipment with DIGITAL IN on tape. DIGITAL ANALOG OPTICAL IN OUT IN OUT L R IN OUT CD PLAYER/ RECORDER G Use a digital coaxial cable to...
User manual
Page 11
... various sources connected to select the digital coaxial input. ➜ DIGITAL IN is still consuming some power. and outputs, these connections allow you to make digital recordings from various sources connected to select the digital optical input. ➜ OPTICAL IN is required for direct recording from any digital audio equipment with any digital appliance connected to a digital input of the receiver. Press INPUT on the CD player/recorder to the receiver. Keep the caps in a safe place. 2 Use a digital optical cable to standby, it...
... various sources connected to select the digital coaxial input. ➜ DIGITAL IN is still consuming some power. and outputs, these connections allow you to make digital recordings from various sources connected to select the digital optical input. ➜ OPTICAL IN is required for direct recording from any digital audio equipment with any digital appliance connected to a digital input of the receiver. Press INPUT on the CD player/recorder to the receiver. Keep the caps in a safe place. 2 Use a digital optical cable to standby, it...

User manual
Page 12
... be illuminated depending on the different modes you are in.This in order to standby 2 / OPEN/CLOSE opens/closes the CD player drawer 3 CD player drawer 4 display 5 CD RECORDER CD recorder drawer blue light on: CD recorder is selected red light on: recording in random order ) DISPLAY selects display information ¡¢ CD player: selects the next track, searches forward ™4 CD player: selects the previous track, searches backward...
... be illuminated depending on the different modes you are in.This in order to standby 2 / OPEN/CLOSE opens/closes the CD player drawer 3 CD player drawer 4 display 5 CD RECORDER CD recorder drawer blue light on: CD recorder is selected red light on: recording in random order ) DISPLAY selects display information ¡¢ CD player: selects the next track, searches forward ™4 CD player: selects the previous track, searches backward...

User manual
Page 13
... numbers for CD text 5 TR. PROGRAM 0 6 8 ALBUM ALBUM + 7 9 ! 0 @ $ DISPLAY # DIM % & CD TEXT/edit DELETE SHUFFLE REPEAT ^ * ( CD TEXT ) ¡ Remote control usage Open the battery compartment of the display & DISPLAY selects display information * CD TEXT/edit switches through CD text information, enters/exits the CD text edit menu ( DELETE deletes CD text ) REPEAT repeats a track, an entire CD(RW), or a program ¡ SHUFFLE plays...
... numbers for CD text 5 TR. PROGRAM 0 6 8 ALBUM ALBUM + 7 9 ! 0 @ $ DISPLAY # DIM % & CD TEXT/edit DELETE SHUFFLE REPEAT ^ * ( CD TEXT ) ¡ Remote control usage Open the battery compartment of the display & DISPLAY selects display information * CD TEXT/edit switches through CD text information, enters/exits the CD text edit menu ( DELETE deletes CD text ) REPEAT repeats a track, an entire CD(RW), or a program ¡ SHUFFLE plays...
User manual
Page 15
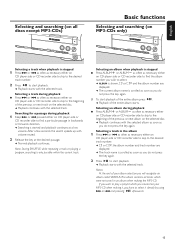
... or playing a program, searching is stopped G Press ALBUM+ or ALBUM- as often as necessary either on CD player side or CD recorder side to skip to the desired track number. ➜ CD or CDR, the album number and track number are displayed. ➜ The current album name is scrolled as soon as you have to select it directly by using...
... or playing a program, searching is stopped G Press ALBUM+ or ALBUM- as often as necessary either on CD player side or CD recorder side to skip to the desired track number. ➜ CD or CDR, the album number and track number are displayed. ➜ The current album name is scrolled as soon as you have to select it directly by using...

User manual
Page 16
... Basic functions SHUFFLE and REPEAT Repeating a track, a disc or a program 1 Press REPEAT repeatedly on the remote control during playback to end programming. Note: If you try to store more than one CD. 1 Load the desired disc(s) in the disc tray(s). 2 Press PROGRAM on the remote control to enter the program menu. ➜ PROG starts blinking and PROGRAM is displayed. ➜ The step number (STEP), the track number and playing...
... Basic functions SHUFFLE and REPEAT Repeating a track, a disc or a program 1 Press REPEAT repeatedly on the remote control during playback to end programming. Note: If you try to store more than one CD. 1 Load the desired disc(s) in the disc tray(s). 2 Press PROGRAM on the remote control to enter the program menu. ➜ PROG starts blinking and PROGRAM is displayed. ➜ The step number (STEP), the track number and playing...

User manual
Page 17
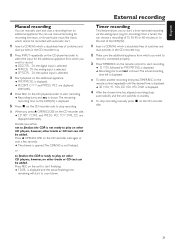
... a CDRW compatible CD player and CD recorder, - In that completes the recording of the additional appliance: ➜ DIGITAL IN: the digital coaxial input is selected. ➜ OPTICAL IN: the digital optical input is selected. ➜ ANALOG IN: the analog input is selected. 2 Keep ALBUM+ or ALBUM- play a recorded CDRW on the disc is less than 7 seconds, DISC FULL is not possible to adjust the desired recording level. 17...
... a CDRW compatible CD player and CD recorder, - In that completes the recording of the additional appliance: ➜ DIGITAL IN: the digital coaxial input is selected. ➜ OPTICAL IN: the digital optical input is selected. ➜ ANALOG IN: the analog input is selected. 2 Keep ALBUM+ or ALBUM- play a recorded CDRW on the disc is less than 7 seconds, DISC FULL is not possible to adjust the desired recording level. 17...
User manual
Page 20
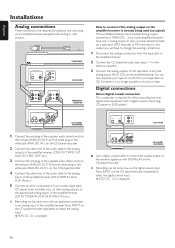
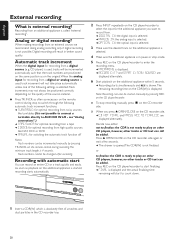
... following automatic track increment functions: ➜ TURNTABLE: for optimal recording from noisy sources like DAT, DCC or DVD ➜ MANUAL: for recording from high quality sources like turntables (It is absolutely free of the source material. When making recordings from . ➜ DIGITAL IN: the digital input is selected. ➜ ANALOG IN: the analog input is selected. ➜ OPTICAL IN: the optical input is selected. 3 Make sure the desired track...
... following automatic track increment functions: ➜ TURNTABLE: for optimal recording from noisy sources like DAT, DCC or DVD ➜ MANUAL: for recording from high quality sources like turntables (It is absolutely free of the source material. When making recordings from . ➜ DIGITAL IN: the digital input is selected. ➜ ANALOG IN: the analog input is selected. ➜ OPTICAL IN: the optical input is selected. 3 Make sure the desired track...
User manual
Page 21
... unit switches to standby. 0 To stop recording manually press Ç on the additional appliance. ➜ PREPARING is displayed. ➜ RECORD EXT? English Manual recording You can manually start and stop a recording from an additional appliance.You can use manual recording for recording live music, or for the additional appliance from which you want to record. ➜ DIGITAL IN: the digital input is selected...
... unit switches to standby. 0 To stop recording manually press Ç on the additional appliance. ➜ PREPARING is displayed. ➜ RECORD EXT? English Manual recording You can manually start and stop a recording from an additional appliance.You can use manual recording for recording live music, or for the additional appliance from which you want to record. ➜ DIGITAL IN: the digital input is selected...

User manual
Page 24
Problem No power No sound No reaction to controls Automatic start of permanent feature display (demo mode) Remote control does not function properly WRONG DISC, USE AUDIO CD and INSERT DISC indication WRONG DISC, USE CDR WITH `DIGITAL AUDIO´ LOGO and INSERT DISC indication NO SIGNAL indication or CHECK INPUT indication OVERHEATING indication Does not record Stops during recording Recorded disc does not play in another track increment mode. - Make sure the power cable is inserted...
Problem No power No sound No reaction to controls Automatic start of permanent feature display (demo mode) Remote control does not function properly WRONG DISC, USE AUDIO CD and INSERT DISC indication WRONG DISC, USE CDR WITH `DIGITAL AUDIO´ LOGO and INSERT DISC indication NO SIGNAL indication or CHECK INPUT indication OVERHEATING indication Does not record Stops during recording Recorded disc does not play in another track increment mode. - Make sure the power cable is inserted...
User manual
Page 25
...; labor charges for installation or setup of the product, adjustment of customer controls on the product, and installation or repair of antenna systems outside of the product. • product repair and/or part replacement because of misuse, accident, unauthorized repair or other cause not within the control of Philips Consumer Electronics Company. • reception problems caused by signal conditions or cable or antenna systems outside the unit...
...; labor charges for installation or setup of the product, adjustment of customer controls on the product, and installation or repair of antenna systems outside of the product. • product repair and/or part replacement because of misuse, accident, unauthorized repair or other cause not within the control of Philips Consumer Electronics Company. • reception problems caused by signal conditions or cable or antenna systems outside the unit...

Quick start guide
Page 1
... demo mode is cancelled permanently. Do not use special audio discs only.These discs are two different types of the unit and will not work. Philips Audio CD Player/Recorder CDR795, CDR796 English TURNTABLE PHONO CD IN IN L R CDR/TAPE IN OUT L R AMPLIFIER/ RECEIVER DIGITAL ANALOG OPTICAL IN OUT IN OUT L R IN OUT CD PLAYER/ RECORDER ~ AC MAINS DIGITAL OUTPUT OPTICAL COAX ANALOG OUTPUT L R DIGITAL COAXIAL SOURCE CD PLAYER, DVD, DAT This Quick Installation Card...
... demo mode is cancelled permanently. Do not use special audio discs only.These discs are two different types of the unit and will not work. Philips Audio CD Player/Recorder CDR795, CDR796 English TURNTABLE PHONO CD IN IN L R CDR/TAPE IN OUT L R AMPLIFIER/ RECEIVER DIGITAL ANALOG OPTICAL IN OUT IN OUT L R IN OUT CD PLAYER/ RECORDER ~ AC MAINS DIGITAL OUTPUT OPTICAL COAX ANALOG OUTPUT L R DIGITAL COAXIAL SOURCE CD PLAYER, DVD, DAT This Quick Installation Card...


