
Leaflet
Page 2
...OTR) • Auto repeat play • Screen saver • 3D Surround Sound DVD functionality • Multi-angle selection • Audio selection (1 out of max. 8 languages) • Subtitles selection (1 out of max. 32 languages) • Aspect ratio conversion (16:9, 4:3 letterbox, 4:3 Pan Scan) • Time Search • Parental control • Disc Menu support (title menu and root menu) • Resume (1 discs) after stop/ standby Audio CD functionality • Time display (Track) • Random (Shuffle) • Full audio functionality with remote control • Programming with...
...OTR) • Auto repeat play • Screen saver • 3D Surround Sound DVD functionality • Multi-angle selection • Audio selection (1 out of max. 8 languages) • Subtitles selection (1 out of max. 32 languages) • Aspect ratio conversion (16:9, 4:3 letterbox, 4:3 Pan Scan) • Time Search • Parental control • Disc Menu support (title menu and root menu) • Resume (1 discs) after stop/ standby Audio CD functionality • Time display (Track) • Random (Shuffle) • Full audio functionality with remote control • Programming with...

User manual
Page 5
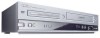
... Video (yellow tips) cables • This Owner's Manual and Quick-Use-Guide DVD Disc Menus... This DVD/VCR combines a Digital Video Disc (DVD) Player and a Hi-Fi Video Cassette Recorder (VCR) into one unit, letting you cannot use the DVD/VCR to set of equipment. VCR Features • Automatic Head Cleaner • Repeat Play • Channel Setup • Searching:Time, Index, Forward, and • English, French, and Spanish menus and dis- DVD manufacturers set in this owner's manual carefully to learn how to use the DVD Player's Setup menu...
... Video (yellow tips) cables • This Owner's Manual and Quick-Use-Guide DVD Disc Menus... This DVD/VCR combines a Digital Video Disc (DVD) Player and a Hi-Fi Video Cassette Recorder (VCR) into one unit, letting you cannot use the DVD/VCR to set of equipment. VCR Features • Automatic Head Cleaner • Repeat Play • Channel Setup • Searching:Time, Index, Forward, and • English, French, and Spanish menus and dis- DVD manufacturers set in this owner's manual carefully to learn how to use the DVD Player's Setup menu...

User manual
Page 7
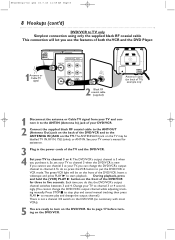
... DVD picture will be sent from the power outlets. Determine how to PROGRESSIVE. Such channels may be labelled CVBS, Composite, or baseband), use the Component Video jacks (Y Pb/Cb Pr/Cr) for the DVD Player. Press DVD to Progressive Scan. If your TV to put the DVD/VCR in DVD mode.With no Disc in a single cable. Follow the steps for excellent picture quality. Set your TV or moni- Connect the DVD/VCR's COAXIAL DIGITAL AUDIO...
... DVD picture will be sent from the power outlets. Determine how to PROGRESSIVE. Such channels may be labelled CVBS, Composite, or baseband), use the Component Video jacks (Y Pb/Cb Pr/Cr) for the DVD Player. Press DVD to Progressive Scan. If your TV to put the DVD/VCR in DVD mode.With no Disc in a single cable. Follow the steps for excellent picture quality. Set your TV or moni- Connect the DVD/VCR's COAXIAL DIGITAL AUDIO...
User manual
Page 8
... or Cable TV signal OFF ON PROGRESSIVE DVD S-VIDEO COMPONENT AUDIO OUT VIDEO OUT OUT Y DIGITAL AUDIO OUT CB L COAXIAL CR R DVD/VCR VCR AUDIO OUT AUDIO IN ANT-IN L L R R ANT-OUT VIDEO OUT VIDEO IN 75 CAANBTLE/ 2 Black RF coaxial cable (supplied) 75Ω ANT / CABLE Antenna In Jack (on the front of the DVD/VCR. Each time you cannot use the features of the TV and the DVD/VCR. 4 Set your TV to channel 3 or 4. The DVD/VCR's output channel...
... or Cable TV signal OFF ON PROGRESSIVE DVD S-VIDEO COMPONENT AUDIO OUT VIDEO OUT OUT Y DIGITAL AUDIO OUT CB L COAXIAL CR R DVD/VCR VCR AUDIO OUT AUDIO IN ANT-IN L L R R ANT-OUT VIDEO OUT VIDEO IN 75 CAANBTLE/ 2 Black RF coaxial cable (supplied) 75Ω ANT / CABLE Antenna In Jack (on the front of the DVD/VCR. Each time you cannot use the features of the TV and the DVD/VCR. 4 Set your TV to channel 3 or 4. The DVD/VCR's output channel...

User manual
Page 9
...).The DVD/VCR's output channel is channel 3 when the DVD/VCR is step 7 on page 38.) Leave the Cable Box/Satellite Receiver on for a timer recording. ● If you use audio and video cables to connect them to the VCR AUDIO IN and VIDEO IN jacks on the rear of both the VCR and the DVD Player. 1Cable Box/Satellite Receiver IN OUT Cable Signal RF coaxial cable 2 DVD/VCR ANT-IN DVD/VCR VCR AUDIO OUT AUDIO IN L L R R ANT-OUT VIDEO OUT VIDEO IN DVD S-VIDEO COMPONENT AUDIO OUT VIDEO OUT OUT Y DIGITAL AUDIO...
...).The DVD/VCR's output channel is channel 3 when the DVD/VCR is step 7 on page 38.) Leave the Cable Box/Satellite Receiver on for a timer recording. ● If you use audio and video cables to connect them to the VCR AUDIO IN and VIDEO IN jacks on the rear of both the VCR and the DVD Player. 1Cable Box/Satellite Receiver IN OUT Cable Signal RF coaxial cable 2 DVD/VCR ANT-IN DVD/VCR VCR AUDIO OUT AUDIO IN L L R R ANT-OUT VIDEO OUT VIDEO IN DVD S-VIDEO COMPONENT AUDIO OUT VIDEO OUT OUT Y DIGITAL AUDIO...

User manual
Page 10
... RECORD or RECORD to the DVD/VCR's ANT-IN (Antenna In) jack. 2 Use an RF coaxial cable (as the DVD/VCR's output channel (03 or 04).The DVD/VCR's output channel is channel 3 when the DVD/VCR is new.To alternate it between the Cable Box/Satellite Receiver and the DVD/VCR as the RF output channel of both the VCR and the DVD Player. DVD/VCR 1 Cable Signal ANT-IN DVD/VCR VCR AUDIO OUT AUDIO IN L L R R ANT-OUT VIDEO OUT VIDEO IN 2 Cable Box/Satellite Receiver DVD S-VIDEO COMPONENT AUDIO DIGITAL OUT VIDEO OUT OUT AUDIO...
... RECORD or RECORD to the DVD/VCR's ANT-IN (Antenna In) jack. 2 Use an RF coaxial cable (as the DVD/VCR's output channel (03 or 04).The DVD/VCR's output channel is channel 3 when the DVD/VCR is new.To alternate it between the Cable Box/Satellite Receiver and the DVD/VCR as the RF output channel of both the VCR and the DVD Player. DVD/VCR 1 Cable Signal ANT-IN DVD/VCR VCR AUDIO OUT AUDIO IN L L R R ANT-OUT VIDEO OUT VIDEO IN 2 Cable Box/Satellite Receiver DVD S-VIDEO COMPONENT AUDIO DIGITAL OUT VIDEO OUT OUT AUDIO...

User manual
Page 11
... the TV's AUDIO IN jack.You will not use the features of both the VCR and the DVD Player. 1 Antenna or Cable TV Signal to ANT-IN Jack ANT-IN DVD/VCR VCR AUDIO OUT AUDIO IN L L R R ANT-OUT VIDEO OUT VIDEO IN PROGRESSIVE IP DVD S-VIDEO COMPONENT AUDIO OUT VIDEO OUT OUT Y DIGITAL AUDIO OUT Pb/ Cb L COAXIAL Pr/ Cr R 2 Audio Cables 3 Video Cable Audio and Video IN Jacks on TV 1 Connect the antenna or Cable TV signal to the...
... the TV's AUDIO IN jack.You will not use the features of both the VCR and the DVD Player. 1 Antenna or Cable TV Signal to ANT-IN Jack ANT-IN DVD/VCR VCR AUDIO OUT AUDIO IN L L R R ANT-OUT VIDEO OUT VIDEO IN PROGRESSIVE IP DVD S-VIDEO COMPONENT AUDIO OUT VIDEO OUT OUT Y DIGITAL AUDIO OUT Pb/ Cb L COAXIAL Pr/ Cr R 2 Audio Cables 3 Video Cable Audio and Video IN Jacks on TV 1 Connect the antenna or Cable TV signal to the...

User manual
Page 12
... the correct Component Video In channel. 5 You are wrong, the sound will be distorted or you play a DVD when the settings are ready to turn on the TV. To help you are using the yellow video cable for DVD Player features. Press DVD to put the DVD/VCR in DVD mode.With no Disc in the DVD Player's Setup menu. If you may damage the TV speakers. If you find the right Audio/Video In channel, turn on...
... the correct Component Video In channel. 5 You are wrong, the sound will be distorted or you play a DVD when the settings are ready to turn on the TV. To help you are using the yellow video cable for DVD Player features. Press DVD to put the DVD/VCR in DVD mode.With no Disc in the DVD Player's Setup menu. If you may damage the TV speakers. If you find the right Audio/Video In channel, turn on...
User manual
Page 13
.... If you are using the RF coaxial cable for DVD Player features. Details are ready to put the DVD/VCR in DVD mode.With no Disc in the DVD Player's Setup menu. To help you get the TV on the S-Video In channel. 5 You are on the TV screen, or try channel 3 or 4 at the TV. Press DVD to turn on the DVD/VCR. Match the cable colors to the jack colors. 3 Connect an S-Video cable (not supplied...
.... If you are using the RF coaxial cable for DVD Player features. Details are ready to put the DVD/VCR in DVD mode.With no Disc in the DVD Player's Setup menu. To help you get the TV on the S-Video In channel. 5 You are on the TV screen, or try channel 3 or 4 at the TV. Press DVD to turn on the DVD/VCR. Match the cable colors to the jack colors. 3 Connect an S-Video cable (not supplied...

User manual
Page 14
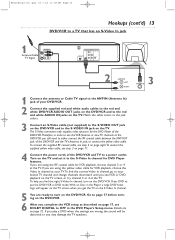
... the DVD/VCR in DVD mode.With no Disc in the DVD Player's Setup menu. H9420UD(p1-51).QX4 03.7.18 11:59 AM Page 14 14 Hookups (cont'd) DVD/VCR to a TV and a Stereo 1Antenna/Cable TV Signal ANT-IN DVD/VCR VCR AUDIO OUT AUDIO IN L L R R ANT-OUT VIDEO OUT VIDEO IN PROGRESSIVE IP DVD S-VIDEO COMPONENT AUDIO OUT VIDEO OUT OUT Y DIGITAL AUDIO OUT Pb/ Cb L COAXIAL Pr/ Cr R VIDEO IN 3 2 AUDIO (LEFT) IN AUDIO (RIGHT) IN 1 Connect the...
... the DVD/VCR in DVD mode.With no Disc in the DVD Player's Setup menu. H9420UD(p1-51).QX4 03.7.18 11:59 AM Page 14 14 Hookups (cont'd) DVD/VCR to a TV and a Stereo 1Antenna/Cable TV Signal ANT-IN DVD/VCR VCR AUDIO OUT AUDIO IN L L R R ANT-OUT VIDEO OUT VIDEO IN PROGRESSIVE IP DVD S-VIDEO COMPONENT AUDIO OUT VIDEO OUT OUT Y DIGITAL AUDIO OUT Pb/ Cb L COAXIAL Pr/ Cr R VIDEO IN 3 2 AUDIO (LEFT) IN AUDIO (RIGHT) IN 1 Connect the...
User manual
Page 15
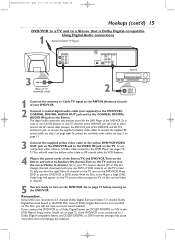
... a Dolby Digital-compatible Stereo, set DOLBY DIGITAL to your DVD/VCR. 2 Connect a coaxial digital audio cable (not supplied) to the DVD/VCR's COAXIAL DIGITAL AUDIO OUT jack and to ON in the DVD Player's Setup menu. So, in order to use component video cable or S-Video cable instead for the DVD Player, see step 2 on page 11. 3 Connect the supplied yellow video cable to the yellow DVD/VCR VIDEO OUT jack on the DVD/VCR and to turn on the DVD/VCR. Press DVD to put the DVD/VCR in DVD mode.With no Disc...
... a Dolby Digital-compatible Stereo, set DOLBY DIGITAL to your DVD/VCR. 2 Connect a coaxial digital audio cable (not supplied) to the DVD/VCR's COAXIAL DIGITAL AUDIO OUT jack and to ON in the DVD Player's Setup menu. So, in order to use component video cable or S-Video cable instead for the DVD Player, see step 2 on page 11. 3 Connect the supplied yellow video cable to the yellow DVD/VCR VIDEO OUT jack on the DVD/VCR and to turn on the DVD/VCR. Press DVD to put the DVD/VCR in DVD mode.With no Disc...
User manual
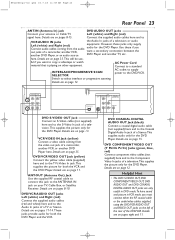
Page 23
... VCR. DVD COAXIAL DIGITAL AUDIO OUT Jack (black) Connect a coaxial digital audio cable (not supplied) here and to the TV's Video In jack. Details are on page 15. Details are only useful in DVD mode.To have sound and picture in VCR mode, you want a secondary connection between the DVD Player and another DVD Player here. Helpful Hint • The DVD S-VIDEO OUT, DVD COMPONENT VIDEO OUT, DVD AUDIO OUT and DVD COAXIAL DIGITAL AUDIO OUT jacks are on the left of the rear...
... VCR. DVD COAXIAL DIGITAL AUDIO OUT Jack (black) Connect a coaxial digital audio cable (not supplied) here and to the TV's Video In jack. Details are on page 15. Details are only useful in DVD mode.To have sound and picture in VCR mode, you want a secondary connection between the DVD Player and another DVD Player here. Helpful Hint • The DVD S-VIDEO OUT, DVD COMPONENT VIDEO OUT, DVD AUDIO OUT and DVD COAXIAL DIGITAL AUDIO OUT jacks are on the left of the rear...

User manual
Page 25
... remove the DVD Player's Setup menu. SPEED Button Press to select TV channels. Enter channel numbers as a twodigit number for DVD subtitles. Details are on page 59. Details are on page 63. In VCR mode, use to select the VCR's recording speed (SP or SLP). For channels 100 and above . If you have Cable TV, channels 1-125 are on pages 36-38. Use the Number buttons to choose a DVD audio language or an Audio CD sound mode. Remote Control (cont'd) 25 STANDBY-ON SEARCH MODE DISPLAY REPEAT REPEAT AUDIO A-B SUBTITLE...
... remove the DVD Player's Setup menu. SPEED Button Press to select TV channels. Enter channel numbers as a twodigit number for DVD subtitles. Details are on page 59. Details are on page 63. In VCR mode, use to select the VCR's recording speed (SP or SLP). For channels 100 and above . If you have Cable TV, channels 1-125 are on pages 36-38. Use the Number buttons to choose a DVD audio language or an Audio CD sound mode. Remote Control (cont'd) 25 STANDBY-ON SEARCH MODE DISPLAY REPEAT REPEAT AUDIO A-B SUBTITLE...

User manual
Page 32
... the front of the DVD/VCR. The red RECORD light will appear on the screen. The red RECORD light will switch to Stop after five minutes to prevent recording. Each ■ mark equals one minute remaining. Press CLEAR/RESET to record a television program onto a videotape. STANDBY-ON SEARCH MODE DISPLAY REPEAT REPEAT AUDIO A-B SUBTITLE ZOOM ANGLE SKIP / CH RETURN TITLE CLEAR/RESET SLOW 4 DVD SYSTEM MENU VCR/TV VCR DISC/VCR MENU OK 7 3 4 STOP PLAY PAUSE TIMER SET VCR Plus+ RECORD SPEED 1 45 89...
... the front of the DVD/VCR. The red RECORD light will appear on the screen. The red RECORD light will switch to Stop after five minutes to prevent recording. Each ■ mark equals one minute remaining. Press CLEAR/RESET to record a television program onto a videotape. STANDBY-ON SEARCH MODE DISPLAY REPEAT REPEAT AUDIO A-B SUBTITLE ZOOM ANGLE SKIP / CH RETURN TITLE CLEAR/RESET SLOW 4 DVD SYSTEM MENU VCR/TV VCR DISC/VCR MENU OK 7 3 4 STOP PLAY PAUSE TIMER SET VCR Plus+ RECORD SPEED 1 45 89...

User manual
Page 66
... a Track or File, press PLAY B or OK. You cannot make or record such Discs using this DVD/VCR. 1 ● Record MP3 Tracks at an incorrect Track or may contain pictures in a JPEG format or audio Tracks in mind when making Discs you record and finalize on the TV screen. If you select a Folder and press OK, the Tracks or Files within that you intend to choose a transition mode. Keep...
... a Track or File, press PLAY B or OK. You cannot make or record such Discs using this DVD/VCR. 1 ● Record MP3 Tracks at an incorrect Track or may contain pictures in a JPEG format or audio Tracks in mind when making Discs you record and finalize on the TV screen. If you select a Folder and press OK, the Tracks or Files within that you intend to choose a transition mode. Keep...

User manual
Page 78
... OUTPUT so the red DVD light appears on this list of problems and possible solutions before you call a customer service representative, please know the model number and serial number of the DVD/VCR.This means the DVD/VCR is in DVD mode. • Make sure the video cable is connected completely to an AC (alternating current) outlet. • Press the STANDBY-ON button to assist you. If you want to your TV owner's manual...
... OUTPUT so the red DVD light appears on this list of problems and possible solutions before you call a customer service representative, please know the model number and serial number of the DVD/VCR.This means the DVD/VCR is in DVD mode. • Make sure the video cable is connected completely to an AC (alternating current) outlet. • Press the STANDBY-ON button to assist you. If you want to your TV owner's manual...

User manual
Page 80
... signal, and Cable Box/Satellite Receiver (if applicable). Details are on the front of the DVD/VCR. • Make sure the VCR clock is missing, the DVD/VCR will eject the tape.The TIMER REC light will not perform a timer recording. • Make sure the recording start and stop times are on a tape is set timer recordings differently. The VCR will not record a TV program. • Put the DVD/VCR in standby mode for TV channels above , enter chan- Press VCR or OUTPUT...
... signal, and Cable Box/Satellite Receiver (if applicable). Details are on the front of the DVD/VCR. • Make sure the VCR clock is missing, the DVD/VCR will eject the tape.The TIMER REC light will not perform a timer recording. • Make sure the recording start and stop times are on a tape is set timer recordings differently. The VCR will not record a TV program. • Put the DVD/VCR in standby mode for TV channels above , enter chan- Press VCR or OUTPUT...

User manual
Page 81
... white audio cables, you will only get stereo sound if you will turn off.Then, press STOP/EJECT A on the front of copyright protected programs. • This DVD/VCR incorporates copyright protection technology that are receiving stereo, you press RECORD, RECORD, or TIMER SET. • Make sure the tape has a record tab. You cannot remove the tape. • Make sure the power plug is completely connected to select another may need to five times...
... white audio cables, you will only get stereo sound if you will turn off.Then, press STOP/EJECT A on the front of copyright protected programs. • This DVD/VCR incorporates copyright protection technology that are receiving stereo, you press RECORD, RECORD, or TIMER SET. • Make sure the tape has a record tab. You cannot remove the tape. • Make sure the power plug is completely connected to select another may need to five times...

User manual
Page 83
... playback 66 number buttons 24 ok button 24 on-screen status displays (vcr) . . . . .31 one-touch recording 34 open/close button 19, 22 output button 22 parental controls 60-61 password 60 pause button 25, 47, 56, 63 play button 18-19, 22, 24 player menu 70 playing discs 19 playing tapes 18 power cord 23 light 21 program 64 quick setup 69, 70, 72 random 65 rear panel 23 rec (record) button 24, 32 rec (record) light 21 record button 22, 32, 34 recording basic 32 one channel...
... playback 66 number buttons 24 ok button 24 on-screen status displays (vcr) . . . . .31 one-touch recording 34 open/close button 19, 22 output button 22 parental controls 60-61 password 60 pause button 25, 47, 56, 63 play button 18-19, 22, 24 player menu 70 playing discs 19 playing tapes 18 power cord 23 light 21 program 64 quick setup 69, 70, 72 random 65 rear panel 23 rec (record) button 24, 32 rec (record) light 21 record button 22, 32, 34 recording basic 32 one channel...
Quick start guide
Page 1
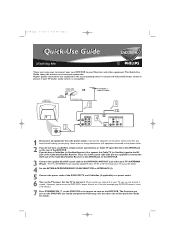
... or CABLE TV SIGNAL 5 ANTENNA IN 3 DVD/VCR VCR AUDIOOUT AUDIOIN ANT-IN L L R R ANT-OUT VIDEOOUT VIDEO IN 4 DVD S-VIDEO COMPONENT AUDIO DIGITAL OUT VIDEOOUT OUT AUDIO OUT Y PROGRESSIVE I ). 5 Connect the power cords of this Quick-Use Guide for details.) 7 Press STANDBY-ON 2 on the DVD/VCR or its remote to turn on the DVD/VCR, you do not have a Cable Box, simply connect your Antenna or Cable TV signal directly to the ANT-IN jack on the rear of the Cable Box/Satellite Receiver...
... or CABLE TV SIGNAL 5 ANTENNA IN 3 DVD/VCR VCR AUDIOOUT AUDIOIN ANT-IN L L R R ANT-OUT VIDEOOUT VIDEO IN 4 DVD S-VIDEO COMPONENT AUDIO DIGITAL OUT VIDEOOUT OUT AUDIO OUT Y PROGRESSIVE I ). 5 Connect the power cords of this Quick-Use Guide for details.) 7 Press STANDBY-ON 2 on the DVD/VCR or its remote to turn on the DVD/VCR, you do not have a Cable Box, simply connect your Antenna or Cable TV signal directly to the ANT-IN jack on the rear of the Cable Box/Satellite Receiver...


