Leaflet
Page 2
...8226; Playback Media: DVD+R/+RW, DVD-R/-RW, CDR/RW, Kodak Picture CD, Picture CD Connectivity • Rear Connections: Analog audio Left/Right out, Composite video (CVBS) output, Digital coaxial out, ComponentVideo out Progressive Accessories • Included accessories: 2 x AAA Batteries, Audio/ Video cable, Remote Control, Product Registration Card, User Manual, World Wide Warranty leaflet Dimensions • Packaging dimensions (W x H x D): 314 x 95 x 290 mm Power • Power consumption: < 10 W • Power supply: 120V, 60Hz • Standby power consumption: < 1 W Plays it all Play...
...8226; Playback Media: DVD+R/+RW, DVD-R/-RW, CDR/RW, Kodak Picture CD, Picture CD Connectivity • Rear Connections: Analog audio Left/Right out, Composite video (CVBS) output, Digital coaxial out, ComponentVideo out Progressive Accessories • Included accessories: 2 x AAA Batteries, Audio/ Video cable, Remote Control, Product Registration Card, User Manual, World Wide Warranty leaflet Dimensions • Packaging dimensions (W x H x D): 314 x 95 x 290 mm Power • Power consumption: < 10 W • Power supply: 120V, 60Hz • Standby power consumption: < 1 W Plays it all Play...
User manual
Page 6
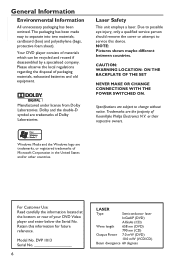
... BACKPLATE OF THE SET NEVER MAKE OR CHANGE CONNECTIONS WITH THE POWER SWITCHED ON. Windows Media and the Windows logo are subject to change without notice. Manufactured under license from Dolby Laboratories. Specifications are trademarks, or registered trademarks of Dolby Laboratories. DVP 1013 Serial No 6 LASER Type Semiconductor laser InGaAlP (DVD) AIGaAs (CD) Wave length 658 nm (DVD) 790 nm (CD) Output Power 7.0 mW (DVD) 10.0 mW (VCD...
... BACKPLATE OF THE SET NEVER MAKE OR CHANGE CONNECTIONS WITH THE POWER SWITCHED ON. Windows Media and the Windows logo are subject to change without notice. Manufactured under license from Dolby Laboratories. Specifications are trademarks, or registered trademarks of Dolby Laboratories. DVP 1013 Serial No 6 LASER Type Semiconductor laser InGaAlP (DVD) AIGaAs (CD) Wave length 658 nm (DVD) 790 nm (CD) Output Power 7.0 mW (DVD) 10.0 mW (VCD...

User manual
Page 8
... channel 18 Step 3: Setting up Progressive Scan feature 19 Step 4: TV color system 20 Step 5: Setting the language 21 On-screen display (OSD) language...21 Audio, Subtitle and Disc menu languages 21 Playback from Disc Playable discs...22 Supported formats...22 Playback Features Starting disc playback 23 Basic playback controls 23 Pausing playback...23 Selecting title/chapter/track ...23 Stopping playback ...23 Operations for video playback 24 Using the Disc Menu ...24 Zooming in ...24 Slow Motion...24 Forward / Reverse Searching ...24 Selecting various repeat functions 25 Repeat play...
... channel 18 Step 3: Setting up Progressive Scan feature 19 Step 4: TV color system 20 Step 5: Setting the language 21 On-screen display (OSD) language...21 Audio, Subtitle and Disc menu languages 21 Playback from Disc Playable discs...22 Supported formats...22 Playback Features Starting disc playback 23 Basic playback controls 23 Pausing playback...23 Selecting title/chapter/track ...23 Stopping playback ...23 Operations for video playback 24 Using the Disc Menu ...24 Zooming in ...24 Slow Motion...24 Forward / Reverse Searching ...24 Selecting various repeat functions 25 Repeat play...

User manual
Page 9
... Operation ...28 Playback selection ...28 DVD Menu Options Using the General setup menu 29 OSD Language...29 Sleep...29 Using the Audio setup menu 30~31 Downmix ...30 Digital Audio ...30-31 Using the Video setup menu 31~33 TV Type...32 Setting the TV Display ...32 Progressive ...32 Closed captions ...32 Sharpness...33 Brightness/Contrast/Color...33 Using the Preference setup menu 33~35 Subtitle / Audio / Disc Menu ...34 Parental ...34 Changing the Password...35 Restoring to the original settings...35 Others Software upgrade ...36 Specifications...37 Troubleshooting...
... Operation ...28 Playback selection ...28 DVD Menu Options Using the General setup menu 29 OSD Language...29 Sleep...29 Using the Audio setup menu 30~31 Downmix ...30 Digital Audio ...30-31 Using the Video setup menu 31~33 TV Type...32 Setting the TV Display ...32 Progressive ...32 Closed captions ...32 Sharpness...33 Brightness/Contrast/Color...33 Using the Preference setup menu 33~35 Subtitle / Audio / Disc Menu ...34 Parental ...34 Changing the Password...35 Restoring to the original settings...35 Others Software upgrade ...36 Specifications...37 Troubleshooting...
User manual
Page 11
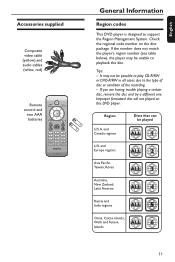
... support the Region Management System. Tips: - If you are having trouble playing a certain disc, remove the disc and try a different one. Improper formatted disc will not played on the disc package. Accessories supplied Composite video cable (yellow) and audio cables (white, red) Remote control and two AAA batteries DISC MENU DISPLAY RETURN TITLE PREV STOP PLAY/PAUSE SETUP NEXT MUTE SUBTITLE ZOOM REPEAT AUDIO REPEAT A-B General Information Region codes This DVD player is designed to the type of disc or condition of the recording. - Check the regional code number...
... support the Region Management System. Tips: - If you are having trouble playing a certain disc, remove the disc and try a different one. Improper formatted disc will not played on the disc package. Accessories supplied Composite video cable (yellow) and audio cables (white, red) Remote control and two AAA batteries DISC MENU DISPLAY RETURN TITLE PREV STOP PLAY/PAUSE SETUP NEXT MUTE SUBTITLE ZOOM REPEAT AUDIO REPEAT A-B General Information Region codes This DVD player is designed to the type of disc or condition of the recording. - Check the regional code number...

User manual
Page 12
... video connection from the power outlet. 12 IMPORTANT! - You only need to the television. The progressive scan video quality is only possible when using YPbPr and a progressive scan television is required. Connect the DVD player directly to make sure that all the devices are disconnected from the following options, depending on the television (cable supplied). Using Composite Video jacks (CVBS) A Use the composite video cable (yellow) to connect the DVD player's CVBS jack to the component video input...
... video connection from the power outlet. 12 IMPORTANT! - You only need to the television. The progressive scan video quality is only possible when using YPbPr and a progressive scan television is required. Connect the DVD player directly to make sure that all the devices are disconnected from the following options, depending on the television (cable supplied). Using Composite Video jacks (CVBS) A Use the composite video cable (yellow) to connect the DVD player's CVBS jack to the component video input...
User manual
Page 13
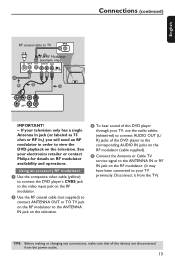
... Cable TV service signal to the ANTENNA IN jack on RF modulator availability and operations. Disconnect it from the power outlet. 13 Using an accessory RF modulator A Use the composite video cable (yellow) to connect the DVD player's CVBS jack to the video input jack on the RF modulator. (It may have been connected to view the DVD playback on the RF modulator (cable supplied). TIPS: Before making or changing any connections, make...
... Cable TV service signal to the ANTENNA IN jack on RF modulator availability and operations. Disconnect it from the power outlet. 13 Using an accessory RF modulator A Use the composite video cable (yellow) to connect the DVD player's CVBS jack to the video input jack on the RF modulator. (It may have been connected to view the DVD playback on the RF modulator (cable supplied). TIPS: Before making or changing any connections, make...

User manual
Page 17
English Remote Control Product Overview (continued) DISC MENU - To go back to the previous title/ chapter/ track STOP - Stops playback u PLAY/PAUSE - Displays information on the TV screen REPEAT - Disables or enables sound output Alphanumeric keypad - Skips to previous menu/ show title menu PREV í - Selects numbered items in a menu AUDIO - S T - Enters or exits the system setup menu NEXT ë - Skips to the left or right, do a slow forward SETUP - Starts or pauses playback SUBTITLE - Enlarge a picture on TV...
English Remote Control Product Overview (continued) DISC MENU - To go back to the previous title/ chapter/ track STOP - Stops playback u PLAY/PAUSE - Displays information on the TV screen REPEAT - Disables or enables sound output Alphanumeric keypad - Skips to previous menu/ show title menu PREV í - Selects numbered items in a menu AUDIO - S T - Enters or exits the system setup menu NEXT ë - Skips to the left or right, do a slow forward SETUP - Starts or pauses playback SUBTITLE - Enlarge a picture on TV...
User manual
Page 18
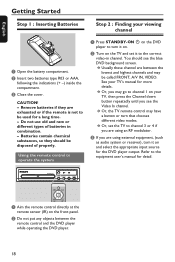
... DVD player. 18 Using the remote control to operate the system A Press STANDBY-ON 2 on and select the appropriate input source for detail. DISC MENU DISPLAY RETURN TITLE PREV SETUP NEXT A Aim the remote control directly at the remote sensor (IR) on your TV, then press the Channel down button repeatedly until you are using an RF modulator. CAUTION! - Or, you are using external equipment, (such as audio system or receiver), turn that chooses different video modes...
... DVD player. 18 Using the remote control to operate the system A Press STANDBY-ON 2 on and select the appropriate input source for detail. DISC MENU DISPLAY RETURN TITLE PREV SETUP NEXT A Aim the remote control directly at the remote sensor (IR) on your TV, then press the Channel down button repeatedly until you are using an RF modulator. CAUTION! - Or, you are using external equipment, (such as audio system or receiver), turn that chooses different video modes...
User manual
Page 19
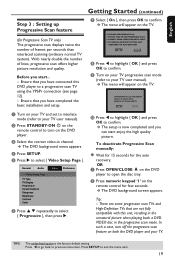
... the number of lines, progressive scan offers higher picture resolution and quality. CONNECT USING YPBPR (GBR) VIDEO CABLE. 3. General Audio Video - - The setup is the factory default setting. OR A Press OPEN/CLOSE ç on your TV user manual). The DVD background screen appears. Tip: - Press W to go back to open the disc tray. G Select { On }, then press OK to select { Progressive }, then press X. IF PICTURE IS GOOD, PRESS OK BUTTON ON REMOTE. TY Type TV Display Progressive Closed Captions Sharpness Brightness Contrast Color Preference F Press S T repeatedly...
... the number of lines, progressive scan offers higher picture resolution and quality. CONNECT USING YPBPR (GBR) VIDEO CABLE. 3. General Audio Video - - The setup is the factory default setting. OR A Press OPEN/CLOSE ç on your TV user manual). The DVD background screen appears. Tip: - Press W to go back to open the disc tray. G Select { On }, then press OK to select { Progressive }, then press X. IF PICTURE IS GOOD, PRESS OK BUTTON ON REMOTE. TY Type TV Display Progressive Closed Captions Sharpness Brightness Contrast Color Preference F Press S T repeatedly...
User manual
Page 20
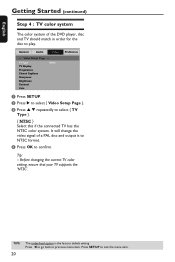
... the DVD player, disc and TV should match in order for the disc to select { TV Type }. { NTSC } Select this if the connected TV has the NTSC color system. D Press OK to previous menu item. Tip: - Press W to go back to confirm. B Press X to exit the menu item. Press SETUP to select { Video Setup Page }. General Audio Video - - TIPS: 20 The underlined option is the factory default setting. TY Type TV Display Progressive Closed...
... the DVD player, disc and TV should match in order for the disc to select { TV Type }. { NTSC } Select this if the connected TV has the NTSC color system. D Press OK to previous menu item. Tip: - Press W to go back to confirm. B Press X to exit the menu item. Press SETUP to select { Video Setup Page }. General Audio Video - - TIPS: 20 The underlined option is the factory default setting. TY Type TV Display Progressive Closed...

User manual
Page 21
... confirm. On-screen display (OSD) language Select this DVD player screen display menu. General Setup Page - - C Use S T to select a language and press OK to the illustrations shown on the remote to change the language of the disc menu. E Repeat steps C - TIPS: The underlined option is not in the list, then select { Others }, then use the numeric keypad (0-9) on the user manual. The menu language (on the disc, the disc's default language will remain as you want is the factory default setting. General Audio Video - - D for...
... confirm. On-screen display (OSD) language Select this DVD player screen display menu. General Setup Page - - C Use S T to select a language and press OK to the illustrations shown on the remote to change the language of the disc menu. E Repeat steps C - TIPS: The underlined option is not in the list, then select { Others }, then use the numeric keypad (0-9) on the user manual. The menu language (on the disc, the disc's default language will remain as you want is the factory default setting. General Audio Video - - D for...
User manual
Page 23
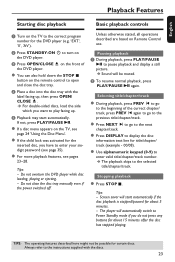
... the instructions supplied with the label facing up . For more playback features, see page 24 'Using the Disc Menu'. Unless otherwise stated, all operations described are based on the DVD player. Use alphanumeric keypad (0-9) to play facing up , then press OPEN/ CLOSE ç. D Place a disc into the disc tray with the discs. 23 English Playback Features Starting disc playback Basic playback controls A Turn on the remote control to open and close the disc tray manually even if the power switched off. C Press OPEN/CLOSE...
... the instructions supplied with the label facing up . For more playback features, see page 24 'Using the Disc Menu'. Unless otherwise stated, all operations described are based on the DVD player. Use alphanumeric keypad (0-9) to play facing up , then press OPEN/ CLOSE ç. D Place a disc into the disc tray with the discs. 23 English Playback Features Starting disc playback Basic playback controls A Turn on the remote control to open and close the disc tray manually even if the power switched off. C Press OPEN/CLOSE...

User manual
Page 30
... menu item. Example: { Stereo } The setting is selected and setup is the factory default setting. A In 'Audio Setup Page', press S T to a Dolby Pro Logic decoder. Digital Audio The options included in the menu is greyed out, that means the feature is connected to select { Downmix }, then press X. { Stereo } Select this option when output delivers sound from only the two front speakers. { LT/RT } Select this option if your DVD player. A In 'Audio Setup...
... menu item. Example: { Stereo } The setting is selected and setup is the factory default setting. A In 'Audio Setup Page', press S T to a Dolby Pro Logic decoder. Digital Audio The options included in the menu is greyed out, that means the feature is connected to select { Downmix }, then press X. { Stereo } Select this option when output delivers sound from only the two front speakers. { LT/RT } Select this option if your DVD player. A In 'Audio Setup...

User manual
Page 31
... audio format (Dolby Digital, MPEG-2). { PCM Only } Select this if the connected device is not capable of 96kHz. C Press S T to select an item, then press X to PCM (Pulse Code Modulation). { SPDIF Off } To deactivate the digital audio output. The DVD player will convert the Dolby Digital and MPEG-2 multichannel signals to access. Tip: - Using the Video setup menu A Press SETUP on the remote control. TY Type TV Display Progressive Closed Captions Sharpness Brightness Contrast Color Preference B Press W X to previous menu item. If the selection...
... audio format (Dolby Digital, MPEG-2). { PCM Only } Select this if the connected device is not capable of 96kHz. C Press S T to select an item, then press X to PCM (Pulse Code Modulation). { SPDIF Off } To deactivate the digital audio output. The DVD player will convert the Dolby Digital and MPEG-2 multichannel signals to access. Tip: - Using the Video setup menu A Press SETUP on the remote control. TY Type TV Display Progressive Closed Captions Sharpness Brightness Contrast Color Preference B Press W X to previous menu item. If the selection...

User manual
Page 35
... factory defaults. All settings will now reset to select { Reset }. E Enter the new six-digit password a second time to confirm. F Press OK to confirm. Press W to go back to the factory defaults, except your Parental. The same default password is the factory default setting. D Enter the new six-digit password. English DVD Menu Options (continued) Changing the Password You need to enter your old six-digit password, enter the default password '136900'. General Audio Video Preference Restoring to the original settings Setting the { Default } function...
... factory defaults. All settings will now reset to select { Reset }. E Enter the new six-digit password a second time to confirm. F Press OK to confirm. Press W to go back to the factory defaults, except your Parental. The same default password is the factory default setting. D Enter the new six-digit password. English DVD Menu Options (continued) Changing the Password You need to enter your old six-digit password, enter the default password '136900'. General Audio Video Preference Restoring to the original settings Setting the { Default } function...
User manual
Page 38
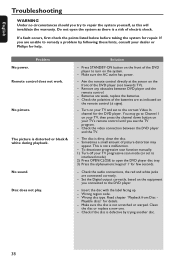
... button on your TV progressive scan mode (or set to the correct Video In channel for help. Set the Digital output correctly, based on the equipment you see the TV program. - Read chapter "Playback from Disc - Make sure the disc is not a malfunction. - English Troubleshooting WARNING Under no circumstances should you try to repair the system yourself, as indicated on the remote control (± signs). - If a fault occurs, first check the points listed...
... button on your TV progressive scan mode (or set to the correct Video In channel for help. Set the Digital output correctly, based on the equipment you see the TV program. - Read chapter "Playback from Disc - Make sure the disc is not a malfunction. - English Troubleshooting WARNING Under no circumstances should you try to repair the system yourself, as indicated on the remote control (± signs). - If a fault occurs, first check the points listed...
User manual
Page 39
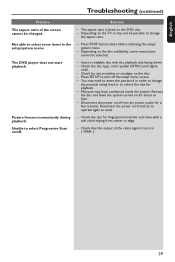
... region code. - Disconnect the power cord from center to unlock the disc for fingerprint/scratches and clean with the playback side facing down. - Depending on the disc. - Insert a readable disc with a playback. Picture freezes momentarily during - Check that the output of the screen cannot be selected. Press STOP button twice before selecting the setup/ system menu. - English Troubleshooting (continued) Problem Solution The aspect ratio of the video signal is fixed on /off the setup menu screen. - The DVD player does not start playback. - Remove...
... region code. - Disconnect the power cord from center to unlock the disc for fingerprint/scratches and clean with the playback side facing down. - Depending on the disc. - Insert a readable disc with a playback. Picture freezes momentarily during - Check that the output of the screen cannot be selected. Press STOP button twice before selecting the setup/ system menu. - English Troubleshooting (continued) Problem Solution The aspect ratio of the video signal is fixed on /off the setup menu screen. - The DVD player does not start playback. - Remove...

User manual
Page 40
... user-set level. AUDIO OUT Jacks: Jacks on the back of the DVD System that supports PBC, you to a TV. Component Video Out Jacks: Jacks on DVD, music, etc., in video software, or the entire album in each country. MP3: A file format with no data compression used to a TV that have compatible region codes. The limitation varies from DVD into numbers. Progressive Scan: It displays all the horizontal lines of a picture...
... user-set level. AUDIO OUT Jacks: Jacks on the back of the DVD System that supports PBC, you to a TV. Component Video Out Jacks: Jacks on DVD, music, etc., in video software, or the entire album in each country. MP3: A file format with no data compression used to a TV that have compatible region codes. The limitation varies from DVD into numbers. Progressive Scan: It displays all the horizontal lines of a picture...
Quick start guide
Page 2
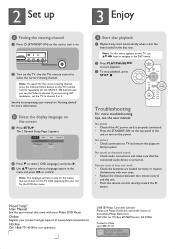
...; Point the remote control directly toward the IR sensor. Use the TVs remote control to select { OSD Language } and press . If you see the user manual. The { General Setup Page } appears. Remote control does not work • Check the batteries are using a RF modulator, set here is only for the menus that the connected audio device is properly connected. • Press the STANDBY-ON on the top panel of Koninklijke Philips Electronics P&F USA...
...; Point the remote control directly toward the IR sensor. Use the TVs remote control to select { OSD Language } and press . If you see the user manual. The { General Setup Page } appears. Remote control does not work • Check the batteries are using a RF modulator, set here is only for the menus that the connected audio device is properly connected. • Press the STANDBY-ON on the top panel of Koninklijke Philips Electronics P&F USA...


