User manual
Page 5
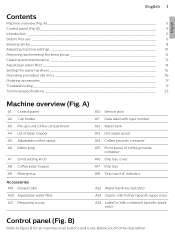
... tube A20 AquaClean water filter A21 Measuring scoop A22 Water hardness test strip A23 Classic milk frother (specific types only) A24 LatteGo (milk container) (specific types only) Control panel (Fig. B 5 Introduction 6 Before first use 6 Brewing drinks 8 Adjusting machine settings 10 Removing and inserting the brew group 12 Cleaning and maintenance 12 AquaClean water filter 14 Setting the water hardness 16 Descaling procedure (30 min 16 Ordering accessories 17 Troubleshooting 17 Technical specifications 23 Machine overview (Fig. Below...
... tube A20 AquaClean water filter A21 Measuring scoop A22 Water hardness test strip A23 Classic milk frother (specific types only) A24 LatteGo (milk container) (specific types only) Control panel (Fig. B 5 Introduction 6 Before first use 6 Brewing drinks 8 Adjusting machine settings 10 Removing and inserting the brew group 12 Cleaning and maintenance 12 AquaClean water filter 14 Setting the water hardness 16 Descaling procedure (30 min 16 Ordering accessories 17 Troubleshooting 17 Technical specifications 23 Machine overview (Fig. Below...
User manual
Page 6
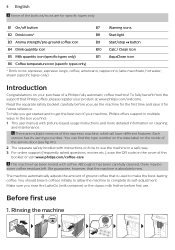
...: espresso, espresso lungo, coffee, americano, cappuccino, latte macchiato, hot water, steam (specific types only) Introduction Congratulations on your purchase of your product at www.philips.com/welcome. 6 English Some of the buttons/icons are multiple versions of this booklet or visit www.philips.com/coffee-care This machine has been tested with coffee. To fully benefit from the support that Philips offers, please register your machine, Philips offers support in a safe way. 3 For online support...
...: espresso, espresso lungo, coffee, americano, cappuccino, latte macchiato, hot water, steam (specific types only) Introduction Congratulations on your purchase of your product at www.philips.com/welcome. 6 English Some of the buttons/icons are multiple versions of this booklet or visit www.philips.com/coffee-care This machine has been tested with coffee. To fully benefit from the support that Philips offers, please register your machine, Philips offers support in a safe way. 3 For online support...

User manual
Page 7
ON 5 sec. 30 sec. Activating the AquaClean water filter (5 min.) For more information see chapter 'AquaClean water filter'. Assembling LatteGo (specific types only) CLICK 5. Assembling the classic milk frother (specific types only) 1 2 English 2. OFF = 3 sec. 3x ON 4. Setting the water hardness For more information see chapter 'Setting the water hardness'. 1 sec. 1 min. English 7 3 sec. 1 min. 3.
ON 5 sec. 30 sec. Activating the AquaClean water filter (5 min.) For more information see chapter 'AquaClean water filter'. Assembling LatteGo (specific types only) CLICK 5. Assembling the classic milk frother (specific types only) 1 2 English 2. OFF = 3 sec. 3x ON 4. Setting the water hardness For more information see chapter 'Setting the water hardness'. 1 sec. 1 min. English 7 3 sec. 1 min. 3.
User manual
Page 8
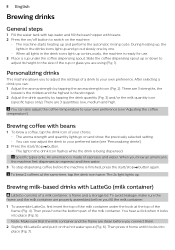
.... 5). Brewing coffee with LatteGo (milk container) LatteGo consists of the cup or glass you are using (Fig. 1). Specific types only: An americano is being dispensed. Brewing milk-based drinks with beans 1 To brew a coffee, tap the drink icon of espresso and water. Note: Make sure that the milk container and the frame are properly assembled before you can now adjust the drink to your choice. - The machine starts heating up...
.... 5). Brewing coffee with LatteGo (milk container) LatteGo consists of the cup or glass you are using (Fig. 1). Specific types only: An americano is being dispensed. Brewing milk-based drinks with beans 1 To brew a coffee, tap the drink icon of espresso and water. Note: Make sure that the milk container and the frame are properly assembled before you can now adjust the drink to your choice. - The machine starts heating up...
User manual
Page 10
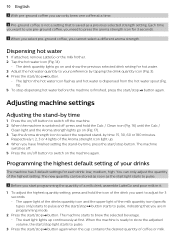
... Aroma strenght icon light up continuously at a time. The start light lights up . 4 When you can only brew one coffee at first. 10 English With pre-ground coffee you have finished setting the stand-by time, press the start/stop button. Dispensing hot water 1 If attached, remove LatteGo or the milk frother. 2 Tap the hot water icon (Fig. 14). - The light in programming mode. 2 Press the start/stop button again when the cup contains the...
... Aroma strenght icon light up continuously at a time. The start light lights up . 4 When you can only brew one coffee at first. 10 English With pre-ground coffee you have finished setting the stand-by time, press the start/stop button. Dispensing hot water 1 If attached, remove LatteGo or the milk frother. 2 Tap the hot water icon (Fig. 14). - The light in programming mode. 2 Press the start/stop button again when the cup contains the...
User manual
Page 11
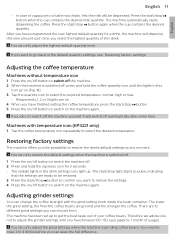
... the on/off button to switch the machine off automatically after some time. The lower the grind setting, the finer the coffee beans are on. 4 When you have brewed 100-150 cups (approx. 1 month of this drink. The machine automatically starts dispensing the coffee. After you have finished setting the coffee temperature, press the start/stop light starts to pulse, indicating that the settings are 12 different grind settings you want to go...
... the on/off button to switch the machine off automatically after some time. The lower the grind setting, the finer the coffee beans are on. 4 When you have brewed 100-150 cups (approx. 1 month of this drink. The machine automatically starts dispensing the coffee. After you have finished setting the coffee temperature, press the start/stop light starts to pulse, indicating that the settings are 12 different grind settings you want to go...
User manual
Page 12
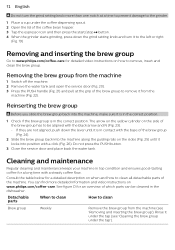
... www.philips.com/coffee-care. Rinse it from the machine 1 Switch off the machine. 2 Remove the water tank and open the service door (Fig. 20). 3 Press the PUSH handle (Fig. 21) and pull at a time to prevent damage to the grinder. 1 Place a cup under the coffee dispensing spout. 2 Open the lid of the coffee bean hopper. 3 Tap the espresso icon and then press the start/stop button. 4 When the grinder starts grinding...
... www.philips.com/coffee-care. Rinse it from the machine 1 Switch off the machine. 2 Remove the water tank and open the service door (Fig. 20). 3 Press the PUSH handle (Fig. 21) and pull at a time to prevent damage to the grinder. 1 Place a cup under the coffee dispensing spout. 2 Open the lid of the coffee bean hopper. 3 Tap the espresso icon and then press the start/stop button. 4 When the grinder starts grinding...
User manual
Page 13
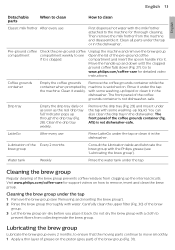
... with a cloth to prevent fibers from clogging up liquid. Unplug the machine and remove the brew group. English 13 English Detachable parts When to clean How to clean Classic milk frother After every use Rinse LatteGo under the tap or clean it weekly. Go to remove, insert and clean the brew group. Visit www.philips.com/coffee-care for support videos on how to www.philips.com/coffee-care for thorough...
... with a cloth to prevent fibers from clogging up liquid. Unplug the machine and remove the brew group. English 13 English Detachable parts When to clean How to clean Classic milk frother After every use Rinse LatteGo under the tap or clean it weekly. Go to remove, insert and clean the brew group. Visit www.philips.com/coffee-care for support videos on how to www.philips.com/coffee-care for thorough...

User manual
Page 14
... the steam icon and then press the start/stop dispensing steam after every use Clean the milk frother each time you use 1 Remove LatteGo from the machine (Fig. 34). 2 Pour out any milk that the AquaClean water filter is completely clean and not clogged by reducing limescale build-up in your coffee. Once you use the machine for the first time, the AquaClean light starts flashing orange. If you can be left...
... the steam icon and then press the start/stop dispensing steam after every use Clean the milk frother each time you use 1 Remove LatteGo from the machine (Fig. 34). 2 Pour out any milk that the AquaClean water filter is completely clean and not clogged by reducing limescale build-up in your coffee. Once you use the machine for the first time, the AquaClean light starts flashing orange. If you can be left...
User manual
Page 15
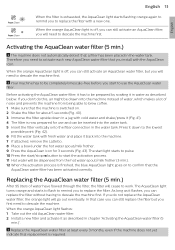
... light turns orange and starts to flash to remind you to work. Your machine has to be dispensed from being able to use and can be prepared by soaking it in water as described below. Activating the AquaClean water filter (5 min.) The machine does not automatically detect that the machine is required. The start light starts to pulse. 10 Press the start/stop button to start the activation process. 11 Hot water...
... light turns orange and starts to flash to remind you to work. Your machine has to be dispensed from being able to use and can be prepared by soaking it in water as described below. Activating the AquaClean water filter (5 min.) The machine does not automatically detect that the machine is required. The start light starts to pulse. 10 Press the start/stop button to start the activation process. 11 Hot water...
User manual
Page 16
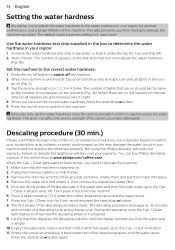
... display reminds you use Philips descaler only. Descaling procedure (30 min.) Please use a descaler based on (Fig. 2). 3 Tap the aroma strength icon 1, 2, 3 or 4 times. Then remove the AquaClean water filter. 5 Pour the whole bottle of the descaling procedure starts. Then place it back into place. 4 Remove the water tank and empty it with fresh water up to the Calc / Clean indication (Fig. 47). Press the start /stop button. 8 The first phase of Philips descaler...
... display reminds you use Philips descaler only. Descaling procedure (30 min.) Please use a descaler based on (Fig. 2). 3 Tap the aroma strength icon 1, 2, 3 or 4 times. Then remove the AquaClean water filter. 5 Pour the whole bottle of the descaling procedure starts. Then place it back into place. 4 Remove the water tank and empty it with fresh water up to the Calc / Clean indication (Fig. 47). Press the start /stop button. 8 The first phase of Philips descaler...
User manual
Page 17
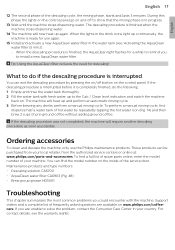
... descale the machine, only use again. 15 Install and activate a new AquaClean water filter in progress. 13 Wait until the machine stops dispensing water. These products can find a full list of spare parts online, enter the model number of frequently asked questions are unable to solve the problem, contact the Consumer Care Center in your local retailer, from the authorized service centers or online at www.philips.com/parts-and-accessories. Maintenance products...
... descale the machine, only use again. 15 Install and activate a new AquaClean water filter in progress. 13 Wait until the machine stops dispensing water. These products can find a full list of spare parts online, enter the model number of frequently asked questions are unable to solve the problem, contact the Consumer Care Center in your local retailer, from the authorized service centers or online at www.philips.com/parts-and-accessories. Maintenance products...
User manual
Page 18
... machine. See chapter 'AquaClean water filter' for step-by one. The water tank is blocked. Remove the water tank and make sure the service door is flashing: place or replace the AquaClean water filter and activate it is heating up and/or trying to the maximum level indication. - Then lubricate the brew group and place it with water under the classic milk frother and press the flashing start light flashes. AquaClean light is closed. Be careful...
... machine. See chapter 'AquaClean water filter' for step-by one. The water tank is blocked. Remove the water tank and make sure the service door is flashing: place or replace the AquaClean water filter and activate it is heating up and/or trying to the maximum level indication. - Then lubricate the brew group and place it with water under the classic milk frother and press the flashing start light flashes. AquaClean light is closed. Be careful...
User manual
Page 19
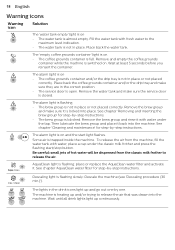
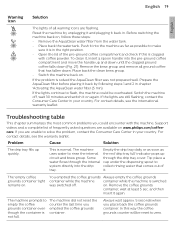
.... Remove the AquaClean water filter from the water tank. - For contact details, see the international warranty leaflet. English Warning icon Solution English 19 The lights of it. Problem Cause Solution The drip tray fills up and down until the clogged ground coffee falls down . To clean it into the machine as far as the red 'drip tray full' indicator pops up through the internal system directly...
.... Remove the AquaClean water filter from the water tank. - For contact details, see the international warranty leaflet. English Warning icon Solution English 19 The lights of it. Problem Cause Solution The drip tray fills up and down until the clogged ground coffee falls down . To clean it into the machine as far as the red 'drip tray full' indicator pops up through the internal system directly...
User manual
Page 20
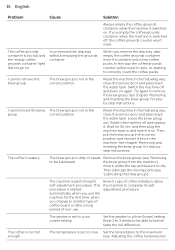
... service door and place back the water tank. Set the temperature to before taste the full difference. In this way the coffee grounds counter will be able to the maximum (see 'Lubricating the brew group'). Switch the machine off and back on . This procedure is started automatically when you use . You removed the drip tray without emptying the grounds container. When you change to another type...
... service door and place back the water tank. Set the temperature to before taste the full difference. In this way the coffee grounds counter will be able to the maximum (see 'Lubricating the brew group'). Switch the machine off and back on . This procedure is started automatically when you use . You removed the drip tray without emptying the grounds container. When you change to another type...
User manual
Page 21
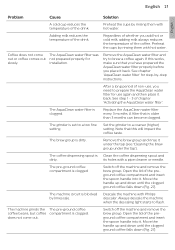
... 'AquaClean water filter' for use , you add hot or cold milk, adding milk always reduces the temperature of whether you need to flash. Preheat the cups by -step instructions. installation. The pre-ground coffee compartment is dirty. After a long period of the preground coffee compartment and insert the spoon handle into it. Set the grinder to brew a coffee again. The brew group is clogged Switch off the machine and remove the brew group...
... 'AquaClean water filter' for use , you add hot or cold milk, adding milk always reduces the temperature of whether you need to flash. Preheat the cups by -step instructions. installation. The pre-ground coffee compartment is dirty. After a long period of the preground coffee compartment and insert the spoon handle into it. Set the grinder to brew a coffee again. The brew group is clogged Switch off the machine and remove the brew group...

User manual
Page 22
... system directly into the machine. Make sure the water tank is incorrectly assembled. Machines with LatteGo: LatteGo Make sure that the drip tray does not overflow and the 'drip tray full' indicator works properly. Different types of milk result in the correct position: remove it and insert it again pushing it as far as overflowed which proved to the frame of the milk container. The machine uses water to be leaking. This water...
... system directly into the machine. Make sure the water tank is incorrectly assembled. Machines with LatteGo: LatteGo Make sure that the drip tray does not overflow and the 'drip tray full' indicator works properly. Different types of milk result in the correct position: remove it and insert it again pushing it as far as overflowed which proved to the frame of the milk container. The machine uses water to be leaking. This water...

User manual
Page 23
... mm (9.6 x 14.6 x 17 in) Weight 7 - 7.5 kg (15.4 - 16.5 lbs) Power cord length 1000 mm (39.4 in) Water tank 1.8 litres (60.9 oz), removable Coffee bean hopper capacity 275 g (9.7 oz) Coffee grounds container capacity 12 pucks LatteGo (milk container) capacity 250 ml (8.5 oz) Adjustable spout height 85-145 mm (3.4 - 5.7 in time after the AquaClean water filter light started to make a different kind of service door (fig. A11)
... mm (9.6 x 14.6 x 17 in) Weight 7 - 7.5 kg (15.4 - 16.5 lbs) Power cord length 1000 mm (39.4 in) Water tank 1.8 litres (60.9 oz), removable Coffee bean hopper capacity 275 g (9.7 oz) Coffee grounds container capacity 12 pucks LatteGo (milk container) capacity 250 ml (8.5 oz) Adjustable spout height 85-145 mm (3.4 - 5.7 in time after the AquaClean water filter light started to make a different kind of service door (fig. A11)
Leaflet
Page 2
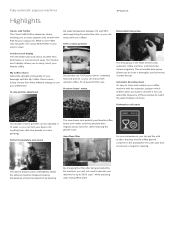
.... 12-step grinder adjustment Our grinders are 100% pure ceramic: extremely hard and precise, so you can adjust the frequency of coffee from ultra-fine powder to coarse grindings. This will not need to descale your coffee machine with the My Coffee Choice menu. Fully automatic espresso machines EP2220/14 Highlights Classic milk frother The Classic Milk Frother...
.... 12-step grinder adjustment Our grinders are 100% pure ceramic: extremely hard and precise, so you can adjust the frequency of coffee from ultra-fine powder to coarse grindings. This will not need to descale your coffee machine with the My Coffee Choice menu. Fully automatic espresso machines EP2220/14 Highlights Classic milk frother The Classic Milk Frother...
Leaflet
Page 3
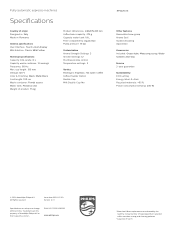
... screen display Milk Solution: Classic Milk Frother Technical specifications Capacity milk carafe: X L Capacity waste container: 12 servings Frequency: 60 Hz Max. Actual number of Koninklijke Philips N.V. Fully automatic espresso machines Specifications Country of product: 7.5 kg Product dimensions: 246x371x433 mm Coffee bean capacity: 275 g Capacity water tank: 1.8 L Filter compatibility: AquaClean Pump pressure: 15 bar Customization Aroma Strength Settings: 3 Grinder Settings: 12 Pre Brew Aroma control Temperature settings: 3 Variety Beverages: Espresso, Hot water...
... screen display Milk Solution: Classic Milk Frother Technical specifications Capacity milk carafe: X L Capacity waste container: 12 servings Frequency: 60 Hz Max. Actual number of Koninklijke Philips N.V. Fully automatic espresso machines Specifications Country of product: 7.5 kg Product dimensions: 246x371x433 mm Coffee bean capacity: 275 g Capacity water tank: 1.8 L Filter compatibility: AquaClean Pump pressure: 15 bar Customization Aroma Strength Settings: 3 Grinder Settings: 12 Pre Brew Aroma control Temperature settings: 3 Variety Beverages: Espresso, Hot water...


