
Owners Manual
Page 2
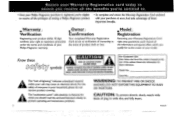
... NOT OPEN CAUTION: TO REDUCE THE RISK OF ELECTRIC SHOCK, DO NOT REMOVE COVER (OR BACK). For Customer Use Enter below the Serial No. Know these important benefits. • Warranty Verification Registering your product within your unit may cause an electrical shock. which you should read the enclosed literature closely to prevent operating and maintenance problems. WARNING...
... NOT OPEN CAUTION: TO REDUCE THE RISK OF ELECTRIC SHOCK, DO NOT REMOVE COVER (OR BACK). For Customer Use Enter below the Serial No. Know these important benefits. • Warranty Verification Registering your product within your unit may cause an electrical shock. which you should read the enclosed literature closely to prevent operating and maintenance problems. WARNING...
Owners Manual
Page 6
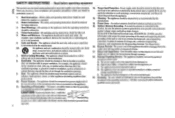
... in performance; particular attention to rain; Read Instructions - All operating and use this (polarized) plug with respect to a power supply only of this plug to the wide slot and fully insert. ,, Do not use instructions should be read before operating equipment This product was designed and manufactured to the receiver, be fully inserted to qualified service personnel. 11. where they are There are...
... in performance; particular attention to rain; Read Instructions - All operating and use this (polarized) plug with respect to a power supply only of this plug to the wide slot and fully insert. ,, Do not use instructions should be read before operating equipment This product was designed and manufactured to the receiver, be fully inserted to qualified service personnel. 11. where they are There are...
Owners Manual
Page 7
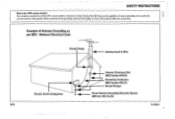
... and, in Wire Electric Service Equipment -4- I .44- 71 Antenna Discharge Unit (NEC Section 810-20) Grounding Conductors (NEC Section 810-21) Ground Clamps Power Service Grounding Electrode System (NEC Art. 250, Part H) 92/11 EL 4562-1 7 Example of cable entry as per NEC - National Electrical Code Ground Clamp Antenna Lead-in particular, specifies that the cable ground shall be connected to the...
... and, in Wire Electric Service Equipment -4- I .44- 71 Antenna Discharge Unit (NEC Section 810-20) Grounding Conductors (NEC Section 810-21) Ground Clamps Power Service Grounding Electrode System (NEC Art. 250, Part H) 92/11 EL 4562-1 7 Example of cable entry as per NEC - National Electrical Code Ground Clamp Antenna Lead-in particular, specifies that the cable ground shall be connected to the...
Owners Manual
Page 8
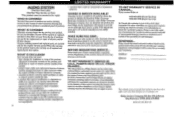
... check your product. Centers may not apply to you.). Please record the model and serial numbers found on the product below.Also, please fill out and mail your warranty registration card promptly.It will attempt to return your owner's manual before requesting service.Adjustments of the controls discussed there may be repaired or replaced, and labor is free.After one year thereafter, all parts will...
... check your product. Centers may not apply to you.). Please record the model and serial numbers found on the product below.Also, please fill out and mail your warranty registration card promptly.It will attempt to return your owner's manual before requesting service.Adjustments of the controls discussed there may be repaired or replaced, and labor is free.After one year thereafter, all parts will...
Owners Manual
Page 9
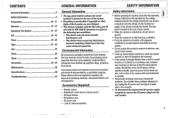
... the system from the power supply completely, remove the AC power plug from a cold to the following two conditions: - AM loop antenna - Should this will not operate normally. If not, please consult your system is possible. • Electrostatic discharge may condense on the lens of the CD unit inside the system. CONTENTS General Information Safety Information Preparation Controls Operating The System CD Tuner Tape Aux Clock Timer Recording Maintenance Specifications Troubleshooting GENERAL...
... the system from the power supply completely, remove the AC power plug from a cold to the following two conditions: - AM loop antenna - Should this will not operate normally. If not, please consult your system is possible. • Electrostatic discharge may condense on the lens of the CD unit inside the system. CONTENTS General Information Safety Information Preparation Controls Operating The System CD Tuner Tape Aux Clock Timer Recording Maintenance Specifications Troubleshooting GENERAL...
Owners Manual
Page 11
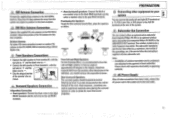
... optional wireless active subwoofer (recommended Philips FB 202W) to -. • Clip the stripped portion 14, of a TV, VCR, Laser Disc or DVD player to the wall outlet. 11 Note: - C) AC Power Supply After all other equipment to your I system You can connect the audio left speaker to Front terminal L, with the red wire to + and the black wire to the SUBWOOFER OUT terminal. FRONT LEFT MINI HIFI SYSTEM FRONT RIGHT SURROUND...
... optional wireless active subwoofer (recommended Philips FB 202W) to -. • Clip the stripped portion 14, of a TV, VCR, Laser Disc or DVD player to the wall outlet. 11 Note: - C) AC Power Supply After all other equipment to your I system You can connect the audio left speaker to Front terminal L, with the red wire to + and the black wire to the SUBWOOFER OUT terminal. FRONT LEFT MINI HIFI SYSTEM FRONT RIGHT SURROUND...
Owners Manual
Page 13
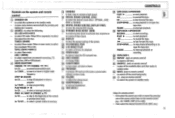
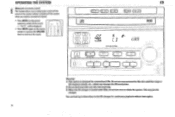
... available discs and their tracks in for TUNER to select a preset station in memory. is TAPE DECK 1 OPERATION to switch on bass boost to enhance bass response or RECORD to start recording. - for TUNER to tune to a lower or higher radio PROGRAM to store radio stations automatically by pressing and DIGITAL SOUND CONTROL DISPLAY PANEL tape door. AUX/ (VIDEO) - for TUNER to stop programming. STOP ■ (CLEAR) stations in tuner mode; Notes for 2 seconds. CONTROLS Controls on the system and remote DUBBING g TAPE DECK 2 OPERATION control...
... available discs and their tracks in for TUNER to select a preset station in memory. is TAPE DECK 1 OPERATION to switch on bass boost to enhance bass response or RECORD to start recording. - for TUNER to tune to a lower or higher radio PROGRAM to store radio stations automatically by pressing and DIGITAL SOUND CONTROL DISPLAY PANEL tape door. AUX/ (VIDEO) - for TUNER to stop programming. STOP ■ (CLEAR) stations in tuner mode; Notes for 2 seconds. CONTROLS Controls on the system and remote DUBBING g TAPE DECK 2 OPERATION control...
Owners Manual
Page 14
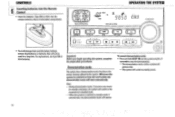
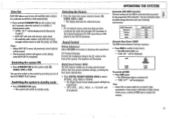
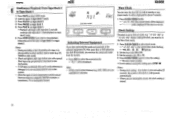
OPERATING THE SYSTEM DIGITAL SOUND CONTROL DEB 41- Whenever the systemisswitchedon from possible battery leakage, remove dead batteries or batteries that shows the various features offered by the system. The demonstration mode will switch to the respective (or standby)mode. - CONTROLS Inserting batteries into the Remote I Control • Insert the batteries (Type 1103 or MA) into the remote control as shown in the battery compartment. the demonstrationmode willresume. Important Before you begin operating the...
OPERATING THE SYSTEM DIGITAL SOUND CONTROL DEB 41- Whenever the systemisswitchedon from possible battery leakage, remove dead batteries or batteries that shows the various features offered by the system. The demonstration mode will switch to the respective (or standby)mode. - CONTROLS Inserting batteries into the Remote I Control • Insert the batteries (Type 1103 or MA) into the remote control as shown in the battery compartment. the demonstrationmode willresume. Important Before you begin operating the...
Owners Manual
Page 15
... be displayed. "BBB OFT" will be displayed. Note: - OPERATING THE SYSTEM Easy Set EASY SET allows you to enjoy special sound effects that have preset equalizer settings, providing the best music reproduction. • Press DIGITAL SOUND CONTROL (DSC) to select OPTIMAL JAll, ROCK or TECHNO. -• The Digital Sound Control display panel will light up . - Selecting the Source • Press the respective source selection button: CD, TUNER, TAPE or AUX. - Sound Control Volume Adjustment Adjust VOLUME to standby mode. For Personal Listening Connect the headphones plug to...
... be displayed. "BBB OFT" will be displayed. Note: - OPERATING THE SYSTEM Easy Set EASY SET allows you to enjoy special sound effects that have preset equalizer settings, providing the best music reproduction. • Press DIGITAL SOUND CONTROL (DSC) to select OPTIMAL JAll, ROCK or TECHNO. -• The Digital Sound Control display panel will light up . - Selecting the Source • Press the respective source selection button: CD, TUNER, TAPE or AUX. - Sound Control Volume Adjustment Adjust VOLUME to standby mode. For Personal Listening Connect the headphones plug to...
Owners Manual
Page 16
... MUTE on the sound. "MUTE" will be displayed. • Press MUTE again on the remote control or increase the VOLUME level to switch on the remote control to three discs in the CD changer for conventional CDs. ".'"..S:' I 0 CD 1 0 CO2 1 0 CO3 11 J q.,- -.RN -,[e.E CD P.IC•IiiODI.R J is loaded with CD(s), do not turn over orshake the system. Do not use any accessories like disc stabilizer rings or CD treatment sheets...
... MUTE on the sound. "MUTE" will be displayed. • Press MUTE again on the remote control or increase the VOLUME level to switch on the remote control to three discs in the CD changer for conventional CDs. ".'"..S:' I 0 CD 1 0 CO2 1 0 CO3 11 J q.,- -.RN -,[e.E CD P.IC•IiiODI.R J is loaded with CD(s), do not turn over orshake the system. Do not use any accessories like disc stabilizer rings or CD treatment sheets...
Owners Manual
Page 17
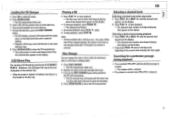
... the desired track appears on the display. • If you press DISC CHANGE again during playback • Press and hold 44 or N until the empty tray is at the right hand side and is ready for changing. 3 Press OPEN•CLOSE to start playback. - The CD changer carousel will switch to select CD mode. 2 Press OPEN•CLOSE. The volume will play the track again.
... the desired track appears on the display. • If you press DISC CHANGE again during playback • Press and hold 44 or N until the empty tray is at the right hand side and is ready for changing. 3 Press OPEN•CLOSE to start playback. - The CD changer carousel will switch to select CD mode. 2 Press OPEN•CLOSE. The volume will play the track again.
Owners Manual
Page 18
... track, the display will play all the discs and tracks 1 Press SHUFFLE. - The REPEAT and PROGRAM flags will be displayed. 2 Press SHUFFLE again to start program playback. TEPERT MPG:" will be displayed. - "appears in the disc trays. 2 Press PROGRAM to resume normal playback. - The REPEAT flag appears on remote control) It will be played repeatedly. - The PROGRAM flag starts flashing. 3 Press the CD 1•CEI 2•CD 3 button to select...
... track, the display will play all the discs and tracks 1 Press SHUFFLE. - The REPEAT and PROGRAM flags will be displayed. 2 Press SHUFFLE again to start program playback. TEPERT MPG:" will be displayed. - "appears in the disc trays. 2 Press PROGRAM to resume normal playback. - The REPEAT flag appears on remote control) It will be played repeatedly. - The PROGRAM flag starts flashing. 3 Press the CD 1•CEI 2•CD 3 button to select...
Owners Manual
Page 19
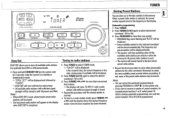
... 10 before proceeding. All available radio stations with the last active band. - WhenEASYSETis used , - TUNER Storing Preset Stations You can cancel the automatic programming by °TUNER'. - PROGRAM flag starts flashing and IlUTO' will be displayed. - If not, some of presetnumbers, for examplepresetnumbers 1 to 40 willbeprogrammed. 19 Notes: - INT77:77, VD.76 CiTel COWEOL 0TANO0lNlY (n CD 1 SITIO D69 Ts, MCCAW =I I= MINI HIFI SYSTEM 0 TUNER WAD 0 WT'rArM D II...
... 10 before proceeding. All available radio stations with the last active band. - WhenEASYSETis used , - TUNER Storing Preset Stations You can cancel the automatic programming by °TUNER'. - PROGRAM flag starts flashing and IlUTO' will be displayed. - If not, some of presetnumbers, for examplepresetnumbers 1 to 40 willbeprogrammed. 19 Notes: - INT77:77, VD.76 CiTel COWEOL 0TANO0lNlY (n CD 1 SITIO D69 Ts, MCCAW =I I= MINI HIFI SYSTEM 0 TUNER WAD 0 WT'rArM D II...
Owners Manual
Page 20
... select the desired waveband FM or AM. 3 Press PROGRAM for less than one second. - Notes: - Duringprogramming, ifno buttonispressed within20 seconds, the system willexitprogrammode automatically. The preset number, frequency and waveband appear on the system only. - Tuning to Preset Radio Stations • Press PRESET V or A to change an existingpresetnumber;repeatsteps 4 and5. - TUNER Manual programming 1 Press TUNER. 2 Press TUNER (BAND) to store anotherradio station, the display willshow ° PROGRRN FULL ".
... select the desired waveband FM or AM. 3 Press PROGRAM for less than one second. - Notes: - Duringprogramming, ifno buttonispressed within20 seconds, the system willexitprogrammode automatically. The preset number, frequency and waveband appear on the system only. - Tuning to Preset Radio Stations • Press PRESET V or A to change an existingpresetnumber;repeatsteps 4 and5. - TUNER Manual programming 1 Press TUNER. 2 Press TUNER (BAND) to store anotherradio station, the display willshow ° PROGRRN FULL ".
Owners Manual
Page 22
... the enhanced sound from the system. • Press AUX to select the external mode. - °arc° will be displayed. " 1025 PM" (the current time) will be displayed if the clock is erased. 22 Clock Setting The clock is set) at standby or any source mode. " /2:00 AM" or the current time starts flashing. - Playback will begin with tape deck 1 when playback on tape deck 2 ends. 6 Press STOP•OPEN if...
... the enhanced sound from the system. • Press AUX to select the external mode. - °arc° will be displayed. " 1025 PM" (the current time) will be displayed if the clock is erased. 22 Clock Setting The clock is set) at standby or any source mode. " /2:00 AM" or the current time starts flashing. - Playback will begin with tape deck 1 when playback on tape deck 2 ends. 6 Press STOP•OPEN if...
Owners Manual
Page 23
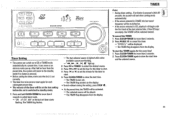
... TUNER mode automatically at the last setting before the set is lighted while other available sources are empty, the TUNER willbe selectedinstead. During timersetting, ifno button ispressed within 90 seconds, the system will be played. - The last selected source is switched to standby mode. 1 Press and hold CLOCK•TIMER for each subsequent preset time. • The volume of the last selected disc. The TIMER flag disappears from the display. TIMER Notes: - I ri I I. MINI HIFI SYSTEM...
... TUNER mode automatically at the last setting before the set is lighted while other available sources are empty, the TUNER willbe selectedinstead. During timersetting, ifno button ispressed within 90 seconds, the system will be played. - The last selected source is switched to standby mode. 1 Press and hold CLOCK•TIMER for each subsequent preset time. • The volume of the last selected disc. The TIMER flag disappears from the display. TIMER Notes: - I ri I I. MINI HIFI SYSTEM...
Owners Manual
Page 24
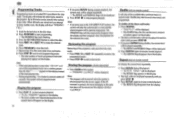
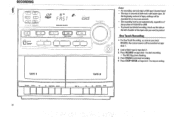
...PLAY • TAPE 2 STOP-OPEN PAUSE 24 For recording, use only tape of VOLUME or DBB. TAPE 1 • I Notes: - The REC flag starts flashing. 3 Press PAUSE to interrupt recording. 4 Press STOP•OPEN on tape deck 1 to start recording. - At the beginning and end of the tape...as soon as you press RECORD, the current source will be recorded on tape deck 1. 1 Load a blank tape in tape deck 1. 2 Press RECORD on tape deck 1 to seven seconds. - The tape is set automatically, regardless of the position of fEC type I MINI HIFI SYSTEM U 0 TAPE USTI•TADE 0 0 ADS :CA ...
...PLAY • TAPE 2 STOP-OPEN PAUSE 24 For recording, use only tape of VOLUME or DBB. TAPE 1 • I Notes: - The REC flag starts flashing. 3 Press PAUSE to interrupt recording. 4 Press STOP•OPEN on tape deck 1 to start recording. - At the beginning and end of the tape...as soon as you press RECORD, the current source will be recorded on tape deck 1. 1 Load a blank tape in tape deck 1. 2 Press RECORD on tape deck 1 to seven seconds. - The tape is set automatically, regardless of the position of fEC type I MINI HIFI SYSTEM U 0 TAPE USTI•TADE 0 0 ADS :CA ...
Owners Manual
Page 25
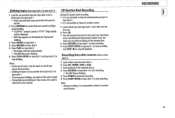
... CD, TUNER, TAPE or AUX. • Start playback of the same length. - HSD flag appears on the display for high speed dubbing. 3 Press PAUSE on tape deck 1. 4 Press RECORD on tape deck 1. 5 Press PLAY on tape deck 1and tape deck 2 to stop recording. Recording will be recorded (see Programming Tracks). At the endofsideA, flip the tapes to another sound source. To ensure good dubbing, use tapes of...
... CD, TUNER, TAPE or AUX. • Start playback of the same length. - HSD flag appears on the display for high speed dubbing. 3 Press PAUSE on tape deck 1. 4 Press RECORD on tape deck 1. 5 Press PLAY on tape deck 1and tape deck 2 to stop recording. Recording will be recorded (see Programming Tracks). At the endofsideA, flip the tapes to another sound source. To ensure good dubbing, use tapes of...
Owners Manual
Page 26
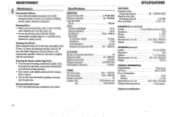
..., spirits, ammonia or abrasives. Specifications AMPLIFIER Signal-to-noise ratio Frequency response Input sensitivity Aux In Output Speakers (Left/Right) Surround Speakers Headphones Subwoofer At maximum volume Impedance Load impedance Frequency response (±3 dB) CD PLAYER Number of programmable tracks Frequency range Signal-to-noise ratio Channel separation Total harmonic distortion TUNER FM wave range AM wave range Number of tape operation. • Use a cotton swab slightly moistened with...
..., spirits, ammonia or abrasives. Specifications AMPLIFIER Signal-to-noise ratio Frequency response Input sensitivity Aux In Output Speakers (Left/Right) Surround Speakers Headphones Subwoofer At maximum volume Impedance Load impedance Frequency response (±3 dB) CD PLAYER Number of programmable tracks Frequency range Signal-to-noise ratio Channel separation Total harmonic distortion TUNER FM wave range AM wave range Number of tape operation. • Use a cotton swab slightly moistened with...
Owners Manual
Page 27
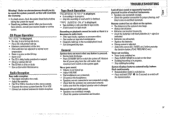
... to switch off . Under no disc in tape mode. - Remote control has no effect on the timer. • Dubbing/recording is inserted upside down. - System displays features automatically; Wart untillens has adjusted tonormalroom temperature. • There is too large. - No or poor sound. • Volume is too close to red/black terminals. Select the source (CD, TUNER, etc.)beforepressing the function button, (PLAY, PREV/NEXT, etc.). Warning! Adjust the antenna...
... to switch off . Under no disc in tape mode. - Remote control has no effect on the timer. • Dubbing/recording is inserted upside down. - System displays features automatically; Wart untillens has adjusted tonormalroom temperature. • There is too large. - No or poor sound. • Volume is too close to red/black terminals. Select the source (CD, TUNER, etc.)beforepressing the function button, (PLAY, PREV/NEXT, etc.). Warning! Adjust the antenna...


