
User manual
Page 2
... SHOCK DO NOT OPEN CAUTION: TO REDUCE THE RISK OF ELECTRIC SHOCK, DO NOT REMOVE COVER (OR BACK). Retain this information for which you qualify for as verification of ownership in the event of everyone in your household, please do not remove product covering. s The...fully insert. For Customer Use Enter below the Serial No. NO USER-SERVICEABLE PARTS INSIDE. 2 Return your Warranty Registration card today to ensure you receive all the benefits you're entitled to. • Once your Philips purchase is located on the rear of the cabinet. Model Registration Returning your Warranty ...
... SHOCK DO NOT OPEN CAUTION: TO REDUCE THE RISK OF ELECTRIC SHOCK, DO NOT REMOVE COVER (OR BACK). Retain this information for which you qualify for as verification of ownership in the event of everyone in your household, please do not remove product covering. s The...fully insert. For Customer Use Enter below the Serial No. NO USER-SERVICEABLE PARTS INSIDE. 2 Return your Warranty Registration card today to ensure you receive all the benefits you're entitled to. • Once your Philips purchase is located on the rear of the cabinet. Model Registration Returning your Warranty ...
User manual
Page 4
... . 4. CAUTION Use of controls or adjustments or performance of procedures other than the other apparatus (including amplifiers) that may have fallen into your outlet, consult an electrician for radio noise emissions from tip-over. 13. 4 IMPORTANT SAFETY INSTRUCTIONS - Read these instructions - Do not install near water - NO USER-SERVICEABLE PARTS INSIDE. This symbol warns the user that important literature concerning the operation and...
... . 4. CAUTION Use of controls or adjustments or performance of procedures other than the other apparatus (including amplifiers) that may have fallen into your outlet, consult an electrician for radio noise emissions from tip-over. 13. 4 IMPORTANT SAFETY INSTRUCTIONS - Read these instructions - Do not install near water - NO USER-SERVICEABLE PARTS INSIDE. This symbol warns the user that important literature concerning the operation and...
User manual
Page 5
... antenna systems outside the unit. • a product that you need to a Philips factory service center (see enclosed list) or authorized service center for installation or setup of the product, adjustment of customer controls on the product, and installation or repair of antenna systems outside of the product. • product repair and/or part replacement because of misuse, accident, unauthorized repair or other cause not within the control of purchase. All parts, including repaired and replaced parts, are covered only for any direct...
... antenna systems outside the unit. • a product that you need to a Philips factory service center (see enclosed list) or authorized service center for installation or setup of the product, adjustment of customer controls on the product, and installation or repair of antenna systems outside of the product. • product repair and/or part replacement because of misuse, accident, unauthorized repair or other cause not within the control of purchase. All parts, including repaired and replaced parts, are covered only for any direct...
User manual
Page 7
... operating the system, check that may cause unexpected problems. See whether these problems disappear if you repair the system yourself, as this occur, the CD player will invalidate the warranty! • If the system is brought directly from a cold to prevent internal heat build-up in again after a few seconds. • To disconnect the system from the power supply completely, remove the AC power plug from...
... operating the system, check that may cause unexpected problems. See whether these problems disappear if you repair the system yourself, as this occur, the CD player will invalidate the warranty! • If the system is brought directly from a cold to prevent internal heat build-up in again after a few seconds. • To disconnect the system from the power supply completely, remove the AC power plug from...
User manual
Page 9
..., connect the AC power cord to the system and to the AUX IN terminals at the rear of a TV,VCR, Laser Disc player, DVD player or CD Recorder to the wall outlet. + + - C Speakers Connection • Connect the right speaker to Front terminal R, with the colored wire to + and the black wire to the FM AERIAL (FM ANTENNA) 300 Ω terminal using a 300 Ω dipole wire. 9 A AM Loop Antenna Connection Connect the supplied loop antenna to...
..., connect the AC power cord to the system and to the AUX IN terminals at the rear of a TV,VCR, Laser Disc player, DVD player or CD Recorder to the wall outlet. + + - C Speakers Connection • Connect the right speaker to Front terminal R, with the colored wire to + and the black wire to the FM AERIAL (FM ANTENNA) 300 Ω terminal using a 300 Ω dipole wire. 9 A AM Loop Antenna Connection Connect the supplied loop antenna to...
User manual
Page 10
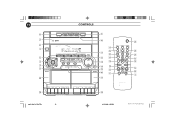
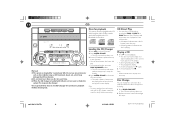
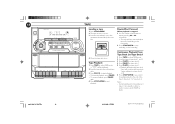
10 CONTROLS 8 7 6 1 5 4 3 2 DISC CHANGE DISC 1 DISC 2 DISC 3 OPEN • CLOSE 3CD C H A N G E R 3 CD ROTARY CHANGER SYSTEM • CD REWRITABLE COMPATIBLE • CD SYNCHRO RECORDING • C10 FW- MINI HIFI SYSTEM STANDBY-ON DBB OPT IMAL JA DSC OCK TEC HNO vv vv ZZ R CD1 • 2 • 3 CD FM • AM TUNER TUNING TAPE 1 • 2 TAPE VIDEO AUX v PRESET v DIGITAL SOUND CONTROL SEARCH STOP• CLEAR PLAY• PAUSE PREV PROGRAM CLOCK•TIMER DIM NEXT DIGITAL SOUND CONTROL MASTER VOLUME TAPE 1 PLAY/ REC TAPE 2 PLAYBACK 9 0 ! @ # $ %...
10 CONTROLS 8 7 6 1 5 4 3 2 DISC CHANGE DISC 1 DISC 2 DISC 3 OPEN • CLOSE 3CD C H A N G E R 3 CD ROTARY CHANGER SYSTEM • CD REWRITABLE COMPATIBLE • CD SYNCHRO RECORDING • C10 FW- MINI HIFI SYSTEM STANDBY-ON DBB OPT IMAL JA DSC OCK TEC HNO vv vv ZZ R CD1 • 2 • 3 CD FM • AM TUNER TUNING TAPE 1 • 2 TAPE VIDEO AUX v PRESET v DIGITAL SOUND CONTROL SEARCH STOP• CLEAR PLAY• PAUSE PREV PROGRAM CLOCK•TIMER DIM NEXT DIGITAL SOUND CONTROL MASTER VOLUME TAPE 1 PLAY/ REC TAPE 2 PLAYBACK 9 0 ! @ # $ %...
User manual
Page 11
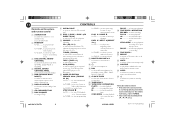
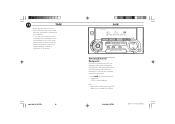
... mode. to select the desired sound effect : OPTIMAL, JAZZ, ROCK or TECHNO. 4 DIGITAL SOUND CONTROL PANEL - to start recording. STOP•OPEN...to stop playback or to open or close the CD carousel tray. 0 DISC 1 / DISC 2 / DISC 3 (CD DIRECT PLAY) - to increase or decrease the volume. $n - 11 Controls on the system only) to start or stop CD playback or to clear a program. to standby mode at a selected time. ∞B - to switch off bass boost. 6 DISPLAY SCREEN - to switch the system to select Tape mode...
... mode. to select the desired sound effect : OPTIMAL, JAZZ, ROCK or TECHNO. 4 DIGITAL SOUND CONTROL PANEL - to start recording. STOP•OPEN...to stop playback or to open or close the CD carousel tray. 0 DISC 1 / DISC 2 / DISC 3 (CD DIRECT PLAY) - to increase or decrease the volume. $n - 11 Controls on the system only) to start or stop CD playback or to clear a program. to standby mode at a selected time. ∞B - to switch off bass boost. 6 DISPLAY SCREEN - to switch the system to select Tape mode...
User manual
Page 12
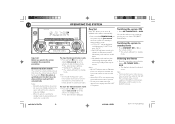
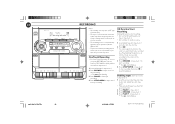
... Disc player, DVD player or CD Recorder) to standby mode. Notes: - MINI HIFI SYSTEM DBB OPT HNO STANDBY-ON IMAL JA DSC CK TEC vv vv ZZ RO CD1 • 2 • 3 CD FM • AM TUNER TUNING TAPE 1 • 2 TAPE VIDEO AUX v PRESET v DIGITAL SOUND CONTROL SEARCH STOP• CLEAR PLAY• PAUSE PREV PROGRAM CLOCK•TIMER DIM NEXT DIGITAL SOUND CONTROL MASTER VOLUME Important: Before you have connected the audio left and right OUT terminals of the CD DIRECT PLAY buttons. Demonstration mode The system has...
... Disc player, DVD player or CD Recorder) to standby mode. Notes: - MINI HIFI SYSTEM DBB OPT HNO STANDBY-ON IMAL JA DSC CK TEC vv vv ZZ RO CD1 • 2 • 3 CD FM • AM TUNER TUNING TAPE 1 • 2 TAPE VIDEO AUX v PRESET v DIGITAL SOUND CONTROL SEARCH STOP• CLEAR PLAY• PAUSE PREV PROGRAM CLOCK•TIMER DIM NEXT DIGITAL SOUND CONTROL MASTER VOLUME Important: Before you have connected the audio left and right OUT terminals of the CD DIRECT PLAY buttons. Demonstration mode The system has...
User manual
Page 13
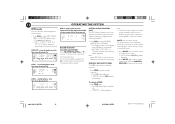
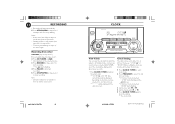
... DBB to switch on the sound. Some CDs or tapes might be displayed. MUTE (only on remote control) This feature allows you to temporarily switch off the sound of the system without switching off the system when you to enjoy special sound effects that have preset equalizer settings, providing the best music reproduction. • Press DSC to select OPTIMAL, JAZZ, ROCK or TECHNO. ™ The Digital Sound Control display panel will light up...
... DBB to switch on the sound. Some CDs or tapes might be displayed. MUTE (only on remote control) This feature allows you to temporarily switch off the sound of the system without switching off the system when you to enjoy special sound effects that have preset equalizer settings, providing the best music reproduction. • Press DSC to select OPTIMAL, JAZZ, ROCK or TECHNO. ™ The Digital Sound Control display panel will light up...
User manual
Page 14
... end of playback of the current track appear on the display. MINI HIFI SYSTEM DBB OPT HNO STANDBY-ON IMAL JA DSC CK TEC vv vv ZZ RO CD1 • 2 • 3 CD FM • AM TUNER TUNING TAPE 1 • 2 TAPE VIDEO AUX v PRESET v DIGITAL SOUND CONTROL SEARCH STOP• CLEAR PLAY• PAUSE PREV PROGRAM CLOCK• TIMER DIM NEXT DIGITAL SOUND CONTROL MASTER VOLUME Warning! 1) This system is loaded in the CD changer for conventional CDs. Note: -
... end of playback of the current track appear on the display. MINI HIFI SYSTEM DBB OPT HNO STANDBY-ON IMAL JA DSC CK TEC vv vv ZZ RO CD1 • 2 • 3 CD FM • AM TUNER TUNING TAPE 1 • 2 TAPE VIDEO AUX v PRESET v DIGITAL SOUND CONTROL SEARCH STOP• CLEAR PLAY• PAUSE PREV PROGRAM CLOCK• TIMER DIM NEXT DIGITAL SOUND CONTROL MASTER VOLUME Warning! 1) This system is loaded in the CD changer for conventional CDs. Note: -
User manual
Page 15
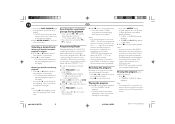
.... CD Searching for changing. 3 Press OPEN•CLOSE to the beginning of a loaded CD is possible when playback is opened. The PROG display also will disappear temporarily from the power supply or when the CD carousel tray is stopped.The display will indicate the total tracks stored in the disc trays. 2 Press PROGRAM to start program playback. ™ "PLAY PROGRAM" will be displayed. ™ The track number and elapsed playing time of...
.... CD Searching for changing. 3 Press OPEN•CLOSE to the beginning of a loaded CD is possible when playback is opened. The PROG display also will disappear temporarily from the power supply or when the CD carousel tray is stopped.The display will indicate the total tracks stored in the disc trays. 2 Press PROGRAM to start program playback. ™ "PLAY PROGRAM" will be displayed. ™ The track number and elapsed playing time of...
User manual
Page 16
... select TUNER mode. ™ "TUNER" will be displayed. ™ The REP, PROG, and SHUF flags appear on the display. MINI HIFI SYSTEM DBB OPT HNO STANDBY-ON IMAL JA DSC CK TEC vv vv ZZ RO CD1 • 2 • 3 CD FM • AM TUNER TUNING TAPE 1 • 2 TAPE VIDEO AUX v PRESET v DIGITAL SOUND CONTROL SEARCH STOP• CLEAR PLAY• PAUSE PREV PROGRAM CLOCK•TIMER DIM NEXT DIGITAL SOUND CONTROL MASTER VOLUME Note: - Notes: - REPEAT DISC mode is displayed to...
... select TUNER mode. ™ "TUNER" will be displayed. ™ The REP, PROG, and SHUF flags appear on the display. MINI HIFI SYSTEM DBB OPT HNO STANDBY-ON IMAL JA DSC CK TEC vv vv ZZ RO CD1 • 2 • 3 CD FM • AM TUNER TUNING TAPE 1 • 2 TAPE VIDEO AUX v PRESET v DIGITAL SOUND CONTROL SEARCH STOP• CLEAR PLAY• PAUSE PREV PROGRAM CLOCK•TIMER DIM NEXT DIGITAL SOUND CONTROL MASTER VOLUME Note: - Notes: - REPEAT DISC mode is displayed to...
User manual
Page 18
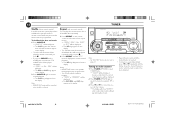
... FW- MINI HIFI SYSTEM STANDBY-ON DBB OPT IMAL JA DSC CK TEC HNO vv vv ZZ RO CD1 • 2 • 3 CD FM • A M TUNER TUNING TAPE 1 • 2 TAPE VIDEO AUX v PRESET v DIGITAL SOUND CONTROL SEARCH STOP• CLEAR PLAY• PAUSE PREV PROGRAM CLOCK•TIMER DIM NEXT DIGITAL SOUND CONTROL TAPE 1 PLAY/ REC RECORD PLAY v v v v v FULL AUTO STOP STOP.OPEN PAUSE PLAY vv v v v v TAPE MASTER VOLUME Loading a tape 1 Press STOP•OPEN. 2 The tape deck door opens. 3 Load the tape with tape deck 2 and...
... FW- MINI HIFI SYSTEM STANDBY-ON DBB OPT IMAL JA DSC CK TEC HNO vv vv ZZ RO CD1 • 2 • 3 CD FM • A M TUNER TUNING TAPE 1 • 2 TAPE VIDEO AUX v PRESET v DIGITAL SOUND CONTROL SEARCH STOP• CLEAR PLAY• PAUSE PREV PROGRAM CLOCK•TIMER DIM NEXT DIGITAL SOUND CONTROL TAPE 1 PLAY/ REC RECORD PLAY v v v v v FULL AUTO STOP STOP.OPEN PAUSE PLAY vv v v v v TAPE MASTER VOLUME Loading a tape 1 Press STOP•OPEN. 2 The tape deck door opens. 3 Load the tape with tape deck 2 and...
User manual
Page 19
... this system. - MINI HIFI SYSTEM DBB OPT HNO STANDBY-ON IMAL JA DSC CK TEC vv vv ZZ RO CD1 • 2 • 3 CD FM • AM TUNER TUNING TAPE 1 • 2 TAPE VIDEO AUX v PRESET v MASTER VOLUME DIGITAL SOUND CONTROL SEARCH STOP• CLEAR PLAY• PAUSE PREV PROGRAM CLOCK•TIMER DIM NEXT DIGITAL SOUND CONTROL Selecting External Equipment If you have connected the audio out terminals of the external equipment (TV,VCR, Laser Disc player, DVD player or CD Recorder...
... this system. - MINI HIFI SYSTEM DBB OPT HNO STANDBY-ON IMAL JA DSC CK TEC vv vv ZZ RO CD1 • 2 • 3 CD FM • AM TUNER TUNING TAPE 1 • 2 TAPE VIDEO AUX v PRESET v MASTER VOLUME DIGITAL SOUND CONTROL SEARCH STOP• CLEAR PLAY• PAUSE PREV PROGRAM CLOCK•TIMER DIM NEXT DIGITAL SOUND CONTROL Selecting External Equipment If you have connected the audio out terminals of the external equipment (TV,VCR, Laser Disc player, DVD player or CD Recorder...
User manual
Page 20
... PM 3139 116 19292 (ENG) MINI HIFI SYSTEM STANDBY-ON DBB PTI MAL JA O DSC CK TEC HNO vv vv ZZ RO CD1 • 2 • 3 CD FM • AM TUNER TUNING TAPE 1 • 2 TAPE VIDEO AUX v PRESET v DIGITAL SOUND CONTROL SEARCH STOP• CLEAR PLAY• PAUSE PREV PROGRAM CLOCK•TIMER DIM NEXT DIGITAL SOUND CONTROL MASTER VOLUME TAPE 1 PLAY/ REC TAPE 2 PLAYBACK RECORD PLAY v v v v v FULL AUTO STOP STOP.OPEN PAUSE PLAY vv v v v v STOP.OPEN PAUSE Notes: - The recording level...
... PM 3139 116 19292 (ENG) MINI HIFI SYSTEM STANDBY-ON DBB PTI MAL JA O DSC CK TEC HNO vv vv ZZ RO CD1 • 2 • 3 CD FM • AM TUNER TUNING TAPE 1 • 2 TAPE VIDEO AUX v PRESET v DIGITAL SOUND CONTROL SEARCH STOP• CLEAR PLAY• PAUSE PREV PROGRAM CLOCK•TIMER DIM NEXT DIGITAL SOUND CONTROL MASTER VOLUME TAPE 1 PLAY/ REC TAPE 2 PLAYBACK RECORD PLAY v v v v v FULL AUTO STOP STOP.OPEN PAUSE PLAY vv v v v v STOP.OPEN PAUSE Notes: - The recording level...
User manual
Page 21
... will be set in either 12- MINI HIFI SYSTEM DBB OPT HNO STANDBY-ON IMAL JA DSC CK TEC vv vv ZZ RO CD1 • 2 • 3 CD FM • AM TUNER TUNING TAPE 1 • 2 TAPE VIDEO AUX v PRESET v DIGITAL SOUND CONTROL SEARCH STOP• CLEAR PLAY• PAUSE PREV PROGRAM CLOCK•TIMER DIM NEXT DIGITAL SOUND CONTROL MASTER VOLUME View Clock You can be displayed depending on whether you must be displayed if the clock is not...
... will be set in either 12- MINI HIFI SYSTEM DBB OPT HNO STANDBY-ON IMAL JA DSC CK TEC vv vv ZZ RO CD1 • 2 • 3 CD FM • AM TUNER TUNING TAPE 1 • 2 TAPE VIDEO AUX v PRESET v DIGITAL SOUND CONTROL SEARCH STOP• CLEAR PLAY• PAUSE PREV PROGRAM CLOCK•TIMER DIM NEXT DIGITAL SOUND CONTROL MASTER VOLUME View Clock You can be displayed depending on whether you must be displayed if the clock is not...
User manual
Page 22
... selected disc or program. Timer Setting • The system can serve as follows (time in the CD carousel tray. 3 Press␣ à or á to set the hour for the timer to start. 4 Press␣ í or ë to set . ™ The TIMER remains on the display. • At the preset time, the timer will be activated. ™ The selected source will be switched on the remote control repeatedly to the standby mode automatically...
... selected disc or program. Timer Setting • The system can serve as follows (time in the CD carousel tray. 3 Press␣ à or á to set the hour for the timer to start. 4 Press␣ í or ë to set . ™ The TIMER remains on the display. • At the preset time, the timer will be activated. ™ The selected source will be switched on the remote control repeatedly to the standby mode automatically...
User manual
Page 23
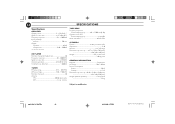
...) Total harmonic distortion 0.003% TUNER FM wave range 87.5 - 108 MHz AM wave range 530 - 1700 kHz Number of presets 40 Antenna FM 300 Ω dipole wire AM Loop antenna SPECIFICATIONS TAPE DECK Frequency response Normal tape (type I 80 - 12,500 Hz (8 dB) Signal-to-noise ratio Normal tape (type I 48 dBA Wow and flutter 0.4% DIN SPEAKERS System double port bass reflex Impedance 3 Ω...
...) Total harmonic distortion 0.003% TUNER FM wave range 87.5 - 108 MHz AM wave range 530 - 1700 kHz Number of presets 40 Antenna FM 300 Ω dipole wire AM Loop antenna SPECIFICATIONS TAPE DECK Frequency response Normal tape (type I 80 - 12,500 Hz (8 dB) Signal-to-noise ratio Normal tape (type I 48 dBA Wow and flutter 0.4% DIN SPEAKERS System double port bass reflex Impedance 3 Ω...

User manual
Page 24
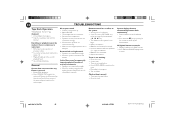
... the CD lens with a standard CD player. ™ Read the instruction booklet of tape operation. • Use a cotton swab slightly moistened with cleaner. Cleaning Discs • When a disc becomes dirty, clean it with a mild detergent solution. Radio Reception Poor radio reception. • The signal is badly scratched or dirty. ™ Replace or clean CD. Do not use with Philips CD Lens Cleaner or any problems persist after...
... the CD lens with a standard CD player. ™ Read the instruction booklet of tape operation. • Use a cotton swab slightly moistened with cleaner. Cleaning Discs • When a disc becomes dirty, clean it with a mild detergent solution. Radio Reception Poor radio reception. • The signal is badly scratched or dirty. ™ Replace or clean CD. Do not use with Philips CD Lens Cleaner or any problems persist after...
User manual
Page 25
... power plug from the wall outlet, then reconnect the power plug and switch on the system) for proper phasing, colored/black wires to switch the system off the demonstration. Timer is not working. • Clock is not set. ™ Set the clock. • Timer is not switched on. ™ Press CLOCK•TIMER to switch off . All lighted buttons are connected wrongly. ™ Check the speaker connections and location. System displays features automatically; 25 Tape Deck Operation "RECORDING ACTIVE" is displayed...
... power plug from the wall outlet, then reconnect the power plug and switch on the system) for proper phasing, colored/black wires to switch the system off the demonstration. Timer is not working. • Clock is not set. ™ Set the clock. • Timer is not switched on. ™ Press CLOCK•TIMER to switch off . All lighted buttons are connected wrongly. ™ Check the speaker connections and location. System displays features automatically; 25 Tape Deck Operation "RECORDING ACTIVE" is displayed...


