
User manual
Page 1
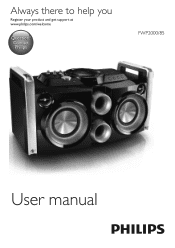
Always there to help you Register your product and get support at www.philips.com/welcome Question? Contact Philips FWP2000/85 User manual
Always there to help you Register your product and get support at www.philips.com/welcome Question? Contact Philips FWP2000/85 User manual

User manual
Page 3
... 16 Supported MP3 disc formats 16 2 Your Mini Hi-Fi System 5 Maintenance 16 Introduction 5 What's in the box 5 9 Troubleshooting 17 Overview of the main unit 6 Overview of the remote control 7 3 Get started 8 Install remote control battery 8 Connect power 8 Turn on 9 4 Play 9 Basic play operations 9 Play disc 9 Play from USB 10 Play options 10 5 Listen to radio 11 Tune to radio stations 11 Store radio stations 11 Select a preset radio station 11 6 Adjust sound 12 Adjust speaker volume 12 Select a sound effect 12 Select an audio output mode 12...
... 16 Supported MP3 disc formats 16 2 Your Mini Hi-Fi System 5 Maintenance 16 Introduction 5 What's in the box 5 9 Troubleshooting 17 Overview of the main unit 6 Overview of the remote control 7 3 Get started 8 Install remote control battery 8 Connect power 8 Turn on 9 4 Play 9 Basic play operations 9 Play disc 9 Play from USB 10 Play options 10 5 Listen to radio 11 Tune to radio stations 11 Store radio stations 11 Select a preset radio station 11 6 Adjust sound 12 Adjust speaker volume 12 Select a sound effect 12 Select an audio output mode 12...
User manual
Page 4
... lightning' indicates uninsulated material within your household, please do not remove product covering. k Use only with dry cloth. Install in bodily injury, property damage, or damage to wide slot, fully insert. Servicing is required when the apparatus has been damaged in your unit may result in accordance with liquids, such as power-supply cord or plug is used, use this apparatus...
... lightning' indicates uninsulated material within your household, please do not remove product covering. k Use only with dry cloth. Install in bodily injury, property damage, or damage to wide slot, fully insert. Servicing is required when the apparatus has been damaged in your unit may result in accordance with liquids, such as power-supply cord or plug is used, use this apparatus...
User manual
Page 5
...;• Keep this apparatus in a confined space. Over time your hearing 'comfort level' adapts to a safe level before your volume control at a low setting. • Slowly increase the sound until you can also cause hearing loss. • Be sure to operate the equipment. liquid filled objects, lighted candles). Never install this unit away from direct sunlight, naked flames or heat. •• Never look...
...;• Keep this apparatus in a confined space. Over time your hearing 'comfort level' adapts to a safe level before your volume control at a low setting. • Slowly increase the sound until you can also cause hearing loss. • Be sure to operate the equipment. liquid filled objects, lighted candles). Never install this unit away from direct sunlight, naked flames or heat. •• Never look...

User manual
Page 6
... of these products helps prevent potentially negative consequences on a recycling center in your area. Please visit www.recycle.philips.com for such purposes. This equipment should not be used for additional information on the environment and human health. This apparatus includes this label: The making of unauthorized copies of copyprotected material, including computer programs, files, broadcasts and sound recordings, may...
... of these products helps prevent potentially negative consequences on a recycling center in your area. Please visit www.recycle.philips.com for such purposes. This equipment should not be used for additional information on the environment and human health. This apparatus includes this label: The making of unauthorized copies of copyprotected material, including computer programs, files, broadcasts and sound recordings, may...

User manual
Page 7
... sound effects: • Digital Sound Control (DSC) • Dynamic Bass Boost (DBB) • Bass and treble adjustment • Max Sound for instant power boost What's in the box Check and identify the contents of your package: • Main unit • Remote control (with battery) • Power cord • Power cord converter • FM antenna • User manual • Quick start guide EN 5 2 Your Mini Hi-Fi System Congratulations on your product at www.philips...
... sound effects: • Digital Sound Control (DSC) • Dynamic Bass Boost (DBB) • Bass and treble adjustment • Max Sound for instant power boost What's in the box Check and identify the contents of your package: • Main unit • Remote control (with battery) • Power cord • Power cord converter • FM antenna • User manual • Quick start guide EN 5 2 Your Mini Hi-Fi System Congratulations on your product at www.philips...

User manual
Page 8
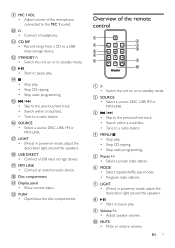
... a preset sound setting. Overview of the microphone connected to the MIC 2 socket. b BASS • Adjust the bass level of the speaker or the connected microphone (range: -5 to +5). d DBB 6 EN • Turn on /off dynamic bass enhancement. h MIC 2VOL • Adjust volume of the main unit a b c d e MIC 1 MIC 2 MIC 1 VOL +5 +5 MIN MAX 0 0 MIC 2 VOL -5 BASS -5 TREBLE MIN MAX VOLUME MIN MAX DBB DSC j i h g f k l m n CD RIP USB DIRECT MP3-LINK PART Y MAC HIN E FW P2000 STANDBY SOURCE LIGHT tuv s r q p o a MIC 1/MIC 2 • Connect microphones...
... a preset sound setting. Overview of the microphone connected to the MIC 2 socket. b BASS • Adjust the bass level of the speaker or the connected microphone (range: -5 to +5). d DBB 6 EN • Turn on /off dynamic bass enhancement. h MIC 2VOL • Adjust volume of the main unit a b c d e MIC 1 MIC 2 MIC 1 VOL +5 +5 MIN MAX 0 0 MIC 2 VOL -5 BASS -5 TREBLE MIN MAX VOLUME MIN MAX DBB DSC j i h g f k l m n CD RIP USB DIRECT MP3-LINK PART Y MAC HIN E FW P2000 STANDBY SOURCE LIGHT tuv s r q p o a MIC 1/MIC 2 • Connect microphones...
User manual
Page 9
.../shuffle play . g LIGHT • (Press) in power-on or to a USB mass storage device. m • Start or pause play modes. • Program radio stations. s MP3 LINK • Connect an external audio device. t Disc compartment u Display panel • Show current status. Overview of the microphone connected to a radio station. e Preset +/• Select a preset radio station. j • Connect a headphone. n • Stop play . i Volume +/• Adjust speaker volume. o / • Skip to the previous/next track. • Search within a track/disc. • Tune to the MIC...
.../shuffle play . g LIGHT • (Press) in power-on or to a USB mass storage device. m • Start or pause play modes. • Program radio stations. s MP3 LINK • Connect an external audio device. t Disc compartment u Display panel • Show current status. Overview of the microphone connected to a radio station. e Preset +/• Select a preset radio station. j • Connect a headphone. n • Stop play . i Volume +/• Adjust speaker volume. o / • Skip to the previous/next track. • Search within a track/disc. • Tune to the MIC...
User manual
Page 10
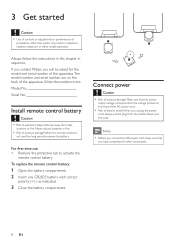
... you connect the AC power cord, make sure that the power supply voltage corresponds to activate the remote control battery. When you have completed all other unsafe operation. Connect power Caution •• Risk of product damage! Make sure that you unplug the power cord, always pull the plug from heat, sunshine or fire. Keep batteries away from the socket. Never discard batteries in this apparatus.The model number and serial number...
... you connect the AC power cord, make sure that the power supply voltage corresponds to activate the remote control battery. When you have completed all other unsafe operation. Connect power Caution •• Risk of product damage! Make sure that you unplug the power cord, always pull the plug from heat, sunshine or fire. Keep batteries away from the socket. Never discard batteries in this apparatus.The model number and serial number...

User manual
Page 11
... the display panel turns off. Function To stop play To pause/resume play To skip to a track To search during play . press and hold / , then release to standby mode. »» The backlight on this unit. • the wall power socket. EN 9 Switch to standby mode • Press to switch the unit to resume normal play Action press MENU/ . press / . press . Basic play operations You can control play starts automatically. Turn on 1 Turn the POWER ON/OFF switch...
... the display panel turns off. Function To stop play To pause/resume play To skip to a track To search during play . press and hold / , then release to standby mode. »» The backlight on this unit. • the wall power socket. EN 9 Switch to standby mode • Press to switch the unit to resume normal play Action press MENU/ . press / . press . Basic play operations You can control play starts automatically. Turn on 1 Turn the POWER ON/OFF switch...

User manual
Page 12
.... 1 Insert a USB mass storage device into theUSB DIRECT socket. 2 Press SOURCE repeatedly to select: • [REP ONE] (repeat one): play the current track repeatedly. • [REP ALL] (repeat all): play all tracks repeatedly. • [SHUFFLE] (shuffle): play all tracks repeatedly in random order. • [NORMAL] (normal): resume normal play • Press MODE repeatedly to select the USB source. »» Play starts automatically. Play options...
.... 1 Insert a USB mass storage device into theUSB DIRECT socket. 2 Press SOURCE repeatedly to select: • [REP ONE] (repeat one): play the current track repeatedly. • [REP ALL] (repeat all): play all tracks repeatedly. • [SHUFFLE] (shuffle): play all tracks repeatedly in random order. • [NORMAL] (normal): resume normal play • Press MODE repeatedly to select the USB source. »» Play starts automatically. Play options...

User manual
Page 13
...; To overwrite a programmed station, store another station in its place. Select a preset radio station • In tuner mode, press Preset +/- repeatedly to a weak station: 1 Press / repeatedly until you find optimal reception. 5 Listen to radio Tune to radio stations Note •• To improve FM reception, fully extend and adjust the position of the preset station is displayed. 4 Repeat the previous steps to program other stations. To tune to select a preset radio station.
...; To overwrite a programmed station, store another station in its place. Select a preset radio station • In tuner mode, press Preset +/- repeatedly to a weak station: 1 Press / repeatedly until you find optimal reception. 5 Listen to radio Tune to radio stations Note •• To improve FM reception, fully extend and adjust the position of the preset station is displayed. 4 Repeat the previous steps to program other stations. To tune to select a preset radio station.
User manual
Page 14
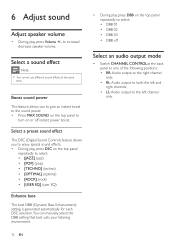
6 Adjust sound Adjust speaker volume • During play , press DBB on or off Select an audio output mode • Switch CHANNEL CONTROLat the back panel to one of the following positions: • RR: Audio output to the right channel only; • RL: Audio output to both the left and right channels; • LL: Audio output to the left channel only. Select a sound effect Note •• You cannot use different sound effects at the...
6 Adjust sound Adjust speaker volume • During play , press DBB on or off Select an audio output mode • Switch CHANNEL CONTROLat the back panel to one of the following positions: • RR: Audio output to the right channel only; • RL: Audio output to both the left and right channels; • LL: Audio output to the left channel only. Select a sound effect Note •• You cannot use different sound effects at the...
User manual
Page 15
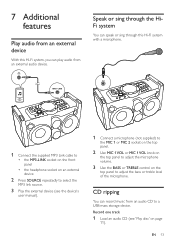
... the device's user manual). 1 Connect a microphone (not supplied) to the MIC 1 or MIC 2 socket on the top panel. 2 Use MIC 1 VOL or MIC 1 VOL knob on the top panel to adjust the microphone volume. 3 Use the BASS or TREBLE control on the top panel to adjust the bass or treble level of the microphone. Speak or sing through this Hi-Fi system with a microphone. 7 Additional features Play audio from an external device With...
... the device's user manual). 1 Connect a microphone (not supplied) to the MIC 1 or MIC 2 socket on the top panel. 2 Use MIC 1 VOL or MIC 1 VOL knob on the top panel to adjust the microphone volume. 3 Use the BASS or TREBLE control on the top panel to adjust the bass or treble level of the microphone. Speak or sing through this Hi-Fi system with a microphone. 7 Additional features Play audio from an external device With...
User manual
Page 16
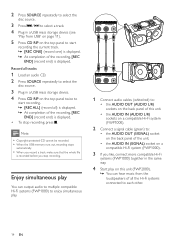
... select a track. 4 Plug in a USB mass storage device (see 'Play from the loudspeakers of the recording, [REC END] (record end) is displayed. Enjoy simultaneous play You can output audio to multiple compatible Hi-Fi systems (FWP1000) to enjoy simultaneous play. 1 Connect audio cables (white/red) to: • the AUDIO OUT (AUDIO L/R) sockets on the back panel of this unit. • the AUDIO IN (AUDIO L/R) sockets on a compatible Hi-Fi system (FWP1000). 2 Connect a signal cable (green) to...
... select a track. 4 Plug in a USB mass storage device (see 'Play from the loudspeakers of the recording, [REC END] (record end) is displayed. Enjoy simultaneous play You can output audio to multiple compatible Hi-Fi systems (FWP1000) to enjoy simultaneous play. 1 Connect audio cables (white/red) to: • the AUDIO OUT (AUDIO L/R) sockets on the back panel of this unit. • the AUDIO IN (AUDIO L/R) sockets on a compatible Hi-Fi system (FWP1000). 2 Connect a signal cable (green) to...
User manual
Page 17
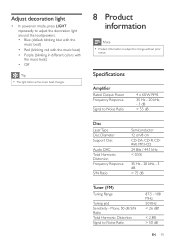
... Tuning grid Sensitivity - Specifications Amplifier Rated Output Power Frequency Response Signal to Noise Ratio 87.5 - 108 MHz 50 KHz < 26 dBf < 2.8% > 50 dB EN 15 Adjust decoration light • In power-on mode, press LIGHT repeatedly to adjust the decoration light around the loudspeakers. • Blue (default, blinking blue with the music beat) • Red (blinking red with the music beat) • Purple (blinking in different colors...
... Tuning grid Sensitivity - Specifications Amplifier Rated Output Power Frequency Response Signal to Noise Ratio 87.5 - 108 MHz 50 KHz < 26 dBf < 2.8% > 50 dB EN 15 Adjust decoration light • In power-on mode, press LIGHT repeatedly to adjust the decoration light around the loudspeakers. • Blue (default, blinking blue with the music beat) • Red (blinking red with the music beat) • Purple (blinking in different colors...
User manual
Page 18
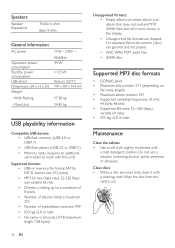
... USB playability information Compatible USB devices: • USB flash memory (USB 2.0 or USB1.1) • USB flash players (USB 2.0 or USB1.1) • Memory cards (requires an additional card reader to work with this unit) Supported formats: • USB or memory file format FAT16, FAT32 (sector size: 512 bytes) • MP3 bit rate (data rate): 32-320 Kbps and variable bit rate • Directory nesting up to a maximum of 8 levels • Number of albums/ folders: maximum 255 • Number...
... USB playability information Compatible USB devices: • USB flash memory (USB 2.0 or USB1.1) • USB flash players (USB 2.0 or USB1.1) • Memory cards (requires an additional card reader to work with this unit) Supported formats: • USB or memory file format FAT16, FAT32 (sector size: 512 bytes) • MP3 bit rate (data rate): 32-320 Kbps and variable bit rate • Directory nesting up to a maximum of 8 levels • Number of albums/ folders: maximum 255 • Number...
User manual
Page 19
...; As a power-saving feature, the unit switches off automatically after track play quality, clean the disc lens with cleaner. 9 Troubleshooting Warning •• Never remove the casing of the unit is connected properly. •• Make sure that there is power at the disc lens.To ensure good play reaches the end and no control is operated. If the problem remains unsolved, go to repair the system...
...; As a power-saving feature, the unit switches off automatically after track play quality, clean the disc lens with cleaner. 9 Troubleshooting Warning •• Never remove the casing of the unit is connected properly. •• Make sure that there is power at the disc lens.To ensure good play reaches the end and no control is operated. If the problem remains unsolved, go to repair the system...
User manual
Page 20
... (+/- Remote control does not work •• Before you press any function button, first select the correct source with the remote control instead of the unit. No disc detected •• Load a CD/MP3 disc. •• Check if the disc is incompatible with the unit.Try another one. 18 EN signs) aligned as indicated. •• Replace the battery. •• Aim the remote control directly at...
... (+/- Remote control does not work •• Before you press any function button, first select the correct source with the remote control instead of the unit. No disc detected •• Load a CD/MP3 disc. •• Check if the disc is incompatible with the unit.Try another one. 18 EN signs) aligned as indicated. •• Replace the battery. •• Aim the remote control directly at...

User manual
Page 21
FWP2000_85_UM_V2.0 All rights reserved. Specifications are subject to change without notice © 2013 Koninklijke Philips Electronics N.V.
FWP2000_85_UM_V2.0 All rights reserved. Specifications are subject to change without notice © 2013 Koninklijke Philips Electronics N.V.


