

User manual
Page 5
... for remote control - Accessories (Supplied) - Batteries (two AA size) for energy efficiency. Philips has determined that prevents overheating. • Do not expose the system to a warm location, or is placed in the system until normal playback is switched on, do not move it in again after a few seconds. • To disconnect the system from the power supply completely, remove the AC power plug from...
... for remote control - Accessories (Supplied) - Batteries (two AA size) for energy efficiency. Philips has determined that prevents overheating. • Do not expose the system to a warm location, or is placed in the system until normal playback is switched on, do not move it in again after a few seconds. • To disconnect the system from the power supply completely, remove the AC power plug from...

User manual
Page 7
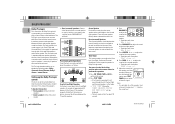
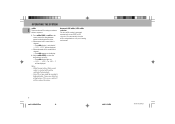
..., Laser Disc player, DVD player or CD Recorder to the audio equipment with digital input (e.g. K AC Power Supply After all other end to the AUX/CDR IN terminals at the rear of +/- English CAUTION: - PREPARATION F Line Out Connection (wireless ready) You can record the digital sound from the CD, through this manual. Connect the wireless radio frequency transmitter to the grey REAR SURROUND terminals. Please check with the subwoofer. Connect one pair of the system. speaker terminal...
..., Laser Disc player, DVD player or CD Recorder to the audio equipment with digital input (e.g. K AC Power Supply After all other end to the AUX/CDR IN terminals at the rear of +/- English CAUTION: - PREPARATION F Line Out Connection (wireless ready) You can record the digital sound from the CD, through this manual. Connect the wireless radio frequency transmitter to the grey REAR SURROUND terminals. Please check with the subwoofer. Connect one pair of the system. speaker terminal...
User manual
Page 8
... obtain the best sound. FRONT LEFT SUBWOOFER CENTER SPEAKER MINI HIFI SYSTEM FRONT RIGHT Center Speaker For the best sound, place the center speaker at the ideal sitting position and use the remote control to perform this operation. 3 Press DPL TEST TONE BALANCE BALANCE L L R to adjust the CENTER REAR sound of the - + - + front left and right speakers. You must set the speakers' level at the back of the room. to adjust the sound of the surround speakers. ™ The display will...
... obtain the best sound. FRONT LEFT SUBWOOFER CENTER SPEAKER MINI HIFI SYSTEM FRONT RIGHT Center Speaker For the best sound, place the center speaker at the ideal sitting position and use the remote control to perform this operation. 3 Press DPL TEST TONE BALANCE BALANCE L L R to adjust the CENTER REAR sound of the - + - + front left and right speakers. You must set the speakers' level at the back of the room. to adjust the sound of the surround speakers. ™ The display will...

User manual
Page 9
... best Dolby Pro Logic sound, switch on a tape. Dolby 3 Stereo Use this setting when full surround is not required, but a wide stereo sound is for a full Dolby Surround Pro Logic mode. • Press DPL to "Classic" and with the selection. SURR SURR ™ The DPL display panel will light up with VEC off. 2 Dolby Pro Logic mode will light up . Normal Stereo This setting is for normal stereo sound without the center speaker. Dolby Center Phantom This setting is for use...
... best Dolby Pro Logic sound, switch on a tape. Dolby 3 Stereo Use this setting when full surround is not required, but a wide stereo sound is for a full Dolby Surround Pro Logic mode. • Press DPL to "Classic" and with the selection. SURR SURR ™ The DPL display panel will light up with VEC off. 2 Dolby Pro Logic mode will light up . Normal Stereo This setting is for normal stereo sound without the center speaker. Dolby Center Phantom This setting is for use...

User manual
Page 11
... the desired Digital Sound or CDR/DVD. to program preset radio 0 SOURCE - to select brightness for TAPE ........ When in DSC AUX mode, press to start playback. PLAY PAUSE ÉÅ - station name, program PERSONAL AUX / (CDR/DVD) type and radio text. - Control effect : OPTIMAL, CLASSIC, TV/AV (only on the system and remote control VEC - to clear a program. to select Dolby Surround, Dolby Center to connect headphones. When tape for the infrared remote control. - to stop DSC, VEC or BASS/TREBLE...
... the desired Digital Sound or CDR/DVD. to program preset radio 0 SOURCE - to select brightness for TAPE ........ When in DSC AUX mode, press to start playback. PLAY PAUSE ÉÅ - station name, program PERSONAL AUX / (CDR/DVD) type and radio text. - Control effect : OPTIMAL, CLASSIC, TV/AV (only on the system and remote control VEC - to clear a program. to select Dolby Surround, Dolby Center to connect headphones. When tape for the infrared remote control. - to stop DSC, VEC or BASS/TREBLE...

User manual
Page 12
... repeat a CD track, a disc, or all the available discs and their tracks in random order. · DIGIT 0 - 9 (numbers consisting of two figures must be keyed in within 2 seconds) for playback or programming. REV (AUTO REVERSE) - to select a preset radio station in tape deck 2 only. to start recording on the remote control (e.g. to control by pressing one of the center speaker. › TIMER ON/OFF - to switch on the system only...
... repeat a CD track, a disc, or all the available discs and their tracks in random order. · DIGIT 0 - 9 (numbers consisting of two figures must be keyed in within 2 seconds) for playback or programming. REV (AUTO REVERSE) - to select a preset radio station in tape deck 2 only. to start recording on the remote control (e.g. to control by pressing one of the center speaker. › TIMER ON/OFF - to switch on the system only...

User manual
Page 13
... TIME" will be displayed. ™ When RDS time is available in standby mode. ™ The demonstration will proceed to standby mode. PERSONAL DS English STANDBY ON MINI HIFI SYSTEM POWER SAVE IR SENSOR VEC C BASS/TREBLE CD 1•2•3 BAND TAPE 1•2 CDR/DVD C 1C•D2 • 3 BTAUNNDER TAPE SEARCH•TUNING STOP•CLEAR PLAY PAUSE v ACUDRX PRESET v PREV SIDE NEXT PROG CLOCK/ TIMER DIM A. Easy Set EASY SET allows you operate the system...
... TIME" will be displayed. ™ When RDS time is available in standby mode. ™ The demonstration will proceed to standby mode. PERSONAL DS English STANDBY ON MINI HIFI SYSTEM POWER SAVE IR SENSOR VEC C BASS/TREBLE CD 1•2•3 BAND TAPE 1•2 CDR/DVD C 1C•D2 • 3 BTAUNNDER TAPE SEARCH•TUNING STOP•CLEAR PLAY PAUSE v ACUDRX PRESET v PREV SIDE NEXT PROG CLOCK/ TIMER DIM A. Easy Set EASY SET allows you operate the system...

User manual
Page 14
... settings. 1 Press to select the PERSONAL feature. 2 Adjust the JOG to select DIM 1, DIM 2, DIM 3 or DIM OFF display mode. ™ The DIM appears on the mode selected. The speakers will resume 5 seconds later. English OPERATING THE SYSTEM Switching the system ON • Press CD, TUNER, TAPE or AUX. You can only select one of the system. Selecting the Source • Press the respective source selection button: CD, TUNER, TAPE or AUX...
... settings. 1 Press to select the PERSONAL feature. 2 Adjust the JOG to select DIM 1, DIM 2, DIM 3 or DIM OFF display mode. ™ The DIM appears on the mode selected. The speakers will resume 5 seconds later. English OPERATING THE SYSTEM Switching the system ON • Press CD, TUNER, TAPE or AUX. You can only select one of the system. Selecting the Source • Press the respective source selection button: CD, TUNER, TAPE or AUX...
User manual
Page 16
... the volume. Some CDs or tapes might be switched off automatically. - You can manually select the wOOx setting that best suits your listening environment. 16 pg 01-31/P88/22-Eng 16 3/6/00, 1:26 PM 3139 116 19721 English OPERATING THE SYSTEM wOOx There are three wOOx settings to enhance the bass response. 1 Press wOOx PLUS (or wOOx on the display. 2 Adjust wOOx...
... the volume. Some CDs or tapes might be switched off automatically. - You can manually select the wOOx setting that best suits your listening environment. 16 pg 01-31/P88/22-Eng 16 3/6/00, 1:26 PM 3139 116 19721 English OPERATING THE SYSTEM wOOx There are three wOOx settings to enhance the bass response. 1 Press wOOx PLUS (or wOOx on the display. 2 Adjust wOOx...

User manual
Page 17
... total playing time will rotate until the CD changer completely reads the disc(s) before proceeding. PERSONAL DS English DISC CHANGE DISC 1 DISC 2 DISC 3 OPEN•CLOSE STANDBY ON MINI HIFI SYSTEM POWER SAVE IR SENSOR VEC C BASS/TREBLE CD 1•2•3 BAND TAPE 1•2 CDR/DVD C1C•D2 • 3 BTAUNNDER TAPE SEARCH•TUNING STOP•CLEAR PLAY PAUSE v ACUDRX PRESET v PREV SIDE NEXT PROG CLOCK/ TIMER DIM A. REV DUB (HSD) RECORD 3CD C H A N G E R LEFT CENTER RIGHT...
... total playing time will rotate until the CD changer completely reads the disc(s) before proceeding. PERSONAL DS English DISC CHANGE DISC 1 DISC 2 DISC 3 OPEN•CLOSE STANDBY ON MINI HIFI SYSTEM POWER SAVE IR SENSOR VEC C BASS/TREBLE CD 1•2•3 BAND TAPE 1•2 CDR/DVD C1C•D2 • 3 BTAUNNDER TAPE SEARCH•TUNING STOP•CLEAR PLAY PAUSE v ACUDRX PRESET v PREV SIDE NEXT PROG CLOCK/ TIMER DIM A. REV DUB (HSD) RECORD 3CD C H A N G E R LEFT CENTER RIGHT...

User manual
Page 18
... CD carousel tray will switch to close to retrieve the inner CD and then open again with the inner CD accessible. 3 Press OPEN•CLOSE to standby mode after 30 minutes if no button is stopped. The display will skip to start programming. ™ The PROGRAM starts flashing. ™ It will play the track again. Pressingí during playback • Press í or ë (or Digit 0-9 on the remote control...
... CD carousel tray will switch to close to retrieve the inner CD and then open again with the inner CD accessible. 3 Press OPEN•CLOSE to standby mode after 30 minutes if no button is stopped. The display will skip to start programming. ™ The PROGRAM starts flashing. ™ It will play the track again. Pressingí during playback • Press í or ë (or Digit 0-9 on the remote control...

User manual
Page 20
... be displayed. 20 ™ The system will start searching for example preset numbers 1 to 9, select preset 10 before starting automatic programming, only the preset numbers 10 to a weak station, briefly press à or á repeatedly until a radio station with RDS and then followed by pressing PROG orÇ (on the system only). - English TUNER STANDBY ON MINI HIFI SYSTEM POWER SAVE IR SENSOR VEC C BASS/TREBLE CD 1•2•3 BAND TAPE 1•2 CDR/DVD...
... be displayed. 20 ™ The system will start searching for example preset numbers 1 to 9, select preset 10 before starting automatic programming, only the preset numbers 10 to a weak station, briefly press à or á repeatedly until a radio station with RDS and then followed by pressing PROG orÇ (on the system only). - English TUNER STANDBY ON MINI HIFI SYSTEM POWER SAVE IR SENSOR VEC C BASS/TREBLE CD 1•2•3 BAND TAPE 1•2 CDR/DVD...

User manual
Page 21
... the first 5 presets, the NEWS/TA function will remain uninterrupted. ™ If no RDS station is displayed. English TUNER Receiving RDS Radio Station Ç RDS (Radio Data System) is a broadcasting service that allows FM stations to send additional information along with RDS clock 1 Press CLOCK/TIMER. ™ "--:--" or current time appears on the display. 2 Press CLOCK/TIMER once more to enter clock setting mode. ™ "00:00" or current time starts flashing. 3 Press RDS...
... the first 5 presets, the NEWS/TA function will remain uninterrupted. ™ If no RDS station is displayed. English TUNER Receiving RDS Radio Station Ç RDS (Radio Data System) is a broadcasting service that allows FM stations to send additional information along with RDS clock 1 Press CLOCK/TIMER. ™ "--:--" or current time appears on the display. 2 Press CLOCK/TIMER once more to enter clock setting mode. ™ "00:00" or current time starts flashing. 3 Press RDS...

User manual
Page 22
..." or "TA OFF" will be displayed immediately after the "TUNER" message. 22 pg 01-31/P88/22-Eng 22 AUX/CDR STANDBY ON MINI HIFI SYSTEM POWER SAVE IR SENSOR VEC C BASS/TREBLE CD 1•2•3 BAND TAPE 1•2 CDR/DVD C1C•D2 • 3 BTAUNNDER TAPE SEARCH•TUNING STOP•CLEAR PLAY PAUSE v ACUDRX PRESET v PREV SIDE NEXT PROG CLOCK/ TIMER DIM A. There are available for...
..." or "TA OFF" will be displayed immediately after the "TUNER" message. 22 pg 01-31/P88/22-Eng 22 AUX/CDR STANDBY ON MINI HIFI SYSTEM POWER SAVE IR SENSOR VEC C BASS/TREBLE CD 1•2•3 BAND TAPE 1•2 CDR/DVD C1C•D2 • 3 BTAUNNDER TAPE SEARCH•TUNING STOP•CLEAR PLAY PAUSE v ACUDRX PRESET v PREV SIDE NEXT PROG CLOCK/ TIMER DIM A. There are available for...

User manual
Page 25
... DS English STANDBY ON MINI HIFI SYSTEM POWER SAVE IR SENSOR VEC C BASS/TREBLE CD 1•2•3 BAND TAPE 1•2 CDR/DVD C 1C•D2 • 3 BTAUNNDER TAPE SEARCH•TUNING STOP•CLEAR PLAY PAUSE v ACUDRX PRESET v PREV SIDE NEXT PROG CLOCK/ TIMER DIM A. Dolby B NR can be recorded for Tuner or CD recording. - It is secured at both ends with Dolby B NR. 5 Press CD, TUNER or AUX. • Start playback of...
... DS English STANDBY ON MINI HIFI SYSTEM POWER SAVE IR SENSOR VEC C BASS/TREBLE CD 1•2•3 BAND TAPE 1•2 CDR/DVD C 1C•D2 • 3 BTAUNNDER TAPE SEARCH•TUNING STOP•CLEAR PLAY PAUSE v ACUDRX PRESET v PREV SIDE NEXT PROG CLOCK/ TIMER DIM A. Dolby B NR can be recorded for Tuner or CD recording. - It is secured at both ends with Dolby B NR. 5 Press CD, TUNER or AUX. • Start playback of...

User manual
Page 27
... system only) to store the setting. ™ The clock starts. • To exit without storing the setting, press Ç on whether you up. View Clock Clock Setting "Receiving RDS Radio Station" under TUNER section. 1 Press and hold CLOCK/TIMER for the timer to CD, TUNER, or TAPE 2 mode automatically at a preset time. Before setting the clock, you have selected 12- be in Standby mode or when any sound source is set. • The volume of the timer will always be displayed...
... system only) to store the setting. ™ The clock starts. • To exit without storing the setting, press Ç on whether you up. View Clock Clock Setting "Receiving RDS Radio Station" under TUNER section. 1 Press and hold CLOCK/TIMER for the timer to CD, TUNER, or TAPE 2 mode automatically at a preset time. Before setting the clock, you have selected 12- be in Standby mode or when any sound source is set. • The volume of the timer will always be displayed...

User manual
Page 28
... system will be switched on the remote control repeatedly to select a period of the selected disc or program. If the source selected is CD, playback will begin with the first track of time. ™ The selections are empty, TUNER will be selected instead. - If the source selected is TUNER, the last tuned frequency will be played. To start time. ™ The timer is now set. ™ The TIMER remains...
... system will be switched on the remote control repeatedly to select a period of the selected disc or program. If the source selected is CD, playback will begin with the first track of time. ™ The selections are empty, TUNER will be selected instead. - If the source selected is TUNER, the last tuned frequency will be played. To start time. ™ The timer is now set. ™ The TIMER remains...

User manual
Page 29
English Specifications AMPLIFIER Output power DPL Mode Left/Right Channel .. 2 x 160 W MPO / 2 x 80 RMS(1) Center Channel .......... 80 W MPO / 40 W RMS, 12 Ω Surround Channel 2 x 40 W MPO 2 x 20 W RMS, 6 Ω Stereo Mode 2 x 160 W MPO / 2 x 80 RMS(1) Signal-to-noise ratio 75 dBA (IEC) Frequency response 40 - 20000 Hz, ± 3 dB Input sensitivity AUX In / CDR/DVD In 500 mV / 1V Output Speakers 6 Ω Center Speakers 12 Ω Surround Speakers 6 Ω Headphones 32 Ω...
English Specifications AMPLIFIER Output power DPL Mode Left/Right Channel .. 2 x 160 W MPO / 2 x 80 RMS(1) Center Channel .......... 80 W MPO / 40 W RMS, 12 Ω Surround Channel 2 x 40 W MPO 2 x 20 W RMS, 6 Ω Stereo Mode 2 x 160 W MPO / 2 x 80 RMS(1) Signal-to-noise ratio 75 dBA (IEC) Frequency response 40 - 20000 Hz, ± 3 dB Input sensitivity AUX In / CDR/DVD In 500 mV / 1V Output Speakers 6 Ω Center Speakers 12 Ω Surround Speakers 6 Ω Headphones 32 Ω...

User manual
Page 30
... CD player. ™ Read the instruction booklet of your dealer. Do not open the set yourself as this will invalidate the guarantee. Cleaning Discs • When a disc becomes dirty, clean it with cleaner. Wipe the disc from the center out. • Do not use with cleaning fluid or alcohol. • You can also clean the heads by playing a cleaning tape once. Radio Reception...
... CD player. ™ Read the instruction booklet of your dealer. Do not open the set yourself as this will invalidate the guarantee. Cleaning Discs • When a disc becomes dirty, clean it with cleaner. Wipe the disc from the center out. • Do not use with cleaning fluid or alcohol. • You can also clean the heads by playing a cleaning tape once. Radio Reception...

User manual
Page 31
... material sounds strange. • Tape was a power failure. ™ Reset the clock. Remove the AC power plug from the wall outlet during tape playback. ™ Reconnect the AC power plug and switch on the system again. System displays features automatically; Timer is not working. • Clock is not set. ™ Set the clock. • Timer is not switched on. ™ Press TIMER ON/OFF to colored/black terminals. All lighted buttons are connected wrongly. ™ Check the speaker connection...
... material sounds strange. • Tape was a power failure. ™ Reset the clock. Remove the AC power plug from the wall outlet during tape playback. ™ Reconnect the AC power plug and switch on the system again. System displays features automatically; Timer is not working. • Clock is not set. ™ Set the clock. • Timer is not switched on. ™ Press TIMER ON/OFF to colored/black terminals. All lighted buttons are connected wrongly. ™ Check the speaker connection...


