
Leaflet
Page 1
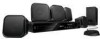
Philips 5.1 Home theater 1000W RMS power DVD playback HTS3371D Spectacular surround sound with 1080p HDMI upconversion, as well as convenient iPod playback via a single remote Play all your movies and music • DivX Ultra .... Enjoy sharp pictures with superb clarity Just like in the movies High definition pictures and powerful surround sound delivered by this elegant system provide unbeatable home entertainment. Connect and enjoy multiple sources • Dock included for convenient playback from your iPod/iPhone • Hi-Speed USB 2.0 Link plays video/music from...
Philips 5.1 Home theater 1000W RMS power DVD playback HTS3371D Spectacular surround sound with 1080p HDMI upconversion, as well as convenient iPod playback via a single remote Play all your movies and music • DivX Ultra .... Enjoy sharp pictures with superb clarity Just like in the movies High definition pictures and powerful surround sound delivered by this elegant system provide unbeatable home entertainment. Connect and enjoy multiple sources • Dock included for convenient playback from your iPod/iPhone • Hi-Speed USB 2.0 Link plays video/music from...
Leaflet
Page 2
..., multiple audio languages, multiple tracks and menus into one convenient file format. in "1080p') eliminates the line structure prevalent on your TV or home theater system - HDMI 1080p HDMI 1080p upscaling delivers images that can now be CDs, (S)VCDs, DVDs, DVD+R, DVD-R, DVD+RW, DVD-RW... of sharing media files on TV screens, again ensuring relentlessly sharp images. EasyLink EasyLink lets you want - 5.1 Home theater 1000W RMS power DVD playback Highlights HTS3371D/F7 Dock included for iPod/iPhone Use the docking station for your iPod and iPhone, and enjoy music from your...
..., multiple audio languages, multiple tracks and menus into one convenient file format. in "1080p') eliminates the line structure prevalent on your TV or home theater system - HDMI 1080p HDMI 1080p upscaling delivers images that can now be CDs, (S)VCDs, DVDs, DVD+R, DVD-R, DVD+RW, DVD-RW... of sharing media files on TV screens, again ensuring relentlessly sharp images. EasyLink EasyLink lets you want - 5.1 Home theater 1000W RMS power DVD playback Highlights HTS3371D/F7 Dock included for iPod/iPhone Use the docking station for your iPod and iPhone, and enjoy music from your...

Leaflet
Page 3
....3 kg • Issue date 2011-02-22 Version: 4.3.13 12 NC: 8670 000 48781 UPC: 6 09585 16453 6 © 2011 Koninklijke Philips Electronics N.V. All Rights reserved. 5.1 Home theater 1000W RMS power DVD playback Specifications HTS3371D/F7 Picture/Display • D/A converter: 12 bit, 108 MHz • Picture enhancement: High Def (720p, 1080i, 1080p), Progressive scan Sound...
....3 kg • Issue date 2011-02-22 Version: 4.3.13 12 NC: 8670 000 48781 UPC: 6 09585 16453 6 © 2011 Koninklijke Philips Electronics N.V. All Rights reserved. 5.1 Home theater 1000W RMS power DVD playback Specifications HTS3371D/F7 Picture/Display • D/A converter: 12 bit, 108 MHz • Picture enhancement: High Def (720p, 1080i, 1080p), Progressive scan Sound...

User manual
Page 3
... 36 1 Important 4 Select a preset sound 36 Important safety instruction 4 Trademark notice 6 8 Adjust settings 37 General setup 37 2 Your Home Theater System 7 Audio setup 39 Feature highlights 7 Video setup 41 Product overview 8 Preferences 43 3 Connect 11 9 Additional Information 45 Place the... batteries 18 Find the correct viewing channel 19 Select menu display language 19 Turn on Progressive Scan 20 Change speaker settings 21 Use Philips EasyLink 22 Select a play source 24 5 Play 25 Play a disc 25 Play video 25 Play music 28 Play photo 29...
... 36 1 Important 4 Select a preset sound 36 Important safety instruction 4 Trademark notice 6 8 Adjust settings 37 General setup 37 2 Your Home Theater System 7 Audio setup 39 Feature highlights 7 Video setup 41 Product overview 8 Preferences 43 3 Connect 11 9 Additional Information 45 Place the... batteries 18 Find the correct viewing channel 19 Select menu display language 19 Turn on Progressive Scan 20 Change speaker settings 21 Use Philips EasyLink 22 Select a play source 24 5 Play 25 Play a disc 25 Play video 25 Play music 28 Play photo 29...

User manual
Page 5
... space of packaging materials, exhausted batteries and old equipment. Please observe the local regulations regarding disposal of at least 4 inches around the Home Theater System for a Class B digital device, pursuant to correct the interference by one or more of this device. • Where the ...-003. Notice for USA This equipment has been tested and found to comply with the limits for ventilation. Never install the Home Theater System in a particular installation. Of this equipment does cause harmful interference to radio or television reception, which the receiver is connected...
... space of packaging materials, exhausted batteries and old equipment. Please observe the local regulations regarding disposal of at least 4 inches around the Home Theater System for a Class B digital device, pursuant to correct the interference by one or more of this device. • Where the ...-003. Notice for USA This equipment has been tested and found to comply with the limits for ventilation. Never install the Home Theater System in a particular installation. Of this equipment does cause harmful interference to radio or television reception, which the receiver is connected...

User manual
Page 7
... a real-to-life sound experience as if you are listening to enjoy the music play in superb sound quality. Philips EasyLink Your Home Theater System supports Philips EasyLink, which uses the HDMI CEC (Consumer Electronics Control) protocol. Hi speed USB 2.0 Link and MP3 link Simply... are saved in the highest picture quality available for an amazing viewing experience. English Your Home Theater System 2 Your Home Theater System Congratulations on any TV. EasyLink-compliant devices that Philips offers, register your USB device. To fully beneÀt from an audio CD into the...
... a real-to-life sound experience as if you are listening to enjoy the music play in superb sound quality. Philips EasyLink Your Home Theater System supports Philips EasyLink, which uses the HDMI CEC (Consumer Electronics Control) protocol. Hi speed USB 2.0 Link and MP3 link Simply... are saved in the highest picture quality available for an amazing viewing experience. English Your Home Theater System 2 Your Home Theater System Congratulations on any TV. EasyLink-compliant devices that Philips offers, register your USB device. To fully beneÀt from an audio CD into the...

User manual
Page 8
... or listen to standby mode. h IR sensor • Detects signals from the connected device. Product overview Main unit a b cdefghijk a (Standby-On) • Turns on the Home Theater System or switches to audio from the remote control. In radio mode, automatically tunes radio stations during Àrst-time setup.
... or listen to standby mode. h IR sensor • Detects signals from the connected device. Product overview Main unit a b cdefghijk a (Standby-On) • Turns on the Home Theater System or switches to audio from the remote control. In radio mode, automatically tunes radio stations during Àrst-time setup.

User manual
Page 9
...the audio delay time. to supported surround sound or stereo sound. k Numeric buttons • Selects an item to turn off the Home Theater System and all HDMI CEC compliant devices. e • • • • (Navigation buttons) Navigates through the menus....radio mode, press left and right for audio sync, then press VOL +/- EN 9 English Your Home Theater System Remote control a b c d o e p f q g r h s t i j k u l v m w n a (Standby-On) • Turns on the Home Theater System or switches to standby mode. • Press and hold to start auto search. f ...
...the audio delay time. to supported surround sound or stereo sound. k Numeric buttons • Selects an item to turn off the Home Theater System and all HDMI CEC compliant devices. e • • • • (Navigation buttons) Navigates through the menus....radio mode, press left and right for audio sync, then press VOL +/- EN 9 English Your Home Theater System Remote control a b c d o e p f q g r h s t i j k u l v m w n a (Standby-On) • Turns on the Home Theater System or switches to standby mode. • Press and hold to start auto search. f ...

User manual
Page 10
... in or out of preset stations: press to the menu during playback. q / (Previous/Next) • Skips to standby. u SLEEP • Sets a delay after which the Home Theater System switches to the previous or next title, chapter, or track. v REPEAT/PROGRAM • Selects or turns off repeat mode. 10 EN r (Mute) • Mutes...
... in or out of preset stations: press to the menu during playback. q / (Previous/Next) • Skips to standby. u SLEEP • Sets a delay after which the Home Theater System switches to the previous or next title, chapter, or track. v REPEAT/PROGRAM • Selects or turns off repeat mode. 10 EN r (Mute) • Mutes...

User manual
Page 11
... • Before you have full access to your TV, depending on availability and your Home Theater System. Connect video cables Connect this Home Theater System to TV to use your needs. EN 11 Connect English A comprehensive interactive guide...best video connection that you make or change any radiation devices. Do not place it cannot be used to connect this Home Theater System too close to a TV. Basic connections: • Video • Speakers and subwoofer • Power Optional...; Refer to the listening area. 3 Place the subwoofer at www.connectivityguide.philips.com.
... • Before you have full access to your TV, depending on availability and your Home Theater System. Connect video cables Connect this Home Theater System to TV to use your needs. EN 11 Connect English A comprehensive interactive guide...best video connection that you make or change any radiation devices. Do not place it cannot be used to connect this Home Theater System too close to a TV. Basic connections: • Video • Speakers and subwoofer • Power Optional...; Refer to the listening area. 3 Place the subwoofer at www.connectivityguide.philips.com.
User manual
Page 12
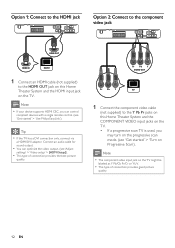
... via a HDMI/DVI adaptor. Pr Pb Y VIDEO OUT Pr Pb Y 1 Connect the component video cable (not supplied) to the HDMI OUT jack on this Home Theater System and the COMPONENT VIDEO input jacks on the TV might be labeled as Y Pb/Cb Pr/Cr or YUV. • This type of connection... component video input jack on the TV. • If a progressive scan TV is used, you can optimize the video output. (see 'Get started ' > 'Use Philips EasyLink'). Connect an audio cable for sound output. • You can control compliant devices with a single remote control. (see 'Get started ' > 'Turn on the ...
... via a HDMI/DVI adaptor. Pr Pb Y VIDEO OUT Pr Pb Y 1 Connect the component video cable (not supplied) to the HDMI OUT jack on this Home Theater System and the COMPONENT VIDEO input jacks on the TV might be labeled as Y Pb/Cb Pr/Cr or YUV. • This type of connection... component video input jack on the TV. • If a progressive scan TV is used, you can optimize the video output. (see 'Get started ' > 'Use Philips EasyLink'). Connect an audio cable for sound output. • You can control compliant devices with a single remote control. (see 'Get started ' > 'Turn on the ...

User manual
Page 13
...or RF In), use a RF modulator to view the disc play on the TV. 1 Connect a composite video cable (yellow) from the VIDEO jack on this Home Theater System to the video input jack on RF modulator. 2 Connect a RF coaxial cable (not supplied) from the ANTENNA OUT or TO TV jack on the... your TV. 3 If the off-air antenna or Cable TV service signal is connected to your TV, disconnect it from your electronics retailer or contact Philips for details about RF modulator availability and operations. English Connect Option 3: Connect to the Video (CVBS) jack Option 4: Connect to the RF modulator VIDEO...
...or RF In), use a RF modulator to view the disc play on the TV. 1 Connect a composite video cable (yellow) from the VIDEO jack on this Home Theater System to the video input jack on RF modulator. 2 Connect a RF coaxial cable (not supplied) from the ANTENNA OUT or TO TV jack on the... your TV. 3 If the off-air antenna or Cable TV service signal is connected to your TV, disconnect it from your electronics retailer or contact Philips for details about RF modulator availability and operations. English Connect Option 3: Connect to the Video (CVBS) jack Option 4: Connect to the RF modulator VIDEO...

User manual
Page 14
FM (75 Ω) ANTENNA 1 Connect the FM antenna to the FM75 jack on the Home Theater System. Connect speakers and subwoofer Connect radio antenna 1 Connect the speakers and subwoofer to the matching jacks on this Home Theater System (for some models, this cable is already connected). 2 Extend the FM antenna and Àx its ends to the wall. Note • Ensure that the colors of the plugs and jacks are matched. Tip • For better FM stereo reception, connect to an external FM antenna. 14 EN
FM (75 Ω) ANTENNA 1 Connect the FM antenna to the FM75 jack on the Home Theater System. Connect speakers and subwoofer Connect radio antenna 1 Connect the speakers and subwoofer to the matching jacks on this Home Theater System (for some models, this cable is already connected). 2 Extend the FM antenna and Àx its ends to the wall. Note • Ensure that the colors of the plugs and jacks are matched. Tip • For better FM stereo reception, connect to an external FM antenna. 14 EN
User manual
Page 15
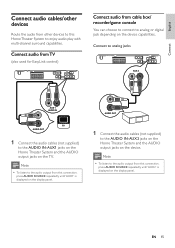
...1 Connect the audio cables (not supplied) to the AUDIO IN-AUX2 jacks on the Home Theater System and the AUDIO output jacks on the device. Note • To listen to the audio output from this Home Theater System to enjoy audio play with multi-channel surround capabilities. Connect to analog jacks AUX ...2 AUDIO IN AUX 1 AUDIO IN AUDIO OUT AUDIO OUT 1 Connect the audio cables (not supplied) to the AUDIO IN-AUX1 jacks on the Home Theater System and the AUDIO output jacks on the device capabilities. Connect audio from TV (also used for EasyLink control) Connect audio from cable box/ recorder...
...1 Connect the audio cables (not supplied) to the AUDIO IN-AUX2 jacks on the Home Theater System and the AUDIO output jacks on the device. Note • To listen to the audio output from this Home Theater System to enjoy audio play with multi-channel surround capabilities. Connect to analog jacks AUX ...2 AUDIO IN AUX 1 AUDIO IN AUDIO OUT AUDIO OUT 1 Connect the audio cables (not supplied) to the AUDIO IN-AUX1 jacks on the Home Theater System and the AUDIO output jacks on the device capabilities. Connect audio from TV (also used for EasyLink control) Connect audio from cable box/ recorder...
User manual
Page 16
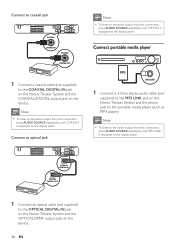
... displayed on the display panel. OPTICAL DIGITAL IN OPTICAL DIGITAL OUT 1 Connect an optical cable (not supplied) to the COAXIAL DIGITAL-IN jack on the Home Theater System and the COAXIAL/DIGITAL output jack on the device. Note • To listen to the audio output from this... Home Theater System and the phone jack on the portable media player (such as MP3 player). Connect to optical jack Note • To listen to the audio ...
... displayed on the display panel. OPTICAL DIGITAL IN OPTICAL DIGITAL OUT 1 Connect an optical cable (not supplied) to the COAXIAL DIGITAL-IN jack on the Home Theater System and the COAXIAL/DIGITAL output jack on the device. Note • To listen to the audio output from this... Home Theater System and the phone jack on the portable media player (such as MP3 player). Connect to optical jack Note • To listen to the audio ...
User manual
Page 17
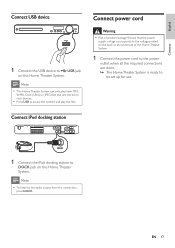
...EN 17 Connect iPod docking station DOCK 1 Connect the iPod docking station to DOCK jack on this Home Theater System. English Connect Connect USB device 1 Connect the USB device to USB jack on this Home Theater System. Note • To listen to the voltage printed on the back or the underside of... product damage! Connect power cord Warning • Risk of the Home Theater System. 1 Connect the power cord to the power outlet when all the required connections are stored on such devices. • Press USB to ...
...EN 17 Connect iPod docking station DOCK 1 Connect the iPod docking station to DOCK jack on this Home Theater System. English Connect Connect USB device 1 Connect the USB device to USB jack on this Home Theater System. Note • To listen to the voltage printed on the back or the underside of... product damage! Connect power cord Warning • Risk of the Home Theater System. 1 Connect the power cord to the power outlet when all the required connections are stored on such devices. • Press USB to ...
User manual
Page 18
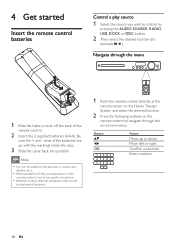
... carbon and alkaline, etc.). • Remove batteries if they should be disposed of properly. 1 Point the remote control directly at the remote sensor on the Home Theater System and select the desired function. 2 Press the following buttons on -screen menus. Navigate through the on the remote control to be used for example...
... carbon and alkaline, etc.). • Remove batteries if they should be disposed of properly. 1 Point the remote control directly at the remote sensor on the Home Theater System and select the desired function. 2 Press the following buttons on -screen menus. Navigate through the on the remote control to be used for example...

User manual
Page 19
... your country or region. EN 19 Select menu display language Note • Skip this setting if this Home Theater System is used. Tip • You can set the default language for DVD disc menu (see the Philips screen. • Press SOURCE button repeatedly on the remote control of the following ways: • Go...
... your country or region. EN 19 Select menu display language Note • Skip this setting if this Home Theater System is used. Tip • You can set the default language for DVD disc menu (see the Philips screen. • Press SOURCE button repeatedly on the remote control of the following ways: • Go...

User manual
Page 20
... the component video jack'). Video Setup TV System On TV Display Off Screen Fit Picture Setting HDMI Setup Closed Caption Progressive 1 Turn on both this Home Theater System. 3 Press DISC. 4 Press SETUP. 5 Press to select [Video Setup] in the menu, then press . 6 Select [Progressive] > [On], then .... » The progressive setup is deactivated (see 'Connect video cables' > 'Option 2: Connect to exit the menu. 9 You can connect this Home Theater System and the TV. 20 EN Note • If a blank/distorted screen is on the TV. Note • During play, when progressive scan...
... the component video jack'). Video Setup TV System On TV Display Off Screen Fit Picture Setting HDMI Setup Closed Caption Progressive 1 Turn on both this Home Theater System. 3 Press DISC. 4 Press SETUP. 5 Press to select [Video Setup] in the menu, then press . 6 Select [Progressive] > [On], then .... » The progressive setup is deactivated (see 'Connect video cables' > 'Option 2: Connect to exit the menu. 9 You can connect this Home Theater System and the TV. 20 EN Note • If a blank/distorted screen is on the TV. Note • During play, when progressive scan...
User manual
Page 22
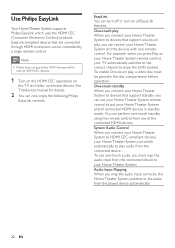
... standby When you map the audio input correctly, this Home Theater System switches to the audio from the connected device to put your Home Theater System to devices that are connected through HDMI connectors can now enjoy the following Philips EasyLink controls. Use Philips EasyLink Your Home Theater System supports Philips EasyLink, which uses the HDMI CEC (Consumer Electronics...
... standby When you map the audio input correctly, this Home Theater System switches to the audio from the connected device to put your Home Theater System to devices that are connected through HDMI connectors can now enjoy the following Philips EasyLink controls. Use Philips EasyLink Your Home Theater System supports Philips EasyLink, which uses the HDMI CEC (Consumer Electronics...


