
Leaflet
Page 2
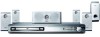
... Pro Logic II provides five channels of your MP3 and digital pictures. DVD home theater system Highlights HTS3410D/37 6x Class D Digital Amplifier When it comes to perfect audio there is no line structure. In...audio information to play or OK. These basic steps are clearly described on the disc. Philips Class D Amplifiers™ provide dramatically enhanced sound quality over digital amplifiers used by plugging the... competitors as they are written at the rear of connection and obtaining picture and sound. Easy-fit™ connectors Color-coded connectors provide a simple ...
... Pro Logic II provides five channels of your MP3 and digital pictures. DVD home theater system Highlights HTS3410D/37 6x Class D Digital Amplifier When it comes to perfect audio there is no line structure. In...audio information to play or OK. These basic steps are clearly described on the disc. Philips Class D Amplifiers™ provide dramatically enhanced sound quality over digital amplifiers used by plugging the... competitors as they are written at the rear of connection and obtaining picture and sound. Easy-fit™ connectors Color-coded connectors provide a simple ...
Leaflet
Page 3
... date 2009-07-03 Version: 6.0.10 12 NC: 9073 100 12734 UPC: 0 37849 95624 3 © 2009 Koninklijke Philips Electronics N.V. DVD home theater system Specifications HTS3410D/37 Picture/Display • Aspect ratio: 4:3, 16:9 • D/A converter: 10 bit / 54 MHz • Picture... digital tuning • Auto store • Number of Koninklijke Philips Electronics N.V. or their respective owners. Specifications are the property of Preset Channels: 40 Connectivity • Front / Side connections: Headphone out • Other connections: AUX in, TV in (audio, cinch), Line out, Digital...
... date 2009-07-03 Version: 6.0.10 12 NC: 9073 100 12734 UPC: 0 37849 95624 3 © 2009 Koninklijke Philips Electronics N.V. DVD home theater system Specifications HTS3410D/37 Picture/Display • Aspect ratio: 4:3, 16:9 • D/A converter: 10 bit / 54 MHz • Picture... digital tuning • Auto store • Number of Koninklijke Philips Electronics N.V. or their respective owners. Specifications are the property of Preset Channels: 40 Connectivity • Front / Side connections: Headphone out • Other connections: AUX in, TV in (audio, cinch), Line out, Digital...

User manual
Page 4
... ARTIFACTS TO BE DISPLAYED IN THE PICTURE. IN CASE OF 525 OR 625 PROGRESSIVE SCAN PICTURE PROBLEMS, IT IS RECOMMENDED THAT THE USER SWITCH THE CONNECTION TO THE 'STANDARD DEFINITION' OUTPUT. ATENCIÓN El uso de mando o ajustes o la ejecucción de métodos que no sean los aquí descritos... as set out in hazardous radiation exposure or other than herein may not cause harmful interference, and - This warning label is located on certain discs, Philips is subject to guarantee that this laser product.
... ARTIFACTS TO BE DISPLAYED IN THE PICTURE. IN CASE OF 525 OR 625 PROGRESSIVE SCAN PICTURE PROBLEMS, IT IS RECOMMENDED THAT THE USER SWITCH THE CONNECTION TO THE 'STANDARD DEFINITION' OUTPUT. ATENCIÓN El uso de mando o ajustes o la ejecucción de métodos que no sean los aquí descritos... as set out in hazardous radiation exposure or other than herein may not cause harmful interference, and - This warning label is located on certain discs, Philips is subject to guarantee that this laser product.
User manual
Page 7
...Video jack (Y Pb Pr) .. 11 Using S-Video jack 12 Using an accessory RF modulator 12 Step 4: Connecting FM/AM antennas 13 Step 5: Connecting the power cord 13 Connections (optional) Connecting a VCR or Cable/Satellite Box .... 14 Viewing and listening to the playback ...... 14 Using the VCR ... Selecting surround sound 33 Selecting digital sound effects 34 Volume Control 34 Dimming system's display screen 34 Using the remote to operate 'Philips' television 34 Specifications 35 Troubleshooting 36-37 Glossary 38-39 Limited Warranty 40 7 turning on /off 28 Screen saver - turning ...
...Video jack (Y Pb Pr) .. 11 Using S-Video jack 12 Using an accessory RF modulator 12 Step 4: Connecting FM/AM antennas 13 Step 5: Connecting the power cord 13 Connections (optional) Connecting a VCR or Cable/Satellite Box .... 14 Viewing and listening to the playback ...... 14 Using the VCR ... Selecting surround sound 33 Selecting digital sound effects 34 Volume Control 34 Dimming system's display screen 34 Using the remote to operate 'Philips' television 34 Specifications 35 Troubleshooting 36-37 Glossary 38-39 Limited Warranty 40 7 turning on /off 28 Screen saver - turning ...
User manual
Page 9
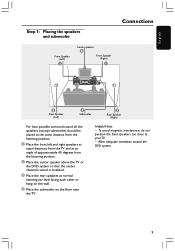
... TV. - Allow adequate ventilation around the DVD system. 9 Helpful Hints: - English Step 1: Placing the speakers and subwoofer Front Speaker (Left) 1 Center speaker 2 Front Speaker (Right) 1 Connections 3 Rear Speaker (Left) 4 Subwoofer 3 Rear Speaker (Right) For best possible surround sound, all the speakers (except subwoofer) should be placed at the same distance from...
... TV. - Allow adequate ventilation around the DVD system. 9 Helpful Hints: - English Step 1: Placing the speakers and subwoofer Front Speaker (Left) 1 Center speaker 2 Front Speaker (Right) 1 Connections 3 Rear Speaker (Left) 4 Subwoofer 3 Rear Speaker (Right) For best possible surround sound, all the speakers (except subwoofer) should be placed at the same distance from...
User manual
Page 10
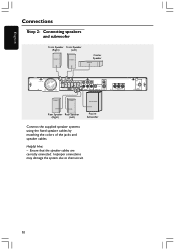
Helpful Hint: - Improper connections may damage the system due to short-circuit. 10 English Connections Step 2: Connecting speakers and subwoofer Front Speaker Front Speaker (Right) (Left) FRONT R FRONT L Center Speaker CENTER REAR R REAR L SUBWOOFER Rear Speaker Rear Speaker (Right) (Left) Passive Subwoofer Connect the supplied speaker systems using the fixed speaker cables by matching the colors of the jacks and speaker cables. Ensure that the speaker cables are correctly connected.
Helpful Hint: - Improper connections may damage the system due to short-circuit. 10 English Connections Step 2: Connecting speakers and subwoofer Front Speaker Front Speaker (Right) (Left) FRONT R FRONT L Center Speaker CENTER REAR R REAR L SUBWOOFER Rear Speaker Rear Speaker (Right) (Left) Passive Subwoofer Connect the supplied speaker systems using the fixed speaker cables by matching the colors of the jacks and speaker cables. Ensure that the speaker cables are correctly connected.

User manual
Page 11
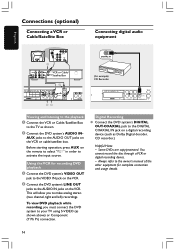
...CVBS, Composite or Baseband) on the TV. 2 To hear the TV channels through this DVD system, use the supplied audio cables (white/red) to connect AUDIO IN-TV jacks to your TV user manual. The progressive scan video quality is only possible when usingY Pb Pr, and a progressive scan TV...- If your TV. - You only need to deactivate progressive scan. 11 Press and hold OPEN/CLOSE button and press '1' to make one video connection from the following options, depending on the capabilities of your TV does not support Progressive Scan, you are using a Progressive Scan TV (TV must ...
...CVBS, Composite or Baseband) on the TV. 2 To hear the TV channels through this DVD system, use the supplied audio cables (white/red) to connect AUDIO IN-TV jacks to your TV user manual. The progressive scan video quality is only possible when usingY Pb Pr, and a progressive scan TV...- If your TV. - You only need to deactivate progressive scan. 11 Press and hold OPEN/CLOSE button and press '1' to make one video connection from the following options, depending on the capabilities of your TV does not support Progressive Scan, you are using a Progressive Scan TV (TV must ...

User manual
Page 12
Disconnect it from the TV.) 12 If S-Video is used for details on the TV. If your electronics retailer or contact Philips for DVD playback connection, the system's VIDEO OUT setting will need to be changed accordingly. See your TV only has a single Antenna In jack (labeled as Y/ C or S-... ohm or RF In), you will need an RF modulator in order to view DVD playback on the RF modulator. (It may have been connected to the corresponding AUDIO OUT jacks on RF modulator availability and operations. IMPORTANT! Using an accessory RF modulator 1 Use the supplied composite video cable...
Disconnect it from the TV.) 12 If S-Video is used for details on the TV. If your electronics retailer or contact Philips for DVD playback connection, the system's VIDEO OUT setting will need to be changed accordingly. See your TV only has a single Antenna In jack (labeled as Y/ C or S-... ohm or RF In), you will need an RF modulator in order to view DVD playback on the RF modulator. (It may have been connected to the corresponding AUDIO OUT jacks on RF modulator availability and operations. IMPORTANT! Using an accessory RF modulator 1 Use the supplied composite video cable...

User manual
Page 13
... FM antenna and fix its ends to prevent unwanted interference. 13 Helpful Hints: - For better FM stereo reception, connect an external FM antenna (not supplied.) After everything is connected properly, 1 Plug the AC power cord into the slot ➠ AM antenna 1 FM antenna 2 1 ~ AC...Adjust the position of the system for optimal reception. - English Step 4: Connecting FM/AM antennas Connections Step 5: Connecting the power cord fix the claw into the power outlet. 2 Never make or change any connections with the power switched on the rear or bottom of the antennas for ...
... FM antenna and fix its ends to prevent unwanted interference. 13 Helpful Hints: - For better FM stereo reception, connect an external FM antenna (not supplied.) After everything is connected properly, 1 Plug the AC power cord into the slot ➠ AM antenna 1 FM antenna 2 1 ~ AC...Adjust the position of the system for optimal reception. - English Step 4: Connecting FM/AM antennas Connections Step 5: Connecting the power cord fix the claw into the power outlet. 2 Never make or change any connections with the power switched on the rear or bottom of the antennas for ...
User manual
Page 14
... the DIGITAL COAXIAL IN jack on the remote to select "AUX" in order to the owner's manual of the other equipment for complete connection and usage details. 14 Always refer to activate the input source. Before starting operation, press AUX on a digital recording device (such as shown...3 L R 24 DIGITAL IN (for example) CD Recorder FRONT FRONT FRONT REAR REAR SUBWOOFER RIGHT LEFT CENTER RIGHT LEFT Viewing and listening to the playback 1 Connect the VCR or Cable/Satellite Box to the TV as Dolby Digital decoder, CD recorder.) Helpful Hints: - To view DVD playback while recording, you to...
... the DIGITAL COAXIAL IN jack on the remote to select "AUX" in order to the owner's manual of the other equipment for complete connection and usage details. 14 Always refer to activate the input source. Before starting operation, press AUX on a digital recording device (such as shown...3 L R 24 DIGITAL IN (for example) CD Recorder FRONT FRONT FRONT REAR REAR SUBWOOFER RIGHT LEFT CENTER RIGHT LEFT Viewing and listening to the playback 1 Connect the VCR or Cable/Satellite Box to the TV as Dolby Digital decoder, CD recorder.) Helpful Hints: - To view DVD playback while recording, you to...
User manual
Page 17
.... 17 Remove batteries if they should see the Video In channel. ➜ Or, the TV remote control may have completed all the necessary connections. (See pages 11-12 "Connecting TV".) 1 Press SOURCE control until "DISC" appears on the display panel (or press DISC on the remote.) 2 Turn on the TV and set...
.... 17 Remove batteries if they should see the Video In channel. ➜ Or, the TV remote control may have completed all the necessary connections. (See pages 11-12 "Connecting TV".) 1 Press SOURCE control until "DISC" appears on the display panel (or press DISC on the remote.) 2 Turn on the TV and set...
User manual
Page 18
... shape Set the aspect ratio of the DVD Player according to the TV you select must be available on the disc. The format you have connected. Select this case, a wide picture with black bands on the upper and lower portions of an NTSC disc and output it to NTSC format. NTSC... - In this if the connected TV is not, the setting for TV display will change the video signal of the TV screen will be in accordance with both sides of...
... shape Set the aspect ratio of the DVD Player according to the TV you select must be available on the disc. The format you have connected. Select this case, a wide picture with black bands on the upper and lower portions of an NTSC disc and output it to NTSC format. NTSC... - In this if the connected TV is not, the setting for TV display will change the video signal of the TV screen will be in accordance with both sides of...
User manual
Page 21
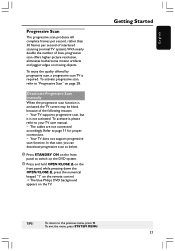
To activate it is required. To activate progressive scan, refer to your TV user manual. - The cables are not connected accordingly. English Progressive Scan The progressive scan produces 60 complete frames per second, rather than 30 frames per second of interlaced ..., while pressing down the OPEN/CLOSE 0, press the numerical keypad "1" on the remote control. ➜ The blue Philips DVD background appears on the front panel to page 11 for proper connections. - Your TV supports progressive scan, but it , please refer to "Progressive Scan" on moving objects. Getting Started...
To activate it is required. To activate progressive scan, refer to your TV user manual. - The cables are not connected accordingly. English Progressive Scan The progressive scan produces 60 complete frames per second, rather than 30 frames per second of interlaced ..., while pressing down the OPEN/CLOSE 0, press the numerical keypad "1" on the remote control. ➜ The blue Philips DVD background appears on the front panel to page 11 for proper connections. - Your TV supports progressive scan, but it , please refer to "Progressive Scan" on moving objects. Getting Started...

User manual
Page 27
...your TV using component video jacks. You do not need to adjust the video output setting if you have connected the DVD system to confirm your TV using CVBS jack (yellow) to connect the DVD system to your selection. To exit the menu, press SYSTEM MENU. 27 Helpful Hints: - ...TIPS: To return to enter the menu. Stop playback, then follow the steps of video output that matches the video connection between the DVD system and your TV. - Y PR PB Select this if you are described in the menu. 4 Press OK to your particular requirements. ,...
...your TV using component video jacks. You do not need to adjust the video output setting if you have connected the DVD system to confirm your TV using CVBS jack (yellow) to connect the DVD system to your selection. To exit the menu, press SYSTEM MENU. 27 Helpful Hints: - ...TIPS: To return to enter the menu. Stop playback, then follow the steps of video output that matches the video connection between the DVD system and your TV. - Y PR PB Select this if you are described in the menu. 4 Press OK to your particular requirements. ,...
User manual
Page 32
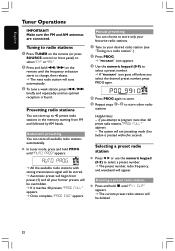
... indication starts to program more than 40 preset radio stations,"PROG FULL" appears. - English Tuner Operations IMPORTANT! Make sure the FM and AM antennas are connected. If you select the desired preset number, press PROG again. 4 Press PROG again to store. 5 Repeat steps 1~4 to select "FM" or "AM." 2 Press and hold...
... indication starts to program more than 40 preset radio stations,"PROG FULL" appears. - English Tuner Operations IMPORTANT! Make sure the FM and AM antennas are connected. If you select the desired preset number, press PROG again. 4 Press PROG again to store. 5 Repeat steps 1~4 to select "FM" or "AM." 2 Press and hold...
User manual
Page 33
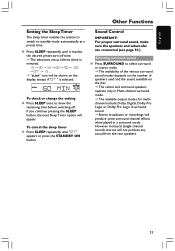
...) sources will appear. To check or change the setting G Press SLEEP once to show the remaining time before switching off time. ➜ The selections are connected (see page 10.) Selecting surround sound G Press SURROUND to standby mode automatically at a preset time. G Press SLEEP repeatedly until "OFF" appears or press the STANDBY...
...) sources will appear. To check or change the setting G Press SLEEP once to show the remaining time before switching off time. ➜ The selections are connected (see page 10.) Selecting surround sound G Press SURROUND to standby mode automatically at a preset time. G Press SLEEP repeatedly until "OFF" appears or press the STANDBY...
User manual
Page 36
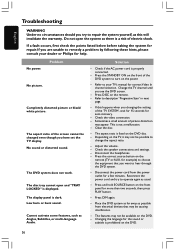
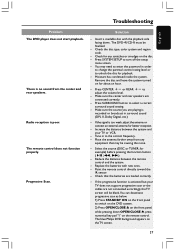
...is a risk of electric shock. Press DISC on the DVD. - Check the video connection. - Depending on the power. - Disconnect the power cord from electrical devices that you want to your dealer or Philips for help. Press DIM again. - Cannot activate some features, such as Angles, Subtitles,... or multi-language Audio. Clean the disc. - Check if the AC power cord is not a malfunction. - This is properly connected. - Reconnect the power cord and...
...is a risk of electric shock. Press DISC on the DVD. - Check the video connection. - Depending on the power. - Disconnect the power cord from electrical devices that you want to your dealer or Philips for help. Press DIM again. - Cannot activate some features, such as Angles, Subtitles,... or multi-language Audio. Clean the disc. - Check if the AC power cord is not a malfunction. - This is properly connected. - Reconnect the power cord and...
User manual
Page 37
.... - Remove the disc and leave the system turned on for example) before pressing the function button (ÉÅ, S, T.) - The blue Philips DVD background appears on the disc. - There is poor. Radio reception is no sound from any scratches or smudges on the TV screen. 37... control rating level or to switch on the DVD system. 2) Press OPEN/CLOSE 0 on the remote control. Make sure the source you are connected correctly. - Progressive Scan. Check the disc type, color system and region code. - Moisture has condensed inside the system. Press CENTER +- or...
.... - Remove the disc and leave the system turned on for example) before pressing the function button (ÉÅ, S, T.) - The blue Philips DVD background appears on the disc. - There is poor. Radio reception is no sound from any scratches or smudges on the TV screen. 37... control rating level or to switch on the DVD system. 2) Press OPEN/CLOSE 0 on the remote control. Make sure the source you are connected correctly. - Progressive Scan. Check the disc type, color system and region code. - Moisture has condensed inside the system. Press CENTER +- or...
User manual
Page 38
... will only play according to digital signal for controlling playback. Digital: Sound that has not been turned into progressive format when the DVD Player is connected to be prohibited if the software's level is the abbreviation of Motion Picture Experts Group 1 (or MPEG1) Audio Layer 3. A still-picture data compression system proposed...
... will only play according to digital signal for controlling playback. Digital: Sound that has not been turned into progressive format when the DVD Player is connected to be prohibited if the software's level is the abbreviation of Motion Picture Experts Group 1 (or MPEG1) Audio Layer 3. A still-picture data compression system proposed...

User manual
Page 40
... for shipping. When it is determined to rental purposes). • Products sold AS IS or RENEWED. You may not apply to a Philips authorized service center for repair. If you will repair or replace the product, at its original carton and packing material. COVERAGE: (If ...product, and installation or repair of antenna systems outside of the product. • Product repair and/or part replacement because of improper installation, connections to improper voltage supply, abuse, neglect, misuse, accident, unauthorized repair or other cause not within ninety (90) days of the date ...
... for shipping. When it is determined to rental purposes). • Products sold AS IS or RENEWED. You may not apply to a Philips authorized service center for repair. If you will repair or replace the product, at its original carton and packing material. COVERAGE: (If ...product, and installation or repair of antenna systems outside of the product. • Product repair and/or part replacement because of improper installation, connections to improper voltage supply, abuse, neglect, misuse, accident, unauthorized repair or other cause not within ninety (90) days of the date ...


