
User manual
Page 6
...contents General General Information ...8 Setup precautions...8 Accessories supplied ...8 Cleaning discs ...8 About recycling...8 Product Overview Main Unit ...9 Remote Control ...10-12 Using the remote control ...12 Connections Basic Connections ...13-18 Step 1: Placing the speakers...13 Step 2: Connecting to TV ...14-16......23 Setting the speakers' channels...24 Setting the EasyLink control ...25 One touch control...25 Disc Playback Disc Operations ...26-34 Playable discs ...26 Playing a disc ...26 Basic playback controls...27 Selecting various repeat/shuffle functions 27 Repeating a specific...
...contents General General Information ...8 Setup precautions...8 Accessories supplied ...8 Cleaning discs ...8 About recycling...8 Product Overview Main Unit ...9 Remote Control ...10-12 Using the remote control ...12 Connections Basic Connections ...13-18 Step 1: Placing the speakers...13 Step 2: Connecting to TV ...14-16......23 Setting the speakers' channels...24 Setting the EasyLink control ...25 One touch control...25 Disc Playback Disc Operations ...26-34 Playable discs ...26 Playing a disc ...26 Basic playback controls...27 Selecting various repeat/shuffle functions 27 Repeating a specific...

User manual
Page 8
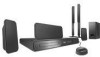
...unit (e.g., liquid filled objects, lighted candles.) Accessories supplied - 1 subwoofer - 1 center speaker - 2 front and 2 rear speakers - 1 remote control with adequate ventilation to dripping or splashing. - Place this unit near the AC outlet where the AC power plug can be recycled. Avoid ...number of this unit on non-polluting paper. Never place this unit and 5cm (2") from the center to a recycling center. Speaker cables (for HTS3566D tallboy speakers) - 2 screws (for discs. Setup precautions Finding a suitable location - Quick Start Guide Cleaning discs To clean a disc, use ...
...unit (e.g., liquid filled objects, lighted candles.) Accessories supplied - 1 subwoofer - 1 center speaker - 2 front and 2 rear speakers - 1 remote control with adequate ventilation to dripping or splashing. - Place this unit near the AC outlet where the AC power plug can be recycled. Avoid ...number of this unit on non-polluting paper. Never place this unit and 5cm (2") from the center to a recycling center. Speaker cables (for HTS3566D tallboy speakers) - 2 screws (for discs. Setup precautions Finding a suitable location - Quick Start Guide Cleaning discs To clean a disc, use ...

User manual
Page 10
... time setup. Sets the audio output delay times if the video playback is connected to the iPod that is slower than the audio output. English Remote Control 1 2 3 4 5 6 7 8 9 10 11 a 2 (Standby-On) - RADIO: switches to erase the current preset radio station. DOCK: switches to the docking station. Displays the current status or disc...
... time setup. Sets the audio output delay times if the video playback is connected to the iPod that is slower than the audio output. English Remote Control 1 2 3 4 5 6 7 8 9 10 11 a 2 (Standby-On) - RADIO: switches to erase the current preset radio station. DOCK: switches to the docking station. Displays the current status or disc...

User manual
Page 11
... search. - Adjusts the volume level. Repeat playback a specific section on a disc. 12 13 14 15 16 17 18 19 20 21 22 v REPEAT (PROGRAM) - English Remote Control (continued) l OK - Confirms an entry or selection. p % (Mute) - Enters a number of the disc. - u REPEAT A-B - Selects a DVD subtitle language. DISC: skips to the PBC menu. n MENU...
... search. - Adjusts the volume level. Repeat playback a specific section on a disc. 12 13 14 15 16 17 18 19 20 21 22 v REPEAT (PROGRAM) - English Remote Control (continued) l OK - Confirms an entry or selection. p % (Mute) - Enters a number of the disc. - u REPEAT A-B - Selects a DVD subtitle language. DISC: skips to the PBC menu. n MENU...

User manual
Page 12
... pressing the AUX (MP3 LINK), RADIO, USB, DOCK or DISC button on the front panel. English Remote Control (continued) Using the remote control CAUTION! - Remove batteries if they should be used for example í, ë.) 12 1_hts3565-66D_37_eng2_final813.i12 12 2008-03-27... 3:11:57 PM F Then select the desired function (for a long time. - Batteries contain chemical substances, they are exhausted or if the remote control is not to be disposed of properly. C Close the cover. B Insert two batteries type R03 or AAA, following the indications (+-) inside the compartment...
... pressing the AUX (MP3 LINK), RADIO, USB, DOCK or DISC button on the front panel. English Remote Control (continued) Using the remote control CAUTION! - Remove batteries if they should be used for example í, ë.) 12 1_hts3565-66D_37_eng2_final813.i12 12 2008-03-27... 3:11:57 PM F Then select the desired function (for a long time. - Batteries contain chemical substances, they are exhausted or if the remote control is not to be disposed of properly. C Close the cover. B Insert two batteries type R03 or AAA, following the indications (+-) inside the compartment...

User manual
Page 20
You may press ° button repeatedly on your TV. Refer to your TV user manual on how to select the correct input on your TV's remote control. Switching to different play source On the main unit Press the SOURCE button on the TV and switch it to the correct video-in channel. ...Press RADIO to switch to channel 3 or 4. If you see the Video In channel. On the remote control 20 1_hts3565-66D_37_eng2_final813.i20 20 Press DISC to switch to USB mode. Press USB to switch to DISC mode. C Turn on the main unit repeatedly...
You may press ° button repeatedly on your TV. Refer to your TV user manual on how to select the correct input on your TV's remote control. Switching to different play source On the main unit Press the SOURCE button on the TV and switch it to the correct video-in channel. ...Press RADIO to switch to channel 3 or 4. If you see the Video In channel. On the remote control 20 1_hts3565-66D_37_eng2_final813.i20 20 Press DISC to switch to USB mode. Press USB to switch to DISC mode. C Turn on the main unit repeatedly...
User manual
Page 21
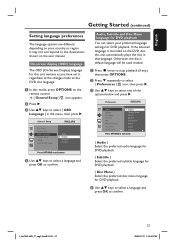
...) language The OSD (On-Screen Display) language for DVD playback You can select your country or region. If the selected language is recorded on the remote control. { General Setup } icon appears. A In disc mode, press OPTIONS on the DVD disc, this unit remains as you have set it, regardless of the options...
...) language The OSD (On-Screen Display) language for DVD playback You can select your country or region. If the selected language is recorded on the remote control. { General Setup } icon appears. A In disc mode, press OPTIONS on the DVD disc, this unit remains as you have set it, regardless of the options...

User manual
Page 22
...-03-27 3:12:01 PM Helpful Hints: - For some DVDs, the subtitle/audio/disc menu language can press the AUDIO SYNC or SUBTITLE on the remote control to enter the 4-digit language code 'XXXX' (see 'Language Code') and press OK to change the default settings you want is not available in the...
...-03-27 3:12:01 PM Helpful Hints: - For some DVDs, the subtitle/audio/disc menu language can press the AUDIO SYNC or SUBTITLE on the remote control to enter the 4-digit language code 'XXXX' (see 'Language Code') and press OK to change the default settings you want is not available in the...

User manual
Page 23
...picture. D Press repeatedly to confirm. 1_hts3565-66D_37_eng2_final813.i23 23 23 2008-03-27 3:12:01 PM B Press on the remote control. C Press OPTIONS on the remote control. The setup is now completed and you start to a Progressive Scan TV or component video input'.) A Turn on your TV... viewing channel for the this unit. Ensure that the TV progressive scan mode is displayed A Press ç on the remote control. A message appears on the remote control. There will be no picture is turned off the progressive scan feature on your TV user manual. Helpful Hints: - ...
...picture. D Press repeatedly to confirm. 1_hts3565-66D_37_eng2_final813.i23 23 23 2008-03-27 3:12:01 PM B Press on the remote control. C Press OPTIONS on the remote control. The setup is now completed and you start to a Progressive Scan TV or component video input'.) A Turn on your TV... viewing channel for the this unit. Ensure that the TV progressive scan mode is displayed A Press ç on the remote control. A message appears on the remote control. There will be no picture is turned off the progressive scan feature on your TV user manual. Helpful Hints: - ...

User manual
Page 24
... Right 0dB Press OPTIONS to exit menu E Use keys to confirm. Helpful Hints: - C Select { Speakers Volume } and press . A In disc mode, press OPTIONS on the remote control. Use the longer delay time settings when the rear speakers are not accessible. Before you optimize the sound according to your surround sound needs. G Press...
... Right 0dB Press OPTIONS to exit menu E Use keys to confirm. Helpful Hints: - C Select { Speakers Volume } and press . A In disc mode, press OPTIONS on the remote control. Use the longer delay time settings when the rear speakers are not accessible. Before you optimize the sound according to your surround sound needs. G Press...

User manual
Page 25
...OPTIONS. Ensure that matches the audio input and press OK. To enable one touch input switching function, select { System Audio Control } > { On }, then press OK. Philips does not guarantee 100% interoperability with all the HDMI CEC compliant devices. When using this Home Theatre unit and start play ...video channel. One touch power off this Home Theatre unit and TV are turned on this unit's remote control, you have to HDMI CEC compliant TV or device with a single remote control. It is displayed. G Select { HDMI Input Mapping }, then press OK. Your TV automatically ...
...OPTIONS. Ensure that matches the audio input and press OK. To enable one touch input switching function, select { System Audio Control } > { On }, then press OK. Philips does not guarantee 100% interoperability with all the HDMI CEC compliant devices. When using this Home Theatre unit and start play ...video channel. One touch power off this Home Theatre unit and TV are turned on this unit's remote control, you have to HDMI CEC compliant TV or device with a single remote control. It is displayed. G Select { HDMI Input Mapping }, then press OK. Your TV automatically ...

User manual
Page 26
... resolution support up . DivX® files on CD-R(W) - Playing a disc A Press SOURCE repeatedly until 'DISC' appears on the display panel (or press DISC on the remote control.) B Turn on this unit. - The blue DVD background screen appears on the disc tray. Make sure the disc label is indicated at the current time...
... resolution support up . DivX® files on CD-R(W) - Playing a disc A Press SOURCE repeatedly until 'DISC' appears on the display panel (or press DISC on the remote control.) B Turn on this unit. - The blue DVD background screen appears on the disc tray. Make sure the disc label is indicated at the current time...

User manual
Page 27
... functions The available of the repeat play options and shuffle play mode are vary depending on the remote control. Repeat playback is not possible on VCDs/ SVCDs when the PBC mode is active, press again...any buttons within 15 minutes after a disc has stopped playing. - English Disc Operations (continued) Basic playback controls Pausing playback During playback, press u. Helpful Hints: - If the message 'Playback from the beginning. - ...the repeat track mode is turned on the remote control repeatedly to replay the same track/ chapter. This is stopped for more than 5 minutes.
... functions The available of the repeat play options and shuffle play mode are vary depending on the remote control. Repeat playback is not possible on VCDs/ SVCDs when the PBC mode is active, press again...any buttons within 15 minutes after a disc has stopped playing. - English Disc Operations (continued) Basic playback controls Pausing playback During playback, press u. Helpful Hints: - If the message 'Playback from the beginning. - ...the repeat track mode is turned on the remote control repeatedly to replay the same track/ chapter. This is stopped for more than 5 minutes.

User manual
Page 28
... for repeat playback is only possible within the same title/track. Using the Disc Menu Depending on the disc format, a menu may appear on the remote control. 28 1_hts3565-66D_37_eng2_final813.i28 28 2008-03-27 3:12:02 PM Helpful Hint: - To access or remove the menu Press DISC on the TV screen...) Repeating a specific section (A-B) A While playing a disc, press REPEAT A-B at the start playback. To select a playback feature or item Use keys or numeric keypad 0-9 on the remote control, then press OK to end the section.
... for repeat playback is only possible within the same title/track. Using the Disc Menu Depending on the disc format, a menu may appear on the remote control. 28 1_hts3565-66D_37_eng2_final813.i28 28 2008-03-27 3:12:02 PM Helpful Hint: - To access or remove the menu Press DISC on the TV screen...) Repeating a specific section (A-B) A While playing a disc, press REPEAT A-B at the start playback. To select a playback feature or item Use keys or numeric keypad 0-9 on the remote control, then press OK to end the section.

User manual
Page 33
... playback. For a JPEG disc, the picture menu appears on the TV. Supported file format: - D Press MENU (BACK) to return to pan through the enlarged image. Remote control 1_hts3565-66D_37_eng2_final813.i33 33 33 2008-03-27 3:12:04 PM It cannot display progressive JPEG, Motion JPEG, or pictures in formats other pictures on...
... playback. For a JPEG disc, the picture menu appears on the TV. Supported file format: - D Press MENU (BACK) to return to pan through the enlarged image. Remote control 1_hts3565-66D_37_eng2_final813.i33 33 33 2008-03-27 3:12:04 PM It cannot display progressive JPEG, Motion JPEG, or pictures in formats other pictures on...

User manual
Page 34
... Use keys to select a MP3/WMA file from the disc menu and press OK. Playing a DivX® disc You can press AUDIO SYNC on the remote control to perform fast reverse/forward search. If the DivX title has different audio tracks, you can only play . Playback skips to start playback. The subtitle... folder or album. C Press OK to select a JPEG file from the disc menu and press OK to the time entered. Use m / M on the remote control to play those DivX videos that contains both the MP3/WMA music and JPEG photo files. If the DivX disc has multilingual subtitles, you want...
... Use keys to select a MP3/WMA file from the disc menu and press OK. Playing a DivX® disc You can press AUDIO SYNC on the remote control to perform fast reverse/forward search. If the DivX title has different audio tracks, you can only play . Playback skips to start playback. The subtitle... folder or album. C Press OK to select a JPEG file from the disc menu and press OK to the time entered. Use m / M on the remote control to play those DivX videos that contains both the MP3/WMA music and JPEG photo files. If the DivX disc has multilingual subtitles, you want...

User manual
Page 35
... iPod Playing from iPod AUX 2 AUX 1 A Connect the docking station to play/pause u playback. D Start playback on your Apple iPod can use the remote control to control the music: Action Remote control Press to enjoy the superior sound output from the speaker system. The music will be heard through the speakers. MENU (BACK) Press to... gen iPod Touch iPod Nano 2nd gen iPod Classic Preparing the docking station The supplied docking station has an adjustable support to it on the remote control. Whenever this unit.
... iPod Playing from iPod AUX 2 AUX 1 A Connect the docking station to play/pause u playback. D Start playback on your Apple iPod can use the remote control to control the music: Action Remote control Press to enjoy the superior sound output from the speaker system. The music will be heard through the speakers. MENU (BACK) Press to... gen iPod Touch iPod Nano 2nd gen iPod Classic Preparing the docking station The supplied docking station has an adjustable support to it on the remote control. Whenever this unit.

User manual
Page 36
However, editing or copying the data file is required. - A Connect the USB flash drive/USB memory card reader directly to the jack on the remote control to select device C Press USB on this unit. Helpful Hints: - When the USB device does not fit into the USB jack, a USB extension cable (not ...
However, editing or copying the data file is required. - A Connect the USB flash drive/USB memory card reader directly to the jack on the remote control to select device C Press USB on this unit. Helpful Hints: - When the USB device does not fit into the USB jack, a USB extension cable (not ...

User manual
Page 37
.... Other Audio Player Playing from other portable audio player You can connect your portable audio player. B Press AUX (MP3 LINK) on the remote control repeatedly until 'MP3 LINK' is only possible on your portable audio player to this unit to the 'headphone' output jack on the portable ...audio player. However, controlling of playback is displayed. DISC, USB). 1_hts3565-66D_37_eng2_final813.i37 37 37 2008-03-27 3:12:05 PM A Use a 3.5mm stereo audio cable (...
.... Other Audio Player Playing from other portable audio player You can connect your portable audio player. B Press AUX (MP3 LINK) on the remote control repeatedly until 'MP3 LINK' is only possible on your portable audio player to this unit to the 'headphone' output jack on the portable ...audio player. However, controlling of playback is displayed. DISC, USB). 1_hts3565-66D_37_eng2_final813.i37 37 37 2008-03-27 3:12:05 PM A Use a 3.5mm stereo audio cable (...

User manual
Page 38
...' on this Chapter Preferences Audio Subtitle Disc Menu Parental PBC MP3/JPEG Nav Password DivX Subtitle Press OPTIONS to exit menu See 'Preferences' on the remote control. C Use keys to select an option and press . English Setup Menu Options Accessing the setup menu You can change and press OK to confirm and...
...' on this Chapter Preferences Audio Subtitle Disc Menu Parental PBC MP3/JPEG Nav Password DivX Subtitle Press OPTIONS to exit menu See 'Preferences' on the remote control. C Use keys to select an option and press . English Setup Menu Options Accessing the setup menu You can change and press OK to confirm and...


