
User manual
Page 6
...Switching to different play source ...20 Setting language preferences...21-22 On-screen display (OSD) language ...21 Audio, Subtitle and Disc Menu language for DVD playback 21-22 Setting up Progressive Scan feature...23 Setting the speakers' channels...24 Setting the EasyLink ...control ...25 One touch control...25 Disc Playback Disc Operations ...26-34 Playable discs ...26 Playing a disc ...26 Basic playback controls...27 Selecting various repeat/shuffle functions 27 Repeating a specific section (A-B)...28 Other ...
...Switching to different play source ...20 Setting language preferences...21-22 On-screen display (OSD) language ...21 Audio, Subtitle and Disc Menu language for DVD playback 21-22 Setting up Progressive Scan feature...23 Setting the speakers' channels...24 Setting the EasyLink ...control ...25 One touch control...25 Disc Playback Disc Operations ...26-34 Playable discs ...26 Playing a disc ...26 Basic playback controls...27 Selecting various repeat/shuffle functions 27 Repeating a specific section (A-B)...28 Other ...

User manual
Page 7
... Playing from USB device...36 Playback - USB Device 36 Playing from iPod...35 Playback - English Table of contents Playing a MP3/ WMA disc ...32 Playing a JPEG photo file (slide show)...33 Preview function...33 Zooming...33 Skip/Rotate picture...33 Playing music and photo files simultaneously... 34 Playing a DivX® disc...34 Playback other portable audio player...37 Setup Options Setup Menu Options 38-48 Accessing the setup menu...38 General Setup ...39 Audio ...
... Playing from USB device...36 Playback - USB Device 36 Playing from iPod...35 Playback - English Table of contents Playing a MP3/ WMA disc ...32 Playing a JPEG photo file (slide show)...33 Preview function...33 Zooming...33 Skip/Rotate picture...33 Playing music and photo files simultaneously... 34 Playing a DivX® disc...34 Playback other portable audio player...37 Setup Options Setup Menu Options 38-48 Accessing the setup menu...38 General Setup ...39 Audio ...

User manual
Page 8
... plug can be exposed to the edge in a location with batteries - 1 composite video cable (yellow) - 1 docking station for discs. Never place any userserviceable parts. Place this unit on a flat, hard and stable surface. Avoid high temperature, moisture, water and dust -... Speaker cables (for HTS3566D tallboy speakers) - 2 screws (for ventilation - Never use a micro fiber cleaning cloth and wipe the disc from the center to dripping or splashing. - Please observe the local regulations regarding disposal of...
... plug can be exposed to the edge in a location with batteries - 1 composite video cable (yellow) - 1 docking station for discs. Never place any userserviceable parts. Place this unit on a flat, hard and stable surface. Avoid high temperature, moisture, water and dust -... Speaker cables (for HTS3566D tallboy speakers) - 2 screws (for ventilation - Never use a micro fiber cleaning cloth and wipe the disc from the center to dripping or splashing. - Please observe the local regulations regarding disposal of...

User manual
Page 9
... MP3 LINK or DOCK. h MP3 LINK jack - Main Unit English 1 2 3 4 5 67 89 a 2 (Standby-On) - Opens/closes the disc tray. d Display panel - x (Stop) - DISC: stops playback. - b Disc tray c ç (Open/Close) - Adjusts the volume level. u (Play/Pause) - RADIO: starts auto radio installation for USB flash drive or USB...this button to the previous or next title/ chapter/track. - i (USB) jack - Input for first time setup. DISC: skips to erase the current preset radio station. e VOLUME - Exits an operation. - Phono input for fast forward and backward search...
... MP3 LINK or DOCK. h MP3 LINK jack - Main Unit English 1 2 3 4 5 67 89 a 2 (Standby-On) - Opens/closes the disc tray. d Display panel - x (Stop) - DISC: stops playback. - b Disc tray c ç (Open/Close) - Adjusts the volume level. u (Play/Pause) - RADIO: starts auto radio installation for USB flash drive or USB...this button to the previous or next title/ chapter/track. - i (USB) jack - Input for first time setup. DISC: skips to erase the current preset radio station. e VOLUME - Exits an operation. - Phono input for fast forward and backward search...

User manual
Page 10
... the picture on this button to AUX1, AUX2, DI (DIGITAL IN) or MP3 LINK external source mode. - Opens/closes the disc tray. USB: switches to DISC mode. - Displays the current status or disc information. g Ç (Stop) - RADIO: press and hold this unit or turns off to FM band. - Selects a predefined ... the iPod that is slower than the audio output. d INFO - Enters or exits the system setup menu. Exits an operation. - DISC: stops playback. - DISC: selects an audio language/channel. - Sets the sleep timer. 10 1_hts3565-66D_37_eng2_final813.i10 10 2008-03-27 3:11:57 PM
... the picture on this button to AUX1, AUX2, DI (DIGITAL IN) or MP3 LINK external source mode. - Opens/closes the disc tray. USB: switches to DISC mode. - Displays the current status or disc information. g Ç (Stop) - RADIO: press and hold this unit or turns off to FM band. - Selects a predefined ... the iPod that is slower than the audio output. d INFO - Enters or exits the system setup menu. Exits an operation. - DISC: stops playback. - DISC: selects an audio language/channel. - Sets the sleep timer. 10 1_hts3565-66D_37_eng2_final813.i10 10 2008-03-27 3:11:57 PM

User manual
Page 11
...q VOL +/- Enters a track/title/chapter number of a preset radio station. RADIO: press and hold this button to start manual preset programming. - DISC: selects movement direction in the menu. - t SUBTITLE - RADIO: press left or right for fast forward and backward search. - r SURROUND - Repeat playback... a specific section on a disc. 12 13 14 15 16 17 18 19 20 21 22 v REPEAT (PROGRAM) - Adjusts the volume level. Selects multi-channel surround, stereo or...
...q VOL +/- Enters a track/title/chapter number of a preset radio station. RADIO: press and hold this button to start manual preset programming. - DISC: selects movement direction in the menu. - t SUBTITLE - RADIO: press left or right for fast forward and backward search. - r SURROUND - Repeat playback... a specific section on a disc. 12 13 14 15 16 17 18 19 20 21 22 v REPEAT (PROGRAM) - Adjusts the volume level. Selects multi-channel surround, stereo or...

User manual
Page 12
A Push to be disposed of properly. E Select the source you wish to control by pressing the AUX (MP3 LINK), RADIO, USB, DOCK or DISC button on the front panel. Never mix batteries (old and new or carbon and alkaline, etc.). - F Then select the desired function (for a long time. - C Close ...
A Push to be disposed of properly. E Select the source you wish to control by pressing the AUX (MP3 LINK), RADIO, USB, DOCK or DISC button on the front panel. Never mix batteries (old and new or carbon and alkaline, etc.). - F Then select the desired function (for a long time. - C Close ...

User manual
Page 20
... on your TV's remote control. Press DOCK to switch to USB mode. You may be called FRONT, A/V IN, VIDEO, etc.. B Press DISC on the TV and switch it to DISC mode. Switching to different play source On the main unit Press the SOURCE button on the main unit repeatedly to the lowest... a RF modulator, set the TV to MP3 LINK jack. 2008-03-27 3:12:01 PM On the remote control 20 1_hts3565-66D_37_eng2_final813.i20 20 Press DISC to switch to the correct video-in channel. C Turn on the remote control. Press AUX (MP3 LINK) repeatedly to hear the audio output from the...
... on your TV's remote control. Press DOCK to switch to USB mode. You may be called FRONT, A/V IN, VIDEO, etc.. B Press DISC on the TV and switch it to DISC mode. Switching to different play source On the main unit Press the SOURCE button on the main unit repeatedly to the lowest... a RF modulator, set the TV to MP3 LINK jack. 2008-03-27 3:12:01 PM On the remote control 20 1_hts3565-66D_37_eng2_final813.i20 20 Press DISC to switch to the correct video-in channel. C Turn on the remote control. Press AUX (MP3 LINK) repeatedly to hear the audio output from the...
User manual
Page 21
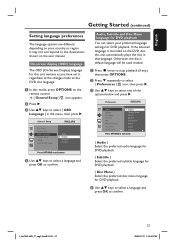
...your country or region. D Use keys to select a language and press OK to select { Preferences } icon, then press . Otherwise, the disc's default language will be used instead. B Press repeatedly to confirm. 1_hts3565-66D_37_eng2_final813.i21 21 21 2008-03-27 3:12:01 PM C Use keys... English Chinese (Simp) French Spanish Portuguese Polish Italian Turkish Press OPTIONS to select { OSD Language } in that language. General Setup Disc Lock Display Dim OSD Language Screen Saver Sleep DivX(R) VOD Code Auto English Français Espanõl Press OPTIONS to exit menu...
...your country or region. D Use keys to select a language and press OK to select { Preferences } icon, then press . Otherwise, the disc's default language will be used instead. B Press repeatedly to confirm. 1_hts3565-66D_37_eng2_final813.i21 21 21 2008-03-27 3:12:01 PM C Use keys... English Chinese (Simp) French Spanish Portuguese Polish Italian Turkish Press OPTIONS to select { OSD Language } in that language. General Setup Disc Lock Display Dim OSD Language Screen Saver Sleep DivX(R) VOD Code Auto English Français Espanõl Press OPTIONS to exit menu...

User manual
Page 22
.... 22 1_hts3565-66D_37_eng2_final813.i22 22 2008-03-27 3:12:01 PM For some DVDs, the subtitle/audio/disc menu language can press the AUDIO SYNC or SUBTITLE on the remote control to enter the 4-digit language code 'XXXX' (see 'Language Code') and press ...
.... 22 1_hts3565-66D_37_eng2_final813.i22 22 2008-03-27 3:12:01 PM For some DVDs, the subtitle/audio/disc menu language can press the AUDIO SYNC or SUBTITLE on the remote control to enter the 4-digit language code 'XXXX' (see 'Language Code') and press ...

User manual
Page 23
B Turn on this unit. D Press repeatedly to the correct viewing channel for the this unit and press DISC on the remote control. Video Setup TV Type TV Display Progressive Off Picture Setting On HDMI Setup Closed Caption F Read the notification message on the ... } icon, then press . There are some progressive scan TV that you have connected this unit, resulting in an unnatural picture when playing back a DVD VIDEO disc in the menu and press OK to { Progressive } > { On } in the progressive scan mode.
B Turn on this unit. D Press repeatedly to the correct viewing channel for the this unit and press DISC on the remote control. Video Setup TV Type TV Display Progressive Off Picture Setting On HDMI Setup Closed Caption F Read the notification message on the ... } icon, then press . There are some progressive scan TV that you have connected this unit, resulting in an unnatural picture when playing back a DVD VIDEO disc in the menu and press OK to { Progressive } > { On } in the progressive scan mode.

User manual
Page 24
...your surroundings and setup. Use the longer delay time settings when the rear speakers are not accessible. Stop the disc playback by pressing Ç twice or remove the disc from the disc tray. C Select { Speakers Volume } and press . The test tone will be generated to help you... judge the sound level of delay time is equivalent to confirm. A In disc mode, press OPTIONS on the remote control. G Press OK to 30 cm change in distance. - English Getting Started (continued) Setting the speakers'...
...your surroundings and setup. Use the longer delay time settings when the rear speakers are not accessible. Stop the disc playback by pressing Ç twice or remove the disc from the disc tray. C Select { Speakers Volume } and press . The test tone will be generated to help you... judge the sound level of delay time is equivalent to confirm. A In disc mode, press OPTIONS on the remote control. G Press OK to 30 cm change in distance. - English Getting Started (continued) Setting the speakers'...

User manual
Page 25
...menu, then press . Then select the TV/device that your TV/devices audio outputs are turned on other with all the HDMI CEC compliant devices. Philips does not guarantee 100% interoperability with a single remote control. Ensure that matches the audio input and press OK. H Select { OK } to... CEC compliant devices. G Select { HDMI Input Mapping }, then press OK. I Select the input { AUX /COAXIAL IN/ MP3 LINK } in the disc compartment before operation. - It is displayed. One touch power off Press STANDBY/POWER button to turn off this Home Theatre unit. Select a TV channel to...
...menu, then press . Then select the TV/device that your TV/devices audio outputs are turned on other with all the HDMI CEC compliant devices. Philips does not guarantee 100% interoperability with a single remote control. Ensure that matches the audio input and press OK. H Select { OK } to... CEC compliant devices. G Select { HDMI Input Mapping }, then press OK. I Select the input { AUX /COAXIAL IN/ MP3 LINK } in the disc compartment before operation. - It is displayed. One touch power off Press STANDBY/POWER button to turn off this Home Theatre unit. Select a TV channel to...

User manual
Page 26
....) B Turn on CD-R(W)/ DVD+R(W): - E Playback starts automatically. See the following pages for this unit is not available on the disc tray. Finalized DVD Recordable (DVD±R), DVD Rewritable (DVD±RW) - JPEG resolution support up to malfunction. The regional code ...for the same region as the unit. Helpful Hints: - English Disc Operations Playable discs Notes: - MP3/ Windows Media™ Audio discs, picture (Kodak, JPEG) files on the TV. Before playing a disc, make sure the disc is facing up . The blue DVD background screen appears on CD-R(W) -...
....) B Turn on CD-R(W)/ DVD+R(W): - E Playback starts automatically. See the following pages for this unit is not available on the disc tray. Finalized DVD Recordable (DVD±R), DVD Rewritable (DVD±RW) - JPEG resolution support up to malfunction. The regional code ...for the same region as the unit. Helpful Hints: - English Disc Operations Playable discs Notes: - MP3/ Windows Media™ Audio discs, picture (Kodak, JPEG) files on the TV. Before playing a disc, make sure the disc is facing up . The blue DVD background screen appears on CD-R(W) -...

User manual
Page 27
...press í' appears on the remote control repeatedly to step forward one frame at each press. Searching backward/forward Press m / M on the disc type. Selecting various repeat/ shuffle functions The available of the repeat play options and shuffle play mode are vary depending on the remote control. English...title) SHUFFLE (random play) RPT SHF (repeat random play) RPT OFF (exit repeat mode) VCD/SVCD/CD RPT ONE (repeat track) RPT ALL (repeat disc) SHUFFLE (random play) RPT SHF (repeat random play) RPT OFF (exit repeat mode) MP3/Windows Media™ Audio/ DivX® RPT ONE (repeat ...
...press í' appears on the remote control repeatedly to step forward one frame at each press. Searching backward/forward Press m / M on the disc type. Selecting various repeat/ shuffle functions The available of the repeat play options and shuffle play mode are vary depending on the remote control. English...title) SHUFFLE (random play) RPT SHF (repeat random play) RPT OFF (exit repeat mode) VCD/SVCD/CD RPT ONE (repeat track) RPT ALL (repeat disc) SHUFFLE (random play) RPT SHF (repeat random play) RPT OFF (exit repeat mode) MP3/Windows Media™ Audio/ DivX® RPT ONE (repeat ...

User manual
Page 28
...control, then press OK to end the section. C Press REPEAT A-B again to the instructions supplied with the discs. Helpful Hint: - Using the Disc Menu Depending on the disc format, a menu may appear on the remote control. 28 1_hts3565-66D_37_eng2_final813.i28 28 2008-03-27 3:12.... To access or remove the menu Press DISC on the TV screen once you load the disc. English Disc Operations (continued) Repeating a specific section (A-B) A While playing a disc, press REPEAT A-B at the start playback. Other playback features for video discs (DVD/VCD/ SVCD) Note: The operating...
...control, then press OK to end the section. C Press REPEAT A-B again to the instructions supplied with the discs. Helpful Hint: - Using the Disc Menu Depending on the disc format, a menu may appear on the remote control. 28 1_hts3565-66D_37_eng2_final813.i28 28 2008-03-27 3:12.... To access or remove the menu Press DISC on the TV screen once you load the disc. English Disc Operations (continued) Repeating a specific section (A-B) A While playing a disc, press REPEAT A-B at the start playback. Other playback features for video discs (DVD/VCD/ SVCD) Note: The operating...
User manual
Page 29
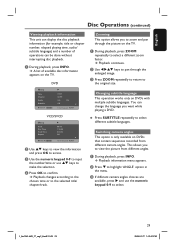
... languages. Press SUBTITLE repeatedly to the original size. B Press to the selected title/ chapter/track. English Disc Operations (continued) Viewing playback information This unit can display the disc playback information (for example, title or chapter number, elapsed playing time, audio/ subtitle language) and a ...playback, press INFO. Menu Title Chapter Audio Subtitle Bitrate 7 DVD 01/01 02/99 2ch Chi Off Title Elapsed VCD/SVCD Menu Track Disc Time Track Time Repeat 09/16 1:16:05 0:04:32 Off Bitrate 8 Total Elapsed B Use keys to view the information and press...
... languages. Press SUBTITLE repeatedly to the original size. B Press to the selected title/ chapter/track. English Disc Operations (continued) Viewing playback information This unit can display the disc playback information (for example, title or chapter number, elapsed playing time, audio/ subtitle language) and a ...playback, press INFO. Menu Title Chapter Audio Subtitle Bitrate 7 DVD 01/01 02/99 2ch Chi Off Title Elapsed VCD/SVCD Menu Track Disc Time Track Time Repeat 09/16 1:16:05 0:04:32 Off Bitrate 8 Total Elapsed B Use keys to view the information and press...

User manual
Page 30
English Disc Operations (continued) Changing sound track language This operation works only on the TV. If the volume control is to select the available audio channels provided ... allows you to select the available audio languages. For DVD Press AUDIO SYNC repeatedly to play VCDs/SVCDs interactively, following the menu on by the disc (STEREO, MONO LEFT, MONO RIGHT or MIX MONO).
English Disc Operations (continued) Changing sound track language This operation works only on the TV. If the volume control is to select the available audio channels provided ... allows you to select the available audio languages. For DVD Press AUDIO SYNC repeatedly to play VCDs/SVCDs interactively, following the menu on by the disc (STEREO, MONO LEFT, MONO RIGHT or MIX MONO).
User manual
Page 31
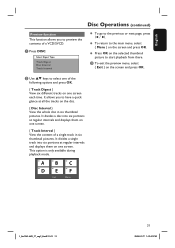
... 01 02 03 04 05 06 Exit Menu 1_hts3565-66D_37_eng2_final813.i31 31 31 2008-03-27 3:12:03 PM A Press DISC. Select Digest Type: Track Digest Disc Interval Track Interval To go to start playback from there. To return to preview the contents of the following options and press... OK. { Track Digest } View six different tracks on one screen each time. It divides a disc into six portions at regular intervals and displays them on one screen. { Track Interval } View the content of a single track in six thumbnail pictures...
... 01 02 03 04 05 06 Exit Menu 1_hts3565-66D_37_eng2_final813.i31 31 31 2008-03-27 3:12:03 PM A Press DISC. Select Digest Type: Track Digest Disc Interval Track Interval To go to start playback from there. To return to preview the contents of the following options and press... OK. { Track Digest } View six different tracks on one screen each time. It divides a disc into six portions at regular intervals and displays them on one screen. { Track Interval } View the content of a single track in six thumbnail pictures...
User manual
Page 32
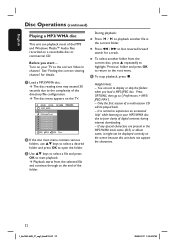
... through to the end of digital contents during internet downloading. - Only the first session of the directory/file configuration. A Load a MP3/WMA disc. The disc reading time may exceed 30 seconds due to the complexity of a multi-session CD will be displayed correctly on the TV. 00:06 04:04... \UDF_MP3\ Previous 08-AudioTrack 09-AudioTrack 10-AudioTrack 11-AudioTrack 12-AudioTrack 13-AudioTrack 14-AudioTrack 001/036 000 018 000 Disc B If the disc main menu contains various folders, use keys to select a desired folder and press OK to open the folder. See 'Finding the correct ...
... through to the end of digital contents during internet downloading. - Only the first session of the directory/file configuration. A Load a MP3/WMA disc. The disc reading time may exceed 30 seconds due to the complexity of a multi-session CD will be displayed correctly on the TV. 00:06 04:04... \UDF_MP3\ Previous 08-AudioTrack 09-AudioTrack 10-AudioTrack 11-AudioTrack 12-AudioTrack 13-AudioTrack 14-AudioTrack 001/036 000 018 000 Disc B If the disc main menu contains various folders, use keys to select a desired folder and press OK to open the folder. See 'Finding the correct ...


