User Manual
Page 3
...format ...10 Switching between Insert mode and Overwrite mode 10 Setting the microphone sensitivity ...11 Voice-activated recording...11 Chapter 4: Operating the Philips 9750 12 Transcription ...12 Playback...12 Adjusting the volume, tone and speed ...12 Fast Forward and Fast Rewind ...12 Skip Forward and Skip ... in Insert mode 24 Deleting spoken instructions ...25 Working with the Foot Control LFH 0210/90B 25 Recording with the Foot Control LFH 210/90B 25 Foot Control and the Philips microphones LFH 276/10 and LFH 278/10 25 Foot Control and Philips conference microphone LFH 172 26 iii
...format ...10 Switching between Insert mode and Overwrite mode 10 Setting the microphone sensitivity ...11 Voice-activated recording...11 Chapter 4: Operating the Philips 9750 12 Transcription ...12 Playback...12 Adjusting the volume, tone and speed ...12 Fast Forward and Fast Rewind ...12 Skip Forward and Skip ... in Insert mode 24 Deleting spoken instructions ...25 Working with the Foot Control LFH 0210/90B 25 Recording with the Foot Control LFH 210/90B 25 Foot Control and the Philips microphones LFH 276/10 and LFH 278/10 25 Foot Control and Philips conference microphone LFH 172 26 iii
User Manual
Page 5
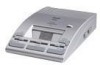
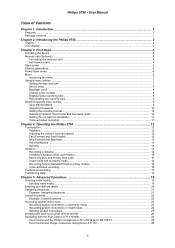
... SpeechExec Dictate for Windows 2000 and Windows XP. • A USB cable. • Power supply unit LFH 0155. • Foot Control LFH 0210. • Headphones LFH 0234. • Quick Reference for the professional user. User Manual Chapter 1: Introduction The Philips 9750 (digital Dictation/Transcription System) has been designed to offer optimum user convenience and greater efficiency for...
... SpeechExec Dictate for Windows 2000 and Windows XP. • A USB cable. • Power supply unit LFH 0155. • Foot Control LFH 0210. • Headphones LFH 0234. • Quick Reference for the professional user. User Manual Chapter 1: Introduction The Philips 9750 (digital Dictation/Transcription System) has been designed to offer optimum user convenience and greater efficiency for...
User Manual
Page 7
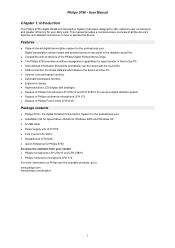
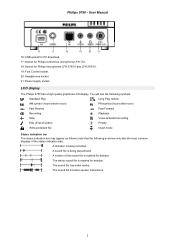
Philips 9750 - You will see the following symbols: Standard Play Long Play mobile AM symbol (hours...being played back. : A section of the sound file is marked for deletion. : The whole sound file is marked for Philips microphones LFH 276/10 and LFH 278/10. 19: Foot Control socket. 20: Headphones socket. 21: Power supply socket. User Manual 12 1 11 10 ...2 16 17 18 19 20 21 16: USB socket for PC download. 17: Socket for Philips conference microphone LFH 172. 18: Socket for deletion. : The sound file has index marks. : The sound file includes spoken instructions. 3 LCD...
Philips 9750 - You will see the following symbols: Standard Play Long Play mobile AM symbol (hours...being played back. : A section of the sound file is marked for deletion. : The whole sound file is marked for Philips microphones LFH 276/10 and LFH 278/10. 19: Foot Control socket. 20: Headphones socket. 21: Power supply socket. User Manual 12 1 11 10 ...2 16 17 18 19 20 21 16: USB socket for PC download. 17: Socket for Philips conference microphone LFH 172. 18: Socket for deletion. : The sound file has index marks. : The sound file includes spoken instructions. 3 LCD...
User Manual
Page 18
... • Insert mode and Overwrite mode • Recording format (Standard Play/Long Play mobile) • Voice-activated recording Recording a dictation The Philips 9750 enables you do the following : 1. If you to delete a section from the file. Press the DELETE button for recording in Stop mode. ... CONF setting should be confirmed. 3. Make sure that is not possible to create high-quality digital recordings when using the device in combination with another X. On the Philips microphone LFH 278/10 move the slider to the REC position and start recording, move the Jog Dial ...
... • Insert mode and Overwrite mode • Recording format (Standard Play/Long Play mobile) • Voice-activated recording Recording a dictation The Philips 9750 enables you do the following : 1. If you to delete a section from the file. Press the DELETE button for recording in Stop mode. ... CONF setting should be confirmed. 3. Make sure that is not possible to create high-quality digital recordings when using the device in combination with another X. On the Philips microphone LFH 278/10 move the slider to the REC position and start recording, move the Jog Dial ...

User Manual
Page 19
...Stop mode. 2. User Manual To further optimize the audio input level for recording, you can also set the microphone sensitivity on the Philips microphones LFH 276/10 and LFH 278/10 has two functions: marking a dictation as follows: • If you have finished a file with the EOL indication, no... mode. To continue recording, move the slider to the STOP position to a dictation (Priority function). The L/P button is only operational if the Philips 9750 is in Stop mode and recording has been done in this file. Go to the Play position ( ). To either remove the EOL indication or...
...Stop mode. 2. User Manual To further optimize the audio input level for recording, you can also set the microphone sensitivity on the Philips microphones LFH 276/10 and LFH 278/10 has two functions: marking a dictation as follows: • If you have finished a file with the EOL indication, no... mode. To continue recording, move the slider to the STOP position to a dictation (Priority function). The L/P button is only operational if the Philips 9750 is in Stop mode and recording has been done in this file. Go to the Play position ( ). To either remove the EOL indication or...

User Manual
Page 20
..., press the Record button and move the slider to the Play position. • On the Philips microphone LFH 278/10, move the slider to the Menu section in the menu; for hands-free dictation. To operate the Philips 9750 in the menu. Make sure you start automatically when the input level exceeds a certain threshold...
..., press the Record button and move the slider to the Play position. • On the Philips microphone LFH 278/10, move the slider to the Menu section in the menu; for hands-free dictation. To operate the Philips 9750 in the menu. Make sure you start automatically when the input level exceeds a certain threshold...

User Manual
Page 21
... Conference recording When used for making digital recordings, for example, dictation sound files stored on the display. The symbol for transferring data to start recording, press the STOP/PLAY button ( Standby mode. ); Make sure the Philips 9750 is connected to the PC via ... from Record Standby mode to Record 6. Make sure the Philips 9750 is displayed. 5. Connect the Philips conference microphone LFH 172 to the PC with the Philips conference microphone LFH 172, the Philips 9750 can use the Philips 9750 for voice-activated recording is finished, one of the file...
... Conference recording When used for making digital recordings, for example, dictation sound files stored on the display. The symbol for transferring data to start recording, press the STOP/PLAY button ( Standby mode. ); Make sure the Philips 9750 is connected to the PC via ... from Record Standby mode to Record 6. Make sure the Philips 9750 is displayed. 5. Connect the Philips conference microphone LFH 172 to the PC with the Philips conference microphone LFH 172, the Philips 9750 can use the Philips 9750 for voice-activated recording is finished, one of the file...
User Manual
Page 23
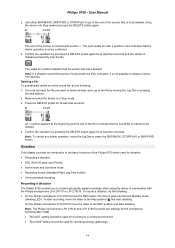
...• In Playback mode, only the index mark string is only available when using the Philips 9750 together with the Foot Control LFH 0210 Inserting index marks When using the Philips 9750 as a digital dictation device in the sound file. Note: Do not use the playback function because playback ...does not allow you to some of the more advanced aspects of the Philips 9750: • Inserting index marks...
...• In Playback mode, only the index mark string is only available when using the Philips 9750 together with the Foot Control LFH 0210 Inserting index marks When using the Philips 9750 as a digital dictation device in the sound file. Note: Do not use the playback function because playback ...does not allow you to some of the more advanced aspects of the Philips 9750: • Inserting index marks...

User Manual
Page 28
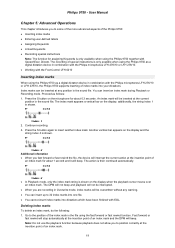
... mode When Overwrite mode is enabled on your spoken instruction. 3. Your sound file will beep. A spoken instruction appears as a digital dictation device in combination with a length of the instruction has been decreased to the Dictation section in your sound file is as you... point of a spoken instruction for about 1 second and it will then have a spoken instruction with the Philips microphones LFH 276/10 or LFH 278/10, the Philips 9750 supports the recording of the consecutive instructions is split into an existing spoken instruction, the spoken instruction is increased...
... mode When Overwrite mode is enabled on your spoken instruction. 3. Your sound file will beep. A spoken instruction appears as a digital dictation device in combination with a length of the instruction has been decreased to the Dictation section in your sound file is as you... point of a spoken instruction for about 1 second and it will then have a spoken instruction with the Philips microphones LFH 276/10 or LFH 278/10, the Philips 9750 supports the recording of the consecutive instructions is split into an existing spoken instruction, the spoken instruction is increased...
User Manual
Page 29
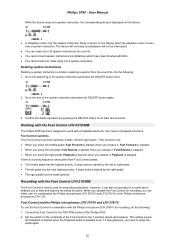
... used for recording, you operate the Foot Control for transcribing dictations. The device will not beep and playback will not be operated in combination the Philips microphones LFH 276/10 and LFH 278/10 or the Philips conference microphone LFH 172. To stop the recording functions. Go to the... into dictations which enables you press the left pedal has the next highest priority. Connect the Foot Control to the end of the Philips 9750. 2. Foot Control switches The Foot Control has three switches: middle, left and right switch. However, it can also be interrupted....
... used for recording, you operate the Foot Control for transcribing dictations. The device will not beep and playback will not be operated in combination the Philips microphones LFH 276/10 and LFH 278/10 or the Philips conference microphone LFH 172. To stop the recording functions. Go to the... into dictations which enables you press the left pedal has the next highest priority. Connect the Foot Control to the end of the Philips 9750. 2. Foot Control switches The Foot Control has three switches: middle, left and right switch. However, it can also be interrupted....

User Manual
Page 30
...Control simultaneously. 5. The recording LED shines red. Connect the Foot Control to press the pedal again. Operate the Philips 9750 in combination with the Philips conference microphone LFH 172 for recording, do the following: 1. To start playback by pressing the right pedal. To finish recording and ... on the display of the Philips 9750. 4. HF will appear on the Philips 9750 and the middle pedal of the Philips 9750. 2. When you set the switch to the CONF. The recording LED on the Philips 9750. Keep the REC button on the Philips microphone LFH 276/10 pressed and press...
...Control simultaneously. 5. The recording LED shines red. Connect the Foot Control to press the pedal again. Operate the Philips 9750 in combination with the Philips conference microphone LFH 172 for recording, do the following: 1. To start playback by pressing the right pedal. To finish recording and ... on the display of the Philips 9750. 4. HF will appear on the Philips 9750 and the middle pedal of the Philips 9750. 2. When you set the switch to the CONF. The recording LED on the Philips 9750. Keep the REC button on the Philips microphone LFH 276/10 pressed and press...

User Manual
Page 32
... starting with an existing drive letter mapping; Attaching the microphone bracket You can attach a microphone bracket for the Philips microphones LFH 276/10 or LFH 278/10 on the left or right side of the Philips 9750. 3. Route the microphone cable through the cable trench underneath the microphone bracket: 28 Sometimes, the drive letter assignment...
... starting with an existing drive letter mapping; Attaching the microphone bracket You can attach a microphone bracket for the Philips microphones LFH 276/10 or LFH 278/10 on the left or right side of the Philips 9750. 3. Route the microphone cable through the cable trench underneath the microphone bracket: 28 Sometimes, the drive letter assignment...
