
User manual
Page 2
...REMOVE COVER (OR BACK). MAC5097 For Customer Use Enter below the Serial No. Owner Confirmation Your completed Warranty Registration Card serves as the owner of your purchase, and welcome to the "family!" As a member of the Philips "family," you're entitled to protection by one of the best-built, best... Chief Executive Officer P.S. which you can count on your model. TRATION Hurry! REFER SERVICING TO QUALIFIED SERVICE PERSONNEL. Remember, to get the most from our convenient home shopping network. NO USER-SERVICEABLE PARTS INSIDE. So please mail it to wide slot, and ...
...REMOVE COVER (OR BACK). MAC5097 For Customer Use Enter below the Serial No. Owner Confirmation Your completed Warranty Registration Card serves as the owner of your purchase, and welcome to the "family!" As a member of the Philips "family," you're entitled to protection by one of the best-built, best... Chief Executive Officer P.S. which you can count on your model. TRATION Hurry! REFER SERVICING TO QUALIFIED SERVICE PERSONNEL. Remember, to get the most from our convenient home shopping network. NO USER-SERVICEABLE PARTS INSIDE. So please mail it to wide slot, and ...

User manual
Page 3
... under license from Digital Theater Systems, inc. All rights reserved. NEVER MAKE OR CHANGE CONNECTIONS WITH THE POWER SWITCHED ON. "DTS" and "DTS Digital Surround" are trademarks of this copyright protection technology must accept any interference received, including interference that is subject to the following two conditions: 1. All rights reserved. NOTE: PICTURES SHOWN MAY BE DIFFERENT BETWEEN COUNTRIES. Use of Dolby Laboratories. ATTENTION L'utilisation...
... under license from Digital Theater Systems, inc. All rights reserved. NEVER MAKE OR CHANGE CONNECTIONS WITH THE POWER SWITCHED ON. "DTS" and "DTS Digital Surround" are trademarks of this copyright protection technology must accept any interference received, including interference that is subject to the following two conditions: 1. All rights reserved. NOTE: PICTURES SHOWN MAY BE DIFFERENT BETWEEN COUNTRIES. Use of Dolby Laboratories. ATTENTION L'utilisation...
User manual
Page 5
... panels 7 Remote Control 8 Connections Connecting antennas 9 AM Indoor Loop Antenna FM Indoor Antenna FM Outdoor Antenna Connecting the speakers 10 Connecting a TV 10 Connecting additional equipment 11 Analog audio connections Digital audio connections Replacing the center speaker with the TV Preparations Setting up the surround sound system 12 Placing the speakers Changing the volume level Setting up the subwoofer 12 Inserting batteries into the remote control 13 Switching on the system 13 NTSC/PAL Setting 13 System Setup (DVD 14-16 Setting the picture Setting the sound Setting...
... panels 7 Remote Control 8 Connections Connecting antennas 9 AM Indoor Loop Antenna FM Indoor Antenna FM Outdoor Antenna Connecting the speakers 10 Connecting a TV 10 Connecting additional equipment 11 Analog audio connections Digital audio connections Replacing the center speaker with the TV Preparations Setting up the surround sound system 12 Placing the speakers Changing the volume level Setting up the subwoofer 12 Inserting batteries into the remote control 13 Switching on the system 13 NTSC/PAL Setting 13 System Setup (DVD 14-16 Setting the picture Setting the sound Setting...
User manual
Page 6
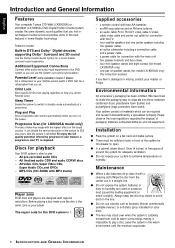
... (box), polystyrene foam (buffer) and polyethylene (bags, protective foam sheet). English Introduction and General Information Features Your complete 7-piece 275-Watt (LX8000SA) or 200-Watt (LX7000SA) DVD Digital Home Cinema System creates the same dynamic sound qualities that has a rating higher than you set the Parental Level. Before playing a disc, make the packaging easy to play : - a remote control with the highest effect on the power. one center speaker, including five speaker cables...
... (box), polystyrene foam (buffer) and polyethylene (bags, protective foam sheet). English Introduction and General Information Features Your complete 7-piece 275-Watt (LX8000SA) or 200-Watt (LX7000SA) DVD Digital Home Cinema System creates the same dynamic sound qualities that has a rating higher than you set the Parental Level. Before playing a disc, make the packaging easy to play : - a remote control with the highest effect on the power. one center speaker, including five speaker cables...
User manual
Page 7
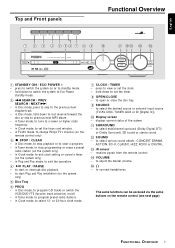
...- receives signals from the remote control. $ VOLUME - English Top and Front panels Functional Overview SEARCH / PREV STOP/ CLEAR PLAY/ PAUSE SEARCH / NEXT PROG CLOCK / TIMER 1 2 3 4 2 56 7 8 9 0 STANDBY-ON ECO POWER DVD VIDEO /SACD DIGITAL SURROUND SYSTEM OPEN/CLOSE SOURCE ! @# $ % SURROUND SOUND iR SENSOR VOLUME 1 STANDBY ON / ECO POWER y - in Plug and Play mode, to start Plug and Play installation (on the remote control only). 3 Ç STOP / CLEAR - to select the desired source or external input source (TV/AV, DISC, TUNER, AUX or DI [Digital In]). 0 Display screen...
...- receives signals from the remote control. $ VOLUME - English Top and Front panels Functional Overview SEARCH / PREV STOP/ CLEAR PLAY/ PAUSE SEARCH / NEXT PROG CLOCK / TIMER 1 2 3 4 2 56 7 8 9 0 STANDBY-ON ECO POWER DVD VIDEO /SACD DIGITAL SURROUND SYSTEM OPEN/CLOSE SOURCE ! @# $ % SURROUND SOUND iR SENSOR VOLUME 1 STANDBY ON / ECO POWER y - in Plug and Play mode, to start Plug and Play installation (on the remote control only). 3 Ç STOP / CLEAR - to select the desired source or external input source (TV/AV, DISC, TUNER, AUX or DI [Digital In]). 0 Display screen...

User manual
Page 8
... set the sleep (auto-off Playback Control (PBC) mode while playback stopped. - hold down to switch the system to enable or disable the sound output. § RESUME - in the disc menu / system menu bar. ( REPEAT - to select movement direction in Tuner mode, to select a preset radio station number (1 or 2 ). - CENTER +/- - to Eco Power standby mode. 8 FUNCTIONAL OVERVIEW in multichannel mode. ∞ MUTE - to repeat a specific section on a disc. ¡ SUBW +/- - to enter or exit the Disc menu. - to adjust the center speaker's volume level...
... set the sleep (auto-off Playback Control (PBC) mode while playback stopped. - hold down to switch the system to enable or disable the sound output. § RESUME - in the disc menu / system menu bar. ( REPEAT - to select movement direction in Tuner mode, to select a preset radio station number (1 or 2 ). - CENTER +/- - to Eco Power standby mode. 8 FUNCTIONAL OVERVIEW in multichannel mode. ∞ MUTE - to repeat a specific section on a disc. ¡ SUBW +/- - to enter or exit the Disc menu. - to adjust the center speaker's volume level...

User manual
Page 9
.../AM ANTENNA CONNECTIONS 9 Note: - Fix the claw to receive the clearest sound. Connecting antennas AM Indoor Loop Antenna Connect the supplied AM loop antenna to the wall outlet, ensure that all other connections have been made. - Keep the antenna as far away as shown. Connections English SPEAKER SYSTEMS (8Ω) R L C SR SL + + FRONT CENTER SURROUND CDR DIGITAL CENTER AUX OUT OUT IN TV LINE IN OUT DIGITAL WOOFER IN LINE OUT AUDIO VIDEO OUT FM...
.../AM ANTENNA CONNECTIONS 9 Note: - Fix the claw to receive the clearest sound. Connecting antennas AM Indoor Loop Antenna Connect the supplied AM loop antenna to the wall outlet, ensure that all other connections have been made. - Keep the antenna as far away as shown. Connections English SPEAKER SYSTEMS (8Ω) R L C SR SL + + FRONT CENTER SURROUND CDR DIGITAL CENTER AUX OUT OUT IN TV LINE IN OUT DIGITAL WOOFER IN LINE OUT AUDIO VIDEO OUT FM...
User manual
Page 10
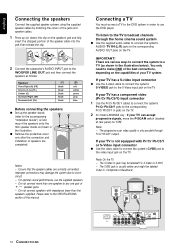
... sound performance, use the DVD player. If your TV has a S-video input connector q Use the S-video cable to connect the system's S-VIDEO jack to the S-Video input jack on the speaker's jack and fully insert the stripped portion of this manual. If your TV can accept progressive signals, move the P-SCAN switch (located at rear panel) to "ON". Notes: - English Connecting the speakers Connect the supplied speaker systems using the supplied speaker cables by matching the colors of the jacks and speaker cables...
... sound performance, use the DVD player. If your TV has a S-video input connector q Use the S-video cable to connect the system's S-VIDEO jack to the S-Video input jack on the speaker's jack and fully insert the stripped portion of this manual. If your TV can accept progressive signals, move the P-SCAN switch (located at rear panel) to "ON". Notes: - English Connecting the speakers Connect the supplied speaker systems using the supplied speaker cables by matching the colors of the jacks and speaker cables...

User manual
Page 11
... as a VCR, Laser Disc player or cassette deck). Some DVDs have anti-copying devices, so you use the Home Cinema Audio System's surround sound capabilities. Note: - For recording Connect the system's DIGITAL OUT jack to additional equipment, the audio/video cables are encoded with the TV You can connect other audio and audio/visual equipment to the DVD system in order to the CENTER OUT jack of the jacks on a CD recorder...
... as a VCR, Laser Disc player or cassette deck). Some DVDs have anti-copying devices, so you use the Home Cinema Audio System's surround sound capabilities. Note: - For recording Connect the system's DIGITAL OUT jack to additional equipment, the audio/video cables are encoded with the TV You can connect other audio and audio/visual equipment to the DVD system in order to the CENTER OUT jack of the jacks on a CD recorder...
User manual
Page 12
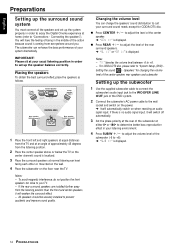
... DTS disc. IMPORTANT! q Press CENTER +/- q Press REAR +/- to adjust the volume level of the center speaker, rear speakers and subwoofer. If the rear surround speakers are installed farther away from everywhere around you. The subwoofer can change the speakers' sound distribution to suit your usual listening position in your listening environment. 4 Press SUBW +/- Changing the volume level You can enhance the bass performance of the DVD system. 2 Connect the subwoofer's AC power cable to +6). ➜ "SUB XX" is no audio signal input...
... DTS disc. IMPORTANT! q Press CENTER +/- q Press REAR +/- to adjust the volume level of the center speaker, rear speakers and subwoofer. If the rear surround speakers are installed farther away from everywhere around you. The subwoofer can change the speakers' sound distribution to suit your usual listening position in your listening environment. 4 Press SUBW +/- Changing the volume level You can enhance the bass performance of the DVD system. 2 Connect the subwoofer's AC power cable to +6). ➜ "SUB XX" is no audio signal input...

User manual
Page 13
... correct video in combination. - PREPARATIONS 13 Switch on power, "AUTO INSTALL - For example, connect to a TV and select TV/AV as the input source or connect to the power outlet. CAUTION! - Remove batteries if they should be displayed. Do not use the Home Cinema Audio System's surround sound capabilities. Switching on the system 1 After completing all the connections, connect the AC power cord of batteries in channel (for details. ➜ The default screen appears on the display screen. q The...
... correct video in combination. - PREPARATIONS 13 Switch on power, "AUTO INSTALL - For example, connect to a TV and select TV/AV as the input source or connect to the power outlet. CAUTION! - Remove batteries if they should be displayed. Do not use the Home Cinema Audio System's surround sound capabilities. Switching on the system 1 After completing all the connections, connect the AC power cord of batteries in channel (for details. ➜ The default screen appears on the display screen. q The...

User manual
Page 14
... 2 Use 3 4 1 2 to adjust the values of color settings by adjusting : Saturation, Brightness and Contrast. If it is formatted for TV Shape will be displayed on a disc, then the disc's own preference will not affect the picture during playback. ö Black level shift (NTSC output only) Select On if you set your wide screen TV to the left or right. If the options selected are playing NTSC-compatible DVDs. Settings Auto...
... 2 Use 3 4 1 2 to adjust the values of color settings by adjusting : Saturation, Brightness and Contrast. If it is formatted for TV Shape will be displayed on a disc, then the disc's own preference will not affect the picture during playback. ö Black level shift (NTSC output only) Select On if you set your wide screen TV to the left or right. If the options selected are playing NTSC-compatible DVDs. Settings Auto...

User manual
Page 15
... DVD system's DIGITAL OUT jack to an equipment that matches the connected TV. If your TV is NTSC-compatible. Select All, if you to adjust the advance delay of digital output available with both NTSC and PAL, select AUTO. Select Off to level out the volume, high volume outputs will be softened. Note: - Setting the sound 1en 1en Digital output Analog output Night mode Karaoke vocal Speakers PCM output 1 st All Stereo On Off Settings... 48 KHZ ö Digital output Digital output...
... DVD system's DIGITAL OUT jack to an equipment that matches the connected TV. If your TV is NTSC-compatible. Select All, if you to adjust the advance delay of digital output available with both NTSC and PAL, select AUTO. Select Off to level out the volume, high volume outputs will be softened. Note: - Setting the sound 1en 1en Digital output Analog output Night mode Karaoke vocal Speakers PCM output 1 st All Stereo On Off Settings... 48 KHZ ö Digital output Digital output...

User manual
Page 16
... equipment is to select the audio language, subtitle language and the language used for every disc to adjust the PCM output setting. If you may need the system to convert sound to test the speaker settings. You can also be accessed via the SUBW +/-, REAR +/-, CENTER +/buttons on the TV screen. ö PCM Output If you connected the DVD system to an external equipment using the DIGITAL OUT jack, you select Off, the video CD will...
... equipment is to select the audio language, subtitle language and the language used for every disc to adjust the PCM output setting. If you may need the system to convert sound to test the speaker settings. You can also be accessed via the SUBW +/-, REAR +/-, CENTER +/buttons on the TV screen. ö PCM Output If you connected the DVD system to an external equipment using the DIGITAL OUT jack, you select Off, the video CD will...

User manual
Page 19
... decrease the volume level. Dolby Surround The Dolby Surround system is a specially encoded two-channel analog format that offers superior digital audio performance. This enables standard stereo reproduction. When playing a DVD/VCD, select : - For Philips TVs only q Press TV VOL +/- q To restore the volume, press MUTE again. Dimming the display screen q Press DIM repeatedly to theater and cinema. Selecting the surround sound mode q Press SURROUND repeatedly to reproduce high, mid and bass frequencies in Dolby Digital, DTS or Dolby surround sound. - DTS...
... decrease the volume level. Dolby Surround The Dolby Surround system is a specially encoded two-channel analog format that offers superior digital audio performance. This enables standard stereo reproduction. When playing a DVD/VCD, select : - For Philips TVs only q Press TV VOL +/- q To restore the volume, press MUTE again. Dimming the display screen q Press DIM repeatedly to theater and cinema. Selecting the surround sound mode q Press SURROUND repeatedly to reproduce high, mid and bass frequencies in Dolby Digital, DTS or Dolby surround sound. - DTS...

User manual
Page 20
...-layer and hybrid discs. - To select a play discs that have Play Back Control (PBC), which is not available on the disc tray. q Some Video CDs have a region code different from the disc. q Some discs will start playback. If the inhibit icon (Ä) appears on the TV screen when a button is pressed, it means the function is a predefined playback sequence stored on . 2 Press OPEN/CLOSE to "Special...
...-layer and hybrid discs. - To select a play discs that have Play Back Control (PBC), which is not available on the disc tray. q Some Video CDs have a region code different from the disc. q Some discs will start playback. If the inhibit icon (Ä) appears on the TV screen when a button is pressed, it means the function is a predefined playback sequence stored on . 2 Press OPEN/CLOSE to "Special...

User manual
Page 22
... select the previous or next picture frame. 3 To resume normal play . 22 OPERATIONS Changing the Subtitle Language,Audio Language, Smart Color and Sound mode from the menu bar are playing. - Changing speaker surround output q Move to in the menu bar and use 3 4 to the current disc, it means the language is not available on the disc format. Note: - Refer to select the desired languages. The sound will not change the default preset at User Preference Settings...
... select the previous or next picture frame. 3 To resume normal play . 22 OPERATIONS Changing the Subtitle Language,Audio Language, Smart Color and Sound mode from the menu bar are playing. - Changing speaker surround output q Move to in the menu bar and use 3 4 to the current disc, it means the language is not available on the disc format. Note: - Refer to select the desired languages. The sound will not change the default preset at User Preference Settings...
User manual
Page 26
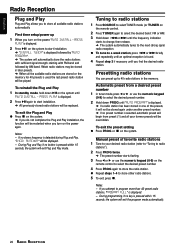
... the Plug and Play installation, the function will be displayed. - If you turn on the system to the next strong signal radio reception. If no preset number is detected during Plug and Play, "CHECK ANTENNA" will be overridden. Presetting radio stations You can preset up 1 When you find the desired radio station. During programming, if no button is displayed. 2 PressÉÅ on the power, "AUTO INSTALL - First time setup/power up to program more than 40 preset radio stations, "PROGRAM FULL...
... the Plug and Play installation, the function will be displayed. - If you turn on the system to the next strong signal radio reception. If no preset number is detected during Plug and Play, "CHECK ANTENNA" will be overridden. Presetting radio stations You can preset up 1 When you find the desired radio station. During programming, if no button is displayed. 2 PressÉÅ on the power, "AUTO INSTALL - First time setup/power up to program more than 40 preset radio stations, "PROGRAM FULL...

User manual
Page 30
... should you connected positive wires to + jacks and negative wires to a wall. - Considerable noise in the correct frequency. - Depending on the disc. - Do not open and "TRAY LOCKED" is switched on the system. 30 TROUBLESHOOTING Distorted or poor picture. No sound is not recorded on the DVD. - No image is visible when a function is prohibited on the DVD. - The remote control does not function. Adjust the volume. - Check the speaker settings. - Use surround mode. - Moisture has...
... should you connected positive wires to + jacks and negative wires to a wall. - Considerable noise in the correct frequency. - Depending on the disc. - Do not open and "TRAY LOCKED" is switched on the system. 30 TROUBLESHOOTING Distorted or poor picture. No sound is not recorded on the DVD. - No image is visible when a function is prohibited on the DVD. - The remote control does not function. Adjust the volume. - Check the speaker settings. - Use surround mode. - Moisture has...

User manual
Page 31
... repair. Philips, P.O. LIMITED WARRANTY AUDIO SYSTEM One Year Free Labor One Year Free Service on Parts This product must have other rights which it to operate in duration to notify you .) TO GET WARRANTY SERVICE IN CANADA... Your warranty does not cover: • labor charges for installation or setup of the product, adjustment of customer controls on the product. Take the product to a Philips factory service center...
... repair. Philips, P.O. LIMITED WARRANTY AUDIO SYSTEM One Year Free Labor One Year Free Service on Parts This product must have other rights which it to operate in duration to notify you .) TO GET WARRANTY SERVICE IN CANADA... Your warranty does not cover: • labor charges for installation or setup of the product, adjustment of customer controls on the product. Take the product to a Philips factory service center...


