

User manual
Page 1
... problems, Philips Representatives can help , call us first! 1-800-531-0039 Thank you for making Philips a part of your home! We've included everything you get started. Do not attempt to return this Philips product. For fast help you need to the store. IM E PORTAN Return your new product by explaining: • Hookups, • First Time Setup, and • Feature Operation. T! Congratulations on purchasing this product...
... problems, Philips Representatives can help , call us first! 1-800-531-0039 Thank you for making Philips a part of your home! We've included everything you get started. Do not attempt to return this Philips product. For fast help you need to the store. IM E PORTAN Return your new product by explaining: • Hookups, • First Time Setup, and • Feature Operation. T! Congratulations on purchasing this product...
User manual
Page 3
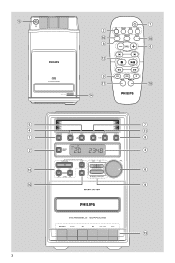
% 2 ^ 8 CD TUNER TAPE AUX REPEAT SHUFFLE SLEEP VOL @ 1 ( 6 9 & $ DSC DBB IS MUTE NEWS/TA * 5 4 1 2 @ 0 STANDBY-ON PROGRAM TIMER ON OFF SOURCE SELECT PROGRAM SHUFFLE CLOCK REPEAT BAND SHUFFLE PLAY•PAUSE PREV NEXT STOP iR 7 ! 8 3 6 9 # 3 3
% 2 ^ 8 CD TUNER TAPE AUX REPEAT SHUFFLE SLEEP VOL @ 1 ( 6 9 & $ DSC DBB IS MUTE NEWS/TA * 5 4 1 2 @ 0 STANDBY-ON PROGRAM TIMER ON OFF SOURCE SELECT PROGRAM SHUFFLE CLOCK REPEAT BAND SHUFFLE PLAY•PAUSE PREV NEXT STOP iR 7 ! 8 3 6 9 # 3 3

User manual
Page 4
... terms and conditions of your Philips warranty. NO USER-SERVICEABLE PARTS INSIDE. which is registered, you're eligible to prevent operating and maintenance problems. WARNING: TO PREVENT FIRE OR SHOCK HAZARD, DO NOT EXPOSE THIS EQUIPMENT TO RAIN OR MOISTURE. Warranty Verification Registering your product within your model. For Customer Use Enter below the Serial No. Owner Confirmation Your completed Warranty...
... terms and conditions of your Philips warranty. NO USER-SERVICEABLE PARTS INSIDE. which is registered, you're eligible to prevent operating and maintenance problems. WARNING: TO PREVENT FIRE OR SHOCK HAZARD, DO NOT EXPOSE THIS EQUIPMENT TO RAIN OR MOISTURE. Warranty Verification Registering your product within your model. For Customer Use Enter below the Serial No. Owner Confirmation Your completed Warranty...

User manual
Page 5
... the most comprehensive warranties and outstanding service networks in the industry. Remember, to come. Dear Philips product owner: Thank you for which you happy with your purchase, and welcome to protection by one of the best-built, best-backed products available today.And we'll do everything in a Philips product. As a member of the Philips "family," you're entitled to...
... the most comprehensive warranties and outstanding service networks in the industry. Remember, to come. Dear Philips product owner: Thank you for which you happy with your purchase, and welcome to protection by one of the best-built, best-backed products available today.And we'll do everything in a Philips product. As a member of the Philips "family," you're entitled to...

User manual
Page 6
... for replacement of the polarized or grounding-type plug. Refer all instructions. 5. To prevent battery leakage which may result in bodily injury, property damage, or damage to qualified service personnel. Do not block any way, such as power-supply cord or plug is used for long periods of time. 14. A grounding type plug has two blades and a third grounding prong. G Remove batteries...
... for replacement of the polarized or grounding-type plug. Refer all instructions. 5. To prevent battery leakage which may result in bodily injury, property damage, or damage to qualified service personnel. Do not block any way, such as power-supply cord or plug is used for long periods of time. 14. A grounding type plug has two blades and a third grounding prong. G Remove batteries...
User manual
Page 8
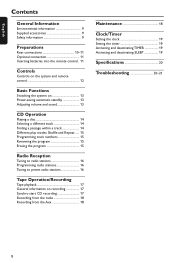
... connection 11 Inserting batteries into the remote control . 11 Controls Controls on the system and remote control 12 Basic Functions Switching the system on 13 Power-saving automatic standby 13 Adjusting volume and sound 13 CD Operation Playing a disc 14 Selecting a different track 14 Finding a passage within a track 14 Different play modes: Shuffle and Repeat ..... 15 Programming track numbers 15 Reviewing the program 15 Erasing the program 15 Radio Reception Tuning to radio stations 16 Programming radio stations 16 Tuning to preset radio stations 16 Tape Operation/Recording...
... connection 11 Inserting batteries into the remote control . 11 Controls Controls on the system and remote control 12 Basic Functions Switching the system on 13 Power-saving automatic standby 13 Adjusting volume and sound 13 CD Operation Playing a disc 14 Selecting a different track 14 Finding a passage within a track 14 Different play modes: Shuffle and Repeat ..... 15 Programming track numbers 15 Reviewing the program 15 Erasing the program 15 Radio Reception Tuning to radio stations 16 Programming radio stations 16 Tuning to preset radio stations 16 Tape Operation/Recording...

User manual
Page 9
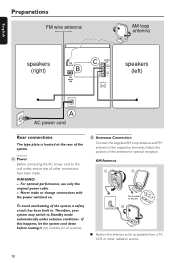
... of the set contain selflubricating bearings and must accept any interference received, including interference that the operating voltage indicated on a flat, hard and stable surface. To disconnect the system from the power supply completely, remove the AC power plug from a cold to excessive moisture, rain, sand or heat sources caused by a specialized company. FM wire antenna Safety Information G Before operating the system, check that...
... of the set contain selflubricating bearings and must accept any interference received, including interference that the operating voltage indicated on a flat, hard and stable surface. To disconnect the system from the power supply completely, remove the AC power plug from a cold to excessive moisture, rain, sand or heat sources caused by a specialized company. FM wire antenna Safety Information G Before operating the system, check that...
User manual
Page 10
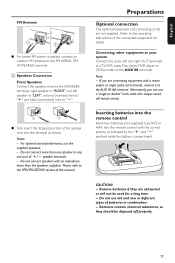
B Antennas Connection Connect the supplied AM loop antenna and FM antenna to Standby mode automatically under extreme conditions. Therefore, your system may switch to the respective terminals. For optimal performance, use only the original power cable. - AM Antenna To avoid overheating of the system. Preparations FM wire antenna AM loop antenna English speakers (right) AM B aerial C RIGHT LEFT AUX in L R speakers (left) A AC power cord Rear connections The type plate is located at the rear of the...
B Antennas Connection Connect the supplied AM loop antenna and FM antenna to Standby mode automatically under extreme conditions. Therefore, your system may switch to the respective terminals. For optimal performance, use only the original power cable. - AM Antenna To avoid overheating of the system. Preparations FM wire antenna AM loop antenna English speakers (right) AM B aerial C RIGHT LEFT AUX in L R speakers (left) A AC power cord Rear connections The type plate is located at the rear of the...
User manual
Page 11
... not use the supplied speakers. - Connecting other equipment to your system Connect the audio left speaker to "LEFT", colored (marked) wire to "+" and black (unmarked) wire to the AUX IN terminals. C Speakers Connection Front Speakers Connect the speaker wires to the SPEAKERS terminals, right speaker to "RIGHT" and left and right OUT terminals of a TV,VCR, Laser Disc player, DVD player or CD Recorder to "-". 1 2 G Fully insert the stripped portion of the speaker wire into the remote control...
... not use the supplied speakers. - Connecting other equipment to your system Connect the audio left speaker to "LEFT", colored (marked) wire to "+" and black (unmarked) wire to the AUX IN terminals. C Speakers Connection Front Speakers Connect the speaker wires to the SPEAKERS terminals, right speaker to "RIGHT" and left and right OUT terminals of a TV,VCR, Laser Disc player, DVD player or CD Recorder to "-". 1 2 G Fully insert the stripped portion of the speaker wire into the remote control...

User manual
Page 12
.... @ Mode Selection STOP 9 stops CD playback or erase a CD program. adjusts the volume level. - for Tuner programs tuner stations manually or automatically. 5 TIMER ON•OFF - PRESET 34 selects a preset radio station. PLAY 2 starts playback fast rewinds/winds the tape. on the system only - on the remote control only - Notes for this version). ( SLEEP - PLAY•PAUSE starts or interrupts CD playback. STOP•OPEN ...stops the tape; activates RDS news and Traffic Announcement (not available for remote control: - First...
.... @ Mode Selection STOP 9 stops CD playback or erase a CD program. adjusts the volume level. - for Tuner programs tuner stations manually or automatically. 5 TIMER ON•OFF - PRESET 34 selects a preset radio station. PLAY 2 starts playback fast rewinds/winds the tape. on the system only - on the remote control only - Notes for this version). ( SLEEP - PLAY•PAUSE starts or interrupts CD playback. STOP•OPEN ...stops the tape; activates RDS news and Traffic Announcement (not available for remote control: - First...

User manual
Page 13
... in tape mode or recording mode, press STOP•OPEN first. ➜ The volume level, interactive sound settings, last selected source and tuner presets will switch to standby 15 minutes after a tape or CD has reached the end and no indication)/ ROCK ( ) / JAZZ ( ) / POP ( ). adjust the volume controls; - Note: - Switching the system on or off. ➜ Display shows: if activated. Power-saving automatic standby As a power-saving feature, the system automatically switches to the selected source. PLAY•...
... in tape mode or recording mode, press STOP•OPEN first. ➜ The volume level, interactive sound settings, last selected source and tuner presets will switch to standby 15 minutes after a tape or CD has reached the end and no indication)/ ROCK ( ) / JAZZ ( ) / POP ( ). adjust the volume controls; - Note: - Switching the system on or off. ➜ Display shows: if activated. Power-saving automatic standby As a power-saving feature, the system automatically switches to the selected source. PLAY•...
User manual
Page 14
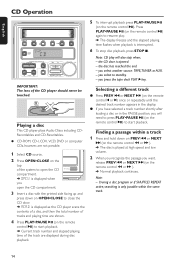
... remote control 2;) to start playback. Note: - Note: CD play . ➜ The display freezes and the elapsed playing time flashes when playback is displayed as the CD player scans the contents of a disc, and then the total number of tracks and playing time are not possible. 1 Select CD source. 2 Press OPEN•CLOSE on the top of the CD player should never be touched. you select another source: TAPE,TUNER or AUX. - X Playing a disc This CD player plays Audio Discs including CDRecordables and CD...
... remote control 2;) to start playback. Note: - Note: CD play . ➜ The display freezes and the elapsed playing time flashes when playback is displayed as the CD player scans the contents of a disc, and then the total number of tracks and playing time are not possible. 1 Select CD source. 2 Press OPEN•CLOSE on the top of the CD player should never be touched. you select another source: TAPE,TUNER or AUX. - X Playing a disc This CD player plays Audio Discs including CDRecordables and CD...

User manual
Page 15
... your disc program, press PLAY•PAUSE 2; (on the remote control 2;) to start playback of the entire disc/ program are no longer displayed. G opening the CD compartment; ➜ PROGRAM disappears from the display. 15 Reviewing the program In STOP mode, press and hold down PROGRAM for a while until the display shows all desired tracks. ➜ FULL is shown and PROGRAM flashes. 2 Use the PREV ¡1 or NEXT 2™ (on the remote control ¡...
... your disc program, press PLAY•PAUSE 2; (on the remote control 2;) to start playback of the entire disc/ program are no longer displayed. G opening the CD compartment; ➜ PROGRAM disappears from the display. 15 Reviewing the program In STOP mode, press and hold down PROGRAM for a while until the display shows all desired tracks. ➜ FULL is shown and PROGRAM flashes. 2 Use the PREV ¡1 or NEXT 2™ (on the remote control ¡...

User manual
Page 16
... other stations. STANDBY-ON PROGRAM TIMER ON OFF SOURCE SELECT PROGRAM CLOCK REPEAT BAND SHUFFLE PLAY•PAUSE PREV NEXT STOP iR Tuning to radio stations 1 Select TUNER source. ➜ TUNER is displayed briefly. 2 Press BAND once or more than 2 seconds to activate programming. ➜ AUTO is displayed. 16 G To tune to a station with a chosen preset number. From this station. 4 Press PROGRAM again to confirm the setting. ➜ PROGRAM disappears, the preset number and the frequency of the preset station are programmed...
... other stations. STANDBY-ON PROGRAM TIMER ON OFF SOURCE SELECT PROGRAM CLOCK REPEAT BAND SHUFFLE PLAY•PAUSE PREV NEXT STOP iR Tuning to radio stations 1 Select TUNER source. ➜ TUNER is displayed briefly. 2 Press BAND once or more than 2 seconds to activate programming. ➜ AUTO is displayed. 16 G To tune to a station with a chosen preset number. From this station. 4 Press PROGRAM again to confirm the setting. ➜ PROGRAM disappears, the preset number and the frequency of the preset station are programmed...

User manual
Page 17
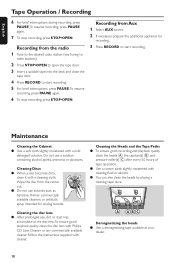
... start the CD player separately. Synchro start CD recording 1 Select CD source. 2 Insert a disc and if desired, program track numbers. 3 Press STOP•OPEN to open the tape door. 4 Insert a suitable tape into the deck and close the tape door. English Tape Operation / Recording Tape playback 1 Select TAPE source. ➜ The display shows TAPE throughout tape operation. 2 Press STOP•OPEN to open the tape door. 3 Insert a recorded tape and close the tape door. 5 Press RECORD to start recording. ➜ Playing...
... start the CD player separately. Synchro start CD recording 1 Select CD source. 2 Insert a disc and if desired, program track numbers. 3 Press STOP•OPEN to open the tape door. 4 Insert a suitable tape into the deck and close the tape door. English Tape Operation / Recording Tape playback 1 Select TAPE source. ➜ The display shows TAPE throughout tape operation. 2 Press STOP•OPEN to open the tape door. 3 Insert a recorded tape and close the tape door. 5 Press RECORD to start recording. ➜ Playing...
User manual
Page 18
...;OPEN. Recording from the radio 1 Tune to the desired radio station (see Tuning to radio stations). 2 Press STOP•OPEN to open the tape door. 3 Insert a suitable tape into the deck and close the tape door. 4 Press RECORD to start recording. 5 For brief interruptions, press PAUSE.To resume recording, press PAUSE again. 6 To stop recording, press STOP•OPEN. Recording from the center out. Cleaning Discs G When a disc...
...;OPEN. Recording from the radio 1 Tune to the desired radio station (see Tuning to radio stations). 2 Press STOP•OPEN to open the tape door. 3 Insert a suitable tape into the deck and close the tape door. 4 Press RECORD to start recording. 5 For brief interruptions, press PAUSE.To resume recording, press PAUSE again. 6 To stop recording, press STOP•OPEN. Recording from the center out. Cleaning Discs G When a disc...

User manual
Page 19
... the remote control once or more than 2 seconds. 2 Turn VOLUME clockwise (or press SELECT SOURCE) to select sound source. 3 Press TIMER ON•OFF to confirm your desired mode. ➜ The selected source CD or TUNER is shown, or press STANDBY ON on the system or remote control. ➜ SLEEP OFF scrolls across the display at a set time.The clock time needs to be set first before the sleep timer can be used . if...
... the remote control once or more than 2 seconds. 2 Turn VOLUME clockwise (or press SELECT SOURCE) to select sound source. 3 Press TIMER ON•OFF to confirm your desired mode. ➜ The selected source CD or TUNER is shown, or press STANDBY ON on the system or remote control. ➜ SLEEP OFF scrolls across the display at a set time.The clock time needs to be set first before the sleep timer can be used . if...

User manual
Page 20
...) Weight (with/without speakers approx. 5.7 / 2.7 kg approx. 12.6 / 6.0 (Lb) Standby power consumption 3 W Subject to modification Troubleshooting WARNING Under no circumstances should you are unable to repair the system yourself, as there is a risk of electric shock. Use a finalized CD-RW or CD-R. 20 Do not open the system as this will invalidate the warranty. Check if the disc is displayed. - If a fault occurs...
...) Weight (with/without speakers approx. 5.7 / 2.7 kg approx. 12.6 / 6.0 (Lb) Standby power consumption 3 W Subject to modification Troubleshooting WARNING Under no circumstances should you are unable to repair the system yourself, as there is a risk of electric shock. Use a finalized CD-RW or CD-R. 20 Do not open the system as this will invalidate the warranty. Check if the disc is displayed. - If a fault occurs...

User manual
Page 21
... the distance between the remote control and the system. - If a recording is clamped. - English Troubleshooting RADIO RECEPTION Radio reception is too weak, adjust the antenna or connect an external antenna for better reception. - If the signal is poor. - Remove and reconnect the AC power plug and switch on the timer. - Replace the batteries. - The timer is erased. - Adjust the volume. - Check that the speakers are pressed. Point the remote control directly toward IR sensor...
... the distance between the remote control and the system. - If a recording is clamped. - English Troubleshooting RADIO RECEPTION Radio reception is too weak, adjust the antenna or connect an external antenna for better reception. - If the signal is poor. - Remove and reconnect the AC power plug and switch on the timer. - Replace the batteries. - The timer is erased. - Adjust the volume. - Check that the speakers are pressed. Point the remote control directly toward IR sensor...

User manual
Page 22
... within the control of Philips. • reception problems caused by signal conditions or cable or antenna systems outside of the product. • product repair and/or part replacement because of misuse, accident, unauthorized repair or other than the country for a particular purpose. MODEL SERIAL MAKE SURE YOU KEEP... Box 520890, Miami, FL 33152, USA, (402) 536-4171 EL4965E007 / 8-02 22 Please check your sales receipt or...
... within the control of Philips. • reception problems caused by signal conditions or cable or antenna systems outside of the product. • product repair and/or part replacement because of misuse, accident, unauthorized repair or other than the country for a particular purpose. MODEL SERIAL MAKE SURE YOU KEEP... Box 520890, Miami, FL 33152, USA, (402) 536-4171 EL4965E007 / 8-02 22 Please check your sales receipt or...


