Leaflet
Page 2
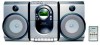
... Media: CD, CD-R, CD-RW • Disc Playback Modes: 20-Track Programmable, Repeat/one/all/program, Shuffle Play • Loader Type: Top • Cassette Deck Technology: Mechanical • Cassette Playback Modes: Electronic Speed Control Audio Recording • Recording Media: Tape • Tape Recording Enhancement: Automatic Recording Level, CD Synchro Start Recording Tuner/Reception/Transmission • Tuner Bands: FM Stereo, AM • Auto digital tuning Convenience • Alarms: CD Alarm, Radio Alarm, Sleep timer • Clock: On main display • Display Type...
... Media: CD, CD-R, CD-RW • Disc Playback Modes: 20-Track Programmable, Repeat/one/all/program, Shuffle Play • Loader Type: Top • Cassette Deck Technology: Mechanical • Cassette Playback Modes: Electronic Speed Control Audio Recording • Recording Media: Tape • Tape Recording Enhancement: Automatic Recording Level, CD Synchro Start Recording Tuner/Reception/Transmission • Tuner Bands: FM Stereo, AM • Auto digital tuning Convenience • Alarms: CD Alarm, Radio Alarm, Sleep timer • Clock: On main display • Display Type...
User manual
Page 1
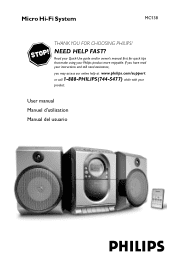
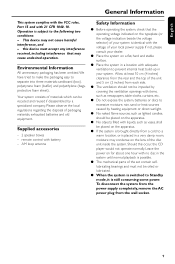
If you have read your instructions and still need assistance, you may access our online help at www.philips.com/support or call 1-888-PHILIPS(744-5477) while with your Philips product more enjoyable. NEED HELP FAST? Read your Quick-Use guide and/or owner's manual first for quick tips that make using your product. Micro Hi-Fi System MC138 THANK YOU FOR CHOOSING PHILIPS! User manual Manuel d'utilisation Manual del usuario
If you have read your instructions and still need assistance, you may access our online help at www.philips.com/support or call 1-888-PHILIPS(744-5477) while with your Philips product more enjoyable. NEED HELP FAST? Read your Quick-Use guide and/or owner's manual first for quick tips that make using your product. Micro Hi-Fi System MC138 THANK YOU FOR CHOOSING PHILIPS! User manual Manuel d'utilisation Manual del usuario
User manual
Page 4
... Card today to obtain warranty service. *Product Safety Notification By registering your product, you'll receive notification - REFER SERVICING TO QUALIFIED SERVICE PERSONNEL. tled, including special money-sav- Model No t This "bolt of lightning" indicates uninsulated material within your model with PHILIPS makes you eligible for all of Product Ownership Registering your household, please do not remove product covering. Serial No WARNING: TO PREVENT...
... Card today to obtain warranty service. *Product Safety Notification By registering your product, you'll receive notification - REFER SERVICING TO QUALIFIED SERVICE PERSONNEL. tled, including special money-sav- Model No t This "bolt of lightning" indicates uninsulated material within your model with PHILIPS makes you eligible for all of Product Ownership Registering your household, please do not remove product covering. Serial No WARNING: TO PREVENT...

User manual
Page 6
..., such as power-supply cord or plug is not used , use attachments/ accessories specified by the manufacturer or sold with the manufacturer's instructions. 8. Disposal of time. 14.Refer all batteries correctly, + and - EL 6475-E004: 03/12 6 Heed all instructions. 5. Install in bodily injury, property damage, or damage to the unit: ● Install all servicing to rain or moisture, does not operate normaly, or...
..., such as power-supply cord or plug is not used , use attachments/ accessories specified by the manufacturer or sold with the manufacturer's instructions. 8. Disposal of time. 14.Refer all batteries correctly, + and - EL 6475-E004: 03/12 6 Heed all instructions. 5. Install in bodily injury, property damage, or damage to the unit: ● Install all servicing to rain or moisture, does not operate normaly, or...
User manual
Page 8
... remote control 11 Replacing battery (lithium CR2025) into the remote control 11 Controls Controls on the system and remote control 12 Basic Functions Switching the system on 13 Power-saving automatic standby 13 Adjusting volume and sound 13 CD Operation Playing a disc 14 Selecting a different track 14 Finding a passage within a track 14 Different play modes: Shuffle and Repeat ..... 15 Programming track numbers 15 Reviewing the programme 15 Erasing the programme 15 Radio Reception Tuning to radio stations 16 Programming radio stations 16 Tuning to preset radio stations 16 Tape...
... remote control 11 Replacing battery (lithium CR2025) into the remote control 11 Controls Controls on the system and remote control 12 Basic Functions Switching the system on 13 Power-saving automatic standby 13 Adjusting volume and sound 13 CD Operation Playing a disc 14 Selecting a different track 14 Finding a passage within a track 14 Different play modes: Shuffle and Repeat ..... 15 Programming track numbers 15 Reviewing the programme 15 Erasing the programme 15 Radio Reception Tuning to radio stations 16 Programming radio stations 16 Tuning to preset radio stations 16 Tape...
User manual
Page 9
... local power supply. Supplied accessories - 2 speaker boxes - This device may condense on the lens of the set contain selflubricating bearings and must accept any interference received, including interference that the operating voltage indicated on the apparatus. ● If the system is possible. ● The mechanical parts of the disc unit inside the system. Allow at least 10 cm (4 inches) clearance from the rear...
... local power supply. Supplied accessories - 2 speaker boxes - This device may condense on the lens of the set contain selflubricating bearings and must accept any interference received, including interference that the operating voltage indicated on the apparatus. ● If the system is possible. ● The mechanical parts of the disc unit inside the system. Allow at least 10 cm (4 inches) clearance from the rear...
User manual
Page 10
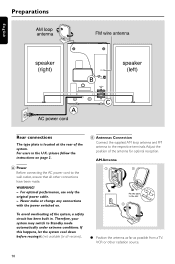
..., VCR or other connections have been made. Never make or change any connections with the power switched on page 2. If this happens, let the system cool down before reusing it (not available for optimal reception. For users in . B Antennas Connection Connect the supplied AM loop antenna and FM antenna to Standby mode automatically under extreme conditions. Adjust the position of the system. WARNING! - Preparations English Rear connections The type plate...
..., VCR or other connections have been made. Never make or change any connections with the power switched on page 2. If this happens, let the system cool down before reusing it (not available for optimal reception. For users in . B Antennas Connection Connect the supplied AM loop antenna and FM antenna to Standby mode automatically under extreme conditions. Adjust the position of the system. WARNING! - Preparations English Rear connections The type plate...
User manual
Page 11
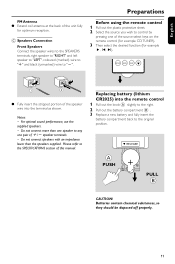
... the remote control (for example CD,TUNER). 3 Then select the desired function (for optimum reception. For optimal sound performance, use the supplied speakers. - VOL REPEAT SHUFFLE SLEEP ● Fully insert the stripped portion of this manual. Replacing battery (lithium CR2025) into the terminal as shown. Do not connect speakers with an impedance lower than one speaker to control by pressing one pair of +/- C Speakers Connection Front Speakers Connect the speaker wires...
... the remote control (for example CD,TUNER). 3 Then select the desired function (for optimum reception. For optimal sound performance, use the supplied speakers. - VOL REPEAT SHUFFLE SLEEP ● Fully insert the stripped portion of this manual. Replacing battery (lithium CR2025) into the terminal as shown. Do not connect speakers with an impedance lower than one speaker to control by pressing one pair of +/- C Speakers Connection Front Speakers Connect the speaker wires...
User manual
Page 12
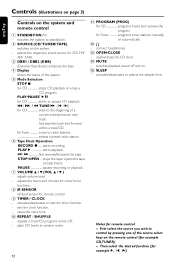
... respective sound source for CD stops CD playback or erase a CD program. shows the status of the system. 5 Mode Selection STOP 9 for CD/ FM/ AM/ TAPE. 3 DBB1 / DBB2 (DBB) - (Dynamic Bass Boost) enhances the bass. 4 Display - starts recording. PAUSE pauses recording or playback. 7 VOLUME 3 / 4 (VOL 3 / 4 ) - repeats a track/CD program/ entire CD. - plays CD tracks in random order. 12 ! connect headphones. # OPEN•CLOSE - First select the source you wish to radio stations selects a preset radio station. 6 Tape Deck Operation RECORD...
... respective sound source for CD stops CD playback or erase a CD program. shows the status of the system. 5 Mode Selection STOP 9 for CD/ FM/ AM/ TAPE. 3 DBB1 / DBB2 (DBB) - (Dynamic Bass Boost) enhances the bass. 4 Display - starts recording. PAUSE pauses recording or playback. 7 VOLUME 3 / 4 (VOL 3 / 4 ) - repeats a track/CD program/ entire CD. - plays CD tracks in random order. 12 ! connect headphones. # OPEN•CLOSE - First select the source you wish to radio stations selects a preset radio station. 6 Tape Deck Operation RECORD...
User manual
Page 13
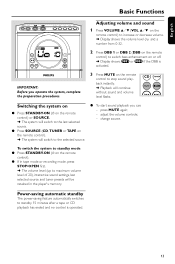
... STANDBY-ON (y on the remote control) or SOURCE. ➜ The system will switch to the last selected source. ● Press SOURCE (CD, TUNER or TAPE on the remote control). ➜ The system will be retained in tape mode or recording mode, press STOP•OPEN first. ➜ The volume level (up to maximum volume level of 20), interactive sound settings, last selected source and tuner presets will switch to the selected source. ● To start sound playback you operate the system...
... STANDBY-ON (y on the remote control) or SOURCE. ➜ The system will switch to the last selected source. ● Press SOURCE (CD, TUNER or TAPE on the remote control). ➜ The system will be retained in tape mode or recording mode, press STOP•OPEN first. ➜ The volume level (up to maximum volume level of 20), interactive sound settings, last selected source and tuner presets will switch to the selected source. ● To start sound playback you operate the system...
User manual
Page 14
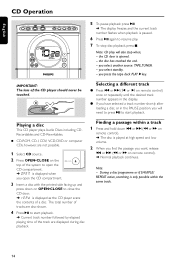
... source: TAPE,TUNER. - to start playback. ➜ Current track number followed by elapsed playing time of the CD player should never be touched. the CD door is paused. 6 Press 2; Playing a disc This CD player plays Audio Discs including CDRecordables and CD-Rewritables. ¶ CD-ROM, CD-I, CDV, VCD, DVD or computer CDs, however, are also shown. 4 Press 2; English CD Operation 5 To pause playback press 2;. ➜ The display freezes and the current track number flashes when playback is opened...
... source: TAPE,TUNER. - to start playback. ➜ Current track number followed by elapsed playing time of the CD player should never be touched. the CD door is paused. 6 Press 2; Playing a disc This CD player plays Audio Discs including CDRecordables and CD-Rewritables. ¶ CD-ROM, CD-I, CDV, VCD, DVD or computer CDs, however, are also shown. 4 Press 2; English CD Operation 5 To pause playback press 2;. ➜ The display freezes and the current track number flashes when playback is opened...
User manual
Page 15
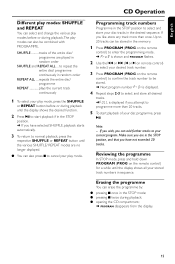
... disc programme, press 2;. Up to 20 tracks can be stored in sequence. Reviewing the programme In STOP mode, press and hold down PROGRAM (PROG on the remote control) to confirm the track number to programme more than 20 tracks. 5 To start playback if in the STOP mode; ● pressing 9 twice during playback; ● opening the CD compartment; ➜ PROGRAM disappears from the display...
... disc programme, press 2;. Up to 20 tracks can be stored in sequence. Reviewing the programme In STOP mode, press and hold down PROGRAM (PROG on the remote control) to confirm the track number to programme more than 20 tracks. 5 To start playback if in the STOP mode; ● pressing 9 twice during playback; ● opening the CD compartment; ➜ PROGRAM disappears from the display...

User manual
Page 16
... remote control) to select a number from 1 to 20 for FM (or 1 to 10 for more than 2 seconds to activate programming. ➜ AUto is preset (1) and all your presets will start . If no preset number is selected, default is displayed and available stations are programmed in the display. 3 Press ¡ or ™ (on TUNE à or á and release button. ➜ The radio automatically tunes to select the preset number where programming should start...
... remote control) to select a number from 1 to 20 for FM (or 1 to 10 for more than 2 seconds to activate programming. ➜ AUto is preset (1) and all your presets will start . If no preset number is selected, default is displayed and available stations are programmed in the display. 3 Press ¡ or ™ (on TUNE à or á and release button. ➜ The radio automatically tunes to select the preset number where programming should start...
User manual
Page 17
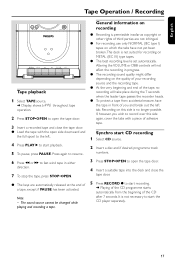
..., programme track numbers. 3 Press STOP•OPEN to open side downward and the full spool to the left tab. If, however, you and break out the left . 4 Press PLAY 2 to start the CD player separately. 17 Press again to resume. 6 Press à or á to record over this side is set automatically. The sound source cannot be changed while playing and recording a tape.
..., programme track numbers. 3 Press STOP•OPEN to open side downward and the full spool to the left tab. If, however, you and break out the left . 4 Press PLAY 2 to start the CD player separately. 17 Press again to resume. 6 Press à or á to record over this side is set automatically. The sound source cannot be changed while playing and recording a tape.
User manual
Page 18
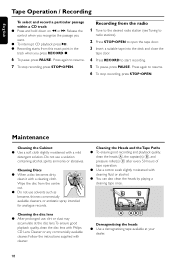
...; Use a demagnetising tape available at the disc lens.To ensure good playback quality, clean the disc lens with Philips CD Lens Cleaner or any commercially available cleaner. Release the control when you recognize the passage you want. ● To interrupt CD playback press 2; . ● Recording starts from the radio 1 Tune to the desired radio station (see Tuning to radio stations). 2 Press STOP•OPEN to open the tape door...
...; Use a demagnetising tape available at the disc lens.To ensure good playback quality, clean the disc lens with Philips CD Lens Cleaner or any commercially available cleaner. Release the control when you recognize the passage you want. ● To interrupt CD playback press 2; . ● Recording starts from the radio 1 Tune to the desired radio station (see Tuning to radio stations). 2 Press STOP•OPEN to open the tape door...
User manual
Page 19
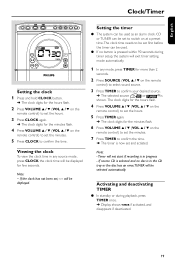
... flash. 6 Press VOLUME 3 / 4 (VOL 3 / 4 on the remote control) to set the minutes. 7 Press TIMER to confirm the time. ➜ The timer is shown. Timer will be used . ● If no button is in the CD tray or the disc has an error,TUNER will be displayed for few seconds. Activating and deactivating TIMER ● In standby or during timer setup, the system will exit timer setting mode automatically. 1 In any source mode, press CLOCK, the clock time will be used as an alarm clock. Setting...
... flash. 6 Press VOLUME 3 / 4 (VOL 3 / 4 on the remote control) to set the minutes. 7 Press TIMER to confirm the time. ➜ The timer is shown. Timer will be used . ● If no button is in the CD tray or the disc has an error,TUNER will be displayed for few seconds. Activating and deactivating TIMER ● In standby or during timer setup, the system will exit timer setting mode automatically. 1 In any source mode, press CLOCK, the clock time will be used as an alarm clock. Setting...
User manual
Page 20
... dB signal-to -noise ratio 55 dBA Channel seperation 30 dB Total harmonic distortion 1.5% TUNER FM wave range 87.5 - 108 MHz AM wave range 530 - 1700 kHz FM Sensitivity at 75 Ω - Specifications AMPLIFIER Output power 2 x 2.5 W RMS 2 x ...Clock/Timer Activating and deactivating SLEEP The sleep timer enables the system to switch off . ➜ Display shows SLEEP and series of time options for selection: 60, 45, 30,15, OFF, 60. ● To deactivate, press SLEEP on the remote control once or more until OFF is shown, or press STANDBY ON on the system or remote control. stereo...
... dB signal-to -noise ratio 55 dBA Channel seperation 30 dB Total harmonic distortion 1.5% TUNER FM wave range 87.5 - 108 MHz AM wave range 530 - 1700 kHz FM Sensitivity at 75 Ω - Specifications AMPLIFIER Output power 2 x 2.5 W RMS 2 x ...Clock/Timer Activating and deactivating SLEEP The sleep timer enables the system to switch off . ➜ Display shows SLEEP and series of time options for selection: 60, 45, 30,15, OFF, 60. ● To deactivate, press SLEEP on the remote control once or more until OFF is shown, or press STANDBY ON on the system or remote control. stereo...

User manual
Page 21
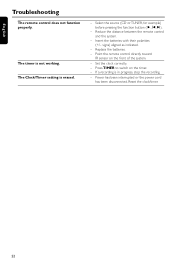
.... Adjust the volume. - Disconnect the headphones. - Do not open the system as this will invalidate the warranty. Replace or clean the disc, see "Maintenance". - Check if the stripped speaker wire is clamped. - Remove and reconnect the AC power plug and switch on the system again. - Insert a disc. - Solution - Apply a piece of poor quality. English Troubleshooting WARNING Under no cd" is too weak, adjust the antenna or connect an external antenna...
.... Adjust the volume. - Disconnect the headphones. - Do not open the system as this will invalidate the warranty. Replace or clean the disc, see "Maintenance". - Check if the stripped speaker wire is clamped. - Remove and reconnect the AC power plug and switch on the system again. - Insert a disc. - Solution - Apply a piece of poor quality. English Troubleshooting WARNING Under no cd" is too weak, adjust the antenna or connect an external antenna...
User manual
Page 22
... on the timer. - Reset the clock/timer. 22 Set the clock correctly. - Select the source (CD or TUNER, for example) before pressing the function button (É,í,ë). - Reduce the distance between the remote control and the system. - Replace the batteries. - If a recording is erased. - The Clock/Timer setting is in progress, stop the recording. - Insert the batteries with their polarities (+/- signs) aligned as indicated. - Press TIMER to switch on the...
... on the timer. - Reset the clock/timer. 22 Set the clock correctly. - Select the source (CD or TUNER, for example) before pressing the function button (É,í,ë). - Reduce the distance between the remote control and the system. - Replace the batteries. - If a recording is erased. - The Clock/Timer setting is in progress, stop the recording. - Insert the batteries with their polarities (+/- signs) aligned as indicated. - Press TIMER to switch on the...
User manual
Page 23
... customer controls on the product, and installation or repair of antenna systems outside of the product. • Product repair and/or part replacement because of improper installation, connections to improper voltage supply, abuse, neglect, misuse, accident, unauthorized repair or other cause not within ninety (90) days of the date of purchase to receive warranted repair on the product. For Ship-In warranty repair, ship the product to a Philips authorized service center for repair in...
... customer controls on the product, and installation or repair of antenna systems outside of the product. • Product repair and/or part replacement because of improper installation, connections to improper voltage supply, abuse, neglect, misuse, accident, unauthorized repair or other cause not within ninety (90) days of the date of purchase to receive warranted repair on the product. For Ship-In warranty repair, ship the product to a Philips authorized service center for repair in...


