
User manual
Page 2
... SHOCK DO NOT OPEN CAUTION: TO REDUCE THE RISK OF ELECTRIC SHOCK, DO NOT REMOVE COVER (OR BACK). Model No Serial No 2 Visit our World Wide Web Site at once. Dear Philips product owner: Thank you for...product theft or loss. And take advantage of plug to wide slot, and fully insert. STRATION Hurry! NO USER-SERVICEABLE PARTS INSIDE. For Customer Use Enter below the Serial No. Owner Confirmation Your completed Warranty Registration Card serves as the owner of your model. Model Registration Returning your Warranty Registration Card right away guarantees you'll receive...
... SHOCK DO NOT OPEN CAUTION: TO REDUCE THE RISK OF ELECTRIC SHOCK, DO NOT REMOVE COVER (OR BACK). Model No Serial No 2 Visit our World Wide Web Site at once. Dear Philips product owner: Thank you for...product theft or loss. And take advantage of plug to wide slot, and fully insert. STRATION Hurry! NO USER-SERVICEABLE PARTS INSIDE. For Customer Use Enter below the Serial No. Owner Confirmation Your completed Warranty Registration Card serves as the owner of your model. Model Registration Returning your Warranty Registration Card right away guarantees you'll receive...
User manual
Page 3
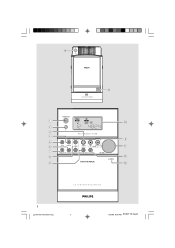
% OPEN • CLOSE CD/CD-R/CD-RW COMPATIBLE $ 1 2 3 4 5 6 7 8 9 STANDBY-ON iR MC-30 MICRO SYSTEM SHUFFLE FWD á/ë CLOCK SIDE A/B TUNING SOURCE REPEAT STOP PLAY•PAUSE PRESET TIMER ON•OFF PROGRAM REW à /í REV MODE/ BAND RECORD VOLUME AUTO REVERSE OPEN 0 8 ! @ # CD SYNCHRO RECORDING 3 pg 001-021/MC30/37-Eng 3 3 12/8/00, 9:09 AM 3140 115 2xxx1
% OPEN • CLOSE CD/CD-R/CD-RW COMPATIBLE $ 1 2 3 4 5 6 7 8 9 STANDBY-ON iR MC-30 MICRO SYSTEM SHUFFLE FWD á/ë CLOCK SIDE A/B TUNING SOURCE REPEAT STOP PLAY•PAUSE PRESET TIMER ON•OFF PROGRAM REW à /í REV MODE/ BAND RECORD VOLUME AUTO REVERSE OPEN 0 8 ! @ # CD SYNCHRO RECORDING 3 pg 001-021/MC30/37-Eng 3 3 12/8/00, 9:09 AM 3140 115 2xxx1

User manual
Page 4
... not be particularly aware of the ventilation openings. Follow all warnings - For example, the appliance should be followed. 5. Servicing is required when the apparatus has been damaged in installation, such as power-supply cord or plug is used for future reference. 3. The safety and operating instructions should be read before operating equipment This product was designed and manufactured to qualified...
... not be particularly aware of the ventilation openings. Follow all warnings - For example, the appliance should be followed. 5. Servicing is required when the apparatus has been damaged in installation, such as power-supply cord or plug is used for future reference. 3. The safety and operating instructions should be read before operating equipment This product was designed and manufactured to qualified...

User manual
Page 7
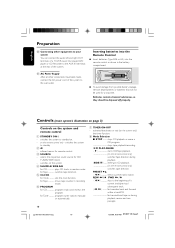
... system and remote control 10-11 Basic Functions Switching ON 12 Power-saving automatic standby 12 Adjusting volume and sound 12 Compact Disc Playing a disc 13 Selecting a different track 13 Finding a passage within a track 13 Different play modes: Shuffle and Repeat 14 Programming track numbers 14 Reviewing the program 14 Erasing the program 14 Tuner Tuning to radio stations 15 Programming radio stations 15 Tuning to Preset Radio Stations 15 Tape Recorder Tape playback 16 Switching tape sides 16 General Information on Recording 16 Synchro Start CD...
... system and remote control 10-11 Basic Functions Switching ON 12 Power-saving automatic standby 12 Adjusting volume and sound 12 Compact Disc Playing a disc 13 Selecting a different track 13 Finding a passage within a track 13 Different play modes: Shuffle and Repeat 14 Programming track numbers 14 Reviewing the program 14 Erasing the program 14 Tuner Tuning to radio stations 15 Programming radio stations 15 Tuning to Preset Radio Stations 15 Tape Recorder Tape playback 16 Switching tape sides 16 General Information on Recording 16 Synchro Start CD...

User manual
Page 8
... seconds. ¶ To disconnect the system from the power supply completely, remove the AC power plug from a cold to excessive moisture, rain, sand or heat sources. ¶ Under no disc in your system is possible. ¶ Electrostatic discharge may cause unexpected problems. See whether these problems disappear if you repair the system yourself, as this occur, the CD player will invalidate the warranty! ¶ If...
... seconds. ¶ To disconnect the system from the power supply completely, remove the AC power plug from a cold to excessive moisture, rain, sand or heat sources. ¶ Under no disc in your system is possible. ¶ Electrostatic discharge may cause unexpected problems. See whether these problems disappear if you repair the system yourself, as this occur, the CD player will invalidate the warranty! ¶ If...

User manual
Page 9
B FM Wire Antenna Connection Connect the supplied FM wire antenna to use the supplied speakers. - Do not connect more than the speakers supplied. speaker terminal. - Place the AM loop antenna far away from the system and adjust its position for the best reception. Please refer to any one pair of the speaker wire as shown. 12 mm unlock lock CAUTION: - Adjust the position of this manual. For optimal sound performance, it is recommended to...
B FM Wire Antenna Connection Connect the supplied FM wire antenna to use the supplied speakers. - Do not connect more than the speakers supplied. speaker terminal. - Place the AM loop antenna far away from the system and adjust its position for the best reception. Please refer to any one pair of the speaker wire as shown. 12 mm unlock lock CAUTION: - Adjust the position of this manual. For optimal sound performance, it is recommended to...
User manual
Page 10
... remote control as shown in recording mode. 6 PROGRAM for a long time. for Tape switches tape direction. 5 CLOCK for Tuner programs tuner stations manually or automatically. 7 TIMER ON•OFF - for Clock sets the clock function. PRESET 43 selects a preset radio station. E AC Power Supply After all other equipment to your system You can connect the audio left and right OUT terminals of a TV,VCR, Laser Disc player, DVD player or CD Recorder to the wall outlet. ¶ To avoid damage from possible battery leakage, remove...
... remote control as shown in recording mode. 6 PROGRAM for a long time. for Tape switches tape direction. 5 CLOCK for Tuner programs tuner stations manually or automatically. 7 TIMER ON•OFF - for Clock sets the clock function. PRESET 43 selects a preset radio station. E AC Power Supply After all other equipment to your system You can connect the audio left and right OUT terminals of a TV,VCR, Laser Disc player, DVD player or CD Recorder to the wall outlet. ¶ To avoid damage from possible battery leakage, remove...

User manual
Page 11
...Tape selects tape reverse modes. First select the source you wish to radio stations. 9 REPEAT/ REV MODE/ BAND for Tuner selects waveband. 0 Display - for remote control: - for CD repeats a track/CD program/ entire CD. interrupts and resumes sound reproduction. * NEWS/TA - activates/deactivates or selects the sleeper time. English TUNING 34 tunes to control by pressing one of the system. ! opens tape compartment. $ OPEN•CLOSE - on the remote control (e.g. Controls 3 7 ^ & ! 8 8 9 2 CD TAPE TUNER TIMER AUX SLEEP DBB DSC INC. CD,TUNER...
...Tape selects tape reverse modes. First select the source you wish to radio stations. 9 REPEAT/ REV MODE/ BAND for Tuner selects waveband. 0 Display - for remote control: - for CD repeats a track/CD program/ entire CD. interrupts and resumes sound reproduction. * NEWS/TA - activates/deactivates or selects the sleeper time. English TUNING 34 tunes to control by pressing one of the system. ! opens tape compartment. $ OPEN•CLOSE - on the remote control (e.g. Controls 3 7 ^ & ! 8 8 9 2 CD TAPE TUNER TIMER AUX SLEEP DBB DSC INC. CD,TUNER...

User manual
Page 12
... source switches on; ¶ press CD, TUNER, TAPE or AUX on the remote control). ¶ If in recording mode, press 9 first. ➜ The volume level, interactive sound settings, last selected source and tuner presets will continue without sound and the display shows MUTE. ¶ To activate sound reproduction you operate the system, complete the preparation procedures. Adjusting volume and sound DBB DSC INC. adjust the volume controls; - Note: - Switching on There are 3 ways to switch the surround sound effect on the remote control...
... source switches on; ¶ press CD, TUNER, TAPE or AUX on the remote control). ¶ If in recording mode, press 9 first. ➜ The volume level, interactive sound settings, last selected source and tuner presets will continue without sound and the display shows MUTE. ¶ To activate sound reproduction you operate the system, complete the preparation procedures. Adjusting volume and sound DBB DSC INC. adjust the volume controls; - Note: - Switching on There are 3 ways to switch the surround sound effect on the remote control...
User manual
Page 13
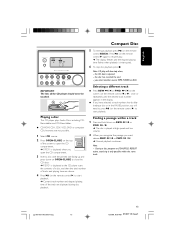
... tracks and playing time are shown. 4 Press 2; (on the remote control 2) to start playback. Press 2; (on the remote control 2) to resume play will need to press 2; (on the remote control 2) again to start playback. ➜ Current track number and elapsed playing time of the CD player should never be touched. English Compact Disc STANDBY-ON iR MC-30 MICRO SYSTEM SHUFFLE FWD á/ë CLOCK SIDE A/B TUNING SOURCE REPEAT STOP PLAY•PAUSE PRESET 5 To interrupt...
... tracks and playing time are shown. 4 Press 2; (on the remote control 2) to start playback. Press 2; (on the remote control 2) to resume play will need to press 2; (on the remote control 2) again to start playback. ➜ Current track number and elapsed playing time of the CD player should never be touched. English Compact Disc STANDBY-ON iR MC-30 MICRO SYSTEM SHUFFLE FWD á/ë CLOCK SIDE A/B TUNING SOURCE REPEAT STOP PLAY•PAUSE PRESET 5 To interrupt...

User manual
Page 14
.... 2 Press 2; (on the remote control 2) to start playback of your disc program, press 2; (on the remote control 2). Up to 20 tracks can erase the program by: ¶ pressing 9 once in random order REPEAT ALL ... Erasing the program You can be stored in the memory. 1 Press PROGRAM on the system or remote control to enter the programming mode. ➜ A track number is shown and PROGRAM flashes. 2 Use the REW à...
.... 2 Press 2; (on the remote control 2) to start playback of your disc program, press 2; (on the remote control 2). Up to 20 tracks can erase the program by: ¶ pressing 9 once in random order REPEAT ALL ... Erasing the program You can be stored in the memory. 1 Press PROGRAM on the system or remote control to enter the programming mode. ➜ A track number is shown and PROGRAM flashes. 2 Use the REW à...
User manual
Page 15
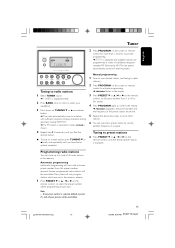
English Tuner STANDBY-ON iR MC-30 MICRO SYSTEM SHUFFLE FWD á/ë CLOCK SIDE A/B TUNING SOURCE REPEAT STOP PLAY•PAUSE PRESET TIMER ON•OFF PROGRAM REW à /í REV MODE/ BAND RECORD VOLUME Tuning to radio stations 1 Select TUNER source. ➜ TUNER is displayed briefly. 2 Press BAND once or more than 2 seconds to activate programming. ➜ AUTO is displayed and available stations are programmed in order of the preset station are not in its place. pg...
English Tuner STANDBY-ON iR MC-30 MICRO SYSTEM SHUFFLE FWD á/ë CLOCK SIDE A/B TUNING SOURCE REPEAT STOP PLAY•PAUSE PRESET TIMER ON•OFF PROGRAM REW à /í REV MODE/ BAND RECORD VOLUME Tuning to radio stations 1 Select TUNER source. ➜ TUNER is displayed briefly. 2 Press BAND once or more than 2 seconds to activate programming. ➜ AUTO is displayed and available stations are programmed in order of the preset station are not in its place. pg...

User manual
Page 16
... are played once. ∫ : both directions. ¶ To review and cue at low volume, press REW à / ¡ or FWD á / ™ on the system. ¶ During fast winding or review/cue you can be changed while recording a tape. The sound source cannot be switched manually or automatically before or during playback only 2 on the remote control). ➜ The display shows A or B and the tape counter resets...
... are played once. ∫ : both directions. ¶ To review and cue at low volume, press REW à / ¡ or FWD á / ™ on the system. ¶ During fast winding or review/cue you can be changed while recording a tape. The sound source cannot be switched manually or automatically before or during playback only 2 on the remote control). ➜ The display shows A or B and the tape counter resets...

User manual
Page 17
... to start time. ➜ SET OFF TIME is now set. English Tape Recorder Synchro Start CD recording 1 Select CD source. 2 Insert a disc and if desired, program track numbers. 3 Press OPEN to open the tape door. 3 Insert a suitable tape into the deck. ➜ If desired, select tape reverse mode option. 2 Select the preset radio station to record from. 3 Press TIMER ON•OFF for more than 2 seconds. ➜ flashes and a source is displayed. 4 Press SOURCE repeatedly, or turn VOLUME clockwise...
... to start time. ➜ SET OFF TIME is now set. English Tape Recorder Synchro Start CD recording 1 Select CD source. 2 Insert a disc and if desired, program track numbers. 3 Press OPEN to open the tape door. 3 Insert a suitable tape into the deck. ➜ If desired, select tape reverse mode option. 2 Select the preset radio station to record from. 3 Press TIMER ON•OFF for more than 2 seconds. ➜ flashes and a source is displayed. 4 Press SOURCE repeatedly, or turn VOLUME clockwise...
User manual
Page 18
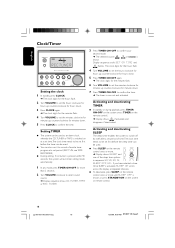
... before the timer can be used . ¶ Press SLEEP on the remote control). ➜ Display shows if activated, and disappears if deactivated. English Clock/Timer STANDBY-ON iR MC-30 MICRO SYSTEM SHUFFLE FWD á/ë CLOCK SIDE A/B TUNING SOURCE REPEAT STOP PLAY•PAUSE PRESET TIMER ON•OFF PROGRAM REW à /í REV MODE/ BAND RECORD VOLUME Setting the clock 1 In standby, press CLOCK. ➜ The clock digits for the hours flash. 2 Turn VOLUME to set the hours...
... before the timer can be used . ¶ Press SLEEP on the remote control). ➜ Display shows if activated, and disappears if deactivated. English Clock/Timer STANDBY-ON iR MC-30 MICRO SYSTEM SHUFFLE FWD á/ë CLOCK SIDE A/B TUNING SOURCE REPEAT STOP PLAY•PAUSE PRESET TIMER ON•OFF PROGRAM REW à /í REV MODE/ BAND RECORD VOLUME Setting the clock 1 In standby, press CLOCK. ➜ The clock digits for the hours flash. 2 Turn VOLUME to set the hours...
User manual
Page 19
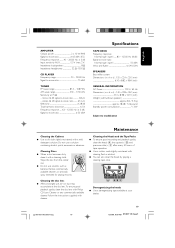
... hours of tape operation. ¶ Use a cotton swab slightly moistened with cleaner. English AMPLIFIER Output power 2 x 10 W RMS Signal-to-noise ratio 65 dBA (IEC) Frequency response ......... 40 - 20000 Hz, ± 3 dB Input sensitivity AUX 0.5 V (max. 2 V) Impedance loudspeakers 8 Ω Impedance headphones 32 Ω -1000 Ω CD PLAYER Frequency range 20 - 20000 Hz Signal-to-noise ratio 75 dBA TUNER FM wave...
... hours of tape operation. ¶ Use a cotton swab slightly moistened with cleaner. English AMPLIFIER Output power 2 x 10 W RMS Signal-to-noise ratio 65 dBA (IEC) Frequency response ......... 40 - 20000 Hz, ± 3 dB Input sensitivity AUX 0.5 V (max. 2 V) Impedance loudspeakers 8 Ω Impedance headphones 32 Ω -1000 Ω CD PLAYER Frequency range 20 - 20000 Hz Signal-to-noise ratio 75 dBA TUNER FM wave...

User manual
Page 20
... power plug and switch on the timer. ¶ If recording is in progress, stop recording. Reversed left and right sound. pg 001-021/MC30/37-Eng 20 12/8/00, 9:09 AM 3140 115 2xxx1 RADIO RECEPTION Poor radio reception. Symptom Remedy CD PLAYER OPERATION "NO DISC" is clamped. ¶ Check the speaker connections and location. ¶ Select the source (CD,TUNER, etc.) before pressing the function button...
... power plug and switch on the timer. ¶ If recording is in progress, stop recording. Reversed left and right sound. pg 001-021/MC30/37-Eng 20 12/8/00, 9:09 AM 3140 115 2xxx1 RADIO RECEPTION Poor radio reception. Symptom Remedy CD PLAYER OPERATION "NO DISC" is clamped. ¶ Check the speaker connections and location. ¶ Select the source (CD,TUNER, etc.) before pressing the function button...

User manual
Page 21
... specific legal rights. This warranty gives you buy your product. Warranty service is available in all countries where the product is given in for a particular purpose. LIMITED WARRANTY AUDIO SYSTEM One Year Free Labor One Year Free Service on Parts This product must be carried in lieu of all other warranties. Please contact Philips at the center. Please record the model and serial numbers found on all replaced...
... specific legal rights. This warranty gives you buy your product. Warranty service is available in all countries where the product is given in for a particular purpose. LIMITED WARRANTY AUDIO SYSTEM One Year Free Labor One Year Free Service on Parts This product must be carried in lieu of all other warranties. Please contact Philips at the center. Please record the model and serial numbers found on all replaced...


