

Leaflet
Page 1
.... Philips DVD Micro Theater MCD735 Superior surround sound for an unforgettable movie Look no further than this 5.1-channel DVD Micro "Theater" system that offers everything you need for the finest music and movie experience with stand • High quality remote control for deep and dramatic sound • 200W RMS total output power Design that blends into your interior(s) • Elegant wood-finished speakers • High-end component design...
.... Philips DVD Micro Theater MCD735 Superior surround sound for an unforgettable movie Look no further than this 5.1-channel DVD Micro "Theater" system that offers everything you need for the finest music and movie experience with stand • High quality remote control for deep and dramatic sound • 200W RMS total output power Design that blends into your interior(s) • Elegant wood-finished speakers • High-end component design...

Leaflet
Page 2
... • Tuner Bands: FM Stereo, AM • Auto digital tuning • Station presets: 40 Connectivity • Video Output - at the touch of colors, resulting in DTS and Dolby Digital decoder eliminates the need for an external decoder by the field with 2xAAA batteries • IFU / User Manual: English, French, Spanish Dimensions • Set dimensions (W x H x D): 210 x 135 x 255 mm • Surround Speaker dimensions (W x H x D): 130 x 155 x 155 mm • Center speaker dimensions...
... • Tuner Bands: FM Stereo, AM • Auto digital tuning • Station presets: 40 Connectivity • Video Output - at the touch of colors, resulting in DTS and Dolby Digital decoder eliminates the need for an external decoder by the field with 2xAAA batteries • IFU / User Manual: English, French, Spanish Dimensions • Set dimensions (W x H x D): 210 x 135 x 255 mm • Surround Speaker dimensions (W x H x D): 130 x 155 x 155 mm • Center speaker dimensions...
User manual
Page 6
... Remote Control 18 Using the Remote Control to operate the Player Step 2: Setting up the TV 18~19 Setting up Progressive Scan feature To deactivate Progressive manually Step 3: Setting the speakers 19 Step 4: Setting language preference 20 Setting the OSD Language Setting the Audio, Subtitle and Disc Menu language Basic Functions Switching on/off the system 21 Volume control 21 Sound Control 21~22 DBB (Dynamic Bass Boost) DSC (Digital Sound Control) LOUDNESS Selecting surround sound Dimming the display screen 22 Disc Operations Playable Discs 23 Playing discs...
... Remote Control 18 Using the Remote Control to operate the Player Step 2: Setting up the TV 18~19 Setting up Progressive Scan feature To deactivate Progressive manually Step 3: Setting the speakers 19 Step 4: Setting language preference 20 Setting the OSD Language Setting the Audio, Subtitle and Disc Menu language Basic Functions Switching on/off the system 21 Volume control 21 Sound Control 21~22 DBB (Dynamic Bass Boost) DSC (Digital Sound Control) LOUDNESS Selecting surround sound Dimming the display screen 22 Disc Operations Playable Discs 23 Playing discs...
User manual
Page 8
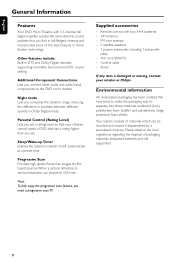
... speakers - 1 passive subwoofer including 1 subwoofer cable - A/V cord (R/W/Y) - Your system consists of materials which can double to the DVD micro theatre. English General Information Features Your DVD Micro Theatre with two AAA batteries - Progressive Scan Provides high quality flicker-free images for film based sources. Note: To fully enjoy the progressive scan feature, you connect other audio and audio/visual components to 525 lines. Remote control with 5.1-channel full digital amplifier...
... speakers - 1 passive subwoofer including 1 subwoofer cable - A/V cord (R/W/Y) - Your system consists of materials which can double to the DVD micro theatre. English General Information Features Your DVD Micro Theatre with two AAA batteries - Progressive Scan Provides high quality flicker-free images for film based sources. Note: To fully enjoy the progressive scan feature, you connect other audio and audio/visual components to 525 lines. Remote control with 5.1-channel full digital amplifier...
User manual
Page 10
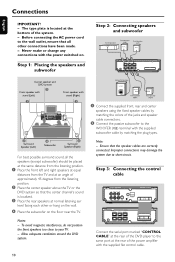
... rear speakers at the rear of the system. - Before connecting the AC power cord to the WOOFER (4Ω) terminal with the power switched on the floor near the TV. Never make or change any connections with the supplied subwoofer cable by matching the plug types. Step 3: Connecting the control cable Connect the serial port marked "CONTROL CABLE" at the rear of the jacks and speaker cable connectors. 2 Connect the passive subwoofer to the wall outlet, ensure that the speaker cables are correctly connected. Connections...
... rear speakers at the rear of the system. - Before connecting the AC power cord to the WOOFER (4Ω) terminal with the power switched on the floor near the TV. Never make or change any connections with the supplied subwoofer cable by matching the plug types. Step 3: Connecting the control cable Connect the serial port marked "CONTROL CABLE" at the rear of the jacks and speaker cable connectors. 2 Connect the passive subwoofer to the wall outlet, ensure that the speaker cables are correctly connected. Connections...
User manual
Page 11
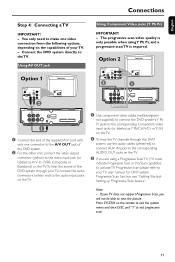
Note: - You only need to make one connector to the A/V OUT jack of this DVD system, use the audio cables (white/red) to connect AUX IN jacks to the corresponding AUDIO OUT jacks on the TV. 3 If you will not be able to the audio input jacks on the TV. 2 To hear the TV channels through this DVD system through your TV user manual. For DVD system Progressive Scan function, see "Getting StartedSetting up...
Note: - You only need to make one connector to the A/V OUT jack of this DVD system, use the audio cables (white/red) to connect AUX IN jacks to the corresponding AUDIO OUT jacks on the TV. 3 If you will not be able to the audio input jacks on the TV. 2 To hear the TV channels through this DVD system through your TV user manual. For DVD system Progressive Scan function, see "Getting StartedSetting up...

User manual
Page 13
... the input source. Before star ting operation, set the DIGITAL OUT according to the audio connection. (See "DIGITAL OUT".) Using the VCR for complete connection and usage details. Never make or change any connection with Dolby Digital decoder). Recording (digital) B ● Connect the system's COAXIAL jack to the AUDIO OUT jacks on the other audio/visual device (such as DTS-Digital Theatre compatible, with the power switched on a digital recording device (such as a TV,VCR, Laser Disc player or...
... the input source. Before star ting operation, set the DIGITAL OUT according to the audio connection. (See "DIGITAL OUT".) Using the VCR for complete connection and usage details. Never make or change any connection with Dolby Digital decoder). Recording (digital) B ● Connect the system's COAXIAL jack to the AUDIO OUT jacks on the other audio/visual device (such as DTS-Digital Theatre compatible, with the power switched on a digital recording device (such as a TV,VCR, Laser Disc player or...

User manual
Page 14
... - TUNER: selects a preset radio station 14 FM press the control knob downward to repeat a track or disc. shows the current status of the DVD player. 5 SOURCE - Functional Overview English 9 0 4 1 2 3 567 8 DVD player and power amplifier 1 ECO POWER/STANDBY ON B - REPEAT•STEREO Disc press the control knob downward to set stereo or mono sound mode. 4 Display - Picture CD ........ point the remote control towards this sensor. 3 Control knob 4 / ¢ Disc press the control knob to the left /right to tune to a higher/ lower radio frequency...
... - TUNER: selects a preset radio station 14 FM press the control knob downward to repeat a track or disc. shows the current status of the DVD player. 5 SOURCE - Functional Overview English 9 0 4 1 2 3 567 8 DVD player and power amplifier 1 ECO POWER/STANDBY ON B - REPEAT•STEREO Disc press the control knob downward to set stereo or mono sound mode. 4 Display - Picture CD ........ point the remote control towards this sensor. 3 Control knob 4 / ¢ Disc press the control knob to the left /right to tune to a higher/ lower radio frequency...

User manual
Page 16
.../higher radio frequency gradually. - DVD/VCD: enters or exits the disc contents menu. - selects an item in clock/timer setting mode. - searches backward/forward in a disc by entering a time, title, chapter or track. - Tuner: selects a preset radio station. % ÉÅ - Power-on the TV screen. ! sets the sleep timer function (auto off . - displays the system clock. ) DIM - Tuner: programs preset radio stations. 5 GOTO/ST - Disc: fast searches in a disc at different speeds. # VOLUME +/- - confirms a selection. 0 ZOOM - press to tune to...
.../higher radio frequency gradually. - DVD/VCD: enters or exits the disc contents menu. - selects an item in clock/timer setting mode. - searches backward/forward in a disc by entering a time, title, chapter or track. - Tuner: selects a preset radio station. % ÉÅ - Power-on the TV screen. ! sets the sleep timer function (auto off . - displays the system clock. ) DIM - Tuner: programs preset radio stations. 5 GOTO/ST - Disc: fast searches in a disc at different speeds. # VOLUME +/- - confirms a selection. 0 ZOOM - press to tune to...

User manual
Page 18
... may have a button or switch that chooses different video modes. ➜ Or, set to channel 3 or 4 if you may go to channel 1 on your TV user manual). 3 Press ECO POWER/STANDBY ON B (B on the remote) to turn on the DVD player. 4 Select the correct Video Input channel. ➜ The DVD background screen appears on interlaced mode (refer to your TV using an RF modulator. See your TV manual for a DVD disc to play on this Player, the colour...
... may have a button or switch that chooses different video modes. ➜ Or, set to channel 3 or 4 if you may go to channel 1 on your TV user manual). 3 Press ECO POWER/STANDBY ON B (B on the remote) to turn on the DVD player. 4 Select the correct Video Input channel. ➜ The DVD background screen appears on interlaced mode (refer to your TV using an RF modulator. See your TV manual for a DVD disc to play on this Player, the colour...

User manual
Page 19
... progressive scan mode or turn on to interlaced mode (refer to your surroundings and setup. ● Press VOL.SEL on the TV. Step 3: Setting the speakers You can adjust the volume level for individual speakers.These adjustments let you can start enjoy the high quality picture. CONNECT YPRPB CABLE. 3. ENSURE TV HAS P-SCAN. 2. There will be due to the connected TV does not accept progressive signals, and...
... progressive scan mode or turn on to interlaced mode (refer to your surroundings and setup. ● Press VOL.SEL on the TV. Step 3: Setting the speakers You can adjust the volume level for individual speakers.These adjustments let you can start enjoy the high quality picture. CONNECT YPRPB CABLE. 3. ENSURE TV HAS P-SCAN. 2. There will be due to the connected TV does not accept progressive signals, and...

User manual
Page 21
... sound settings, last selected source and tuner presets will be retained in the player's memory. For proper surround sound, make sure the speakers and subwoofer are connected (see Connections-Step 3: Connecting speakers and subwoofer.) ● Press SURROUND to select surround or stereo mode. ➜ The availability of the various surround sound modes depends on the number of 12), interactive sound settings, last selected mode, source and tuner presets will switch to standby mode ● Press ECO POWER/STANDBY-ON B (B on the display panel. "XX" denotes the volume level. To switch...
... sound settings, last selected source and tuner presets will be retained in the player's memory. For proper surround sound, make sure the speakers and subwoofer are connected (see Connections-Step 3: Connecting speakers and subwoofer.) ● Press SURROUND to select surround or stereo mode. ➜ The availability of the various surround sound modes depends on the number of 12), interactive sound settings, last selected mode, source and tuner presets will switch to standby mode ● Press ECO POWER/STANDBY-ON B (B on the display panel. "XX" denotes the volume level. To switch...

User manual
Page 23
... tag Region Codes DVDs must enter your four-digit password. (See "Password Setup Page"). 6 At any optional stereo or AV receiver) to a power outlet. 2 Turn on the TV power and set to the correct Video In channel. (See "Setting up the TV"). 3 Press ECO POWER/STANDBY-ONB on the DVD Player front panel or B on the remote. ➜ You should see the blue Philips DVD background screen on the TV. 4 Press OPEN•CLOSE to open the disc tray...
... tag Region Codes DVDs must enter your four-digit password. (See "Password Setup Page"). 6 At any optional stereo or AV receiver) to a power outlet. 2 Turn on the TV power and set to the correct Video In channel. (See "Setting up the TV"). 3 Press ECO POWER/STANDBY-ONB on the DVD Player front panel or B on the remote. ➜ You should see the blue Philips DVD background screen on the TV. 4 Press OPEN•CLOSE to open the disc tray...

User manual
Page 26
...; The data disc menu appears on your TV and set to the correct Video In channel. (See "Setting up the TV"). Camera Angle (DVD) ● Press ANGLE repeatedly to select different audio languages. You have to turn on the TV screen. 2 Use 3 4 to select an album and press OK to large number of the current title/chapter. ➜ Display Off: switches time display off . The disc reading time...
...; The data disc menu appears on your TV and set to the correct Video In channel. (See "Setting up the TV"). Camera Angle (DVD) ● Press ANGLE repeatedly to select different audio languages. You have to turn on the TV screen. 2 Use 3 4 to select an album and press OK to large number of the current title/chapter. ➜ Display Off: switches time display off . The disc reading time...
User manual
Page 30
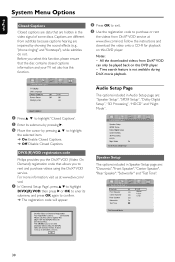
... download the video onto a CD-R for playback on this DVD player. Speaker Setup The options included in Speaker Setup page are hidden in Audio Setup page are different from DivX® VOD can only be played back on this DVD player. - Notes: - DIVX(R) VOD registration code Philips provides you the DivX® VOD (Video On Demand) registration code that the disc contains closed captions information and your TV set...
... download the video onto a CD-R for playback on this DVD player. Speaker Setup The options included in Speaker Setup page are hidden in Audio Setup page are different from DivX® VOD can only be played back on this DVD player. - Notes: - DIVX(R) VOD registration code Philips provides you the DivX® VOD (Video On Demand) registration code that the disc contains closed captions information and your TV set...

User manual
Page 31
... decoding multi-channel audio. System Menu Options SPDIF Output The options included in Digital Audio Setup is: "Dual Mono". Dolby Digital Setup The option included in SPDIF (Sony/Phillips Digital Interface Format) Setup Page are: "SPDIF Off ","SPDIF/Raw" and "SPDIF/PCM". ➜ SPDIF Off:Turns off the SPDIF output. ➜ SPDIF/Raw: If you have connected your DVD Player is connected to a Dolby Pro Logic decoder. ➜ Stereo: Select this option when output delivers sound...
... decoding multi-channel audio. System Menu Options SPDIF Output The options included in Digital Audio Setup is: "Dual Mono". Dolby Digital Setup The option included in SPDIF (Sony/Phillips Digital Interface Format) Setup Page are: "SPDIF Off ","SPDIF/Raw" and "SPDIF/PCM". ➜ SPDIF Off:Turns off the SPDIF output. ➜ SPDIF/Raw: If you have connected your DVD Player is connected to a Dolby Pro Logic decoder. ➜ Stereo: Select this option when output delivers sound...

User manual
Page 39
... your TV owner's manual for help. If the disc's or DVD system's colour system is activated but the connected TV does not support progressive signals or the cables are unable to interlaced mode. 2) Press SYSTEM on the power. Distorted or poor picture. See your TV's colour system, the picture may have a button on the remote. ✔ Set your TV progressive scan mode or turn on the remote to exit...
... your TV owner's manual for help. If the disc's or DVD system's colour system is activated but the connected TV does not support progressive signals or the cables are unable to interlaced mode. 2) Press SYSTEM on the power. Distorted or poor picture. See your TV's colour system, the picture may have a button on the remote. ✔ Set your TV progressive scan mode or turn on the remote to exit...

User manual
Page 40
..., or multi-language Audio. Check for the sound or subtitle is prohibited on the DVD. ✔ The features may be available on the disc. ✔ Tune in radio broadcasts. Remove the disc and leave the system turned on the remote) to the correct frequency. ✔ Connect the antennas. ✔ Fully extend the FM wire antenna. Considerable noise in to resume normal play mode. No sound or distorted sound. ✔ Adjust the volume...
..., or multi-language Audio. Check for the sound or subtitle is prohibited on the DVD. ✔ The features may be available on the disc. ✔ Tune in radio broadcasts. Remove the disc and leave the system turned on the remote) to the correct frequency. ✔ Connect the antennas. ✔ Fully extend the FM wire antenna. Considerable noise in to resume normal play mode. No sound or distorted sound. ✔ Adjust the volume...

User manual
Page 42
... preset regions.This unit will only play discs that have all the horizontal lines of a picture at which features small decrease in image quality in audio software. when it is assigned a title number enabling you to receive progressive scan output from Dolby Digital. Analog sound varies, while digital sound has specific numerical values.These jacks send audio through multiple channels, instead of music; Dolby Digital: A surround sound system developed by different companies. Disc menu: A screen display prepared for users...
... preset regions.This unit will only play discs that have all the horizontal lines of a picture at which features small decrease in image quality in audio software. when it is assigned a title number enabling you to receive progressive scan output from Dolby Digital. Analog sound varies, while digital sound has specific numerical values.These jacks send audio through multiple channels, instead of music; Dolby Digital: A surround sound system developed by different companies. Disc menu: A screen display prepared for users...
Quick start guide (English)
Page 3
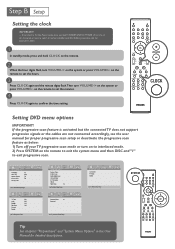
..." and "System Menu Options" in the Eco Power mode, press and hold STANDBY-ON/ECO POWER 2 on the set for 3 seconds or more to switch to set clock in the User Manual for proper progressive scan setup or deactivate the progressive scan feature as below . 1 In standby mode, press and hold CLOCK on the remote. 2 When the hour digits flash, turn VOLUME-/+ on the remote to set the minutes. 4 Press...
..." and "System Menu Options" in the Eco Power mode, press and hold STANDBY-ON/ECO POWER 2 on the set for 3 seconds or more to switch to set clock in the User Manual for proper progressive scan setup or deactivate the progressive scan feature as below . 1 In standby mode, press and hold CLOCK on the remote. 2 When the hour digits flash, turn VOLUME-/+ on the remote to set the minutes. 4 Press...


