

Leaflet
Page 2
...12 NC: 8670 000 25022 UPC: 6 09585 12132 4 © 2009 Koninklijke Philips Electronics N.V. DVD Micro Theater MCD735/37 Specifications Sound • Output Power: Total 200W • Sound Enhancement: Digital Sound Control 4 modes, Dynamic Bass Boost • Sound System: Dolby Prologic II, DTS...White FTD • OSD Languages: English, French, Spanish Accessories • Included Accessories: Control cable, AM/FM Antenna, Audio/Video cable, Quick Use Guide, Guarantee booklet • Remote control: 49-key with the even lines, both fields are subject to -AnalogueConverter that features ...
...12 NC: 8670 000 25022 UPC: 6 09585 12132 4 © 2009 Koninklijke Philips Electronics N.V. DVD Micro Theater MCD735/37 Specifications Sound • Output Power: Total 200W • Sound Enhancement: Digital Sound Control 4 modes, Dynamic Bass Boost • Sound System: Dolby Prologic II, DTS...White FTD • OSD Languages: English, French, Spanish Accessories • Included Accessories: Control cable, AM/FM Antenna, Audio/Video cable, Quick Use Guide, Guarantee booklet • Remote control: 49-key with the even lines, both fields are subject to -AnalogueConverter that features ...
User manual
Page 6
... 8 Installation 9 Maintenance 9 Connections Step 1: Placing the speakers and subwoofer 10 Step 2: Connecting speakers and subwoofer 10 Step 3: Connecting the control cable 10 Step 4: Connecting a TV 11~12 Step 5: Connecting FM/AM antennas 12 Step 6: Connecting the power cord 13 Optional: Connecting additional...Subtitle and Disc Menu language Basic Functions Switching on/off the system 21 Volume control 21 Sound Control 21~22 DBB (Dynamic Bass Boost) DSC (Digital Sound Control) LOUDNESS Selecting surround sound Dimming the display screen 22 Disc Operations Playable Discs 23...
... 8 Installation 9 Maintenance 9 Connections Step 1: Placing the speakers and subwoofer 10 Step 2: Connecting speakers and subwoofer 10 Step 3: Connecting the control cable 10 Step 4: Connecting a TV 11~12 Step 5: Connecting FM/AM antennas 12 Step 6: Connecting the power cord 13 Optional: Connecting additional...Subtitle and Disc Menu language Basic Functions Switching on/off the system 21 Volume control 21 Sound Control 21~22 DBB (Dynamic Bass Boost) DSC (Digital Sound Control) LOUDNESS Selecting surround sound Dimming the display screen 22 Disc Operations Playable Discs 23...
User manual
Page 8
...progressive scan feature, you compress the dynamic range, reducing the difference in loudness between different sounds in Dolby Digital mode. Control cable - Parental Control (Rating Level) Lets you find in full-fledged cinemas and incorporates some of the best features in DTS and Dolby Digital...features include: Built-in home theater technology. Additional Component Connections Lets you set a ratings level so that your retailer or Philips. Sleep/Wake-up Timer Enables the system to separate into three materials: cardboard (box), polystyrene foam (buffer) and polyethylene (bags,...
...progressive scan feature, you compress the dynamic range, reducing the difference in loudness between different sounds in Dolby Digital mode. Control cable - Parental Control (Rating Level) Lets you find in full-fledged cinemas and incorporates some of the best features in DTS and Dolby Digital...features include: Built-in home theater technology. Additional Component Connections Lets you set a ratings level so that your retailer or Philips. Sleep/Wake-up Timer Enables the system to separate into three materials: cardboard (box), polystyrene foam (buffer) and polyethylene (bags,...
User manual
Page 10
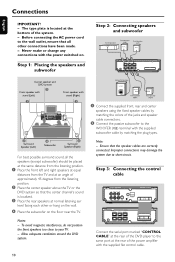
...that the center channel's sound is located at the bottom of the jacks and speaker cable connectors. 2 Connect the passive subwoofer to the WOOFER (4Ω) terminal with the supplied flat control cable. 10 Before connecting the AC power cord to the same port at normal listening ear...magnetic interference, do not position the front speakers too close to short-circuit. Notes: - Note: - Step 3: Connecting the control cable Connect the serial port marked "CONTROL CABLE" at the rear of the DVD player to the wall outlet, ensure that all the speakers (except subwoofer) should be ...
...that the center channel's sound is located at the bottom of the jacks and speaker cable connectors. 2 Connect the passive subwoofer to the WOOFER (4Ω) terminal with the supplied flat control cable. 10 Before connecting the AC power cord to the same port at normal listening ear...magnetic interference, do not position the front speakers too close to short-circuit. Notes: - Note: - Step 3: Connecting the control cable Connect the serial port marked "CONTROL CABLE" at the rear of the DVD player to the wall outlet, ensure that all the speakers (except subwoofer) should be ...

User manual
Page 39
...10004; Check if the TV is activated but the connected TV does not support progressive signals or the cables are unable to select "DVD" or press DISC on the TV. ✔ If the progressive scan ...'s or DVD system's colour system is properly connected. ✔ Press STANDBY ONB on the TV remote control that selects Auxiliary or A/V IN channel. Do not open the system as below before taking the system ... repeatedly to remedy a problem by following these hints, consult your dealer or Philips for repair. Distorted or poor picture. See your TV's colour system, the picture may appear.This...
...10004; Check if the TV is activated but the connected TV does not support progressive signals or the cables are unable to select "DVD" or press DISC on the TV. ✔ If the progressive scan ...'s or DVD system's colour system is properly connected. ✔ Press STANDBY ONB on the TV remote control that selects Auxiliary or A/V IN channel. Do not open the system as below before taking the system ... repeatedly to remedy a problem by following these hints, consult your dealer or Philips for repair. Distorted or poor picture. See your TV's colour system, the picture may appear.This...

User manual
Page 40
...10004; Moisture has condensed inside the system. The DVD micro system does not respond when the buttons are connected correctly. ✔ Replace the speaker cables. ✔ Disconnect the headphones. ✔ The system is in radio broadcasts. Check for any equipment that the speakers are pressed. ✔ ... any scratches or smudges on the disc. ✔ Press SYSTEM MENU to turn off the setup menu screen. ✔ Cancel the parental control rating function or change the aspect ratio. Position for best reception and secure to a wall. ✔ Connect an outdoor FM or AM ...
...10004; Moisture has condensed inside the system. The DVD micro system does not respond when the buttons are connected correctly. ✔ Replace the speaker cables. ✔ Disconnect the headphones. ✔ The system is in radio broadcasts. Check for any equipment that the speakers are pressed. ✔ ... any scratches or smudges on the disc. ✔ Press SYSTEM MENU to turn off the setup menu screen. ✔ Cancel the parental control rating function or change the aspect ratio. Position for best reception and secure to a wall. ✔ Connect an outdoor FM or AM ...

Quick start guide (English)
Page 1
MCD 735 Quick Start Guide BAND BAND What's in the Box? You should find these items upon opening the box. A/V cord (R/W/Y) Subwoofer cable AC power cord RReemmoottee ccoonnttrrooll wwiitthh ttwwoo AAA batteries FM and AM antennas Quick 1 Start Guide U ser 2 M anual Quick start guide User manual Control Cable
MCD 735 Quick Start Guide BAND BAND What's in the Box? You should find these items upon opening the box. A/V cord (R/W/Y) Subwoofer cable AC power cord RReemmoottee ccoonnttrrooll wwiitthh ttwwoo AAA batteries FM and AM antennas Quick 1 Start Guide U ser 2 M anual Quick start guide User manual Control Cable

Quick start guide (English)
Page 2
AC power 5 1 Connect the speaker and subwoofer cables. 2 Connect the AM and FM antennas. 3 Connect the control cable. 4 Connect the A/V cord to the correct Video In channel. See the User Manual for proper connections and detailed setup. For connecting to a Progressive Scan TV, ...
AC power 5 1 Connect the speaker and subwoofer cables. 2 Connect the AM and FM antennas. 3 Connect the control cable. 4 Connect the A/V cord to the correct Video In channel. See the User Manual for proper connections and detailed setup. For connecting to a Progressive Scan TV, ...


