

Leaflet
Page 2
...volume settings - DTS, DolbyDigital, ProLogic ll A built-in your music enjoyment by the field with 2xAAA batteries • IFU / User Manual: English, French, Spanish Dimensions • Set dimensions (W x H x D): 210 x 135 x 255 mm • Surround Speaker... resulting in particular apparent while using the maximum resolution. www.philips.com Ultimately, Digital Sound Control makes it easy for an external... electromagnetic interference generated from the amplifier and DVD loader. DVD Micro Theater MCD735/37 Specifications Sound • Output Power: Total 200W • Sound ...
...volume settings - DTS, DolbyDigital, ProLogic ll A built-in your music enjoyment by the field with 2xAAA batteries • IFU / User Manual: English, French, Spanish Dimensions • Set dimensions (W x H x D): 210 x 135 x 255 mm • Surround Speaker... resulting in particular apparent while using the maximum resolution. www.philips.com Ultimately, Digital Sound Control makes it easy for an external... electromagnetic interference generated from the amplifier and DVD loader. DVD Micro Theater MCD735/37 Specifications Sound • Output Power: Total 200W • Sound ...
User manual
Page 11
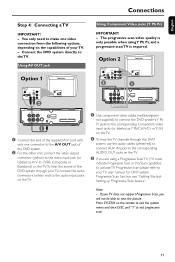
... input jack (or labeled as Y Pb/Cb Pr/Cr or YUV) on the TV. 1 Use component video cables (red/blue/green - Note: - If your TV user manual. English Step 4: Connecting a TV IMPORTANT! - not supplied) to connect the DVD system's Y Pb Pr jacks to the corresponding Component video input jacks (or labeled as...
... input jack (or labeled as Y Pb/Cb Pr/Cr or YUV) on the TV. 1 Use component video cables (red/blue/green - Note: - If your TV user manual. English Step 4: Connecting a TV IMPORTANT! - not supplied) to connect the DVD system's Y Pb Pr jacks to the corresponding Component video input jacks (or labeled as...

User manual
Page 18
...the correct Video Input channel. ➜ The DVD background screen appears on the front panel. CAUTION! - Remove batteries if they should see the blue Philips DVD background screen on your TV, then press the Channel down button repeatedly until you see "Step 4: Connecting a TVUsing Component Video jacks (Y Pb...mode (refer to your TV using an RF modulator. Before enabling the progressive scan feature, you have connected the DVD player to your TV user manual). 3 Press ECO POWER/STANDBY ON B (B on the remote) to operate the Player 1 Aim the Remote Control directly at the remote sensor...
...the correct Video Input channel. ➜ The DVD background screen appears on the front panel. CAUTION! - Remove batteries if they should see the blue Philips DVD background screen on your TV, then press the Channel down button repeatedly until you see "Step 4: Connecting a TVUsing Component Video jacks (Y Pb...mode (refer to your TV using an RF modulator. Before enabling the progressive scan feature, you have connected the DVD player to your TV user manual). 3 Press ECO POWER/STANDBY ON B (B on the remote) to operate the Player 1 Aim the Remote Control directly at the remote sensor...

User manual
Page 19
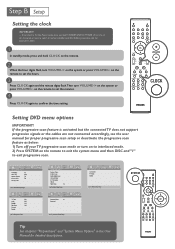
... at this state until you turn on the progressive scan mode on your TV. 9 Turn on your TV progressive scan mode (refer to your TV user manual). ➜ The below menu appears on the TV. 1 Turn off your TV progressive scan mode or turn on to interlaced mode (refer to your surroundings... be due to the connected TV does not accept progressive signals, and progressive is complete now and you optimize the sound according to your TV user manual). 2 Press SYSTEM on the TV. CONFIRM TO USE P-SCAN, IF PICTURE IS GOOD, PRESS OK BUTTON ON REMOTE. TIME LAST 01 SECOND 0 Press 1 2 to highlight...
... at this state until you turn on the progressive scan mode on your TV. 9 Turn on your TV progressive scan mode (refer to your TV user manual). ➜ The below menu appears on the TV. 1 Turn off your TV progressive scan mode or turn on to interlaced mode (refer to your surroundings... be due to the connected TV does not accept progressive signals, and progressive is complete now and you optimize the sound according to your TV user manual). 2 Press SYSTEM on the TV. CONFIRM TO USE P-SCAN, IF PICTURE IS GOOD, PRESS OK BUTTON ON REMOTE. TIME LAST 01 SECOND 0 Press 1 2 to highlight...

Quick start guide (English)
Page 1
A/V cord (R/W/Y) Subwoofer cable AC power cord RReemmoottee ccoonnttrrooll wwiitthh ttwwoo AAA batteries FM and AM antennas Quick 1 Start Guide U ser 2 M anual Quick start guide User manual Control Cable MCD 735 Quick Start Guide BAND BAND What's in the Box? You should find these items upon opening the box.
A/V cord (R/W/Y) Subwoofer cable AC power cord RReemmoottee ccoonnttrrooll wwiitthh ttwwoo AAA batteries FM and AM antennas Quick 1 Start Guide U ser 2 M anual Quick start guide User manual Control Cable MCD 735 Quick Start Guide BAND BAND What's in the Box? You should find these items upon opening the box.

Quick start guide (English)
Page 2
... and FM antennas. 3 Connect the control cable. 4 Connect the A/V cord to the correct Video In channel. For connecting to a Progressive Scan TV, refer to the user manual for other TV connection options. - FM Antenna AM Antenna 2 4 Front Speaker RearSpeaker (right) (right) 3 AC power 5 Center 1 Speaker Front Speaker (left) Rear Speaker (left) Subwoofer...
... and FM antennas. 3 Connect the control cable. 4 Connect the A/V cord to the correct Video In channel. For connecting to a Progressive Scan TV, refer to the user manual for other TV connection options. - FM Antenna AM Antenna 2 4 Front Speaker RearSpeaker (right) (right) 3 AC power 5 Center 1 Speaker Front Speaker (left) Rear Speaker (left) Subwoofer...
Quick start guide (English)
Page 3
...deactivate the progressive scan feature as below . 1 In standby mode, press and hold STANDBY-ON/ECO POWER 2 on the set clock in the User Manual for detailed descriptions. on the remote to set the hours. 3 Press CLOCK again and the minute digits flash.Then turn VOLUME-/+ on the ... If the progressive scan feature is activated but the connected TV does not support progressive signals or the cables are not connected accordingly, see the user manual for 3 seconds or more to switch to normal standby mode first before proceeding with the procedures below : 1) Turn off your TV progressive scan...
...deactivate the progressive scan feature as below . 1 In standby mode, press and hold STANDBY-ON/ECO POWER 2 on the set clock in the User Manual for detailed descriptions. on the remote to set the hours. 3 Press CLOCK again and the minute digits flash.Then turn VOLUME-/+ on the ... If the progressive scan feature is activated but the connected TV does not support progressive signals or the cables are not connected accordingly, see the user manual for 3 seconds or more to switch to normal standby mode first before proceeding with the procedures below : 1) Turn off your TV progressive scan...


