Leaflet
Page 1
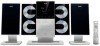
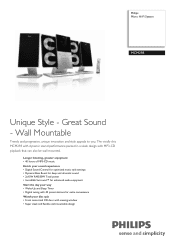
... of MP3-CD music Enrich your sound experience • Digital Sound Control for optimized music style settings • Dynamic Bass Boost for deep and dramatic sound • 2x15W RMS/30W Total power • Incredible Surround™ for enhanced audio enjoyment Start the day your way • Wake-Up and Sleep Timer • Digital tuning with 40 preset stations for extra convenience Watch your disc spin • Front motorized CD door with...
... of MP3-CD music Enrich your sound experience • Digital Sound Control for optimized music style settings • Dynamic Bass Boost for deep and dramatic sound • 2x15W RMS/30W Total power • Incredible Surround™ for enhanced audio enjoyment Start the day your way • Wake-Up and Sleep Timer • Digital tuning with 40 preset stations for extra convenience Watch your disc spin • Front motorized CD door with...
Leaflet
Page 2
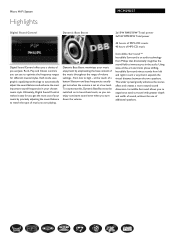
... volume settings - Micro Hi-Fi System Highlights MCM298/37 Digital Sound Control Dynamic Bass Boost 2x15W RMS/30W Total power 2x15W RMS/30W Total power 40 hours of MP3-CD music 40 hours of MP3-CD music Digital Sound Control offers you a choice of pre-set at the touch of a button! Ultimately, Digital Sound Control makes it expands the virtual distance between the two speakers. To counteract this, Dynamic Bass Boost can be switched on to boost bass...
... volume settings - Micro Hi-Fi System Highlights MCM298/37 Digital Sound Control Dynamic Bass Boost 2x15W RMS/30W Total power 2x15W RMS/30W Total power 40 hours of MP3-CD music 40 hours of MP3-CD music Digital Sound Control offers you a choice of pre-set at the touch of a button! Ultimately, Digital Sound Control makes it expands the virtual distance between the two speakers. To counteract this, Dynamic Bass Boost can be switched on to boost bass...
Leaflet
Page 3
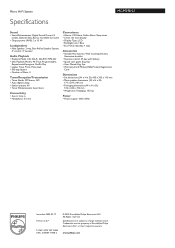
... • Remote control: 47-key with battery • Quick start guide: Eng, Spa • User Manual: Eng, Spa • Warranty Card: Philips (USA) Product Registration Card Dimensions • Set dimensions (W x H x D): 450 x 335 x 115 mm • Main speaker dimensions (W x H x D): 171 x 297 x 89 mm • Packaging dimensions (W x H x D): 512 x 420 x 312 mm • Weight incl. Micro Hi-Fi System Specifications MCM298/37 Sound • Sound Enhancement: Digital Sound Control 4 modes, Dynamic Bass Boost, Incredible Surround • Output power (RMS...
... • Remote control: 47-key with battery • Quick start guide: Eng, Spa • User Manual: Eng, Spa • Warranty Card: Philips (USA) Product Registration Card Dimensions • Set dimensions (W x H x D): 450 x 335 x 115 mm • Main speaker dimensions (W x H x D): 171 x 297 x 89 mm • Packaging dimensions (W x H x D): 512 x 420 x 312 mm • Weight incl. Micro Hi-Fi System Specifications MCM298/37 Sound • Sound Enhancement: Digital Sound Control 4 modes, Dynamic Bass Boost, Incredible Surround • Output power (RMS...
User manual
Page 8
... the system to Eco Power Standby mode 15 Power Saving Automatic Standby 15 Adjusting volume and sound 15 Dimming the display screen 15 CD/MP3-CD Operation Discs for playback 16 About MP3 disc 16 Loading a disc 16 Basic playback controls 17~18 Different play modes: SHUFFLE and REPEAT 18 Programming track numbers 18 Erasing the programme 18 Radio Reception Tuning to radio stations 19 Programming radio stations 19~20 Automatic programming Manual programming Tuning to preset radio stations 20 Clock/Timer Clock setting 21 Timer setting 21~22 Sleep timer setting 22 Specifications...
... the system to Eco Power Standby mode 15 Power Saving Automatic Standby 15 Adjusting volume and sound 15 Dimming the display screen 15 CD/MP3-CD Operation Discs for playback 16 About MP3 disc 16 Loading a disc 16 Basic playback controls 17~18 Different play modes: SHUFFLE and REPEAT 18 Programming track numbers 18 Erasing the programme 18 Radio Reception Tuning to radio stations 19 Programming radio stations 19~20 Automatic programming Manual programming Tuning to preset radio stations 20 Clock/Timer Clock setting 21 Timer setting 21~22 Sleep timer setting 22 Specifications...
User manual
Page 9
... of the disc unit inside the system. FM wire antenna - AM loop antenna - To disconnect the system from the power supply completely, remove the AC power plug from a cold to Standby mode, it is still consuming some power. remote control (with no disc in the system until normal playback is possible. ● The mechanical parts of the set and speakers - Allow at least 10 cm (4 inches) clearance from the rear and the...
... of the disc unit inside the system. FM wire antenna - AM loop antenna - To disconnect the system from the power supply completely, remove the AC power plug from a cold to Standby mode, it is still consuming some power. remote control (with no disc in the system until normal playback is possible. ● The mechanical parts of the set and speakers - Allow at least 10 cm (4 inches) clearance from the rear and the...
User manual
Page 10
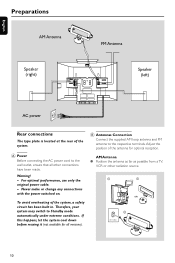
... as possible from a TV, VCR or other connections have been made. Never make or change any connections with the power switched on. Warning! - B Antennas Connection Connect the supplied AM loop antenna and FM antenna to Standby mode automatically under extreme conditions. English Preparations AM Antenna Speaker (right) FM Antenna Speaker (left) AC power Rear connections The type plate is located at the rear of the system, a safety circuit has been built in. Therefore...
... as possible from a TV, VCR or other connections have been made. Never make or change any connections with the power switched on. Warning! - B Antennas Connection Connect the supplied AM loop antenna and FM antenna to Standby mode automatically under extreme conditions. English Preparations AM Antenna Speaker (right) FM Antenna Speaker (left) AC power Rear connections The type plate is located at the rear of the system, a safety circuit has been built in. Therefore...

User manual
Page 11
... system Connect the audio left terminal. speaker terminals. - Placing the set or either place the main set and speakers on the desktop with an impedance lower than one speaker to the operating instructions of the connected equipment for example here. To remove the stand from the slots. Connecting other equipment to the FM ANTENNA terminal. Do not connect more than the speakers supplied. Do not connect speakers with the support...
... system Connect the audio left terminal. speaker terminals. - Placing the set or either place the main set and speakers on the desktop with an impedance lower than one speaker to the operating instructions of the connected equipment for example here. To remove the stand from the slots. Connecting other equipment to the FM ANTENNA terminal. Do not connect more than the speakers supplied. Do not connect speakers with the support...

User manual
Page 12
CAUTION! - Using the Remote Control to operate the Player 1 Aim the Remote Control directly at the remote sensor (IR) on the front panel. 2 Do not put any objects between the Remote Control and the system while operating the system. Remove batteries if they should be disposed of batteries in combination. - Do not use old and new or different types of properly. 12 English Preparations Inserting batteries into the Remote Control 3 1 2 1 Open the battery compartment. 2 Insert...
CAUTION! - Using the Remote Control to operate the Player 1 Aim the Remote Control directly at the remote sensor (IR) on the front panel. 2 Do not put any objects between the Remote Control and the system while operating the system. Remove batteries if they should be disposed of batteries in combination. - Do not use old and new or different types of properly. 12 English Preparations Inserting batteries into the Remote Control 3 1 2 1 Open the battery compartment. 2 Insert...
User manual
Page 13
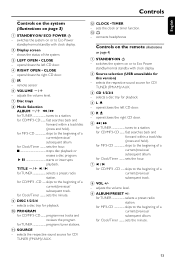
... the program. selects a disc tray for TUNER selects a preset radio station. sets the hour. 7¡ /™ for TUNER tunes to Eco Power standby/normal standby with clock display. 2 Source selection (USB unavailable for this version) - adjusts the volume level. 7 Disc trays 8 Mode Selection ALBUM for CD/MP3 -CD ...... opens/closes the left CD door. 4 RIGHT OPEN • CLOSE - for CD/ TUNER (FM/AM)/ AUX. @ CLOCK • TIMER - selects the respective sound source for Clock/Timer ......... selects the respective sound source for CD/MP3-CD ........ switches the system...
... the program. selects a disc tray for TUNER selects a preset radio station. sets the hour. 7¡ /™ for TUNER tunes to Eco Power standby/normal standby with clock display. 2 Source selection (USB unavailable for this version) - adjusts the volume level. 7 Disc trays 8 Mode Selection ALBUM for CD/MP3 -CD ...... opens/closes the left CD door. 4 RIGHT OPEN • CLOSE - for CD/ TUNER (FM/AM)/ AUX. @ CLOCK • TIMER - selects the respective sound source for Clock/Timer ......... selects the respective sound source for CD/MP3-CD ........ switches the system...
User manual
Page 14
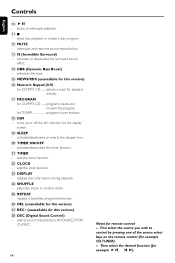
...function (for CD/MP3-CD ........ interrupts and resumes sound reproduction. # IS (Incredible Surround) - activates/deactivates the timer function. ¡ TIMER - plays disc tracks in random order. ∞ REPEAT - sets the timer function. ™ CLOCK - displays disc information during playback. ≤ SHUFFLE - English Controls 0 ÉÅ - starts or interrupts playback. !9 - stops disc playback or erases a disc program. @ MUTE - programs tracks and reviews the program. turns on the remote control (for TUNER programs tuner stations. * DIM - sets the clock function...
...function (for CD/MP3-CD ........ interrupts and resumes sound reproduction. # IS (Incredible Surround) - activates/deactivates the timer function. ¡ TIMER - plays disc tracks in random order. ∞ REPEAT - sets the timer function. ™ CLOCK - displays disc information during playback. ≤ SHUFFLE - English Controls 0 ÉÅ - starts or interrupts playback. !9 - stops disc playback or erases a disc program. @ MUTE - programs tracks and reviews the program. turns on the remote control (for TUNER programs tuner stations. * DIM - sets the clock function...

User manual
Page 15
change source. Basic Functions English Important! Before you can: - Adjusting volume and sound 1 Press VOLUME -/+ (VOL +/- adjust the volume controls; - Dimming the display screen ● Press DIM on the remote repeatedly to turn on the remote to interrupt sound reproduction instantly. ➜ Playback will continue without sound and the display shows MUTE. ● To activate sound reproduction you operate the system, complete the preparation procedures. press MUTE again; - Switching the system to Eco Power Standby mode ●...
change source. Basic Functions English Important! Before you can: - Adjusting volume and sound 1 Press VOLUME -/+ (VOL +/- adjust the volume controls; - Dimming the display screen ● Press DIM on the remote repeatedly to turn on the remote to interrupt sound reproduction instantly. ➜ Playback will continue without sound and the display shows MUTE. ● To activate sound reproduction you operate the system, complete the preparation procedures. press MUTE again; - Switching the system to Eco Power Standby mode ●...

User manual
Page 16
... turn to the next one disc into each tray. - If no disc is displayed briefly.Then, the CD player will play all the discs in any accessories such as disc stabiliser rings or disc treatment sheets, etc., as the CD player scans the contents of a disc, and then the total number of tracks and playing time (or the total number of the system to select CD or press CD on the remote...
... turn to the next one disc into each tray. - If no disc is displayed briefly.Then, the CD player will play all the discs in any accessories such as disc stabiliser rings or disc treatment sheets, etc., as the CD player scans the contents of a disc, and then the total number of tracks and playing time (or the total number of the system to select CD or press CD on the remote...

User manual
Page 17
... the DISPLAY button repeatedly to display ALBUM and TITLE alternatively. Note: - To interrupt playback ● Press ÉÅduring playback. ➜ The display freezes and the elapsed playing time flashes when playback is played at high speed and low volume. 2 When you recognize the passage you can press LEFT OPEN • CLOSE (L ç) to open the right CD door to replace discs without affecting...
... the DISPLAY button repeatedly to display ALBUM and TITLE alternatively. Note: - To interrupt playback ● Press ÉÅduring playback. ➜ The display freezes and the elapsed playing time flashes when playback is played at high speed and low volume. 2 When you recognize the passage you can press LEFT OPEN • CLOSE (L ç) to open the right CD door to replace discs without affecting...
User manual
Page 18
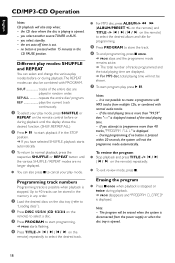
... the programme mode remains active. ➜ The total number of the total playing time. - The program will not be erased when the system is disconnected from multiple CDs, or combined with MP3 tracks from the power supply or when the disc tray is pressed within 15 minutes in random order. you select standby. - Programming track numbers Programming tracks is possible when playback is displayed. on the remote) and...
... the programme mode remains active. ➜ The total number of the total playing time. - The program will not be erased when the system is disconnected from multiple CDs, or combined with MP3 tracks from the power supply or when the disc tray is pressed within 15 minutes in random order. you select standby. - Programming track numbers Programming tracks is possible when playback is displayed. on the remote) and...

User manual
Page 21
... the system. The clock setting will be lighted. 2 Press SOURCE (CD or TUNER on the remote) to select the desired source. ● You can switch on the remote) to select the specific disc you up. Timer setting The system can press DISC 1/2/3/4 (CD 1/2/3/4 on to CD or TUNER mode automatically at a preset time, serving as an alarm to select timer mode. ➜ The last timer setting starts flashing. ➜ The selected source will exit clock setting mode automatically. Notes: - Programming the disc tracks"). tune to the desired radio station...
... the system. The clock setting will be lighted. 2 Press SOURCE (CD or TUNER on the remote) to select the desired source. ● You can switch on the remote) to select the specific disc you up. Timer setting The system can press DISC 1/2/3/4 (CD 1/2/3/4 on to CD or TUNER mode automatically at a preset time, serving as an alarm to select timer mode. ➜ The last timer setting starts flashing. ➜ The selected source will exit clock setting mode automatically. Notes: - Programming the disc tracks"). tune to the desired radio station...

User manual
Page 22
... start time. ● At the preset time, the selected source will exit timer setting mode automatically. Notes: - To change the preset sleep timer ● Press SLEEP again while the remaining sleep timer is pressed within 70 seconds, the system will play. To check the remaining length of time after activation of the sleep timer is displayed, or press STANDBY-ON/ECO POWER B. To activate the TIMER ● Press TIMER ON/OFF on the remote control...
... start time. ● At the preset time, the selected source will exit timer setting mode automatically. Notes: - To change the preset sleep timer ● Press SLEEP again while the remaining sleep timer is pressed within 70 seconds, the system will play. To check the remaining length of time after activation of the sleep timer is displayed, or press STANDBY-ON/ECO POWER B. To activate the TIMER ● Press TIMER ON/OFF on the remote control...

User manual
Page 23
... AMPLIFIER Output power 2 x 15 W RMS 2 x 30 MPO 2 x 10W FTC(1) Signal-to-noise ratio 62 dBA Frequency response ......... 63 - 16000 Hz, ± 3 dB Input sensitivity AUX 600mV Impedance loudspeakers 4 Ω Impedance headphones 32 Ω -1000 0.5W (1) (4 Ω, 120-12.5 kHz, 10% THD) CD PLAYER Frequency range 65 - 16000 Hz Signal-to change without speakers 6.5 / 4.2 kg 2.9 / 1.86 pounds Power consumption Active 80 W Standby 5 W Eco power standby 1 W Specifications...
... AMPLIFIER Output power 2 x 15 W RMS 2 x 30 MPO 2 x 10W FTC(1) Signal-to-noise ratio 62 dBA Frequency response ......... 63 - 16000 Hz, ± 3 dB Input sensitivity AUX 600mV Impedance loudspeakers 4 Ω Impedance headphones 32 Ω -1000 0.5W (1) (4 Ω, 120-12.5 kHz, 10% THD) CD PLAYER Frequency range 65 - 16000 Hz Signal-to change without speakers 6.5 / 4.2 kg 2.9 / 1.86 pounds Power consumption Active 80 W Standby 5 W Eco power standby 1 W Specifications...
User manual
Page 24
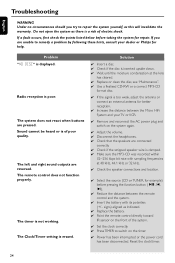
... the Micro HiFi System and your dealer or Philips for help. The Clock/Timer setting is poor. The system does not react when buttons are reversed. Solution ✔ Insert a disc. ✔ Check if the disc is inserted upside down. ✔ Wait until the moisture condensation at 48 kHz, 44.1 kHz or 32 kHz. ✔ Check the speaker connections and location. ✔ Select the source (CD or TUNER...
... the Micro HiFi System and your dealer or Philips for help. The Clock/Timer setting is poor. The system does not react when buttons are reversed. Solution ✔ Insert a disc. ✔ Check if the disc is inserted upside down. ✔ Wait until the moisture condensation at 48 kHz, 44.1 kHz or 32 kHz. ✔ Check the speaker connections and location. ✔ Select the source (CD or TUNER...

Quick start guide
Page 2
... antenna FM antenna 3 Speaker (right) 1 2 Speaker (left) 4 AC power cord Setting the clock 1 In active mode, press CLOCK•TIMER (CLOCK on the remote) repeatedly until the time digits flash. / // 2 Press ALBUM-/+ 5 6 (5 6 on the remote) again to set the minute. 4 Press CLOCK•TIMER (CLOCK on the remote) repeatedly to store the setting. Tip - on the remote) repeatedly to set the hour. 3 Press TITLE ALBUM/PRESET +/- See Wall Mounting for how to connect other equipment to mount the system...
... antenna FM antenna 3 Speaker (right) 1 2 Speaker (left) 4 AC power cord Setting the clock 1 In active mode, press CLOCK•TIMER (CLOCK on the remote) repeatedly until the time digits flash. / // 2 Press ALBUM-/+ 5 6 (5 6 on the remote) again to set the minute. 4 Press CLOCK•TIMER (CLOCK on the remote) repeatedly to store the setting. Tip - on the remote) repeatedly to set the hour. 3 Press TITLE ALBUM/PRESET +/- See Wall Mounting for how to connect other equipment to mount the system...
Quick start guide
Page 3
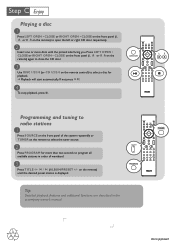
... desired preset station is displayed. Press LEFT OPEN • CLOSE or RIGHT OPEN • CLOSE on the front panel (L ç or R çon the / // remote) again to close the CD door. 3 Use DISC 1/2/3/4 (or CD 1/2/3/4 on the remote) to open the left or right CD door respectively. 2 Insert one or more than two seconds to program all available stations in the accompany owner's manual. C Enjoy Playing a disc 1 Press LEFT OPEN •...
... desired preset station is displayed. Press LEFT OPEN • CLOSE or RIGHT OPEN • CLOSE on the front panel (L ç or R çon the / // remote) again to close the CD door. 3 Use DISC 1/2/3/4 (or CD 1/2/3/4 on the remote) to open the left or right CD door respectively. 2 Insert one or more than two seconds to program all available stations in the accompany owner's manual. C Enjoy Playing a disc 1 Press LEFT OPEN •...


