
User manual
Page 2
Dear Philips product owner: Thank you for your confidence in Philips.You've selected one of the most comprehensive warranties and outstanding service networks in the industry. And most from our convenient home shopping network. NO USER-SERVICEABLE PARTS INSIDE. Retain this is our way of saying welcome - Model No Serial No 2 Visit our World Wide Web Site at once, and take advantage...
Dear Philips product owner: Thank you for your confidence in Philips.You've selected one of the most comprehensive warranties and outstanding service networks in the industry. And most from our convenient home shopping network. NO USER-SERVICEABLE PARTS INSIDE. Retain this is our way of saying welcome - Model No Serial No 2 Visit our World Wide Web Site at once, and take advantage...
User manual
Page 5
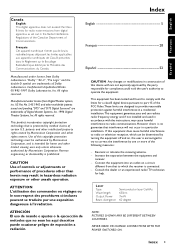
... on , the user is encouraged to try to which can radiate radio frequency energy and, if not installed and used in hazardous radiation exposure or other limited viewing uses only unless otherwise authorized by one or more of this device with the limits for help. NOTE: PICTURES SHOWN MAY BE DIFFERENT BETWEEN COUNTRIES. NEVER MAKE OR CHANGE CONNECTIONS WITH THE POWER SWITCHED ON. No...
... on , the user is encouraged to try to which can radiate radio frequency energy and, if not installed and used in hazardous radiation exposure or other limited viewing uses only unless otherwise authorized by one or more of this device with the limits for help. NOTE: PICTURES SHOWN MAY BE DIFFERENT BETWEEN COUNTRIES. NEVER MAKE OR CHANGE CONNECTIONS WITH THE POWER SWITCHED ON. No...

User manual
Page 7
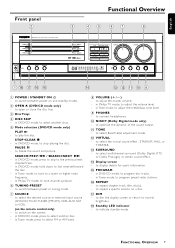
... Connecting a Digital (Optical) audio device Preparations Inserting batteries into the remote control 12 Switching on the system 12 NTSC/PAL automatic conversion 12 Setting up the surround sound system 12-13 Placing the speakers Changing the speaker size Changing the speaker distance Changing the channel level Test Tone Changing system settings-special circumstances Selecting TV aspect 14 Selecting digital audio out 14 Selecting a satellite receiver or cable box 14 Basic Functions Selecting the source 15 Volume control 15 Adjusting the tone 15 Dimming the display screen 15 Selecting...
... Connecting a Digital (Optical) audio device Preparations Inserting batteries into the remote control 12 Switching on the system 12 NTSC/PAL automatic conversion 12 Setting up the surround sound system 12-13 Placing the speakers Changing the speaker size Changing the speaker distance Changing the channel level Test Tone Changing system settings-special circumstances Selecting TV aspect 14 Selecting digital audio out 14 Selecting a satellite receiver or cable box 14 Basic Functions Selecting the source 15 Volume control 15 Adjusting the tone 15 Dimming the display screen 15 Selecting...

User manual
Page 8
... player is 1. 1 Supplied accessories - q Do not use the system's surround sound speakers. Adjustable Speaker Size, Channel Level, and Distance Lets you compress the dynamic range, reducing the difference in loudness between different sounds in Dolby Digital mode. an audio and video cable for a true surround sound experience. Wipe the disc from cold to warm surroundings, making it with two AA batteries - English Introduction and General Information Features Your complete 6-piece 700-Watt DVD Digital Home Cinema...
... player is 1. 1 Supplied accessories - q Do not use the system's surround sound speakers. Adjustable Speaker Size, Channel Level, and Distance Lets you compress the dynamic range, reducing the difference in loudness between different sounds in Dolby Digital mode. an audio and video cable for a true surround sound experience. Wipe the disc from cold to warm surroundings, making it with two AA batteries - English Introduction and General Information Features Your complete 6-piece 700-Watt DVD Digital Home Cinema...
User manual
Page 9
... picture. to display details for user's information. % PROGRAM - in Tone mode, to a lower or higher radio frequency. - to adjust the master volume. - to connect headphones. 0 NIGHT (Dolby Digital mode only) - in Tuner mode, to tune to adjust the treble/bass tone level. 9 PHONES - to program disc tracks. - in DVD/CD mode, to adjust the volume level. - TONE - in Philips TV mode, to stop playing the disc. English Front panel 2 MX 5000D 3DVD VIDEO DIGITAL SURROUND SYSTEM OPEN OPEN OPEN POWER STANDBY ON DIM REPEAT PROGRAM Functional Overview 3 45 67 8 DISC 1 DISC...
... picture. to display details for user's information. % PROGRAM - in Tone mode, to a lower or higher radio frequency. - to adjust the master volume. - to connect headphones. 0 NIGHT (Dolby Digital mode only) - in Tuner mode, to tune to adjust the treble/bass tone level. 9 PHONES - to program disc tracks. - in DVD/CD mode, to adjust the volume level. - TONE - in Philips TV mode, to stop playing the disc. English Front panel 2 MX 5000D 3DVD VIDEO DIGITAL SURROUND SYSTEM OPEN OPEN OPEN POWER STANDBY ON DIM REPEAT PROGRAM Functional Overview 3 45 67 8 DISC 1 DISC...

User manual
Page 10
...exit the disc contents menu. ™ 3412 - to select Philips TV mode. °B - in disc contents menu / / system setup menu / GUI menu. £ OK (DVD/CD mode only) - to select speaker settings, volume balance and to select a preset radio station number (1 or 2). - SUBTITLE - ANGLE - to switch the system to interrupt or resume sound reproduction. ) Numeric keypad (0-9) - to standby mode. 8 FUNCTIONAL OVERVIEW to select movement direction in Tuner mode, to test the speaker settings. ∞ TITLE (DVD mode only) - to enter or exit the system setup menu. ‡...
...exit the disc contents menu. ™ 3412 - to select Philips TV mode. °B - in disc contents menu / / system setup menu / GUI menu. £ OK (DVD/CD mode only) - to select speaker settings, volume balance and to select a preset radio station number (1 or 2). - SUBTITLE - ANGLE - to switch the system to interrupt or resume sound reproduction. ) Numeric keypad (0-9) - to standby mode. 8 FUNCTIONAL OVERVIEW to select movement direction in Tuner mode, to test the speaker settings. ∞ TITLE (DVD mode only) - to enter or exit the system setup menu. ‡...

User manual
Page 11
.... 1 Connect the loop antenna's wires to prevent unwanted noise. Connections English SPEAKERS 6 SUB SURROUND WOOFER CENTER FRONT RL RL OUT CDR IN AUDIO TV IN OUT VCR IN SAT AUX L R FM (75 ) GND AM ANTENNA VIDEO S-VIDEO OUT DVD MONITOR OUT OUT IN VCR IN SAT SUB WOOFER PRE-OUT OPTICAL DIGITAL OUT SAT IN IMPORTANT! - Keep the antenna as far away as possible from the entire system, speaker cables, and the power cable...
.... 1 Connect the loop antenna's wires to prevent unwanted noise. Connections English SPEAKERS 6 SUB SURROUND WOOFER CENTER FRONT RL RL OUT CDR IN AUDIO TV IN OUT VCR IN SAT AUX L R FM (75 ) GND AM ANTENNA VIDEO S-VIDEO OUT DVD MONITOR OUT OUT IN VCR IN SAT SUB WOOFER PRE-OUT OPTICAL DIGITAL OUT SAT IN IMPORTANT! - Keep the antenna as far away as possible from the entire system, speaker cables, and the power cable...
User manual
Page 13
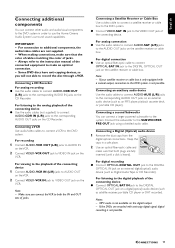
... the corresponding AUDIO OUT jacks on the digital output. - For connection to the digital playback of jacks. - For digital recording q Connect OPTICAL-DIGITAL OUT jack to use the Home Cinema Audio System's surround sound capabilities. For analog connection q Use the audio cables to connect AUDIO-SAT (L/R) jacks to the corresponding AUDIO OUT jacks on the VCR. Some DVD discs have anti-copying devices, so you connect the VCR to VIDEO IN jack on an external audio device (such as an MP3 player, playback cassette...
... the corresponding AUDIO OUT jacks on the digital output. - For connection to the digital playback of jacks. - For digital recording q Connect OPTICAL-DIGITAL OUT jack to use the Home Cinema Audio System's surround sound capabilities. For analog connection q Use the audio cables to connect AUDIO-SAT (L/R) jacks to the corresponding AUDIO OUT jacks on the VCR. Some DVD discs have anti-copying devices, so you connect the VCR to VIDEO IN jack on an external audio device (such as an MP3 player, playback cassette...
User manual
Page 14
... the front and center speakers, it will be securely installed to select the input source. ➜ The selected source will weaken the surround effect. - Connecting the speakers"). If the rear surround speakers are installed farther away from the TV and at normal listening ear level facing each other or mounted on the wall. 4 Place the subwoofer on the last selected source. 3 Adjust the SOURCE button (or press DVD/CD, TV/AV, TUNER, CDR, AUX, SAT or...
... the front and center speakers, it will be securely installed to select the input source. ➜ The selected source will weaken the surround effect. - Connecting the speakers"). If the rear surround speakers are installed farther away from the TV and at normal listening ear level facing each other or mounted on the wall. 4 Place the subwoofer on the last selected source. 3 Adjust the SOURCE button (or press DVD/CD, TV/AV, TUNER, CDR, AUX, SAT or...

User manual
Page 15
... arranged your home cinema (speakers, receiver, and components), you can change the speakers' sound distribution to SW-NO.. front speakers. ➜ "CENTER" - surround speakers. 6 Press 2 to confirm. 7 To change the speaker distance entered in your surround sound needs. right surround speaker's level. ➜ "SL LEVEL" - If the cone size (diameter) of the speaker is set to F-SMALL, the subwoofer cannot be set to suit your DVD Digital Home Cinema System, the speaker size defaults are correct. Changing the channel level You can change the distance...
... arranged your home cinema (speakers, receiver, and components), you can change the speakers' sound distribution to SW-NO.. front speakers. ➜ "CENTER" - surround speakers. 6 Press 2 to confirm. 7 To change the speaker distance entered in your surround sound needs. right surround speaker's level. ➜ "SL LEVEL" - If the cone size (diameter) of the speaker is set to F-SMALL, the subwoofer cannot be set to suit your DVD Digital Home Cinema System, the speaker size defaults are correct. Changing the channel level You can change the distance...

User manual
Page 16
... have digital audio output,"OPT" flashes. 14 PREPARATIONS If an active digital audio output signal is not formatted for widescreen viewing, use a satellite receiver that has digital audio output, press SAT twice. ➜ "SAT- q To use this operation. 1 Press POWER to select "SAT-OPT" and you do not have a conventional TV set , use Dolby Digital or DTS modes. Changing system settings-special circumstances To ensure proper recording quality when you make a copy of a DVD/CD via analog output, set the speaker...
... have digital audio output,"OPT" flashes. 14 PREPARATIONS If an active digital audio output signal is not formatted for widescreen viewing, use a satellite receiver that has digital audio output, press SAT twice. ➜ "SAT- q To use this operation. 1 Press POWER to select "SAT-OPT" and you do not have a conventional TV set , use Dolby Digital or DTS modes. Changing system settings-special circumstances To ensure proper recording quality when you make a copy of a DVD/CD via analog output, set the speaker...

User manual
Page 17
...-channel analog format that offers superior digital audio performance. To use the volume control to adjust Philips TV's volume level, press TV on the remote control to theater and cinema. Note: - Dimming the display screen q Press DIM to switch the dim mode on the disc.The available output modes are delivered through the subwoofer. However, monaural sources will produce some surround channel effects when played in Bass or Treble adjustment mode, adjust VOLUME knob to adjust the selected Bass or Treble level. Front left and right speakers...
...-channel analog format that offers superior digital audio performance. To use the volume control to adjust Philips TV's volume level, press TV on the remote control to theater and cinema. Note: - Dimming the display screen q Press DIM to switch the dim mode on the disc.The available output modes are delivered through the subwoofer. However, monaural sources will produce some surround channel effects when played in Bass or Treble adjustment mode, adjust VOLUME knob to adjust the selected Bass or Treble level. Front left and right speakers...
User manual
Page 18
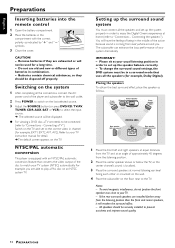
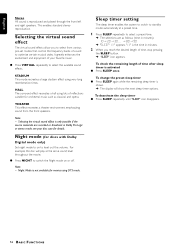
... Logic or stereo mode, see your favorite music. THEATER This effect recreates a theater environment, emphasizing sound from various pre-set modes that control the frequency bands of your disc case for movies using very long reverberation times. To change the preset sleep timer q Press SLEEP again while the remaining sleep timer is reproduced and played through the front left and right speakers. Selecting the virtual sound effect is...
... Logic or stereo mode, see your favorite music. THEATER This effect recreates a theater environment, emphasizing sound from various pre-set modes that control the frequency bands of your disc case for movies using very long reverberation times. To change the preset sleep timer q Press SLEEP again while the remaining sleep timer is reproduced and played through the front left and right speakers. Selecting the virtual sound effect is...

User manual
Page 19
... disc tray open the desired disc tray. 4 Load a disc with normal audio tracks. Notes: - OPERATIONS 17 Do not move the disc player during playback, press S or T button. POWER ON/OFF 3 Press one of your selection and press OK to confirm or numeric keypad (0-9) to select a play discs that have a region code different from the disc. ➜ The selected disc's number begins to flash. If the menu is displayed. To stop mode, numbers are used for album selection...
... disc tray open the desired disc tray. 4 Load a disc with normal audio tracks. Notes: - OPERATIONS 17 Do not move the disc player during playback, press S or T button. POWER ON/OFF 3 Press one of your selection and press OK to confirm or numeric keypad (0-9) to select a play discs that have a region code different from the disc. ➜ The selected disc's number begins to flash. If the menu is displayed. To stop mode, numbers are used for album selection...
User manual
Page 20
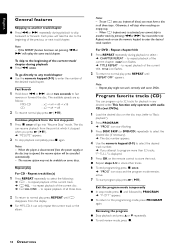
... start flashing. 3 Press DISC SKIP (or DVD/CD) repeatedly to select the desired disc (if necessary). ➜ The disc number appears. 4 Use the numeric keypad (0-9) to select the desired track number. ➜ If you cannot skip to the programming mode, press PROGRAM again. When ∫ (repeat one) is activated, you attempt to program more than 32 tracks, "P-FULL" is displayed. 5 Press OK on the remote control to select...
... start flashing. 3 Press DISC SKIP (or DVD/CD) repeatedly to select the desired disc (if necessary). ➜ The disc number appears. 4 Use the numeric keypad (0-9) to select the desired track number. ➜ If you cannot skip to the programming mode, press PROGRAM again. When ∫ (repeat one) is activated, you attempt to program more than 32 tracks, "P-FULL" is displayed. 5 Press OK on the remote control to select...

User manual
Page 22
... button several times, it , you can be possible on your remote control. The details of the TV screen. 2 Press the 1 or 2 to access GUI menu. 1 Press GUI during playback. ➜ The DVD menu available on the disc. - The DVD menu's contents and operation differ from disc to select the desired scene, followed by £(ÉÅ) or OK. ➜ The selected title starts playing. Using Graphic User...
... button several times, it , you can be possible on your remote control. The details of the TV screen. 2 Press the 1 or 2 to access GUI menu. 1 Press GUI during playback. ➜ The DVD menu available on the disc. - The DVD menu's contents and operation differ from disc to select the desired scene, followed by £(ÉÅ) or OK. ➜ The selected title starts playing. Using Graphic User...

User manual
Page 23
... parental lock function. OPERATIONS 21 Level 1 provides the strictest viewing restrictions. Note: - The password is cleared. IMPORTANT! For example: if you have to exit. Clearing the password 1 At the setup menu, press 4 to select "RATING", then press OK. 2 Enter the default password (2580), then press OK. ➜ Your 4-digit password is preset to 5, the DVD player will be played. 5 Press SYSTEM MENU to reset the player by children.Your DVD player has password device...
... parental lock function. OPERATIONS 21 Level 1 provides the strictest viewing restrictions. Note: - The password is cleared. IMPORTANT! For example: if you have to exit. Clearing the password 1 At the setup menu, press 4 to select "RATING", then press OK. 2 Enter the default password (2580), then press OK. ➜ Your 4-digit password is preset to 5, the DVD player will be played. 5 Press SYSTEM MENU to reset the player by children.Your DVD player has password device...
User manual
Page 24
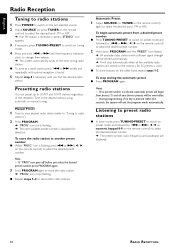
... Tuning to radio stations 1 Press POWER to switch on the last selected source. 2 Adjust SOURCE (or press TUNER on the remote control) to select the desired band : FM or AM. ➜ If an FM station is received in the desired stations using automatic or manual tuning. During programming, if no preset number is found. 5 Repeat step 4 if necessary until the frequency indication starts to change, then release. ➜ The system automatically tunes to store the radio station...
... Tuning to radio stations 1 Press POWER to switch on the last selected source. 2 Adjust SOURCE (or press TUNER on the remote control) to select the desired band : FM or AM. ➜ If an FM station is received in the desired stations using automatic or manual tuning. During programming, if no preset number is found. 5 Repeat step 4 if necessary until the frequency indication starts to change, then release. ➜ The system automatically tunes to store the radio station...

User manual
Page 26
... buttons are connected correctly. - Considerable noise in the correct frequency. - No sound from the center speaker. This is connected correctly. - Check the disc type, color system and regional code. Moisture has condensed inside the system. Reduce the distance to the desired surround mode position. - Adjust the volume. - Make sure the component is not a malfunction. - Fully extend the FM wire antenna. Turn off the setup menu screen. - Check all speakers for correct polarity. - The display...
... buttons are connected correctly. - Considerable noise in the correct frequency. - No sound from the center speaker. This is connected correctly. - Check the disc type, color system and regional code. Moisture has condensed inside the system. Reduce the distance to the desired surround mode position. - Adjust the volume. - Make sure the component is not a malfunction. - Fully extend the FM wire antenna. Turn off the setup menu screen. - Check all speakers for correct polarity. - The display...

User manual
Page 27
... signal conditions or cable or antenna systems outside the unit. • a product that you purchased the product is free. MODEL SERIAL MAKE SURE YOU KEEP... This warranty gives you need to return your product. A sales receipt or other document showing proof of purchase to receive warranty service. Warranty coverage begins the day you buy your product. All parts, including repaired and replaced parts...
... signal conditions or cable or antenna systems outside the unit. • a product that you purchased the product is free. MODEL SERIAL MAKE SURE YOU KEEP... This warranty gives you need to return your product. A sales receipt or other document showing proof of purchase to receive warranty service. Warranty coverage begins the day you buy your product. All parts, including repaired and replaced parts...


