Leaflet
Page 1
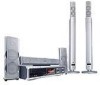
... Control™ provides best sound performance sweet spot • Easy set-up to initialize your total home entertainment Philips DVD/SACD home theater system Progressive Scan MX5600D Total Immersion in speaker columns • Cinema Center Speaker™ for realism cinematic experience • Advanced Class D Amplifier™for compact, powerful sound • DTS 5.1 Dolby Digital Pro Logic II full surround sound • Progressive Scan component video for optimized image quality Plays practically any disc format • Movies: DVD, DVD+R/RW, DVD...
... Control™ provides best sound performance sweet spot • Easy set-up to initialize your total home entertainment Philips DVD/SACD home theater system Progressive Scan MX5600D Total Immersion in speaker columns • Cinema Center Speaker™ for realism cinematic experience • Advanced Class D Amplifier™for compact, powerful sound • DTS 5.1 Dolby Digital Pro Logic II full surround sound • Progressive Scan component video for optimized image quality Plays practically any disc format • Movies: DVD, DVD+R/RW, DVD...

Leaflet
Page 2
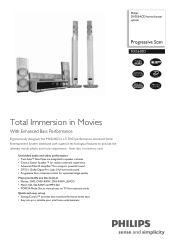
... lines to change without notice. Seating Control™ Achieve best sound performance with the even lines, both fields are written at different angles, more sound depths are designed to downward firing woofers, enhanced accuracy because of Preset Channels: 40 • Auto digital tuning Accessories • Included Accessories: 1x center speaker, 2x front satellite speakers, 2x rear satellite speakers, 2x TwinSub subwoofer/stand, AC Power Cord, Audio Cable, CVBS video cable, FM/MW Antenna, Quick Use Guide, Remote Control, User Manual, Warranty...
... lines to change without notice. Seating Control™ Achieve best sound performance with the even lines, both fields are written at different angles, more sound depths are designed to downward firing woofers, enhanced accuracy because of Preset Channels: 40 • Auto digital tuning Accessories • Included Accessories: 1x center speaker, 2x front satellite speakers, 2x rear satellite speakers, 2x TwinSub subwoofer/stand, AC Power Cord, Audio Cable, CVBS video cable, FM/MW Antenna, Quick Use Guide, Remote Control, User Manual, Warranty...
User manual
Page 1
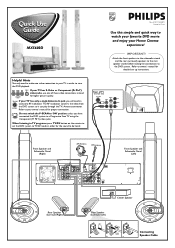
.../AV button on the remote to set up instructions. Pr/Cr Pb/Cb Y S-VIDEO If your TV has S-Video or Component (Pr Pb Y) IN video jacks, use one video connection to your owner's manual for detailed set the DVD system to TV/AV mode in order for higher picture quality. P-SCAN Do not switch the P-SCAN to 'ON' position, unless you will need to make one of TV (example only) If your Home Cinema...
.../AV button on the remote to set up instructions. Pr/Cr Pb/Cb Y S-VIDEO If your TV has S-Video or Component (Pr Pb Y) IN video jacks, use one video connection to your owner's manual for detailed set the DVD system to TV/AV mode in order for higher picture quality. P-SCAN Do not switch the P-SCAN to 'ON' position, unless you will need to make one of TV (example only) If your Home Cinema...
User manual
Page 2
... VIDEO OPEN•CLOSE DISC 1 DISC 2 DISC 3 DISC 4 DISC 5 DISC 1 DISC 2 DISC 3 DISC 4 DISC 5 5 DISC CHANGER STANDBY- You can also adjust the SOURCE button on the front panel until you may go to channel 1 on the front of disc formats provided by various disc manufacturers, your TV, then press the Channel down button repeatedly until "DISC X" appears on the display panel. 2 Turn on the remote control. You should find the below accessories in the accompanying owner's manual. Or, you see the blue Philips DVD background screen...
... VIDEO OPEN•CLOSE DISC 1 DISC 2 DISC 3 DISC 4 DISC 5 DISC 1 DISC 2 DISC 3 DISC 4 DISC 5 5 DISC CHANGER STANDBY- You can also adjust the SOURCE button on the front panel until you may go to channel 1 on the front of disc formats provided by various disc manufacturers, your TV, then press the Channel down button repeatedly until "DISC X" appears on the display panel. 2 Turn on the remote control. You should find the below accessories in the accompanying owner's manual. Or, you see the blue Philips DVD background screen...
User manual
Page 4
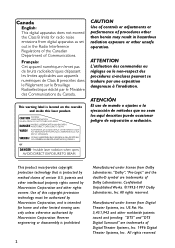
...-1997 Dolby Laboratories, Inc. All rights reserved. Canada English: This digital apparatus does not exceed the Class B limits for home and other limited viewing uses only unless otherwise authorized by Macrovision Corporation. CAUTION: INVISIBLE LASER RADIATION WHEN OPEN. OSYNLIG LASERSTRÅLNING NÄR DENNA DEL ÄR ÖPPNAD. AVOID DIRECT EXPOSURE TO BEAM. patents and other unsafe operation...
...-1997 Dolby Laboratories, Inc. All rights reserved. Canada English: This digital apparatus does not exceed the Class B limits for home and other limited viewing uses only unless otherwise authorized by Macrovision Corporation. CAUTION: INVISIBLE LASER RADIATION WHEN OPEN. OSYNLIG LASERSTRÅLNING NÄR DENNA DEL ÄR ÖPPNAD. AVOID DIRECT EXPOSURE TO BEAM. patents and other unsafe operation...
User manual
Page 6
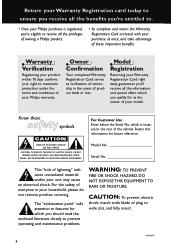
... REMOVE COVER (OR BACK). Warranty Verification Registering your product within your model. Owner Confirmation Your completed Warranty Registration Card serves as the owner of everyone in the event of your Philips warranty. REFER SERVICING TO QUALIFIED SERVICE PERSONNEL. CAUTION: To prevent electric shock, match wide blade of the cabinet. Know these important benefits. NO USER-SERVICEABLE PARTS INSIDE. For Customer Use...
... REMOVE COVER (OR BACK). Warranty Verification Registering your product within your model. Owner Confirmation Your completed Warranty Registration Card serves as the owner of everyone in the event of your Philips warranty. REFER SERVICING TO QUALIFIED SERVICE PERSONNEL. CAUTION: To prevent electric shock, match wide blade of the cabinet. Know these important benefits. NO USER-SERVICEABLE PARTS INSIDE. For Customer Use...
User manual
Page 10
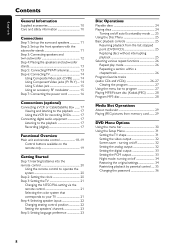
... Disc Operations Playable discs 24 Playing discs 24 Turning on /off 34 Restoring the original settings 34 Restricting playback by parental control ..... 35 Changing the password 36 8 turning on /off 32 Setting the analog output 32 Setting the digital output 33 Setting the PCM output 33 Night mode- turning on/off auto Eco standby mode ...... 25 Using the Disc Menu 25 Basic playback controls 25 Resuming playback from the last stopped point (DVD/VCD 25 Replacing discs without interrupting playback 25 Selecting...
... Disc Operations Playable discs 24 Playing discs 24 Turning on /off 34 Restoring the original settings 34 Restricting playback by parental control ..... 35 Changing the password 36 8 turning on /off 32 Setting the analog output 32 Setting the digital output 33 Setting the PCM output 33 Night mode- turning on/off auto Eco standby mode ...... 25 Using the Disc Menu 25 Basic playback controls 25 Resuming playback from the last stopped point (DVD/VCD 25 Replacing discs without interrupting playback 25 Selecting...

User manual
Page 18
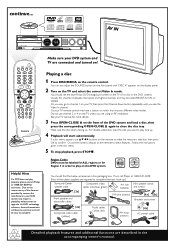
... "Tuner Operations".) PLAY• PAUSE AUTO INSTALL - Never make or change any connections with the power switched on the display panel. PRESS PLAY" may appear on . On the DVD system, "AUTO INSTALL - Press ÉÅ on the front panel to store all available radio stations or press Ç to the power outlet. PRESS PLAY ISC CHANGER MEDIA SLOT LE R-R CENTRE FT DISC RIG DVD R-L SU SUB PLAY• PAUSE STOP SEATING SOURCE SEARCH SURROUND PROG TUNING CLOCK•TIMER DVD VIDEO DIGITAL SURROUND SYSTEM VOLUME...
... "Tuner Operations".) PLAY• PAUSE AUTO INSTALL - Never make or change any connections with the power switched on the display panel. PRESS PLAY" may appear on . On the DVD system, "AUTO INSTALL - Press ÉÅ on the front panel to store all available radio stations or press Ç to the power outlet. PRESS PLAY ISC CHANGER MEDIA SLOT LE R-R CENTRE FT DISC RIG DVD R-L SU SUB PLAY• PAUSE STOP SEATING SOURCE SEARCH SURROUND PROG TUNING CLOCK•TIMER DVD VIDEO DIGITAL SURROUND SYSTEM VOLUME...

User manual
Page 19
... protected discs using the S-VIDEO (as shown. 2 Connect the DVD system's AUX IN (R/L) jacks to the AUDIO IN jacks on the VCR. Before starting operation, press AUX/DI on the remote to select "DI" in order to the audio connection. (See page 33 "Setting the digital output".) Notes: - Always refer to activate the input source. Before starting operation, set the DIGITAL OUTPUT according to activate the input source. Recording (digital) 2 Connect the DVD system's DIGITAL OUT jack to the DIGITAL IN jack on a digital recording device (DTS-Digital Theater System compatible...
... protected discs using the S-VIDEO (as shown. 2 Connect the DVD system's AUX IN (R/L) jacks to the AUDIO IN jacks on the VCR. Before starting operation, press AUX/DI on the remote to select "DI" in order to the audio connection. (See page 33 "Setting the digital output".) Notes: - Always refer to activate the input source. Before starting operation, set the DIGITAL OUTPUT according to activate the input source. Recording (digital) 2 Connect the DVD system's DIGITAL OUT jack to the DIGITAL IN jack on a digital recording device (DTS-Digital Theater System compatible...
User manual
Page 20
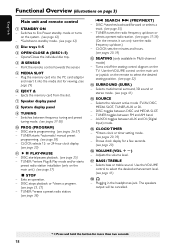
...~5) - Selects multichannel surround, 3D sound or stereo mode. (see page 20) ^ VOLUME (VOL +-) - Use the VOLUME control to select the desired seating position. (see page 22) # SURROUND (SURR.) - Switches to Eco Power standby mode or turns on the TV. English Functional Overview (illustrations on the main unit.) (see page 37) Ç STOP - TUNER: *enters Plug & Play mode and/or starts preset radio station installation (only on page 3) Main unit and remote control 1 STANDBY ON - TUNER: tunes the radio frequency up/down or selects a preset radio station...
...~5) - Selects multichannel surround, 3D sound or stereo mode. (see page 20) ^ VOLUME (VOL +-) - Use the VOLUME control to select the desired seating position. (see page 22) # SURROUND (SURR.) - Switches to Eco Power standby mode or turns on the TV. English Functional Overview (illustrations on the main unit.) (see page 37) Ç STOP - TUNER: *enters Plug & Play mode and/or starts preset radio station installation (only on page 3) Main unit and remote control 1 STANDBY ON - TUNER: tunes the radio frequency up/down or selects a preset radio station...

User manual
Page 23
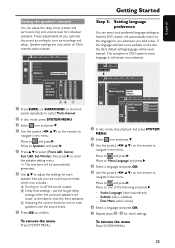
... display panel. ➜ To change the video signal of the disc. English Getting Started Step 3: Setting the TV IMPORTANT! You should match. SETUP MENU 1 2, 3 4 SYSTEM MENU DISC MENU SEATING ZOOM PREV NEXT OK STOP PLAY/PAUSE ➠ TV Shape TV System Video Output Screen Saver Auto NTSC PAL Set TV system 1 In disc mode, stop playback. 2 Press and hold DISC/MEDIA on the remote until you see the blue Philips DVD background screen on the remote to your TV manual for a DVD...
... display panel. ➜ To change the video signal of the disc. English Getting Started Step 3: Setting the TV IMPORTANT! You should match. SETUP MENU 1 2, 3 4 SYSTEM MENU DISC MENU SEATING ZOOM PREV NEXT OK STOP PLAY/PAUSE ➠ TV Shape TV System Video Output Screen Saver Auto NTSC PAL Set TV system 1 In disc mode, stop playback. 2 Press and hold DISC/MEDIA on the remote until you see the blue Philips DVD background screen on the remote to your TV manual for a DVD...
User manual
Page 25
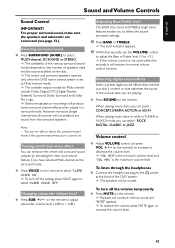
... setup. C Adjusting the volume levels for you whenever you optimize the sound according to your surround sound needs, which may includes : A Turning on the remote to select 'Multi-channel.' 2 In disc mode, press SYSTEM MENU. 3 Select icon and press 4. 4 Use the joystick (1 2 3 4) on Multichannel audio outputs. Set Speaker SeFttriongnst L & R Center Surr L & R Sub Woofer OK to exit On 3 ms 3 dB 6 dB AB C 1 Press SURR. (or SURROUND on the front panel) repeatedly to navigate in the menu. use the longer delay settings when the surround speakers...
... setup. C Adjusting the volume levels for you whenever you optimize the sound according to your surround sound needs, which may includes : A Turning on the remote to select 'Multi-channel.' 2 In disc mode, press SYSTEM MENU. 3 Select icon and press 4. 4 Use the joystick (1 2 3 4) on Multichannel audio outputs. Set Speaker SeFttriongnst L & R Center Surr L & R Sub Woofer OK to exit On 3 ms 3 dB 6 dB AB C 1 Press SURR. (or SURROUND on the front panel) repeatedly to navigate in the menu. use the longer delay settings when the surround speakers...
User manual
Page 26
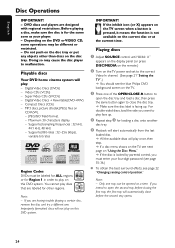
... the best surround effects, see page 22 "Changing seating control position." Playable discs Your DVD home cinema system will automatically close the disc tray. ➜ Make sure the disc label is locked by parental control, you are designed with regional restrictions. Video CDs (VCDs) - English Disc Operations IMPORTANT! - DVD discs and players are having trouble playing a certain disc, remove the disc and try a different one tray can be opened at the current time. Depending on this DVD system. Digital Video Discs (DVDs) - Super Video...
... the best surround effects, see page 22 "Changing seating control position." Playable discs Your DVD home cinema system will automatically close the disc tray. ➜ Make sure the disc label is locked by parental control, you are designed with regional restrictions. Video CDs (VCDs) - English Disc Operations IMPORTANT! - DVD discs and players are having trouble playing a certain disc, remove the disc and try a different one tray can be opened at the current time. Depending on this DVD system. Digital Video Discs (DVDs) - Super Video...
User manual
Page 29
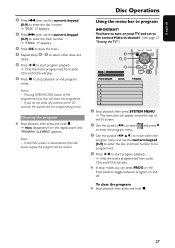
... the programme. - Pressing OPEN•CLOSE button of the TV screen. 2 Use the joystick (1 2) to select to turn on and off. Note: - You have to enter the program menu. If the DVD system is disconnected from the power supply, the program will be programmed. 4 Press ÉÅ to program IMPORTANT! Disc Operations Using the menu bar to start program playback. ➜ Only the tracks programmed from the display panel and "PROGRAM CLEARED" appears.
... the programme. - Pressing OPEN•CLOSE button of the TV screen. 2 Use the joystick (1 2) to select to turn on and off. Note: - You have to enter the program menu. If the DVD system is disconnected from the power supply, the program will be programmed. 4 Press ÉÅ to program IMPORTANT! Disc Operations Using the menu bar to start program playback. ➜ Only the tracks programmed from the display panel and "PROGRAM CLEARED" appears.

User manual
Page 31
... card connector with memory card function. - If you use the joystick (1 2 3 4) to make your player. 3 Adjust SOURCE control until "MEDIA SLOT" appears on the display panel (or press DISC/MEDIA twice on the remote.) 4 Turn on the TV power and set to the correct Video In channel. (See page 21 "Setting the TV".) ➜ If the memory card is recognized, you can; Picture CD Playing JPEG pictures from memory card 1 Remove the...
... card connector with memory card function. - If you use the joystick (1 2 3 4) to make your player. 3 Adjust SOURCE control until "MEDIA SLOT" appears on the display panel (or press DISC/MEDIA twice on the remote.) 4 Turn on the TV power and set to the correct Video In channel. (See page 21 "Setting the TV".) ➜ If the memory card is recognized, you can; Picture CD Playing JPEG pictures from memory card 1 Remove the...
User manual
Page 39
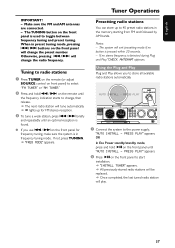
...SURROUND PROG TUNING CLOCK•TIMER DVD VIDEO DIGITAL SURROUND SYSTEM VOLUME TREBL BASS EJECT 1 Connect the system to store all available radio stations automatically. Using the Plug and Play Plug and Play allows you use S / T on the front panel will change the radio frequency. G If you to the power supply, "AUTO INSTALL - The TUNING button on the front panel is in preset tuning mode, pressing S / T buttons on the front panel for FM stereo reception. 3 To tune a weak station, press S / T briefly and repeatedly until "AUTO INSTALL - When in frequency tuning mode. Make...
...SURROUND PROG TUNING CLOCK•TIMER DVD VIDEO DIGITAL SURROUND SYSTEM VOLUME TREBL BASS EJECT 1 Connect the system to store all available radio stations automatically. Using the Plug and Play Plug and Play allows you use S / T on the front panel will change the radio frequency. G If you to the power supply, "AUTO INSTALL - The TUNING button on the front panel is in preset tuning mode, pressing S / T buttons on the front panel for FM stereo reception. 3 To tune a weak station, press S / T briefly and repeatedly until "AUTO INSTALL - When in frequency tuning mode. Make...
User manual
Page 43
... setting, press VOICE again to select the surround sound mode if the system menu/menu bar is the maximum volume level. You are playing. G Press SOUND on the remote. ➜ Playback will be muted. When playing movie discs, you are not able to select "CLEAR VOICE OFF." However, monaural (single channel sound) sources will resume its normal volume control function. G Press VOICE on the disc. ➜ The center and surround speakers operate only when the DVD home cinema system is not used...
... setting, press VOICE again to select the surround sound mode if the system menu/menu bar is the maximum volume level. You are playing. G Press SOUND on the remote. ➜ Playback will be muted. When playing movie discs, you are not able to select "CLEAR VOICE OFF." However, monaural (single channel sound) sources will resume its normal volume control function. G Press VOICE on the disc. ➜ The center and surround speakers operate only when the DVD home cinema system is not used...
User manual
Page 46
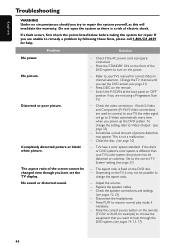
... have set the TV display. Press the correct source button on the remote. - Check if the AC power cord is not a malfunction. - If the disc's or DVD system's color system is different than your TV's manual for repair. Adjust the volume. - If you want to hear through the DVD system. (see page 21) - Distorted or poor picture. No sound or distorted sound. - Press DISC on the remote (TV/AV or AUX, for help. Switch the...
... have set the TV display. Press the correct source button on the remote. - Check if the AC power cord is not a malfunction. - If the disc's or DVD system's color system is different than your TV's manual for repair. Adjust the volume. - If you want to hear through the DVD system. (see page 21) - Distorted or poor picture. No sound or distorted sound. - Press DISC on the remote (TV/AV or AUX, for help. Switch the...
User manual
Page 47
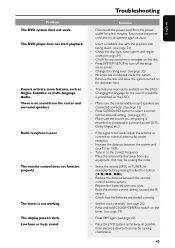
... 41) - There is too weak, adjust the antenna or connect an external antenna for example) before pressing the function button (ÉÅ, S , T.) - The display panel is recorded or broadcast in to turn off the setup menu screen. - Check the disc type, color system and region code. (see page 35) - Changing the language for any equipment that may be causing interference. 45 Select the source (DISC or TUNER, for better reception. - The...
... 41) - There is too weak, adjust the antenna or connect an external antenna for example) before pressing the function button (ÉÅ, S , T.) - The display panel is recorded or broadcast in to turn off the setup menu screen. - Check the disc type, color system and region code. (see page 35) - Changing the language for any equipment that may be causing interference. 45 Select the source (DISC or TUNER, for better reception. - The...
User manual
Page 48
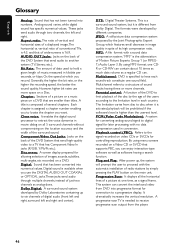
.... Parental control: A function of sound tracks having a search function. PCM (Pulse Code Modulation): A system for allowing selection of images, sounds, subtitles, multi-angles, etc recorded on the back of the surround sound. This system can . However, higher bit rates use the DIGITAL AUDIO OUT COAXIAL or OPTICAL jacks.These jacks send audio through two channels, the left and right and center). Digital sound is specified to another system (TV, Stereo, etc.). Analog sound varies, while digital sound has specific numerical...
.... Parental control: A function of sound tracks having a search function. PCM (Pulse Code Modulation): A system for allowing selection of images, sounds, subtitles, multi-angles, etc recorded on the back of the surround sound. This system can . However, higher bit rates use the DIGITAL AUDIO OUT COAXIAL or OPTICAL jacks.These jacks send audio through two channels, the left and right and center). Digital sound is specified to another system (TV, Stereo, etc.). Analog sound varies, while digital sound has specific numerical...


