
Leaflet
Page 2
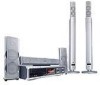
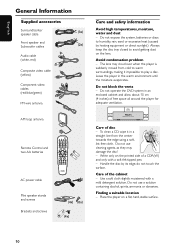
... rear satellite speakers, 2x TwinSub subwoofer/stand, AC Power Cord, Audio Cable, CVBS video cable, FM/MW Antenna, Quick Use Guide, Remote Control, User Manual, Warranty certificate • Included batteries: 2x Longlife AA Dimensions • Center speaker dimensions (W x H x D): ... 2009 Koninklijke Philips Electronics N.V. The overall result is created instantaneously, using the maximum resolution. Multi-format Music Multi-format playability allows you instant access to digital pictures from a much smaller package. DVD/SACD home theater system Progressive Scan MX5600D/37 Specifications ...
... rear satellite speakers, 2x TwinSub subwoofer/stand, AC Power Cord, Audio Cable, CVBS video cable, FM/MW Antenna, Quick Use Guide, Remote Control, User Manual, Warranty certificate • Included batteries: 2x Longlife AA Dimensions • Center speaker dimensions (W x H x D): ... 2009 Koninklijke Philips Electronics N.V. The overall result is created instantaneously, using the maximum resolution. Multi-format Music Multi-format playability allows you instant access to digital pictures from a much smaller package. DVD/SACD home theater system Progressive Scan MX5600D/37 Specifications ...
User manual
Page 1
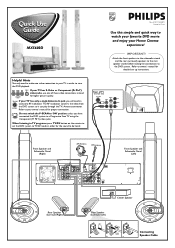
... Antenna In jack, you have ON OFF connected the DVD system to the DVD system. ANTENNA IN Refer to your Home Cinema experience! Y Pr/Cr Pb/Cb R Y Front Speaker...MX5600D 12nc: 3139 115 22091 Printed in China Use this simple and quick way to watch your favorite DVD movie and enjoy your owner's manual for proper connection. Helpful Hints You only need an accessory RF modulator. The RF modulator converts the video from the DVD system.... When listening to TV programs, press TV/AV button on the remote to set the DVD system to TV/AV mode in order to view the DVD playback. P-...
... Antenna In jack, you have ON OFF connected the DVD system to the DVD system. ANTENNA IN Refer to your Home Cinema experience! Y Pr/Cr Pb/Cb R Y Front Speaker...MX5600D 12nc: 3139 115 22091 Printed in China Use this simple and quick way to watch your favorite DVD movie and enjoy your owner's manual for proper connection. Helpful Hints You only need an accessory RF modulator. The RF modulator converts the video from the DVD system.... When listening to TV programs, press TV/AV button on the remote to set the DVD system to TV/AV mode in order to view the DVD playback. P-...
User manual
Page 2
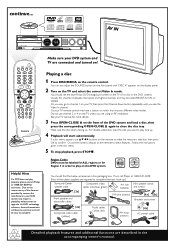
... 4 5 6 7 8 9 SURR. 0 VOL SOUND SYSTEM MENU DISC MENU SEATING ZOOM PREV NEXT OK STOP PLAY/PAUSE DISC SKIP REPEAT REPEAT PROGRAM A-B VOICE MUTE DIM SLEEP SUB TV VOL Make sure your TV remote control may go to complete the basic hook-up . Or, you see the blue Philips DVD background screen on the... front panel until you may have a button or switch that chooses different video modes. Or, your DVD system and TV are using an...
... 4 5 6 7 8 9 SURR. 0 VOL SOUND SYSTEM MENU DISC MENU SEATING ZOOM PREV NEXT OK STOP PLAY/PAUSE DISC SKIP REPEAT REPEAT PROGRAM A-B VOICE MUTE DIM SLEEP SUB TV VOL Make sure your TV remote control may go to complete the basic hook-up . Or, you see the blue Philips DVD background screen on the... front panel until you may have a button or switch that chooses different video modes. Or, your DVD system and TV are using an...
User manual
Page 10
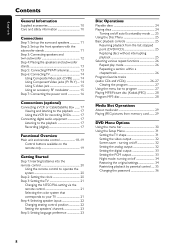
...to the playback 17 Recording (digital 17 Functional Overview Main unit and remote control 18-19 Control buttons available on the remote only 19 Getting Started Step 1: Inserting batteries into the remote control 20 Using the remote control to operate the system 20 Step 2: Setting the clock 20 Step 3: Setting the TV... 21 Changing the NTSC/PAL setting via the remote control 21 Selecting the color system that corresponds to program 27 Playing MP3/Picture disc (Kodak, JPEG 28 Program MP3 disc 28 Media Slot Operations About media slot...
...to the playback 17 Recording (digital 17 Functional Overview Main unit and remote control 18-19 Control buttons available on the remote only 19 Getting Started Step 1: Inserting batteries into the remote control 20 Using the remote control to operate the system 20 Step 2: Setting the clock 20 Step 3: Setting the TV... 21 Changing the NTSC/PAL setting via the remote control 21 Selecting the color system that corresponds to program 27 Playing MP3/Picture disc (Kodak, JPEG 28 Program MP3 disc 28 Media Slot Operations About media slot...

User manual
Page 11
.../off 42 Switching to active mode 42 Switching to Eco Power standby mode ...... 42 Switching to standby mode (view clock) ... 42 Dimming system's display screen 42 Recording to an external device 42 Using the remote to operate your television ... 42 Specifications 43 Troubleshooting 44-45 Glossary 46-47 Limited Warranty 48 Contents 9
.../off 42 Switching to active mode 42 Switching to Eco Power standby mode ...... 42 Switching to standby mode (view clock) ... 42 Dimming system's display screen 42 Recording to an external device 42 Using the remote to operate your television ... 42 Specifications 43 Troubleshooting 44-45 Glossary 46-47 Limited Warranty 48 Contents 9
User manual
Page 12
...allow about 10 cm (4 inches) of free space all around the player for adequate ventilation. 10 cm (4 inches) 10 cm (4 inches) PHILIPS DVD Home Cinema System 10 cm (4 inches) Care of the cabinet - Care of disc - Do not use a solution containing alcohol, spirits, ammonia or abrasives....cable (yellow) Component video cables (red/blue/green) FM wire antenna AM loop antenna Remote Control and two AA batteries DISC/ TV/AV MEDIA TUNER AUX/DI 1 2 3 4 5 6 7 8 9 SURR. 0 VOL SOUND SYSTEM MENU DISC MENU SEATING ZOOM PREV NEXT OK STOP PLAY/PAUSE DISC SKIP REPEAT REPEAT ...
...allow about 10 cm (4 inches) of free space all around the player for adequate ventilation. 10 cm (4 inches) 10 cm (4 inches) PHILIPS DVD Home Cinema System 10 cm (4 inches) Care of the cabinet - Care of disc - Do not use a solution containing alcohol, spirits, ammonia or abrasives....cable (yellow) Component video cables (red/blue/green) FM wire antenna AM loop antenna Remote Control and two AA batteries DISC/ TV/AV MEDIA TUNER AUX/DI 1 2 3 4 5 6 7 8 9 SURR. 0 VOL SOUND SYSTEM MENU DISC MENU SEATING ZOOM PREV NEXT OK STOP PLAY/PAUSE DISC SKIP REPEAT REPEAT ...

User manual
Page 19
...Before starting operation, set the DIGITAL OUTPUT according to activate the input source. Listening to the playback 1 Connect the DVD system's DIGITAL IN jack to the DIGITAL OUT jack on the remote to select "AUX" in order to activate the input source. You cannot record the disc through a VCR or digital ...Some DVDs are copy-protected. Some DVDs are copy-protected. Always refer to the AUDIO IN jacks on a digital recording device (DTS-Digital Theater System compatible, with a Dolby Digital decoder, for example.) Before starting operation, press AUX/DI on a digital audio device.
...Before starting operation, set the DIGITAL OUTPUT according to activate the input source. Listening to the playback 1 Connect the DVD system's DIGITAL IN jack to the DIGITAL OUT jack on the remote to select "AUX" in order to activate the input source. You cannot record the disc through a VCR or digital ...Some DVDs are copy-protected. Some DVDs are copy-protected. Always refer to the AUDIO IN jacks on a digital recording device (DTS-Digital Theater System compatible, with a Dolby Digital decoder, for example.) Before starting operation, press AUX/DI on a digital audio device.
User manual
Page 20
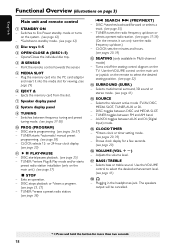
...TUNER: starts *automatic/ manual preset programming. (see page 41) $ SOURCE - Turns on/off the seating control diagram on page 3) Main unit and remote control 1 STANDBY ON - Adjusts the volume level. & BASS / TREBLE - Plugging in Multi-channel mode) - Switches to Eco Power standby mode or turns...(see page 25) - TUNER: toggles between DISC and MEDIA SLOT. - Ejects the memory card from the slot. 7 Speaker display panel 8 System display panel 9 TUNING - English Functional Overview (illustrations on the TV. Plug the memory card into the PC card adaptor and insert it into the...
...TUNER: starts *automatic/ manual preset programming. (see page 41) $ SOURCE - Turns on/off the seating control diagram on page 3) Main unit and remote control 1 STANDBY ON - Adjusts the volume level. & BASS / TREBLE - Plugging in Multi-channel mode) - Switches to Eco Power standby mode or turns...(see page 25) - TUNER: toggles between DISC and MEDIA SLOT. - Ejects the memory card from the slot. 7 Speaker display panel 8 System display panel 9 TUNING - English Functional Overview (illustrations on the TV. Plug the memory card into the PC card adaptor and insert it into the...
User manual
Page 21
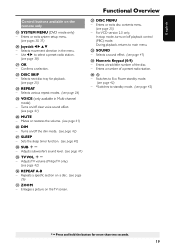
... page 38) ¡ OK - Enters a number of the disc. - Sets the sleep timer function. (see page 42) º REPEAT A-B - In stop mode, turns on the remote only ( SYSTEM MENU (DVD mode only) - Adjusts TV volume (Philips TV only.) (see page 40) • SUB +- Enters or exits...
... page 38) ¡ OK - Enters a number of the disc. - Sets the sleep timer function. (see page 42) º REPEAT A-B - In stop mode, turns on the remote only ( SYSTEM MENU (DVD mode only) - Adjusts TV volume (Philips TV only.) (see page 40) • SUB +- Enters or exits...
User manual
Page 22
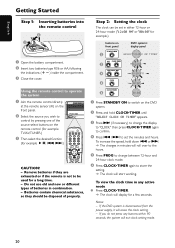
...two batteries type R06 or AA, following the indications (+-) inside the compartment. 3 Close the cover. If the DVD system is not to be used for a few seconds. Using the remote control to store the setting. ➜ The clock will start working. Notes: - Remove batteries if they should be ... Press T (if necessary) to change between 12-hour and 24-hour clock mode. 6 Press CLOCK•TIMER again to operate the system 1 Aim the remote control directly at the remote sensor (iR) on the front panel. 2 Select the source you do not press any active mode G Press CLOCK•TIMER. &#...
...two batteries type R06 or AA, following the indications (+-) inside the compartment. 3 Close the cover. If the DVD system is not to be used for a few seconds. Using the remote control to store the setting. ➜ The clock will start working. Notes: - Remove batteries if they should be ... Press T (if necessary) to change between 12-hour and 24-hour clock mode. 6 Press CLOCK•TIMER again to operate the system 1 Aim the remote control directly at the remote sensor (iR) on the front panel. 2 Select the source you do not press any active mode G Press CLOCK•TIMER. &#...

User manual
Page 23
... be called FRONT, A/V IN, or VIDEO. NTSC - See your TV This DVD system is in channel. Selecting the color system that corresponds to channel 3 or 4 if you see the blue Philips DVD background screen on the remote to navigate in accordance with the video signal of the DVD, the TV and the... DVD system should see the Video In channel. ➜ Or, the TV remote control may be in the menu. PAL - To remove...
... be called FRONT, A/V IN, or VIDEO. NTSC - See your TV This DVD system is in channel. Selecting the color system that corresponds to channel 3 or 4 if you see the blue Philips DVD background screen on the remote to navigate in accordance with the video signal of the DVD, the TV and the... DVD system should see the Video In channel. ➜ Or, the TV remote control may be in the menu. PAL - To remove...
User manual
Page 24
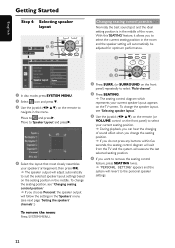
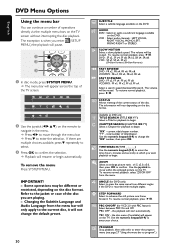
... control diagram will exit from the TV and the system will automatically be adjusted for optimum performance. 7 8 9 1 SURR. 0 SOUND VOL 3 2, 4 SYSTEM MENU SEATING PREV DISC MENU ZOOM NEXT 1 Press SURR. (or SURROUND on the remote to navigate in the room and the speaker setting will... changing of the room. Move to 'Speaker Layout' and press 2. Speaker Layout Square PCM Output 96 kHz Speaker Layout Settings 1 In disc mode, press SYSTEM MENU. 2 Select icon and press 4. 3 Use the joystick (1 2 3 4) on the front panel) repeatedly to select 'Multi-channel.' 2 Press SEATING...
... control diagram will exit from the TV and the system will automatically be adjusted for optimum performance. 7 8 9 1 SURR. 0 SOUND VOL 3 2, 4 SYSTEM MENU SEATING PREV DISC MENU ZOOM NEXT 1 Press SURR. (or SURROUND on the remote to navigate in the room and the speaker setting will... changing of the room. Move to 'Speaker Layout' and press 2. Speaker Layout Square PCM Output 96 kHz Speaker Layout Settings 1 In disc mode, press SYSTEM MENU. 2 Select icon and press 4. 3 Use the joystick (1 2 3 4) on the front panel) repeatedly to select 'Multi-channel.' 2 Press SEATING...
User manual
Page 25
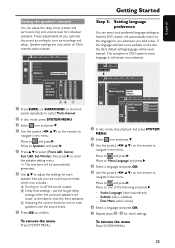
... AB C 1 Press SURR. (or SURROUND on the front panel) repeatedly to select 'Multi-channel.' 2 In disc mode, press SYSTEM MENU. 3 Select icon and press 4. 4 Use the joystick (1 2 3 4) on the remote to navigate in the menu. use the longer delay settings when the surround speakers are only active on the... remote to and press 2. The exception is not available on the disc, the disc's default setting language will be automatically generated. 6 Use 3 4 to adjust the settings for each speaker that this DVD system will automatically switch to the language ...
... AB C 1 Press SURR. (or SURROUND on the front panel) repeatedly to select 'Multi-channel.' 2 In disc mode, press SYSTEM MENU. 3 Select icon and press 4. 4 Use the joystick (1 2 3 4) on the remote to navigate in the menu. use the longer delay settings when the surround speakers are only active on the... remote to and press 2. The exception is not available on the disc, the disc's default setting language will be automatically generated. 6 Use 3 4 to adjust the settings for each speaker that this DVD system will automatically switch to the language ...
User manual
Page 26
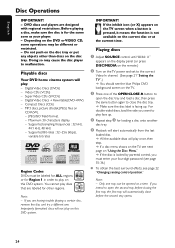
...Playing discs 1 Adjust SOURCE control until "DISC X" appears on the display panel (or press DISC/MEDIA on the remote.) 2 Turn on the TV power and set to the correct Video In channel. (See page 21 "Setting the... TV".) ➜ You should see the blue Philips DVD background screen on the TV. 3 Press one of the OPEN•CLOSE 0 button to open..."Using the Disc Menu." ➜ If the disc is not available on CD-R(W). - Playable discs Your DVD home cinema system will not play face up. 4 Repeat step 3 for loading a disc onto another disc tray. 5 Playback...
...Playing discs 1 Adjust SOURCE control until "DISC X" appears on the display panel (or press DISC/MEDIA on the remote.) 2 Turn on the TV power and set to the correct Video In channel. (See page 21 "Setting the... TV".) ➜ You should see the blue Philips DVD background screen on the TV. 3 Press one of the OPEN•CLOSE 0 button to open..."Using the Disc Menu." ➜ If the disc is not available on CD-R(W). - Playable discs Your DVD home cinema system will not play face up. 4 Repeat step 3 for loading a disc onto another disc tray. 5 Playback...
User manual
Page 27
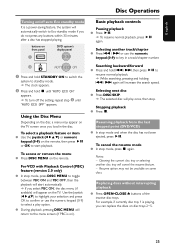
...some discs. To access or remove the menu G Press DISC MENU on front panel DVD system's display panel 1 STANDBY- Selecting next disc G Press DISC SKIP. ➜ The selected disc will appear on the remote, then press ÉÅ or OK to key in the disc. Replacing discs without... Press and hold Ç until "AUTO ECO ON" appears. ➜ To turn off auto Eco standby mode It is a power-saving feature, the system will start playback. Selecting another disc tray will increase the search speed. Stopping playback G Press Ç. To select a playback feature or item G Use...
...some discs. To access or remove the menu G Press DISC MENU on front panel DVD system's display panel 1 STANDBY- Selecting next disc G Press DISC SKIP. ➜ The selected disc will appear on the remote, then press ÉÅ or OK to key in the disc. Replacing discs without... Press and hold Ç until "AUTO ECO ON" appears. ➜ To turn off auto Eco standby mode It is a power-saving feature, the system will start playback. Selecting another disc tray will increase the search speed. Stopping playback G Press Ç. To select a playback feature or item G Use...
User manual
Page 30
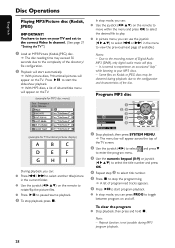
... MP3 discs, a list of albums/titles menu will appear across the top of Digital Audio MP3 (DAM), only digital audio music will appear on the remote to move within the menu and press OK to select the desired file to toggle between program on your MP3 discs. - Due to the recording... DISC MENU SEATING ZOOM PREV NEXT OK STOP PLAY/PAUSE DISC SKIP REPEAT REPEAT PROGRAM 1 Stop playback, then press SYSTEM MENU. ➜ The menu bar will appear on the remote to select another title/picture in the menu to the correct Video In channel. (See page 21 "Setting the TV".) 1 Load an...
... MP3 discs, a list of albums/titles menu will appear across the top of Digital Audio MP3 (DAM), only digital audio music will appear on the remote to move within the menu and press OK to select the desired file to toggle between program on your MP3 discs. - Due to the recording... DISC MENU SEATING ZOOM PREV NEXT OK STOP PLAY/PAUSE DISC SKIP REPEAT REPEAT PROGRAM 1 Stop playback, then press SYSTEM MENU. ➜ The menu bar will appear on the remote to select another title/picture in the menu to the correct Video In channel. (See page 21 "Setting the TV".) 1 Load an...

User manual
Page 31
...(for example, digital still pictures) stored in the memory card (PCMCIA) without the need of compact, portable, digital data exchange or storage systems with compatible memory card devices and versatile IC (Intergrated Circuit) recording medium with a data capacity that has been initialized using a USB connection... watching a DVD playback, the picture/ sound from the 9 thumbnail pictures. G Press ÉÅ to get wet. - Some files on the remote to a camera using a computer or if you can; MP3 files. Memory card - If you insert the PC card adaptor into a different file format...
...(for example, digital still pictures) stored in the memory card (PCMCIA) without the need of compact, portable, digital data exchange or storage systems with compatible memory card devices and versatile IC (Intergrated Circuit) recording medium with a data capacity that has been initialized using a USB connection... watching a DVD playback, the picture/ sound from the 9 thumbnail pictures. G Press ÉÅ to get wet. - Some files on the remote to a camera using a computer or if you can; MP3 files. Memory card - If you insert the PC card adaptor into a different file format...
User manual
Page 32
... bar You can continue a number of the TV screen. 2 Use the joystick (1 2 3 4) on the remote to navigate in the menu. ➜ Press 1 2 to move within the enlarged picture on the TV. SYSTEM MENU 1 2 SEATING DISC MENU ZOOM PREV NEXT 3 OK STOP PLAY/PAUSE 1 In disc mode, press... SYSTEM MENU. ➜ The menu bar will be muted. IMPORTANT! - Select a search speed (backward/forward). TIME ...
... bar You can continue a number of the TV screen. 2 Use the joystick (1 2 3 4) on the remote to navigate in the menu. ➜ Press 1 2 to move within the enlarged picture on the TV. SYSTEM MENU 1 2 SEATING DISC MENU ZOOM PREV NEXT 3 OK STOP PLAY/PAUSE 1 In disc mode, press... SYSTEM MENU. ➜ The menu bar will be muted. IMPORTANT! - Select a search speed (backward/forward). TIME ...
User manual
Page 33
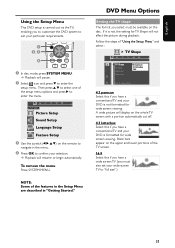
...size".) 31 A wide picture will resume or begin automatically. To remove the menu Press SYSTEM MENU. SETUP MENU Picture Setup Sound Setup Language Setup Feature Setup 3 Use the joystick (1 2 3 4) on the remote to confirm your selection. ➜ Playback will display on the upper and lower portions ...of "Using the Setup Menu" and select : > TV Shape TV Shape TV System Video Output Screen saver 4:3 panscan 4:3 letterbox 16:9 Set TV shape...
...size".) 31 A wide picture will resume or begin automatically. To remove the menu Press SYSTEM MENU. SETUP MENU Picture Setup Sound Setup Language Setup Feature Setup 3 Use the joystick (1 2 3 4) on the remote to confirm your selection. ➜ Playback will display on the upper and lower portions ...of "Using the Setup Menu" and select : > TV Shape TV Shape TV System Video Output Screen saver 4:3 panscan 4:3 letterbox 16:9 Set TV shape...
User manual
Page 34
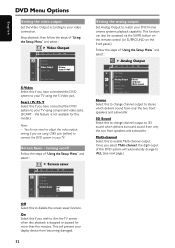
...is not available for more than five minutes. Multi-channel Select this to enable Multi-channel output. Scart / Pr Pb Y Select this DVD system will prevent your display device from only the two front speakers and subwoofer. This will automatically change to your TV using the S-Video jack....be accessed via the SURR. English DVD Menu Options Setting the video output Set the Video Output according to match your DVD home cinema system's playback capability. button on the remote control (or SURROUND on /off Follow the steps of this if you are using component video jacks. (SCART -
...is not available for more than five minutes. Multi-channel Select this to enable Multi-channel output. Scart / Pr Pb Y Select this DVD system will prevent your display device from only the two front speakers and subwoofer. This will automatically change to your TV using the S-Video jack....be accessed via the SURR. English DVD Menu Options Setting the video output Set the Video Output according to match your DVD home cinema system's playback capability. button on the remote control (or SURROUND on /off Follow the steps of this if you are using component video jacks. (SCART -


