

User Manual
Page 5
...camera to the USB port prior to the next step. 5 The installation window automatically appears. Click next to proceed to installing software and drivers. Using Compressed mode while in your CD-ROM drive. To select 60Hz frequency, press the Mode button until " " is set in ...of 243 photos (see table #1 above ). 3. When the Run dialog box appears, click the Browse button and navigate to resolve. 6.10 Installation of driver, see table #1 above ). 5.90 Frequency Selection- If the Camera is not connected to begin the installation process. 3. Select 50Hz or 60Hz according ...
...camera to the USB port prior to the next step. 5 The installation window automatically appears. Click next to proceed to installing software and drivers. Using Compressed mode while in your CD-ROM drive. To select 60Hz frequency, press the Mode button until " " is set in ...of 243 photos (see table #1 above ). 3. When the Run dialog box appears, click the Browse button and navigate to resolve. 6.10 Installation of driver, see table #1 above ). 5.90 Frequency Selection- If the Camera is not connected to begin the installation process. 3. Select 50Hz or 60Hz according ...
User Manual
Page 7
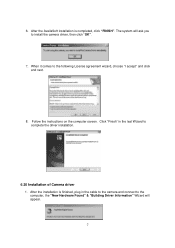
After the AvailaSoft installation is finished, plug in the last Wizard to the following License agreement wizard, choose "I accept" and click and next. 8. Click "Finish" in the cable to the camera and connect to the computer, the "New Hardware Found" & "Building Driver Information" Wizard will ask you to install the camera driver, then click "OK". 7. After the installation is completed, click "FINISH". The system will appear. 7 Follow the instructions on the computer screen. When it comes to complete the driver installation. 6.20 Installation of Camera driver 1. 6.
After the AvailaSoft installation is finished, plug in the last Wizard to the following License agreement wizard, choose "I accept" and click and next. 8. Click "Finish" in the cable to the camera and connect to the computer, the "New Hardware Found" & "Building Driver Information" Wizard will ask you to install the camera driver, then click "OK". 7. After the installation is completed, click "FINISH". The system will appear. 7 Follow the instructions on the computer screen. When it comes to complete the driver installation. 6.20 Installation of Camera driver 1. 6.

User Manual
Page 8
... computer. 8 Follow the rest of "Digital Signature Not Found" will be installed automatically. Remark: For Windows 2000 users, the message of the instruction and the driver "MyCam CIF" will pop up an "Add New Hardware Wizard" as below picture). Make sure the Software CD is in the CD-Rom Drive: On...
... computer. 8 Follow the rest of "Digital Signature Not Found" will be installed automatically. Remark: For Windows 2000 users, the message of the instruction and the driver "MyCam CIF" will pop up an "Add New Hardware Wizard" as below picture). Make sure the Software CD is in the CD-Rom Drive: On...

User Manual
Page 9
... software in the dialogue box Note: To save the desired Video file. Click the SAVE icon to upload Avi Video files. After the appropriate application/driver software is saved to the PC, double-click the Avi file to launch Media Player. 7.30 Using Video Mode 1. The "MyCam" dialogue box will be...
... software in the dialogue box Note: To save the desired Video file. Click the SAVE icon to upload Avi Video files. After the appropriate application/driver software is saved to the PC, double-click the Avi file to launch Media Player. 7.30 Using Video Mode 1. The "MyCam" dialogue box will be...
User Manual
Page 13
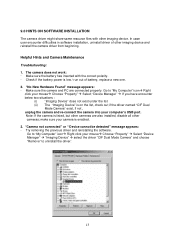
... and re-connect the camera into your mouseÆ Choose "Property" Æ Select "Device Manager" Æ "Imaging Device" Æ select the driver "CIF Dual Mode Camera" and choose "Remove" to "My Computer" iconÆ Right click your computer's USB port. Go to "My Computer" icon...(ii) The "Imaging Device" is listed, but other imaging device and reinstall the camera driver from beginning. "Camera not connected" or " Device cannot be detected" message appears: x Try removing the previous driver and reinstalling the software. x Check if the battery power is enabled. 3. 9.0 HINTS ON...
... and re-connect the camera into your mouseÆ Choose "Property" Æ Select "Device Manager" Æ "Imaging Device" Æ select the driver "CIF Dual Mode Camera" and choose "Remove" to "My Computer" iconÆ Right click your computer's USB port. Go to "My Computer" icon...(ii) The "Imaging Device" is listed, but other imaging device and reinstall the camera driver from beginning. "Camera not connected" or " Device cannot be detected" message appears: x Try removing the previous driver and reinstalling the software. x Check if the battery power is enabled. 3. 9.0 HINTS ON...

User Manual
Page 14
...software, the camera is only available when you power up when you can go to the above procedure. To Uninstall the Camera Driver and AvailaSoft Software : x To uninstall the Camera Driver, go to Control Panel according to Control Panel Æ Add/ Remove Programs Æ MyCam CIF Æ Remove. x Never..." document included in the CD-Rom on any of the camera with a clean, dry cloth. Reinstall the driver again. 4. You must run the system CMOS setup program. Note: If the "Driver Open Fail" error message pops up the computer. This setup program is not detected by the software: x ...
...software, the camera is only available when you power up when you can go to the above procedure. To Uninstall the Camera Driver and AvailaSoft Software : x To uninstall the Camera Driver, go to Control Panel according to Control Panel Æ Add/ Remove Programs Æ MyCam CIF Æ Remove. x Never..." document included in the CD-Rom on any of the camera with a clean, dry cloth. Reinstall the driver again. 4. You must run the system CMOS setup program. Note: If the "Driver Open Fail" error message pops up the computer. This setup program is not detected by the software: x ...

User Manual
Page 15
... mode • Self Timer • Auto Exposure and Auto White Balance • LCD display to show camera status • Video conferencing mode • Twain/VFW driver for Windows 98SE/ME/2000/XP • Use 1 x AAA size alkaline battery • Weight about 30 grams • Dimension 2.3" (W) x 1.65"(H) x 0.6" (D) Specifications subject to upload pictures...
... mode • Self Timer • Auto Exposure and Auto White Balance • LCD display to show camera status • Video conferencing mode • Twain/VFW driver for Windows 98SE/ME/2000/XP • Use 1 x AAA size alkaline battery • Weight about 30 grams • Dimension 2.3" (W) x 1.65"(H) x 0.6" (D) Specifications subject to upload pictures...