

User Manual
Page 2
www.philips.com/support Model Serial Country Austria Belgium Czech Rep Denmark Finland France Germany Greece Hungary Ireland Italy Luxemburg Netherlands Norway Poland Portugal Slovakia Spain Sweden Switzerland UK Number 0810 000205 078250145 800142840 3525 8759 09 2311 3415 0821 611655 01803 386 852 0 0800 3122 1280 ... 900 9070 This information is correct at the time of press. For updated information, see www.support.philips.com Tariff €0.07/min €0.06/min free local local €0.09/min €0.09/min free free local €0.08/min local €0.10/min local local local...
www.philips.com/support Model Serial Country Austria Belgium Czech Rep Denmark Finland France Germany Greece Hungary Ireland Italy Luxemburg Netherlands Norway Poland Portugal Slovakia Spain Sweden Switzerland UK Number 0810 000205 078250145 800142840 3525 8759 09 2311 3415 0821 611655 01803 386 852 0 0800 3122 1280 ... 900 9070 This information is correct at the time of press. For updated information, see www.support.philips.com Tariff €0.07/min €0.06/min free local local €0.09/min €0.09/min free free local €0.08/min local €0.10/min local local local...
User Manual
Page 3
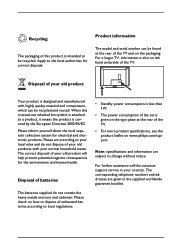
...support service in the supplied worldwide guarantee booklet. Recycling The packaging of this crossed-out wheeled bin symbol is attached to a product, it means the product is designed and manufactured with your local rules and do not contain the heavy metals mercury and cadmium. Please check on www.philips.com/support... • For more product specifications, see the product leaflet on how to dispose of exhausted batteries according to local regulations. • Standby power consumption is less than 1W. • The power consumption of the set is intended to your normal ...
...support service in the supplied worldwide guarantee booklet. Recycling The packaging of this crossed-out wheeled bin symbol is attached to a product, it means the product is designed and manufactured with your local rules and do not contain the heavy metals mercury and cadmium. Please check on www.philips.com/support... • For more product specifications, see the product leaflet on how to dispose of exhausted batteries according to local regulations. • Standby power consumption is less than 1W. • The power consumption of the set is intended to your normal ...
User Manual
Page 4
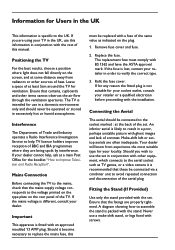
... TV for Users in conjunction with ghost images and lack of the aerial plug. Important This apparatus is specific to avoid repeated connection and disconnection of contrast. Refit the fuse cover. Your dealer will know from radiators or other sources of at a main Post Office for your dealer cannot help TV licence holders improve reception of the set . If your...
... TV for Users in conjunction with ghost images and lack of the aerial plug. Important This apparatus is specific to avoid repeated connection and disconnection of contrast. Refit the fuse cover. Your dealer will know from radiators or other sources of at a main Post Office for your dealer cannot help TV licence holders improve reception of the set . If your...

User Manual
Page 5
... EN-14 Parental lock EN-15 Child lock EN-16 Active control EN-16 13 Picture and Sound Settings EN-17 Smart picture EN-18 Smart sound EN-18 15 Picture Format EN-19 16 Teletext EN-20 17 Using the TV as a PC Monitor ..........EN-22 Connecting a PC to the TV EN-22 Adjusting TV settings in PC Mode.....EN-22 Picture menu for PCs EN...
... EN-14 Parental lock EN-15 Child lock EN-16 Active control EN-16 13 Picture and Sound Settings EN-17 Smart picture EN-18 Smart sound EN-18 15 Picture Format EN-19 16 Teletext EN-20 17 Using the TV as a PC Monitor ..........EN-22 Connecting a PC to the TV EN-22 Adjusting TV settings in PC Mode.....EN-22 Picture menu for PCs EN...
User Manual
Page 6
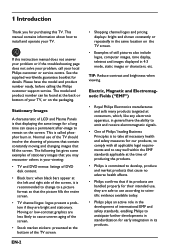
... recommended to change to a picture format so that displaying the same image for a long time can be found at the back or bottom of your TV, or on the packaging. This manual contains information about how to use , they are bright and stationary. Moving or low-contrast graphics are safe to install and operate your local Philips customer or service centre.
... recommended to change to a picture format so that displaying the same image for a long time can be found at the back or bottom of your TV, or on the packaging. This manual contains information about how to use , they are bright and stationary. Moving or low-contrast graphics are safe to install and operate your local Philips customer or service centre.

User Manual
Page 7
... use a poor fitting mains socket. Do not touch, push or rub or strike the screen with water. If you clean the set. 4. Your TV must be made before you have the set . 9. If the TV is mounted on a swivel base or swivel arm, ensure no strain is placed on the power cord when the TV is suitable to the TV set checked...
... use a poor fitting mains socket. Do not touch, push or rub or strike the screen with water. If you clean the set. 4. Your TV must be made before you have the set . 9. If the TV is mounted on a swivel base or swivel arm, ensure no strain is placed on the power cord when the TV is suitable to the TV set checked...

User Manual
Page 8
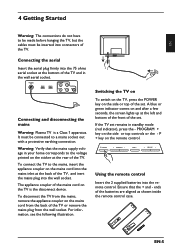
... and face downward. TV aerial socket Insert the aerial plug into the selected menu item and make adjustments. 4. - Headphone Connect your headphone jack to the headphone connector of the TV. 1 2 AUDIO IN VIDEO IN S-VIDEO 1 2 3 EN-4 1. PROGRAM + Select the channel. 3. EXT 1 (RGB) To connect to control the power, menu, volume and programme number. 3 Television Controls and Connectors Side or top controls Use the side or top keys to peripheral equipment...
... and face downward. TV aerial socket Insert the aerial plug into the selected menu item and make adjustments. 4. - Headphone Connect your headphone jack to the headphone connector of the TV. 1 2 AUDIO IN VIDEO IN S-VIDEO 1 2 3 EN-4 1. PROGRAM + Select the channel. 3. EXT 1 (RGB) To connect to control the power, menu, volume and programme number. 3 Television Controls and Connectors Side or top controls Use the side or top keys to peripheral equipment...
User Manual
Page 9
...: Plasma TV is the disconnect device. Connecting the aerial Insert the aerial plug firmly into the remote control. Switching the TV on To switch on the TV, press the POWER key on the mains cord from the back of the batteries are aligned as shown inside the remote control case. POWER PROGRAM MENU VOLUME Using the remote control Insert the 2 supplied batteries into the 75 ohms aerial...
...: Plasma TV is the disconnect device. Connecting the aerial Insert the aerial plug firmly into the remote control. Switching the TV on To switch on the TV, press the POWER key on the mains cord from the back of the batteries are aligned as shown inside the remote control case. POWER PROGRAM MENU VOLUME Using the remote control Insert the 2 supplied batteries into the 75 ohms aerial...
User Manual
Page 10
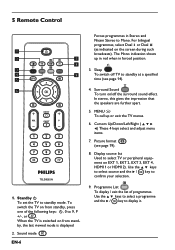
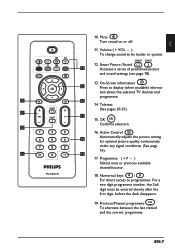
... on from standby, the last viewed mode is switched on EXT 1, EXT 2, EXT 3, EXT 4, HDMI 1 or HDMI 2). Sleep To switch off the surround sound effect. Cursors Up/Down/Left/Right These 4 keys select and adjust menu items. 7. Display source list Used to select TV or peripheral equipment on from standby, press one of programmes. When the TV is displayed 2. The Mono indication shows up...
... on from standby, the last viewed mode is switched on EXT 1, EXT 2, EXT 3, EXT 4, HDMI 1 or HDMI 2). Sleep To switch off the surround sound effect. Cursors Up/Down/Left/Right These 4 keys select and adjust menu items. 7. Display source list Used to select TV or peripheral equipment on from standby, press one of programmes. When the TV is displayed 2. The Mono indication shows up...
User Manual
Page 11
... between the last viewed and the current programme. On-Screen information 15 Press to programmes. Volume ( + VOL - ) To change sound to be entered shortly after the first digit, before the dash disappears. 19. Active Control 18 Automatically adjusts the picture setting for optimal picture quality continuously under any signal conditions. (See page 16). 13 19 17. For a two digit programme number, the 2nd digit must be...
... between the last viewed and the current programme. On-Screen information 15 Press to programmes. Volume ( + VOL - ) To change sound to be entered shortly after the first digit, before the dash disappears. 19. Active Control 18 Automatically adjusts the picture setting for optimal picture quality continuously under any signal conditions. (See page 16). 13 19 17. For a two digit programme number, the 2nd digit must be...

User Manual
Page 12
... signal, the programmes are not numbered correctly. If your language by the Auto Store method (see page 9). Country B CH D DK E F FI GB Press OK to continue Note: If the above menu is not displayed, proceed to your country. 6 Quick Installation When you switch on the TV set for the first time, a menu is complete. This menu prompts you to continue The search starts...
... signal, the programmes are not numbered correctly. If your language by the Auto Store method (see page 9). Country B CH D DK E F FI GB Press OK to continue Note: If the above menu is not displayed, proceed to your country. 6 Quick Installation When you switch on the TV set for the first time, a menu is complete. This menu prompts you to continue The search starts...
User Manual
Page 18
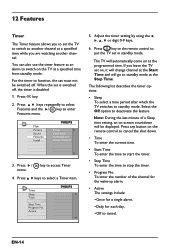
... set on, it will change channel at the Start Time and will automatically come on at a specified time from standby mode. EN-14 Press h key. 2. Press Î ï keys repeatedly to select Features and the Æ/ key to access Timer 4. Main Picture Sound Features Install Timer Child Lock Parental Lock Active Control 3. key to enter Features menu. Active - - : - - 5. You can also use...
... set on, it will change channel at the Start Time and will automatically come on at a specified time from standby mode. EN-14 Press h key. 2. Press Î ï keys repeatedly to select Features and the Æ/ key to access Timer 4. Main Picture Sound Features Install Timer Child Lock Parental Lock Active Control 3. key to enter Features menu. Active - - : - - 5. You can also use...
User Manual
Page 20
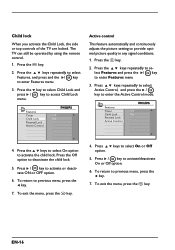
Features Timer Off Child Lock On Parental Lock Active Control Active control This feature automatically and continuously adjusts the picture setting to enter the Active Control mode. Press the h key. 2. Press Î ï keys repeatedly to select Active Control, and press the Æ / key to provide optimal picture quality in any signal conditions. 1. Press Æ / key to previous menu, press the Í key. 7. To return...
Features Timer Off Child Lock On Parental Lock Active Control Active control This feature automatically and continuously adjusts the picture setting to enter the Active Control mode. Press the h key. 2. Press Î ï keys repeatedly to select Active Control, and press the Æ / key to provide optimal picture quality in any signal conditions. 1. Press Æ / key to previous menu, press the Í key. 7. To return...
User Manual
Page 26
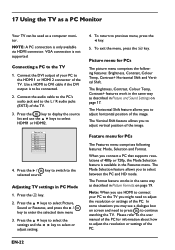
... the Í Æ key to adjust vertical position of 480p or 720p, the Mode Selection feature is only available via HDMI connector. The Vertical Shift feature allows you to the selected source. In some situations you connect a PC that supports resolutions of the image. 17 Using the TV as a PC Monitor Your TV can be connected. 2. To exit the menu, press the h key. When you may...
... the Í Æ key to adjust vertical position of 480p or 720p, the Mode Selection feature is only available via HDMI connector. The Vertical Shift feature allows you to the selected source. In some situations you connect a PC that supports resolutions of the image. 17 Using the TV as a PC Monitor Your TV can be connected. 2. To exit the menu, press the h key. When you may...

User Manual
Page 27
... Component Video Inputs (Ext 4) of the following sources: - HDMI1 or HDMI2 if you using a YPbPr connection Source list TV EXT 1 EXT 2 EXT 3 EXT 4 HDMI 1 HDMI 2 Controlling TV settings in HD mode 1. Picture menu for HD mode The picture menu comprises the following features: Brightness, Contrast, Colour Temp, Contrast+ Horizontal Shift and Vertical Shift. Use a DVI to previous menu, press the Í key. 6. EN-23 To return to HDMI cable if DVI output is connected. - Press the key to display Source...
... Component Video Inputs (Ext 4) of the following sources: - HDMI1 or HDMI2 if you using a YPbPr connection Source list TV EXT 1 EXT 2 EXT 3 EXT 4 HDMI 1 HDMI 2 Controlling TV settings in HD mode 1. Picture menu for HD mode The picture menu comprises the following features: Brightness, Contrast, Colour Temp, Contrast+ Horizontal Shift and Vertical Shift. Use a DVI to previous menu, press the Í key. 6. EN-23 To return to HDMI cable if DVI output is connected. - Press the key to display Source...

User Manual
Page 28
..., 480i, 576p, 576i, 720p, 1080i Note: Your Philips TV is available in Features on your device (DVD player, cable set . The Mode Selection feature allows you do not get a good picture, please change the video format on pages 14-16. Please note that supports resolutions of 480p or 720p, the Mode Selection feature is HDMI compliant. If you to a standard format...
..., 480i, 576p, 576i, 720p, 1080i Note: Your Philips TV is available in Features on your device (DVD player, cable set . The Mode Selection feature allows you do not get a good picture, please change the video format on pages 14-16. Please note that supports resolutions of 480p or 720p, the Mode Selection feature is HDMI compliant. If you to a standard format...

User Manual
Page 33
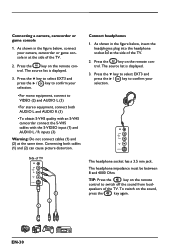
For optimal viewing, switch your equipment to confirm your selection. Connection by VGA is connected correctly. Connect the audio cable to the audio jack on the PC and to the TV with a monitor refresh frequency of 60 Hz. trol. The letter Y indicates the luminance signal. As shown in the following figure, connect your TV is not supported. Although the abbreviations may vary, the letters B and R stand for definitions...
For optimal viewing, switch your equipment to confirm your selection. Connection by VGA is connected correctly. Connect the audio cable to the audio jack on the PC and to the TV with a monitor refresh frequency of 60 Hz. trol. The letter Y indicates the luminance signal. As shown in the following figure, connect your TV is not supported. Although the abbreviations may vary, the letters B and R stand for definitions...
User Manual
Page 34
... connect the S-VHS cables with the S-VIDEO input (1) and AUDIO L / R inputs (3) Warning: Do not connect cables (1) and (2) at the side of the TV. 2. As shown in the figure below, connect your selection. TIP: Press the key on the remote con- Press the key on the remote control to confirm your camera, camcorder or game console in the figure below, insert the headphones plug...
... connect the S-VHS cables with the S-VIDEO input (1) and AUDIO L / R inputs (3) Warning: Do not connect cables (1) and (2) at the side of the TV. 2. As shown in the figure below, connect your selection. TIP: Press the key on the remote con- Press the key on the remote control to confirm your camera, camcorder or game console in the figure below, insert the headphones plug...
User Manual
Page 35
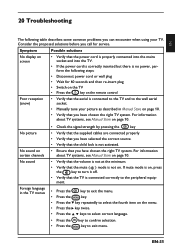
... exit menu. 20 Troubleshooting EN The following steps: • Disconnect power cord or wall plug • Wait for service. Symptom Possible solutions No display on screen • Verify that the power cord is properly connected into the mains socket and into the TV. • If the power cord is correctly inserted but there is connected to the TV and to the wall aerial socket. • Manually tune...
... exit menu. 20 Troubleshooting EN The following steps: • Disconnect power cord or wall plug • Wait for service. Symptom Possible solutions No display on screen • Verify that the power cord is properly connected into the mains socket and into the TV. • If the power cord is correctly inserted but there is connected to the TV and to the wall aerial socket. • Manually tune...
User Manual
Page 36
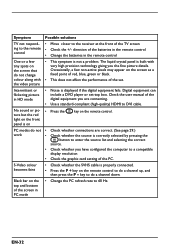
... connecting. • Use a standard-compliant (high-quality) HDMI to DVI cable. • Press the key on the screen that do not change colour along with very high precision technology giving you have configured the computer to a compatible display resolution • Check the graphic card setting of the batteries in the remote control • Change the batteries in the remote control • This symptom is not a problem. Check the user manual of the digital...
... connecting. • Use a standard-compliant (high-quality) HDMI to DVI cable. • Press the key on the screen that do not change colour along with very high precision technology giving you have configured the computer to a compatible display resolution • Check the graphic card setting of the batteries in the remote control • Change the batteries in the remote control • This symptom is not a problem. Check the user manual of the digital...


