
User Manual
Page 1
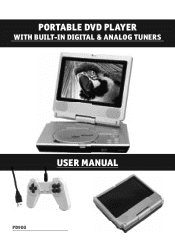
PORTABLE DVD PLAYER WITH BUILT-IN DIGITAL & ANALOG TUNERS USER MANUAL PD900
PORTABLE DVD PLAYER WITH BUILT-IN DIGITAL & ANALOG TUNERS USER MANUAL PD900
User Manual
Page 2
... FUNCTIONS ...3 REMOTE CONTROL ...6 CONNECTION AND SETUP FOR RECEPTION OF DVB-T AND ANALOG TV 7 CONNECTION TO TV SET 8 AS A MONITOR ...9 PLAYING GAMES ...10 FILE BROWSING AND PLAYBACK 11 PLAYING FILES OFF USB FLASH DRIVE 12 NAVIGATING THE FILE MANAGER 12 READING MEMORY CARDS (SD / MS / MMC 13 DVB-T SETUP MENU OVERVIEW 14 DVB-T FIRST TIME INSTALLATION WIZARD 14 OPERATING IN DVB MODE 15 ANALOG TV SETUP MENU OVERVIEW 16 OPERATION IN TV MODE 16 DVD PLAYBACK ...17 PARENTAL LOCK (DVB-T MODE 18 CHARGING...
... FUNCTIONS ...3 REMOTE CONTROL ...6 CONNECTION AND SETUP FOR RECEPTION OF DVB-T AND ANALOG TV 7 CONNECTION TO TV SET 8 AS A MONITOR ...9 PLAYING GAMES ...10 FILE BROWSING AND PLAYBACK 11 PLAYING FILES OFF USB FLASH DRIVE 12 NAVIGATING THE FILE MANAGER 12 READING MEMORY CARDS (SD / MS / MMC 13 DVB-T SETUP MENU OVERVIEW 14 DVB-T FIRST TIME INSTALLATION WIZARD 14 OPERATING IN DVB MODE 15 ANALOG TV SETUP MENU OVERVIEW 16 OPERATION IN TV MODE 16 DVD PLAYBACK ...17 PARENTAL LOCK (DVB-T MODE 18 CHARGING...

User Manual
Page 3
...; DVD player Watch your personal photos in JPG format via integrated card reader) Supported audio and video formats: Video: DVD Video, S/VCD, DivX (DivX 4.x, DivX 5.x), MPG Audio: MP3, WMA Photos: JPG, Kodak Picture CD • Accepts external inputs such as a closed circuit (CCTV) TV monitor. • Super ESP (Electronic Shock Protection) • Built-in high energy rechargeable lithium polymer battery. • Teletext (DVB Mode) 3 Can be used as Video game, Video camera, Video recorder, connect...
...; DVD player Watch your personal photos in JPG format via integrated card reader) Supported audio and video formats: Video: DVD Video, S/VCD, DivX (DivX 4.x, DivX 5.x), MPG Audio: MP3, WMA Photos: JPG, Kodak Picture CD • Accepts external inputs such as a closed circuit (CCTV) TV monitor. • Super ESP (Electronic Shock Protection) • Built-in high energy rechargeable lithium polymer battery. • Teletext (DVB Mode) 3 Can be used as Video game, Video camera, Video recorder, connect...
User Manual
Page 4
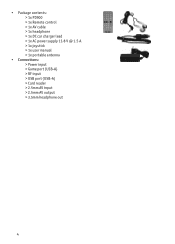
• Package contents: > 1x PD900 > 1x Remote control > 1x AV cable > 1x headphone > 1x DC car charger lead > 1x AC power supply 13.8 V @ 1.5 A > 1x joystick > 1x user manual > 1x portable antenna • Connections: > Power input > Game port (USB-A) > RF input > USB port (USB-A) > Card reader > 2.5mm AV input > 2.5mm AV output > 3.5mm headphone out 4
• Package contents: > 1x PD900 > 1x Remote control > 1x AV cable > 1x headphone > 1x DC car charger lead > 1x AC power supply 13.8 V @ 1.5 A > 1x joystick > 1x user manual > 1x portable antenna • Connections: > Power input > Game port (USB-A) > RF input > USB port (USB-A) > Card reader > 2.5mm AV input > 2.5mm AV output > 3.5mm headphone out 4

User Manual
Page 6
REMOTE CONTROL Note: As you switch between modes (DVD/ TV/ DVB-T/ AV) the buttons functions will change. The remote takes 2x "AAA" batteries. 6
REMOTE CONTROL Note: As you switch between modes (DVD/ TV/ DVB-T/ AV) the buttons functions will change. The remote takes 2x "AAA" batteries. 6
User Manual
Page 7
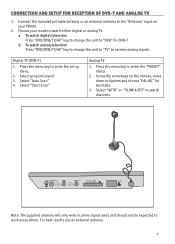
Choose your PD900. 2. Select program search 3. Using the arrow keys on your mode to receive analog signals Digital TV (DVB-T) 1. To watch analog television Press "DVD/DVB/TV/AV" key to change the unit to System and choose "PAL-BG" for DVB-T b. Select "Auto Scan" 4. CONNECTION AND SETUP FOR RECEPTION OF DVB-T AND ANALOG TV 1. To watch digital television Press "DVD/DVB/TV/AV" key to change the unit to...
Choose your PD900. 2. Select program search 3. Using the arrow keys on your mode to receive analog signals Digital TV (DVB-T) 1. To watch analog television Press "DVD/DVB/TV/AV" key to change the unit to System and choose "PAL-BG" for DVB-T b. Select "Auto Scan" 4. CONNECTION AND SETUP FOR RECEPTION OF DVB-T AND ANALOG TV 1. To watch digital television Press "DVD/DVB/TV/AV" key to change the unit to...
User Manual
Page 8
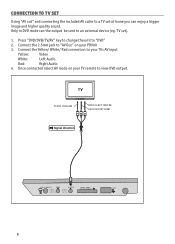
... -R R E A D CA R D (S D /M S /M M C ) USB 8 Press "DVD/DVB/TV/AV" key to change the unit to view DVD output. CONNECTION TO TV SET Using "AV out" and connecting the included AV cable to a TV set ). 1. Connect the Yellow/ White/ Red connectors to an external device (eg. Only in DVD mode can enjoy a bigger image and higher quality sound. Once connected select AV mode on your TVs AV input Yellow: Video White: Left Audio Red: Right Audio 4. TV set at home you...
... -R R E A D CA R D (S D /M S /M M C ) USB 8 Press "DVD/DVB/TV/AV" key to change the unit to view DVD output. CONNECTION TO TV SET Using "AV out" and connecting the included AV cable to a TV set ). 1. Connect the Yellow/ White/ Red connectors to an external device (eg. Only in DVD mode can enjoy a bigger image and higher quality sound. Once connected select AV mode on your TVs AV input Yellow: Video White: Left Audio Red: Right Audio 4. TV set at home you...

User Manual
Page 9
AS A MONITOR You can use your PD900 as a monitor, by inputting video and audio to "AV" 2. Using the AV cable supplied connect the external signal to the output sockets on your device 9 Note: Match the coloured RCA plugs to the "AV In" on your PD900 (see below fig). Press the "DVD/DVB/TV/AV" key, to change the input mode to the unit. 1.
AS A MONITOR You can use your PD900 as a monitor, by inputting video and audio to "AV" 2. Using the AV cable supplied connect the external signal to the output sockets on your device 9 Note: Match the coloured RCA plugs to the "AV In" on your PD900 (see below fig). Press the "DVD/DVB/TV/AV" key, to change the input mode to the unit. 1.

User Manual
Page 10
Power on 4. Play game 10 Load the 8-bit NES game disc into the unit (you wish to play from a USB drive or flash card) 2. Use the remote to the game port as per diagram. Connect the game controller to select the game you can also load 8bit NES games from the menu. 3. PLAYING GAMES 1.
Power on 4. Play game 10 Load the 8-bit NES game disc into the unit (you wish to play from a USB drive or flash card) 2. Use the remote to the game port as per diagram. Connect the game controller to select the game you can also load 8bit NES games from the menu. 3. PLAYING GAMES 1.
User Manual
Page 11
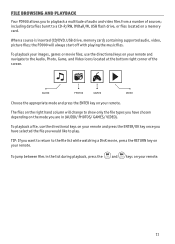
... a DivX movie, press the RETURN key on the mode you to a CD-R/RW, DVD±R/W, USB flash drive, or files located on your remote. including data files burnt to playback a multitude of audio and video files from a number of the screen. use the directional keys on your remote and navigate to play. When a source is inserted (CD/DVD, USB drive, memory card) containing supported audio, video, picture fi...
... a DivX movie, press the RETURN key on the mode you to a CD-R/RW, DVD±R/W, USB flash drive, or files located on your remote. including data files burnt to playback a multitude of audio and video files from a number of the screen. use the directional keys on your remote and navigate to play. When a source is inserted (CD/DVD, USB drive, memory card) containing supported audio, video, picture fi...
User Manual
Page 12
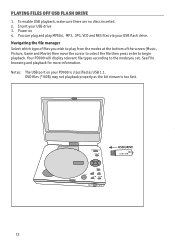
... to select the file then press enter to begin playback. To enable USB playback, make sure there are no discs inserted. 2. DVD files (*.VOB) may not playback properly as the bit stream is classified as USB 1.1. Your PD900 will display relevant file types according to play MPEG4, MP3, JPG, VCD and NES files via your USB flash drive. Power...
... to select the file then press enter to begin playback. To enable USB playback, make sure there are no discs inserted. 2. DVD files (*.VOB) may not playback properly as the bit stream is classified as USB 1.1. Your PD900 will display relevant file types according to play MPEG4, MP3, JPG, VCD and NES files via your USB flash drive. Power...

User Manual
Page 13
To enable USB playback, make sure there are no discs inserted. 2. You can plug and play MPEG4, MP3, JPG, VCD and NES files via your flash card (SD / MS PRO / MS DUO / MMC). 3. Power on. 4. Follow instructions as per USB Drive (Navigating the file manager) 13 READING MEMORY CARDS (SD / MS / MMC) 1. Insert your USB flash drive. 5.
To enable USB playback, make sure there are no discs inserted. 2. You can plug and play MPEG4, MP3, JPG, VCD and NES files via your flash card (SD / MS PRO / MS DUO / MMC). 3. Power on. 4. Follow instructions as per USB Drive (Navigating the file manager) 13 READING MEMORY CARDS (SD / MS / MMC) 1. Insert your USB flash drive. 5.
User Manual
Page 14
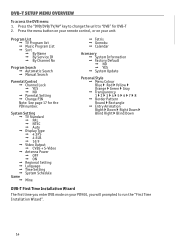
... time you will prompted to "DVB" for the PIN number. Press the "DVD/DVB/TV/AV" key to change the unit to run the "First Time Installation Wizard". 14 Program List TV Program list Music Program List Sort By Name By Service ID By Channel No Program Search Automatic Search Manual Search Parental Control Channel Lock YES NO Parental Setting Change PIN Note: See page 17 for DVB-T 2. DVB-T SETUP MENU OVERVIEW To access the DVB menu...
... time you will prompted to "DVB" for the PIN number. Press the "DVD/DVB/TV/AV" key to change the unit to run the "First Time Installation Wizard". 14 Program List TV Program list Music Program List Sort By Name By Service ID By Channel No Program Search Automatic Search Manual Search Parental Control Channel Lock YES NO Parental Setting Change PIN Note: See page 17 for DVB-T 2. DVB-T SETUP MENU OVERVIEW To access the DVB menu...
User Manual
Page 15
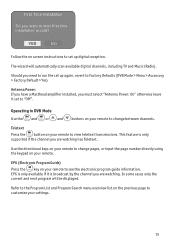
... the electronic program guide information. EPG (Electronic Program Guide) Press the key on your remote to view teletext transmissions. This feature is broadcast by the channel you need to start first time installation wizard? EPG is only available if it set up again, revert to Factory Defaults (DVB Mode > Menu > Accessory > Factory Default > Yes) Antenna Power: If you have a Masthead amplifier installed, you must select "Antenna Power: On...
... the electronic program guide information. EPG (Electronic Program Guide) Press the key on your remote to view teletext transmissions. This feature is broadcast by the channel you need to start first time installation wizard? EPG is only available if it set up again, revert to Factory Defaults (DVB Mode > Menu > Accessory > Factory Default > Yes) Antenna Power: If you have a Masthead amplifier installed, you must select "Antenna Power: On...
User Manual
Page 16
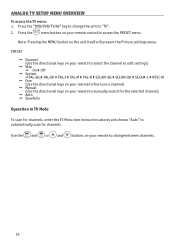
... your remote control to change between channels. 16 Use the and or and buttons on the unit itself will present the Picture settings menu. ANALOG TV SETUP MENU OVERVIEW To access the TV menu: 1. Press the menu button on your remote to change the unit to automatically scan for channels. Note: Pressing the MENU button on your remote to manually search for the selected channel) Auto SlowAuto Operation in TV Mode To scan for channels, enter the TV Menu (see instruction above...
... your remote control to change between channels. 16 Use the and or and buttons on the unit itself will present the Picture settings menu. ANALOG TV SETUP MENU OVERVIEW To access the TV menu: 1. Press the menu button on your remote to change the unit to automatically scan for channels. Note: Pressing the MENU button on your remote to manually search for the selected channel) Auto SlowAuto Operation in TV Mode To scan for channels, enter the TV Menu (see instruction above...

User Manual
Page 17
... and hooking the PD900 to your television set will allow you to access DVD playback settings including parental control, TV aspect ratio, DVD picture settings (Video Setup) and more. 17 Use the directional keys on your remote control to navigate through available subtitles (SUB) or languages (AUDIO) present on your remote to cycle through menu items and press the ENTER/OK key to watch a DVD movie: 1. While watching a DVD movie, use your PD900 like any other modes on your PD900. Press...
... and hooking the PD900 to your television set will allow you to access DVD playback settings including parental control, TV aspect ratio, DVD picture settings (Video Setup) and more. 17 Use the directional keys on your remote control to navigate through available subtitles (SUB) or languages (AUDIO) present on your remote to cycle through menu items and press the ENTER/OK key to watch a DVD movie: 1. While watching a DVD movie, use your PD900 like any other modes on your PD900. Press...
User Manual
Page 18
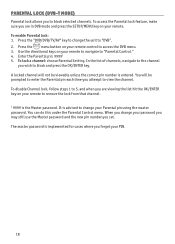
... enable Parental lock: 1. Use the directional keys on your remote control to access the DVB menu. 3. A locked channel will be viewable unless the correct pin number is advised to change the unit to "Parental Control." 4. Press the menu button on your remote to navigate to "DVB". 2. To disable Channel lock, follow steps 1 to 5, and when you are in DVB mode and press the SETUP/MENU key on your remote to remove the lock from that channel. †...
... enable Parental lock: 1. Use the directional keys on your remote control to access the DVB menu. 3. A locked channel will be viewable unless the correct pin number is advised to change the unit to "Parental Control." 4. Press the menu button on your remote to navigate to "DVB". 2. To disable Channel lock, follow steps 1 to 5, and when you are in DVB mode and press the SETUP/MENU key on your remote to remove the lock from that channel. †...
User Manual
Page 19
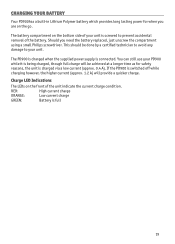
... power for safety reasons, the unit is switched off while charging however, the higher current (approx. 1.2 A) will be done by a certified technician to avoid any damage to prevent accidental removal of the battery. This should be achieved at a longer time as for when you need the battery replaced, just unscrew the compartment using a small Philips screwdriver. If the PD900 is charged...
... power for safety reasons, the unit is switched off while charging however, the higher current (approx. 1.2 A) will be done by a certified technician to avoid any damage to prevent accidental removal of the battery. This should be achieved at a longer time as for when you need the battery replaced, just unscrew the compartment using a small Philips screwdriver. If the PD900 is charged...
User Manual
Page 20
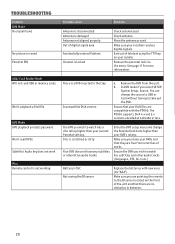
... the tray Incompatible DivX version a. The PD900 supports DivX 4.x and 5.x versions encoded at Not seeing the IR sensor Replace the batteries with the PD900. TROUBLESHOOTING Problem DVB Mode No signal found No picture or sound Parental PIN USB/ Card Reader Mode Will not read USB or memory cards Won't playback a DivX file DVD Mode DVD playback prompts password Won't read DVDs Subtitle/ Audio key does not work Misc. The DVD you clean your DivX files are compatible with new ones (2x "AAA") Make...
... the tray Incompatible DivX version a. The PD900 supports DivX 4.x and 5.x versions encoded at Not seeing the IR sensor Replace the batteries with the PD900. TROUBLESHOOTING Problem DVB Mode No signal found No picture or sound Parental PIN USB/ Card Reader Mode Will not read USB or memory cards Won't playback a DivX file DVD Mode DVD playback prompts password Won't read DVDs Subtitle/ Audio key does not work Misc. The DVD you clean your DivX files are compatible with new ones (2x "AAA") Make...

User Manual
Page 21
SPECIFICATIONS DVD Video D/A Converter DVD Audio Output General Specifications DVB-T Tuner DVB-T Decoder Video D/A converter: 10 bit Horizontal resolution: 500 lines Frequency response: 20 Hz - 20 KHz Dynamic range: 80 dB Audio D/A converter: 96 KHz/ 24 bit Image resolution: 9.2" 800 x 480 pixels Signal system: PAL/ NTSC/ AUTO Power source: Input: 100 - 240 V AC 50/ 60 Hz Output: 13.8 V DC Power consumption: < 20 W (net
SPECIFICATIONS DVD Video D/A Converter DVD Audio Output General Specifications DVB-T Tuner DVB-T Decoder Video D/A converter: 10 bit Horizontal resolution: 500 lines Frequency response: 20 Hz - 20 KHz Dynamic range: 80 dB Audio D/A converter: 96 KHz/ 24 bit Image resolution: 9.2" 800 x 480 pixels Signal system: PAL/ NTSC/ AUTO Power source: Input: 100 - 240 V AC 50/ 60 Hz Output: 13.8 V DC Power consumption: < 20 W (net


