Leaflet
Page 2
... are backlit for extra operational convenience. or their respective owners. All Rights reserved. www.philips.com Digital Camera 8 Megapixels With Swivel Lens Silver Specifications Storage Media • Memory Card Types: Secure Digital (SD), Secure Digital (SDHC) • SIC3608S/G7 Highlights Intuitive user interface Only the relevant keys for the currently selected device are the...
... are backlit for extra operational convenience. or their respective owners. All Rights reserved. www.philips.com Digital Camera 8 Megapixels With Swivel Lens Silver Specifications Storage Media • Memory Card Types: Secure Digital (SD), Secure Digital (SDHC) • SIC3608S/G7 Highlights Intuitive user interface Only the relevant keys for the currently selected device are the...

User manual (English)
Page 2
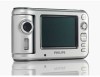
Or swivel the lens to the front and side to ... Capturing photos your shot in the LCD display to preview your way. Simply swivel the lens to the back to make sure everyone is in the frame, say cheese and snap away. Thank you for purchasing the Philips SIC 3608S/G7 digital camera where we encourage you to take photos from different angles. "do the swivel!" Enjoy the independence of snapping perfect self-portraits the first time. Front swivel Side swivel Back swivel Shooting others Stealth mode Self portraits Be creative!
Or swivel the lens to the front and side to ... Capturing photos your shot in the LCD display to preview your way. Simply swivel the lens to the back to make sure everyone is in the frame, say cheese and snap away. Thank you for purchasing the Philips SIC 3608S/G7 digital camera where we encourage you to take photos from different angles. "do the swivel!" Enjoy the independence of snapping perfect self-portraits the first time. Front swivel Side swivel Back swivel Shooting others Stealth mode Self portraits Be creative!

User manual (English)
Page 7
LCD Display Icons Photo/Video Mode Photo Resolution UL XL L M S White Balance AWB Flash Mode A Photo Quality Memory Card Inserted Datestamp On Photos taken/Photo capacity 50 / 100 Battery Usage Selftimer 10s 20s T Digital Zoom 3.3 W II. Load the batteries according to the outside of the battery door. 6 Setting Up Your Camera 3. Batteries The SIC 3608S/G7 uses three (3) AAA alkaline or rechargeable batteries. 3.1 Insert the Batteries Open the battery cover by sliding it to the polarity illustration (+) and (-) on the inside of the camera.
LCD Display Icons Photo/Video Mode Photo Resolution UL XL L M S White Balance AWB Flash Mode A Photo Quality Memory Card Inserted Datestamp On Photos taken/Photo capacity 50 / 100 Battery Usage Selftimer 10s 20s T Digital Zoom 3.3 W II. Load the batteries according to the outside of the battery door. 6 Setting Up Your Camera 3. Batteries The SIC 3608S/G7 uses three (3) AAA alkaline or rechargeable batteries. 3.1 Insert the Batteries Open the battery cover by sliding it to the polarity illustration (+) and (-) on the inside of the camera.
User manual (English)
Page 8
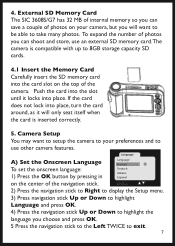
... to setup the camera to your camera, but you choose and press OK. 5 Press the navigation stick to the Left TWICE to take many photos. External SD Memory Card The SIC 3608S/G7 has 32 MB of... internal memory so you can save a couple of photos you can shoot and store, use other camera features. Camera Setup You may want to be able... into place, turn the card around, as it locks into the card slot on the center of the camera. LEFT: Exit 2) Press the navigation stick to Right to display the Setup menu. 3) Press navigation stick...
... to setup the camera to your camera, but you choose and press OK. 5 Press the navigation stick to the Left TWICE to take many photos. External SD Memory Card The SIC 3608S/G7 has 32 MB of... internal memory so you can save a couple of photos you can shoot and store, use other camera features. Camera Setup You may want to be able... into place, turn the card around, as it locks into the card slot on the center of the camera. LEFT: Exit 2) Press the navigation stick to Right to display the Setup menu. 3) Press navigation stick...
User manual (English)
Page 18
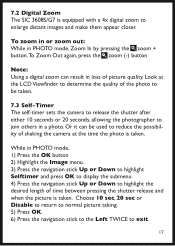
...to determine the quality of the photo to be used to reduce the possibility of shaking the camera at the time the photo is taken. Or it can result in loss of time between pressing... press the zoom (-) button Note: Using a digital zoom can be taken. 7.3 Self-Timer The self-timer sets the camera to release the shutter after either 10 seconds or 20 seconds, allowing the photographer to enlarge distant images and make them appear...Left TWICE to highlight the desired length of picture quality. 7.2 Digital Zoom The SIC 3608S/G7 is equipped with a 4x digital zoom to join others in a photo.
...to determine the quality of the photo to be used to reduce the possibility of shaking the camera at the time the photo is taken. Or it can result in loss of time between pressing... press the zoom (-) button Note: Using a digital zoom can be taken. 7.3 Self-Timer The self-timer sets the camera to release the shutter after either 10 seconds or 20 seconds, allowing the photographer to enlarge distant images and make them appear...Left TWICE to highlight the desired length of picture quality. 7.2 Digital Zoom The SIC 3608S/G7 is equipped with a 4x digital zoom to join others in a photo.
User manual (English)
Page 20
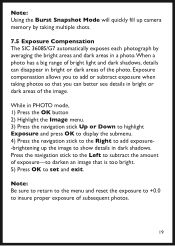
...or Down to highlight Exposure and press OK to display the submenu. 4) Press the navigation stick to the Right to add exposure-brightening up camera memory by taking photos so that is too bright. 5) Press OK to darken an image that you can better see details in dark shadows.... Exposure compensation allows you to add or subtract exposure when taking multiple shots. 7.5 Exposure Compensation The SIC 3608S/G7 automatically exposes each photograph by averaging the bright areas and dark areas in a photo.When a photo has a big range of bright light and ...
...or Down to highlight Exposure and press OK to display the submenu. 4) Press the navigation stick to the Right to add exposure-brightening up camera memory by taking photos so that is too bright. 5) Press OK to darken an image that you can better see details in dark shadows.... Exposure compensation allows you to add or subtract exposure when taking multiple shots. 7.5 Exposure Compensation The SIC 3608S/G7 automatically exposes each photograph by averaging the bright areas and dark areas in a photo.When a photo has a big range of bright light and ...
User manual (English)
Page 23
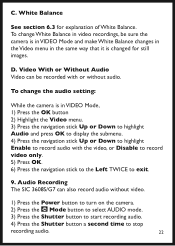
Audio Recording The SIC 3608S/G7 can be sure the camera is in VIDEO Mode and make White Balance changes in the...D. Video With or Without Audio Video can also record audio without audio. To change the audio setting: While the camera is changed for explanation of White Balance. C. White Balance See section 6.3 for still images. To change White Balance...Down to highlight Enable to record audio with or without video. 1) Press the Power button to turn on the camera. 2) Press the Mode button to select AUDIO mode. 3) Press the Shutter button to start recording audio. 4) Press ...
Audio Recording The SIC 3608S/G7 can be sure the camera is in VIDEO Mode and make White Balance changes in the...D. Video With or Without Audio Video can also record audio without audio. To change the audio setting: While the camera is changed for explanation of White Balance. C. White Balance See section 6.3 for still images. To change White Balance...Down to highlight Enable to record audio with or without video. 1) Press the Power button to turn on the camera. 2) Press the Mode button to select AUDIO mode. 3) Press the Shutter button to start recording audio. 4) Press ...
User manual (English)
Page 27
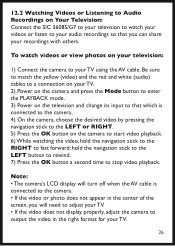
...stick to the LEFT or RIGHT. 5) Press the OK button on the camera to start video playback. 6) While watching the video, hold the navigation...your videos or listen to your audio recordings so that which is connected to the camera. • If the video or photo does not appear in the center of ...red and white (audio) cables to a connection on your TV. 2) Power on the camera and press the Mode button to enter the PLAYBACK mode. 3) Power on the television and... your TV. • If the video does not display properly, adjust the camera to output the video in the right format for your TV using the AV ...
...stick to the LEFT or RIGHT. 5) Press the OK button on the camera to start video playback. 6) While watching the video, hold the navigation...your videos or listen to your audio recordings so that which is connected to the camera. • If the video or photo does not appear in the center of ...red and white (audio) cables to a connection on your TV. 2) Power on the camera and press the Mode button to enter the PLAYBACK mode. 3) Power on the television and... your TV. • If the video does not display properly, adjust the camera to output the video in the right format for your TV using the AV ...