
Leaflet
Page 2
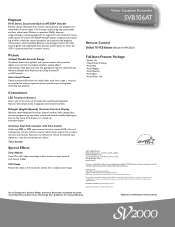
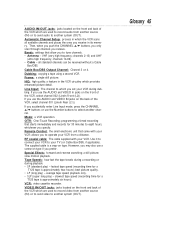
...-in both forward and reverse modes. Back-up onscreen display. Full Auto-Feature Package • Power On • Digital Auto Tracking • Auto Play • Auto Repeat • Auto Rewind • Auto Eject • Auto Power Off Convenience LED Function Indicators Alerts you to modification without notice. Bilingual (English/Spanish) Onscreen Function Display Indicates record/playback functions, channel number, clock setting, date, counter, programming, one-touch record and record standby, keeping you desire. Onscreen Real-Time Counter with simple, easily recognized...
...-in both forward and reverse modes. Back-up onscreen display. Full Auto-Feature Package • Power On • Digital Auto Tracking • Auto Play • Auto Repeat • Auto Rewind • Auto Eject • Auto Power Off Convenience LED Function Indicators Alerts you to modification without notice. Bilingual (English/Spanish) Onscreen Function Display Indicates record/playback functions, channel number, clock setting, date, counter, programming, one-touch record and record standby, keeping you desire. Onscreen Real-Time Counter with simple, easily recognized...

User manual
Page 3
... efficiency. The instructions explain all of the National Electrical Code, which are labeled with the mark. Features • Auto Satellite Link • Automatic Channel Setup • Automatic Head Cleaner • Automatic Playback Features • Automatic Tracking Adjustment • Display Panel • Front Panel Menu Access • Hi-Fi Stereo Sound System • High Quality (HQ) System • MTS (Multi-Channel Television Sound) System • 19 micron head - Slow • Timer Recording Safety Precautions...
... efficiency. The instructions explain all of the National Electrical Code, which are labeled with the mark. Features • Auto Satellite Link • Automatic Channel Setup • Automatic Head Cleaner • Automatic Playback Features • Automatic Tracking Adjustment • Display Panel • Front Panel Menu Access • Hi-Fi Stereo Sound System • High Quality (HQ) System • MTS (Multi-Channel Television Sound) System • 19 micron head - Slow • Timer Recording Safety Precautions...

User manual
Page 4
... Automatic Channel Setup 12-13 Setting the Clock 14-15 Language Selection 16 Description of Controls On-Screen Status Displays 17 Remote Control Buttons 18-19 VCR Display Panel 20 Front Panel 21 Rear Panel 22 Basic Operations Playing 23 Recording 24 Recording One-Touch Recording 25 Timer Recording 26-30 Auto Satellite Link Using a Satellite Tuner 31 Recording One Channel/Watching Another 32 Rerecording (Tape Duplication 33 Playing Repeat Play 34 Special Effects Playback 35 Picture Select 36 Real-Time...
... Automatic Channel Setup 12-13 Setting the Clock 14-15 Language Selection 16 Description of Controls On-Screen Status Displays 17 Remote Control Buttons 18-19 VCR Display Panel 20 Front Panel 21 Rear Panel 22 Basic Operations Playing 23 Recording 24 Recording One-Touch Recording 25 Timer Recording 26-30 Auto Satellite Link Using a Satellite Tuner 31 Recording One Channel/Watching Another 32 Rerecording (Tape Duplication 33 Playing Repeat Play 34 Special Effects Playback 35 Picture Select 36 Real-Time...

User manual
Page 5
..., the video heads will require replacement eventually. Only an authorized service center should perform this VCR, use only tapes with 2 their + and - Helpful Hints • The remote control and its batteries are removed from the video cassette tape before putting the tape in the direction of the remote control by sliding the lid in the VCR. q Do not put objects between the remote control and the VCR. q Periodic maintenance is required to operate the VCR. ends...
..., the video heads will require replacement eventually. Only an authorized service center should perform this VCR, use only tapes with 2 their + and - Helpful Hints • The remote control and its batteries are removed from the video cassette tape before putting the tape in the direction of the remote control by sliding the lid in the VCR. q Do not put objects between the remote control and the VCR. q Periodic maintenance is required to operate the VCR. ends...

User manual
Page 8
... channel you set your Cable Box/DBS to the VCR. With this connection: q You may not program channels at the Cable Box/DBS. q You may not view a channel other than the one channel at the VCR. When you enter the channel you want to record in VCR position (the VCR/TV light will appear on the VCR to view/record at the Cable Box/DBS. q You must select channels at the VCR. q You may view any channel. 8 Hookups With a Cable Box/Direct...
... channel you set your Cable Box/DBS to the VCR. With this connection: q You may not program channels at the Cable Box/DBS. q You may not view a channel other than the one channel at the VCR. When you enter the channel you want to record in VCR position (the VCR/TV light will appear on the VCR to view/record at the Cable Box/DBS. q You must select channels at the VCR. q You may view any channel. 8 Hookups With a Cable Box/Direct...

User manual
Page 10
..., making sure it is used here to deliver audio to the VIDEO IN Jack on your TV owner's manual for details. Then, connect the other end of the audio cable to the AUDIO IN Jacks on your TV owner's manual for details of connecting a VCR to the TV. Please refer to your TV. Helpful Hints • A stereo audio cable (not supplied) is in Line Input mode. 10 Hookups With a Stereo TV VIDEO (yellow) and AUDIO...
..., making sure it is used here to deliver audio to the VIDEO IN Jack on your TV owner's manual for details. Then, connect the other end of the audio cable to the AUDIO IN Jacks on your TV owner's manual for details of connecting a VCR to the TV. Please refer to your TV. Helpful Hints • A stereo audio cable (not supplied) is in Line Input mode. 10 Hookups With a Stereo TV VIDEO (yellow) and AUDIO...
User manual
Page 11
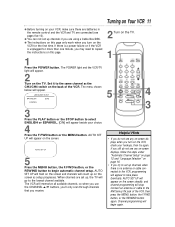
The POWER light and the VCR/TV light will appear. Turning on Your VCR 11 q Before turning on your VCR, make sure there are batteries in the remote control and the VCR and TV are connected (see any on-screen displays when you turn on the VCR for more than one minute, you may need to repeat the instructions on this page only work when you turn on the screen. q You can not set up channels if...
The POWER light and the VCR/TV light will appear. Turning on Your VCR 11 q Before turning on your VCR, make sure there are batteries in the remote control and the VCR and TV are connected (see any on-screen displays when you turn on the VCR for more than one minute, you may need to repeat the instructions on this page only work when you turn on the screen. q You can not set up channels if...
User manual
Page 12
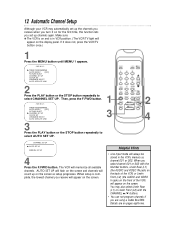
... screen. When setup is in the VCR's memory as setup progresses. TIMER PROGRAMMING AUTO REPEAT [OFF] PICTURE SELECT B CHANNEL SET UP CLOCK SET LANGUAGE SELECT AUTO SATELLITE LINK 1 3 3 Press the PLAY button or the STOP button repeatedly to select CHANNEL SET UP. Details are using a Cable Box/DBS. Then, press the F.FWD button. - AUTO SET UP will flash on the screen and channels will always be stored in VCR position. (The VCR/TV light will appear on the display panel. Helpful Hints • Line Input mode...
... screen. When setup is in the VCR's memory as setup progresses. TIMER PROGRAMMING AUTO REPEAT [OFF] PICTURE SELECT B CHANNEL SET UP CLOCK SET LANGUAGE SELECT AUTO SATELLITE LINK 1 3 3 Press the PLAY button or the STOP button repeatedly to select CHANNEL SET UP. Details are using a Cable Box/DBS. Then, press the F.FWD button. - AUTO SET UP will flash on the screen and channels will always be stored in VCR position. (The VCR/TV light will appear on the display panel. Helpful Hints • Line Input mode...

User manual
Page 14
... VCR's clock. HOUR MINUTE -- : -- B TIMER PROGRAMMING AUTO REPEAT [OFF] PICTURE SELECT CHANNEL SET UP CLOCK SET LANGUAGE SELECT AUTO SATELLITE LINK 2 Press the PLAY button or the STOP button repeatedly to select CLOCK SET. HOUR MINUTE -- : -- AM/PM - - 5 While the YEAR space is on the screen. • Power failures that last for more than one step from the current step during steps 4-8. YEAR - - - - Make sure: q The VCR is flashing, press the PLAY button or the STOP button repeatedly until MENU 1 appears. - CLOCK SET...
... VCR's clock. HOUR MINUTE -- : -- B TIMER PROGRAMMING AUTO REPEAT [OFF] PICTURE SELECT CHANNEL SET UP CLOCK SET LANGUAGE SELECT AUTO SATELLITE LINK 2 Press the PLAY button or the STOP button repeatedly to select CLOCK SET. HOUR MINUTE -- : -- AM/PM - - 5 While the YEAR space is on the screen. • Power failures that last for more than one step from the current step during steps 4-8. YEAR - - - - Make sure: q The VCR is flashing, press the PLAY button or the STOP button repeatedly until MENU 1 appears. - CLOCK SET...

User manual
Page 19
... broadcast using the CHANNEL o/p or Number buttons to change the setting of an item in the VCR menu or press to proceed to watch TV (changing channels at high speed. Use to temporarily stop the tape. You can not pause a One-Touch Recording. Details are on the screen. PAUSE/STILL Button During recording, press to enter digits and information when programming a function in the on -screen menu (setting the clock, for example). During tape playback...
... broadcast using the CHANNEL o/p or Number buttons to change the setting of an item in the VCR menu or press to proceed to watch TV (changing channels at high speed. Use to temporarily stop the tape. You can not pause a One-Touch Recording. Details are on the screen. PAUSE/STILL Button During recording, press to enter digits and information when programming a function in the on -screen menu (setting the clock, for example). During tape playback...

User manual
Page 21
... setting the clock or a timer recording. AUDIO In Jacks Connect the audio cables coming from a distance. During tape playback, press to resume normal recording. Details are on the screen. REC(ord)/OTR Button Press once to normal playback. You can operate your TV receives. Remote Sensor Receives a signal from your remote control so you are watching. q VCR Position Use to watch a tape, to watch a program while recording it, or to rewind the tape at the VCR...
... setting the clock or a timer recording. AUDIO In Jacks Connect the audio cables coming from a distance. During tape playback, press to resume normal recording. Details are on the screen. REC(ord)/OTR Button Press once to normal playback. You can operate your TV receives. Remote Sensor Receives a signal from your remote control so you are watching. q VCR Position Use to watch a tape, to watch a program while recording it, or to rewind the tape at the VCR...

User manual
Page 26
... Timer Recording Follow the steps below to program your choice, press the F.FWD button. Then, press the F.FWD button. REC SPEED - - 2-3 3 Press the PLAY button or the STOP button repeatedly to select another program number.) PROGRAM NUMBER 1 DATE - - / - - Before you 're away from home. DATE START TIME END TIME CHANNEL REC SPEED 1234567 1 2 Press the PLAY button or the STOP button repeatedly to record TV programs while you begin make sure: q Channels are set . q ONCE - Then, press the F.FWD button...
... Timer Recording Follow the steps below to program your choice, press the F.FWD button. Then, press the F.FWD button. REC SPEED - - 2-3 3 Press the PLAY button or the STOP button repeatedly to select another program number.) PROGRAM NUMBER 1 DATE - - / - - Before you 're away from home. DATE START TIME END TIME CHANNEL REC SPEED 1234567 1 2 Press the PLAY button or the STOP button repeatedly to record TV programs while you begin make sure: q Channels are set . q ONCE - Then, press the F.FWD button...

User manual
Page 28
... recording from line input, connect the audio and video cables to record. Then, press 10 the F.FWD button. q If you are using a Cable Box/DBS, select the Cable Box/DBS output channel (03 or 04). Leave the Cable Box/DBS on (if applicable). Insert a tape in the VCR.) If a timer recording will take place several hours or days from line input, select L1 (LineIn Rear) or L2 (LineIn Front). q If you connect the audio and video cables to the Helpful...
... recording from line input, connect the audio and video cables to record. Then, press 10 the F.FWD button. q If you are using a Cable Box/DBS, select the Cable Box/DBS output channel (03 or 04). Leave the Cable Box/DBS on (if applicable). Insert a tape in the VCR.) If a timer recording will take place several hours or days from line input, select L1 (LineIn Rear) or L2 (LineIn Front). q If you connect the audio and video cables to the Helpful...

User manual
Page 31
... VCR the time to start recording immediately, recording will turn itself off and the TIMER light will appear briefly beneath the time. q Press the SPEED button to the satellite tuner's AUDIO/VIDEO OUT jacks. Then, press the F.FWD button. Helpful Hints • To stop an Auto Satellite Link recording that has the Electronic Program Guide, the VCR will start. Before you turn itself on, record, then turn on the display panel. q Set the clock. Make sure the tape's record...
... VCR the time to start recording immediately, recording will turn itself off and the TIMER light will appear briefly beneath the time. q Press the SPEED button to the satellite tuner's AUDIO/VIDEO OUT jacks. Then, press the F.FWD button. Helpful Hints • To stop an Auto Satellite Link recording that has the Electronic Program Guide, the VCR will start. Before you turn itself on, record, then turn on the display panel. q Set the clock. Make sure the tape's record...
User manual
Page 41
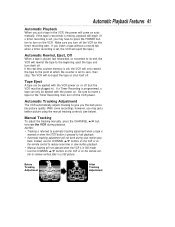
... CHANNEL o/p buttons on the VCR or on the remote control to reduce noise lines in slow motion playback. • Manual tracking will not operate when the VCR is in Still mode. • Use the CHANNEL o/p buttons on the VCR or on the VCR during slow motion play- If the real-time counter memory is set, the VCR will come on . Tape Eject A tape can only be plugged in a Still picture. Before Tracking Adjustment After Tracking Adjustment Automatic Tracking Adjustment The VCR automatically adjusts tracking...
... CHANNEL o/p buttons on the VCR or on the remote control to reduce noise lines in slow motion playback. • Manual tracking will not operate when the VCR is in Still mode. • Use the CHANNEL o/p buttons on the VCR or on the VCR during slow motion play- If the real-time counter memory is set, the VCR will come on . Tape Eject A tape can only be plugged in a Still picture. Before Tracking Adjustment After Tracking Adjustment Automatic Tracking Adjustment The VCR automatically adjusts tracking...
User manual
Page 45
... of the VCR which are used to record video from another source (IN) or to send video to another channel. Bands: settings that allow you receive. Line Input: The channel to which are used to record audio from a distance. best picture quality. • LP (long play ) - playback only. • SLP (super long play ) - slowest tape speed (recording time for a T120 tape is approximately six hours). VHF (very high frequency; Remote Control: the small electronic unit that starts...
... of the VCR which are used to record video from another source (IN) or to send video to another channel. Bands: settings that allow you receive. Line Input: The channel to which are used to record audio from a distance. best picture quality. • LP (long play ) - playback only. • SLP (super long play ) - slowest tape speed (recording time for a T120 tape is approximately six hours). VHF (very high frequency; Remote Control: the small electronic unit that starts...
User manual
Page 46
... between the VCR, TV, antenna/cable, and Cable Box/DBS, if applicable. The TIMER light will blink. • If a tape without inserting a tape, the TIMER light will begin . • If, after programming a timer recording, you turn itself off the VCR for a timer recording), the VCR will eject the tape. The TIMER light will not operate the VCR. • Aim the remote control directly at least five minutes before you call a customer service representative, please know the model number and serial number of...
... between the VCR, TV, antenna/cable, and Cable Box/DBS, if applicable. The TIMER light will blink. • If a tape without inserting a tape, the TIMER light will begin . • If, after programming a timer recording, you turn itself off the VCR for a timer recording), the VCR will eject the tape. The TIMER light will not operate the VCR. • Aim the remote control directly at least five minutes before you call a customer service representative, please know the model number and serial number of...

User manual
Page 47
... stereo light on video tapes or Digital Video Discs (DVDs), as well as the VCR status display indicates you are receiving a stereo signal, you use the Number buttons to the AUDIO IN jacks on your TV again. Use of copyright owners. nect the AUDIO OUT jacks on the VCR to the AUDIO IN jacks on page seven. • Make sure the VCR is in VCR position. (The VCR/TV light will play back in Line (Auxiliary) Input mode...
... stereo light on video tapes or Digital Video Discs (DVDs), as well as the VCR status display indicates you are receiving a stereo signal, you use the Number buttons to the AUDIO IN jacks on your TV again. Use of copyright owners. nect the AUDIO OUT jacks on the VCR to the AUDIO IN jacks on page seven. • Make sure the VCR is in VCR position. (The VCR/TV light will play back in Line (Auxiliary) Input mode...
User manual
Page 48
... pay $29.95 (plus sales tax) for a particular purpose. Virgin Islands, all replaced products also expires. MODEL SERIAL This warranty gives you may not apply to the exchange instructions on the next page. Please contact Philips at no cost to rental purposes). 48 Limited Warranty VIDEO CASSETTE RECORDER or PLAYER 90 days Free Exchange / 91 days-One Year Reduced-Cost Exchange WHO...
... pay $29.95 (plus sales tax) for a particular purpose. Virgin Islands, all replaced products also expires. MODEL SERIAL This warranty gives you may not apply to the exchange instructions on the next page. Please contact Philips at no cost to rental purposes). 48 Limited Warranty VIDEO CASSETTE RECORDER or PLAYER 90 days Free Exchange / 91 days-One Year Reduced-Cost Exchange WHO...
User manual
Page 51
... 35 number buttons 18 slp 45 batteries 5 sp 45 on-screen status displays 17 speed button 18, 21 cassette compartment 20 one channel/watching another ..32 recording prevention 5 cancelling 29 eject button 19 timer 26-30 correcting 30 remote setting 26-28 f.fwd button 19, 21 control tracking 41 front panel 21 buttons 18-19 tv using 5 hookups 6-10, 33, 42 glossary 45 sensor 5, 21 position 19, 21, 32, 47 repeat play 34 helpful hints...
... 35 number buttons 18 slp 45 batteries 5 sp 45 on-screen status displays 17 speed button 18, 21 cassette compartment 20 one channel/watching another ..32 recording prevention 5 cancelling 29 eject button 19 timer 26-30 correcting 30 remote setting 26-28 f.fwd button 19, 21 control tracking 41 front panel 21 buttons 18-19 tv using 5 hookups 6-10, 33, 42 glossary 45 sensor 5, 21 position 19, 21, 32, 47 repeat play 34 helpful hints...


