
Owner's Manual
Page 10
... Use the Map 29 Switching the current position screen display mode 29 How to view the map of the current location 29 Changing the scale of the map 32 Moving the map to the location you want to see 32 Chapter 3 Setting a Route to Your Destination Finding Your Destination by Selecting the Type of Facility 35 Searching for Points of Interest (POI) 35 Finding a POI in your favorite location 47 Registering a previous location in the Address Book 48 Editing a location's information 48 Deleting Address Book...
... Use the Map 29 Switching the current position screen display mode 29 How to view the map of the current location 29 Changing the scale of the map 32 Moving the map to the location you want to see 32 Chapter 3 Setting a Route to Your Destination Finding Your Destination by Selecting the Type of Facility 35 Searching for Points of Interest (POI) 35 Finding a POI in your favorite location 47 Registering a previous location in the Address Book 48 Editing a location's information 48 Deleting Address Book...

Owner's Manual
Page 11
... to XM Satellite Radio 82 Switching the XM channel select mode 83 Switching between the detail information dis- tion positions 61 Correcting the Installation Angle 62 Chapter 5 Customizing Your Navigation System Modifying the Default Settings 63 Items Users can Change 63 Volume 63 System Options 64 Short-Cut Selection 64 Map Display Options 65 Defined Locations 66 Demo Mode 66 Time 66 Modify Current Location 66 Hardware Info 66 Restore Factory Settings 67 Chapter 6 Using the...
... to XM Satellite Radio 82 Switching the XM channel select mode 83 Switching between the detail information dis- tion positions 61 Correcting the Installation Angle 62 Chapter 5 Customizing Your Navigation System Modifying the Default Settings 63 Items Users can Change 63 Volume 63 System Options 64 Short-Cut Selection 64 Map Display Options 65 Defined Locations 66 Demo Mode 66 Time 66 Modify Current Location 66 Hardware Info 66 Restore Factory Settings 67 Chapter 6 Using the...

Owner's Manual
Page 12
... 101 Changing the voice output of the navigation guidance 102 Switching the auto antenna setting 102 Other Functions 102 10 Setup adjustments 102 Setting the video input 102 Setting for rear view camera 102 Selecting the video of rear display 103 Switching the dimmer setting 103 Changing the Wide Screen Mode 104 Operating the Picture Adjustment 104 Adjusting the dimmer 105 Switching the Backlight On/Off 105 Appendix Installing the Program 107 Positioning Technology 109 Positioning by GPS...
... 101 Changing the voice output of the navigation guidance 102 Switching the auto antenna setting 102 Other Functions 102 10 Setup adjustments 102 Setting the video input 102 Setting for rear view camera 102 Selecting the video of rear display 103 Switching the dimmer setting 103 Changing the Wide Screen Mode 104 Operating the Picture Adjustment 104 Adjusting the dimmer 105 Switching the Backlight On/Off 105 Appendix Installing the Program 107 Positioning Technology 109 Positioning by GPS...
Owner's Manual
Page 13
... the driver's vision, (ii) impair the performance of any way from the safe operation of your vehicle. Please call 911. ❒ Route and guidance information displayed by yourself. Always obey current traffic restrictions, even if the navigation system provides contrary advice. ❒ Failure to input correct information about the local time may result in the navigation system providing improper routing and guidance instructions. ❒ Never set the volume...
... the driver's vision, (ii) impair the performance of any way from the safe operation of your vehicle. Please call 911. ❒ Route and guidance information displayed by yourself. Always obey current traffic restrictions, even if the navigation system provides contrary advice. ❒ Failure to input correct information about the local time may result in the navigation system providing improper routing and guidance instructions. ❒ Never set the volume...
Owner's Manual
Page 14
...-5901 For warranty information, please see the Limited Warranty sheet included with - Purchasing software upgrade Using the most accurate destination mapping. Receive updates on file to help you purchased the product for Pioneer products Please contact the dealer or distributor from being used while the vehicle is recommended that senses when the parking brake is set and when the vehicle is not available, please contact the...
...-5901 For warranty information, please see the Limited Warranty sheet included with - Purchasing software upgrade Using the most accurate destination mapping. Receive updates on file to help you purchased the product for Pioneer products Please contact the dealer or distributor from being used while the vehicle is recommended that senses when the parking brake is set and when the vehicle is not available, please contact the...
Owner's Manual
Page 16
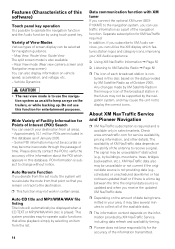
... XM Satellite Radio in the lineup or icon of the broadcast station in this software) Touch panel key operation It is to display the correct icons. Any changes made by the navigation system, and may not work in select markets. Features (Characteristics of this database as of January 2005. - Variety of View Modes Various types of screen display can use traffic information as an aid to change without notice. Map View, Route View, Guide View The split screen mode...
... XM Satellite Radio in the lineup or icon of the broadcast station in this software) Touch panel key operation It is to display the correct icons. Any changes made by the navigation system, and may not work in select markets. Features (Characteristics of this database as of January 2005. - Variety of View Modes Various types of screen display can use traffic information as an aid to change without notice. Map View, Route View, Guide View The split screen mode...

Owner's Manual
Page 21
... object. 6 Press the DEST button. sage and touch "OK". The map of the following features using the "Hardware Manual". • DVD-ROM loading slot • MAP button • DEST button • OPEN/CLOSE button 1 Start the engine. The LCD panel closes automatically. ❒ Make sure the DVD-ROM loading slot is reached, the set , it changes to route guidance mode. After you to assign a destination and begin route guidance. The LCD panel...
... object. 6 Press the DEST button. sage and touch "OK". The map of the following features using the "Hardware Manual". • DVD-ROM loading slot • MAP button • DEST button • OPEN/CLOSE button 1 Start the engine. The LCD panel closes automatically. ❒ Make sure the DVD-ROM loading slot is reached, the set , it changes to route guidance mode. After you to assign a destination and begin route guidance. The LCD panel...

Owner's Manual
Page 25
... the Guidance set to Route View or Guide View and enter a street not recorded on the map by touching the to the speed of the freeway • Way point (If this is very long, and passes through several cities or area, the screen for a new route or stay on the screen and voice information will be provided. NAVI/AV Chapter 1 Basic Operation • Touching the specifies the selected street and streets intersecting it...
... the Guidance set to Route View or Guide View and enter a street not recorded on the map by touching the to the speed of the freeway • Way point (If this is very long, and passes through several cities or area, the screen for a new route or stay on the screen and voice information will be provided. NAVI/AV Chapter 1 Basic Operation • Touching the specifies the selected street and streets intersecting it...

Owner's Manual
Page 29
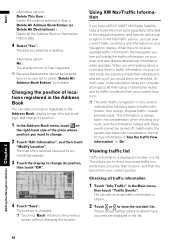
... ❒ "Edit Current Route", "View Current Route", and "Recalculate" can be used only when the GEXP10XMT* is provided by using menus. Traffic information only available for cities where information is connected to Use Menu Screens The basic operation of the screen. There are two types of your navigation system. 1 With the map displayed, press the DEST button. 2 To change to the menu you want to the map, press the MAP button. Active subscription to XM NavTraffic required to use , touch the...
... ❒ "Edit Current Route", "View Current Route", and "Recalculate" can be used only when the GEXP10XMT* is provided by using menus. Traffic information only available for cities where information is connected to Use Menu Screens The basic operation of the screen. There are two types of your navigation system. 1 With the map displayed, press the DEST button. 2 To change to the menu you want to the map, press the MAP button. Active subscription to XM NavTraffic required to use , touch the...
Owner's Manual
Page 52
...: No : The display shown in Step 3 appears. ❒ Because deleted data cannot be turned off. The position is shown. 2 Touch or to select "Delete All Address Book Entries" by mistake. Viewing traffic list Traffic Information is "On". The list with these events cannot be restored, take extra care not to view the incident list. Delete All Address Book Entries (or Delete All Destinations) : Delete all traffic information 1 Touch "Info/Traffic" in the list. When the unit receives updated traffic information, the Navigation system will automatically...
...: No : The display shown in Step 3 appears. ❒ Because deleted data cannot be turned off. The position is shown. 2 Touch or to select "Delete All Address Book Entries" by mistake. Viewing traffic list Traffic Information is "On". The list with these events cannot be restored, take extra care not to view the incident list. Delete All Address Book Entries (or Delete All Destinations) : Delete all traffic information 1 Touch "Info/Traffic" in the list. When the unit receives updated traffic information, the Navigation system will automatically...

Owner's Manual
Page 74
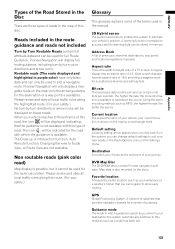
... as ERROR-11 may be played only by switching mode between playback of MP3/WMA/WAV files and audio data (CD-DA), playback starts at "Handling and Care of the Disc" in order of file number. This section describes common operations for these media. ❒ Also see any files in the folder. ❒ The maximum number of characters which can be displayed for a file...
... as ERROR-11 may be played only by switching mode between playback of MP3/WMA/WAV files and audio data (CD-DA), playback starts at "Handling and Care of the Disc" in order of file number. This section describes common operations for these media. ❒ Also see any files in the folder. ❒ The maximum number of characters which can be displayed for a file...
Owner's Manual
Page 103
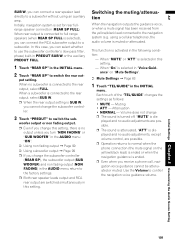
... change ❒ The sound is turned off, "MUTE" is set for rear fullrange speaker connection (REAR SP FULL). using an auxiliary amp. This function is muted or attenuated. Muting • ATT - When a subwoofer is connected to a subwoofer without using a cellular telephone), the audio volume is activated in the INITIAL menu. When "On" is SUB W, you receive a phone call, navigation voice guidance cannot be attenuated or muted. When rear output is connected...
... change ❒ The sound is turned off, "MUTE" is set for rear fullrange speaker connection (REAR SP FULL). using an auxiliary amp. This function is muted or attenuated. Muting • ATT - When a subwoofer is connected to a subwoofer without using a cellular telephone), the audio volume is activated in the INITIAL menu. When "On" is SUB W, you receive a phone call, navigation voice guidance cannot be attenuated or muted. When rear output is connected...

Owner's Manual
Page 115
... with Guide View or Route View, upon entering an unrecorded area the display automatically switches to Map View. (When the vehicle re-enters an area stored on the disc, the display returns to the destination. 113 NAVI/AV Appendix • If you join the road after starting driving immediately after driving around a traffic circle. • When starting the engine. • If you insert the disc and turn your navigation...
... with Guide View or Route View, upon entering an unrecorded area the display automatically switches to Map View. (When the vehicle re-enters an area stored on the disc, the display returns to the destination. 113 NAVI/AV Appendix • If you join the road after starting driving immediately after driving around a traffic circle. • When starting the engine. • If you insert the disc and turn your navigation...
Owner's Manual
Page 117
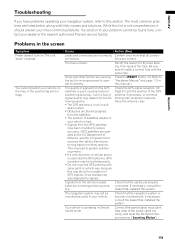
...; The GPS antenna is in the screen Symptom Power doesn't turn on the map or the positioning error is poor, causing reduced positioning accuracy. The quality of the power cable correctly, and reset the 3D Hybrid Sensor memory ("Learning Status"). 115 Noise and other factors are properly connected. Check that all connections are incorrectly connected. Connect the speed signal input (pink lead wire) of signals from the GPS satellites have problems operating your...
...; The GPS antenna is in the screen Symptom Power doesn't turn on the map or the positioning error is poor, causing reduced positioning accuracy. The quality of the power cable correctly, and reset the 3D Hybrid Sensor memory ("Learning Status"). 115 Noise and other factors are properly connected. Check that all connections are incorrectly connected. Connect the speed signal input (pink lead wire) of signals from the GPS satellites have problems operating your...

Owner's Manual
Page 118
Adjusting the volume of your vehicle at a safe place, and cut off ". Cause Action (See) The navigation system is selected. Check whether or not the reverse cle is misaligned after a U-turn the power to "Operating the Picture play " setting (➞ Page 65) and, if Night Display". the map display. Check the "Tracking Display" settings (➞ Page 65) and make sure "Nighttime" is installed with the VOL (+/-) button. desired, select "Daytime...
Adjusting the volume of your vehicle at a safe place, and cut off ". Cause Action (See) The navigation system is selected. Check whether or not the reverse cle is misaligned after a U-turn the power to "Operating the Picture play " setting (➞ Page 65) and, if Night Display". the map display. Check the "Tracking Display" settings (➞ Page 65) and make sure "Nighttime" is installed with the VOL (+/-) button. desired, select "Daytime...
Owner's Manual
Page 120
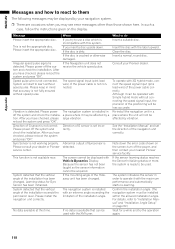
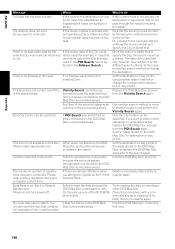
... check the installation. Gyro Sensor is detected. service center. System detected that can be used with 3D hybrid mode, connect the speed signal input (pink lead wire) of the installation exceeds the permission level. No data available at this system. If no data is not correct. Clean the disc. Consult your nearest Pioneer service facility. To operate with the XM tuner. See the "Installation Manual" and set incorrectly.
... check the installation. Gyro Sensor is detected. service center. System detected that can be used with 3D hybrid mode, connect the speed signal input (pink lead wire) of the installation exceeds the permission level. No data available at this system. If no data is not correct. Clean the disc. Consult your nearest Pioneer service facility. To operate with the XM tuner. See the "Installation Manual" and set incorrectly.
Owner's Manual
Page 122
... the route profile because the set destination or way points that house number does not exist on this disc. Insert the DVD Map Disc containing that contains the map data of the DVD-ROM drive is saved as a history. Automatically returning to make the route profile. Failed to list. The maximum number of the selected type. Failed to another search method or change the destination. Re-enter the...
... the route profile because the set destination or way points that house number does not exist on this disc. Insert the DVD Map Disc containing that contains the map data of the DVD-ROM drive is saved as a history. Automatically returning to make the route profile. Failed to list. The maximum number of the selected type. Failed to another search method or change the destination. Re-enter the...
Owner's Manual
Page 127
... map by -turn voice directions and arrow icons. Pioneer Navigation will be used for a variety of a TV screen. The Close-up of intersection function, Auto Reroute function, Changing the view to this type of road. Using the same encoding method (such as your current location is available). Map data is the width-to plot a navigable route. A regular display has an aspect ratio of previously searched destinations, way points and locations registered manually. Default setting A factory setting which the guidance is not available...
... map by -turn voice directions and arrow icons. Pioneer Navigation will be used for a variety of a TV screen. The Close-up of intersection function, Auto Reroute function, Changing the view to this type of road. Using the same encoding method (such as your current location is available). Map data is the width-to plot a navigable route. A regular display has an aspect ratio of previously searched destinations, way points and locations registered manually. Default setting A factory setting which the guidance is not available...
Hardware Manual
Page 5
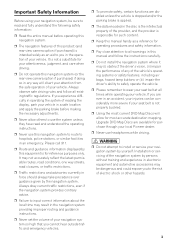
.... ❒ Do not operate this navigation system (or the rear view camera option if purchased) if doing so in any of the vehicle's operating systems or safety features, including air bags, hazard lamp buttons or (iii) impair the driver's ability to safely operate the vehicle. ❒ Please remember to wear your seat belt at all existing traffic regulations. Installation or servicing of electric shock or...
.... ❒ Do not operate this navigation system (or the rear view camera option if purchased) if doing so in any of the vehicle's operating systems or safety features, including air bags, hazard lamp buttons or (iii) impair the driver's ability to safely operate the vehicle. ❒ Please remember to wear your seat belt at all existing traffic regulations. Installation or servicing of electric shock or...

Other Manual
Page 27
..., double-check that all vehicle components that you previously removed. Press the RESET button on this product, be sure to the negative (-) terminal of a pen. 4. Start the engine. 3. Reassemble all connections are correct and that the vehicle is installed correctly. Enter the following settings: 1 Install the program in the navigation system. 2 Make any necessary installation angle adjustments. (Refer to "Correcting the installation angle" in a safe place, that this...
..., double-check that all vehicle components that you previously removed. Press the RESET button on this product, be sure to the negative (-) terminal of a pen. 4. Start the engine. 3. Reassemble all connections are correct and that the vehicle is installed correctly. Enter the following settings: 1 Install the program in the navigation system. 2 Make any necessary installation angle adjustments. (Refer to "Correcting the installation angle" in a safe place, that this...


