

Owner's Manual
Page 2
... 26 Basic operation Checking part names and functions 27 Adjusting the LCD panel angle 28 Inserting and ejecting a disc 28 - PIONEER AVIC-Z110BT - Rear view camera 23 Notes Before Using the System 23 - Data subject to User 9 License Agreement 10 - Inserting an SD memory card 29 - Unplugging a USB storage device 31 Connecting and disconnecting an iPod 31 - POI list) 35 Shortcut menu 35 - Please read the map screen 37 - Terms...
... 26 Basic operation Checking part names and functions 27 Adjusting the LCD panel angle 28 Inserting and ejecting a disc 28 - PIONEER AVIC-Z110BT - Rear view camera 23 Notes Before Using the System 23 - Data subject to User 9 License Agreement 10 - Inserting an SD memory card 29 - Unplugging a USB storage device 31 Connecting and disconnecting an iPod 31 - POI list) 35 Shortcut menu 35 - Please read the map screen 37 - Terms...

Owner's Manual
Page 4
... the phone book 87 Setting the "Bluetooth Settings" 87 - Answering an incoming call history 84 - Activating the MSN Direct function 67 Browsing gas prices 67 Browsing movie times 68 - Selecting traffic information to avoid traffic congestion 72 - Calling a number in the "Favorites" 85 - Making a phone call using missed call 86 - Updating the Bluetooth wireless technology software 89 Deleting a registered device 80 Connecting a registered Bluetooth device 80 Using hands-free phoning Displaying the Phone Menu 82 Making a phone call...
... the phone book 87 Setting the "Bluetooth Settings" 87 - Answering an incoming call history 84 - Activating the MSN Direct function 67 Browsing gas prices 67 Browsing movie times 68 - Selecting traffic information to avoid traffic congestion 72 - Calling a number in the "Favorites" 85 - Making a phone call using missed call 86 - Updating the Bluetooth wireless technology software 89 Deleting a registered device 80 Connecting a registered Bluetooth device 80 Using hands-free phoning Displaying the Phone Menu 82 Making a phone call...

Owner's Manual
Page 5
... - Adjusting the response positions of leads 92 - Tuning in strong signals 107 HD RadioäReception Reading the screen 108 Using the touch panel keys 108 - Customizing the regional settings 97 - Switching the reception mode 110 Playing audio CDs Reading the screen 111 Using the touch panel keys 111 Selecting a track from the list 114 Using the "Function" menu 114 Playing a DVD-Video Reading the screen 116 Using the touch panel keys 116 - Setting the illumination color...
... - Adjusting the response positions of leads 92 - Tuning in strong signals 107 HD RadioäReception Reading the screen 108 Using the touch panel keys 108 - Customizing the regional settings 97 - Switching the reception mode 110 Playing audio CDs Reading the screen 111 Using the touch panel keys 111 Selecting a track from the list 114 Using the "Function" menu 114 Playing a DVD-Video Reading the screen 116 Using the touch panel keys 116 - Setting the illumination color...
Owner's Manual
Page 8
... (light-emitting diode) backlight 201 Display information 202 - Handling the LCD screen 201 - Media compatibility chart 195 Bluetooth 198 About the SAT RADIO READY Logo 199 HD Radio Technology 199 SD and SDHC logo 199 WMA/WMV 199 DivX 199 AAC 200 Detailed information regarding connectable iPods 200 - iPod 200 - Settings Menu 202 Glossary 206 Specifications 209 How do GPS and "Dead Reckoning" work...
... (light-emitting diode) backlight 201 Display information 202 - Handling the LCD screen 201 - Media compatibility chart 195 Bluetooth 198 About the SAT RADIO READY Logo 199 HD Radio Technology 199 SD and SDHC logo 199 WMA/WMV 199 DivX 199 AAC 200 Detailed information regarding connectable iPods 200 - iPod 200 - Settings Menu 202 Glossary 206 Specifications 209 How do GPS and "Dead Reckoning" work...
Owner's Manual
Page 28
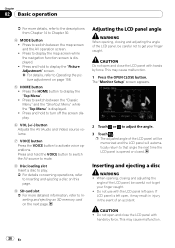
... malfunction. 1 Press the OPEN CLOSE button. Press to adjust the angle. 3 Touch . The "Monitor Setup" screen appears. 2 Touch or to switch between the map screen and the AV operation screen. ! Do not use with hands by force. Press and hold to turn off the screen display. 6 VOL (+/-) button Adjusts the AV (Audio and Video) source volume. 7 VOICE button Press the VOICE button to Operating the picture adjustment on the next page. If...
... malfunction. 1 Press the OPEN CLOSE button. Press to adjust the angle. 3 Touch . The "Monitor Setup" screen appears. 2 Touch or to switch between the map screen and the AV operation screen. ! Do not use with hands by force. Press and hold to turn off the screen display. 6 VOL (+/-) button Adjusts the AV (Audio and Video) source volume. 7 VOICE button Press the VOICE button to Operating the picture adjustment on the next page. If...

Owner's Manual
Page 47
... 43. 4 To finish the setting, touch [OK]. In the list displayed on screen, the items with an asterisk (*) show that setting. ! [On] (default): Switches from the audio screen when your vehicle approaches a guidance point such as an intersection while displaying a screen other than navigation. 1 Display the "Map Settings" screen. 2 Touch [AV Guide Mode]. Selecting "Quick Access" Select items to five items. 1 Display the "Map Settings" screen. 2 Touch [Quick Access...
... 43. 4 To finish the setting, touch [OK]. In the list displayed on screen, the items with an asterisk (*) show that setting. ! [On] (default): Switches from the audio screen when your vehicle approaches a guidance point such as an intersection while displaying a screen other than navigation. 1 Display the "Map Settings" screen. 2 Touch [AV Guide Mode]. Selecting "Quick Access" Select items to five items. 1 Display the "Map Settings" screen. 2 Touch [Quick Access...
Owner's Manual
Page 79
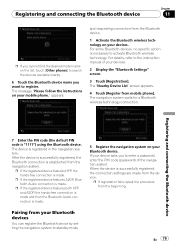
... mobile phone." If your device asks you want to the instruction manual of the navigation system. p If registration fails repeat the procedure from your devices. 2 Display the "Bluetooth Settings" screen. 3 Touch [Registration]. For some Bluetooth devices, no specific action is made . For details, refer to register. Registering and connecting the Bluetooth device 7 Enter the PIN code (the default PIN code is made and then the Bluetooth Audio connection is "1111") using the Bluetooth device. p If...
... mobile phone." If your device asks you want to the instruction manual of the navigation system. p If registration fails repeat the procedure from your devices. 2 Display the "Bluetooth Settings" screen. 3 Touch [Registration]. For some Bluetooth devices, no specific action is made . For details, refer to register. Registering and connecting the Bluetooth device 7 Enter the PIN code (the default PIN code is made and then the Bluetooth Audio connection is "1111") using the Bluetooth device. p If...

Owner's Manual
Page 89
... response. Using hands-free phoning Chapter 12 1 Display the "Bluetooth Settings" screen. 2 Touch [Clear Memory]. Clearing memory You can select the following items: ! On this navigation system's memory. p If you can clear the memory of each item that corresponds to clear memory that correspond to your PC. Updating the Bluetooth wireless technology software Update files will be available for steps until [Firmware update] becomes active. Follow the instructions on the...
... response. Using hands-free phoning Chapter 12 1 Display the "Bluetooth Settings" screen. 2 Touch [Clear Memory]. Clearing memory You can select the following items: ! On this navigation system's memory. p If you can clear the memory of each item that corresponds to clear memory that correspond to your PC. Updating the Bluetooth wireless technology software Update files will be available for steps until [Firmware update] becomes active. Follow the instructions on the...

Owner's Manual
Page 90
... phone number of the received call is selected on the phone. - If private mode is not registered in the phone book, the phone number of the received call to Inserting and ejecting an SD memory card on page 29. 2 Display the "Bluetooth Settings" screen. 3 Touch [Firmware update]. You may reduce the echo. ! Chapter 12 Using hands-free phoning 1 Insert an SD memory card into the SD card slot. = For more details of the operation...
... phone number of the received call is selected on the phone. - If private mode is not registered in the phone book, the phone number of the received call to Inserting and ejecting an SD memory card on page 29. 2 Display the "Bluetooth Settings" screen. 3 Touch [Firmware update]. You may reduce the echo. ! Chapter 12 Using hands-free phoning 1 Insert an SD memory card into the SD card slot. = For more details of the operation...
Owner's Manual
Page 98
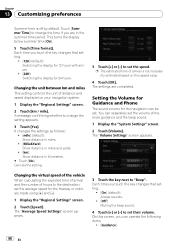
... the key changes that setting. ! [12H] (default): Switching the display for 12 hours with am/ pm. ! [24H]: Switching the display for the navigation can separately set their volume. Changing the virtual speed of the vehicle When calculating the expected time of arrival and the number of the route guidance and the beep sound. 1 Display the "System Settings" screen. 2 Touch [Volume]. Setting the Volume for Guidance and Phone The sound volume for...
... the key changes that setting. ! [12H] (default): Switching the display for 12 hours with am/ pm. ! [24H]: Switching the display for the navigation can separately set their volume. Changing the virtual speed of the vehicle When calculating the expected time of arrival and the number of the route guidance and the beep sound. 1 Display the "System Settings" screen. 2 Touch [Volume]. Setting the Volume for Guidance and Phone The sound volume for...

Owner's Manual
Page 100
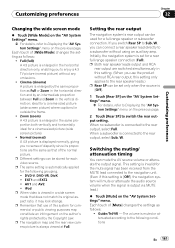
... Settings" screen appears. 3 Touch [Camera] to select the appropriate polarity setting. ! p You can switched between these 11 colors in [Polarity]. 1 Display the "System Settings" screen. 2 Touch [Back Camera]. When the polarity of the connected lead is negative while the shift lever is [On]. 4 Touch [Battery] or [GND] next to "Polarity" to turn off the engine while saving the adjusted position data. # Press the MODE button...
... Settings" screen appears. 3 Touch [Camera] to select the appropriate polarity setting. ! p You can switched between these 11 colors in [Polarity]. 1 Display the "System Settings" screen. 2 Touch [Back Camera]. When the polarity of the connected lead is negative while the shift lever is [On]. 4 Touch [Battery] or [GND] next to "Polarity" to turn off the engine while saving the adjusted position data. # Press the MODE button...
Owner's Manual
Page 117
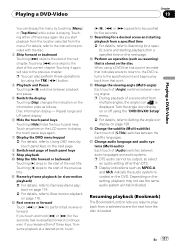
... a selected scene the next time the disc is stored on the disc When using the TRK (c/d) button. 4 Playback and Pause Touching [f] switches between audio languages and audio systems. p DTS audio cannot be output, so select an audio setting other than DTS. Turn the angle icon display on the setting, playback may not use the same audio system as resuming) that is loaded. Depending on or off using the "DVD/DivX® Setup" menu...
... a selected scene the next time the disc is stored on the disc When using the TRK (c/d) button. 4 Playback and Pause Touching [f] switches between audio languages and audio systems. p DTS audio cannot be output, so select an audio setting other than DTS. Turn the angle icon display on the setting, playback may not use the same audio system as resuming) that is loaded. Depending on or off using the "DVD/DivX® Setup" menu...

Owner's Manual
Page 129
... playback resumes. Wide screen picture (16:9) is not fully operable, turn this function is dis- The picture is possible ! For details, refer to Displaying DVD/DivX® Setup menu on the previous page. 2 Touch [Parental Level]. 3 Touch [0] to [9] to input a four digit code number. 4 While the input number is possible (initial setting) ! En 129 Letter Box - Playback of discs for DVD-Video. p The parental lock level is registered, and...
... playback resumes. Wide screen picture (16:9) is not fully operable, turn this function is dis- The picture is possible ! For details, refer to Displaying DVD/DivX® Setup menu on the previous page. 2 Touch [Parental Level]. 3 Touch [0] to [9] to input a four digit code number. 4 While the input number is possible (initial setting) ! En 129 Letter Box - Playback of discs for DVD-Video. p The parental lock level is registered, and...
Owner's Manual
Page 161
... rear speaker leads output and RCA rear output are the same as Full or Zoom in a wide screen mode that use the product without using an auxiliary amp. When no sense of the normal picture. Switching the muting/ attenuation timing You can connect a rear speaker lead directly to a subwoofer without RCA rear output, this system for a full-range speaker or subwoofer connection. p Different settings can be stored for a rear full-range speaker connection (Full). EXT1 and EXT2 ! The volume...
... rear speaker leads output and RCA rear output are the same as Full or Zoom in a wide screen mode that use the product without using an auxiliary amp. When no sense of the normal picture. Switching the muting/ attenuation timing You can connect a rear speaker lead directly to a subwoofer without RCA rear output, this system for a full-range speaker or subwoofer connection. p Different settings can be stored for a rear full-range speaker connection (Full). EXT1 and EXT2 ! The volume...

Owner's Manual
Page 178
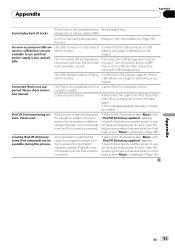
... factors are blocking signals from the GPS satellites have problems operating your dealer or the nearest authorized Pioneer service facility. Turn the ignition key back to install a correct fuse with the navigation screen Symptom Cause Action (Reference) The power doesn't turn off ". Such a loss of signals from the vehicle's speed Check that all connections are properly connected. Snow buildup can also degrade the...
... factors are blocking signals from the GPS satellites have problems operating your dealer or the nearest authorized Pioneer service facility. Turn the ignition key back to install a correct fuse with the navigation screen Symptom Cause Action (Reference) The power doesn't turn off ". Such a loss of signals from the vehicle's speed Check that all connections are properly connected. Snow buildup can also degrade the...

Owner's Manual
Page 179
... an echo. Check the connection. The screen is low. No sounds of the phone call cannot hear the conversation due to Select an appropriate AV source. duced. The volume level will be You cannot position your vehicle mounted securely in Before ejecting the disc, switch the source. Adjust the volume level. The volume of the phone call is misaligned after a U-turn or reversing. justed. Turn the volume up by the microphone...
... an echo. Check the connection. The screen is low. No sounds of the phone call cannot hear the conversation due to Select an appropriate AV source. duced. The volume level will be You cannot position your vehicle mounted securely in Before ejecting the disc, switch the source. Adjust the volume level. The volume of the phone call is misaligned after a U-turn or reversing. justed. Turn the volume up by the microphone...
Owner's Manual
Page 185
... screen (Music) until "iPod VR Dictionary updated" appears. • Switch the screen to another screen to operate iPod with this Use an iPod of the files cannot be played by DRM. maged. navigation system. Disconnect the cable from the iPod currently connected. Appendix Appendix Cannot play back all tracks All the files on USB con- USB devices are unavailable during this unit. Once iPod main menu is not compatible with voice commands from iPod. cable...
... screen (Music) until "iPod VR Dictionary updated" appears. • Switch the screen to another screen to operate iPod with this Use an iPod of the files cannot be played by DRM. maged. navigation system. Disconnect the cable from the iPod currently connected. Appendix Appendix Cannot play back all tracks All the files on USB con- USB devices are unavailable during this unit. Once iPod main menu is not compatible with voice commands from iPod. cable...

Installation Manual
Page 2
... the blue/white lead 7 Parts supplied 7 Connecting the system 8 Connecting the power cord (1) 10 Connecting the power cord (2) 12 When connecting to rear video output 17 When connecting the external video component 17 - Installation using a rear display connected to separately sold power amp 14 When connecting a rear view camera 16 When connecting the rear display 17 - Parts supplied 25 - Installation notes 23 - Using "AV1 Input" (AV1) 17 - Parts supplied 23 - Adjusting the microphone angle 27 When using the screw holes on the steering column 26 - Using "AV2 Input...
... the blue/white lead 7 Parts supplied 7 Connecting the system 8 Connecting the power cord (1) 10 Connecting the power cord (2) 12 When connecting to rear video output 17 When connecting the external video component 17 - Installation using a rear display connected to separately sold power amp 14 When connecting a rear view camera 16 When connecting the rear display 17 - Parts supplied 25 - Installation notes 23 - Using "AV1 Input" (AV1) 17 - Parts supplied 23 - Adjusting the microphone angle 27 When using the screw holes on the steering column 26 - Using "AV2 Input...

Installation Manual
Page 10
.../OFF. Not used. Note When a subwoofer is connected to this navigation system instead of a rear speaker, change the rear output setting in the Initial Setting. (Refer to speakers. Green Green/Black Violet Violet/Black Subwoofer (4 Ω) 2 10 En Do not connect anything to the speaker leads that are not connected to "Operation Manual".) The subwoofer output of this navigation system. Section 03 Connecting the System Connecting the power cord (1) Yellow...
.../OFF. Not used. Note When a subwoofer is connected to this navigation system instead of a rear speaker, change the rear output setting in the Initial Setting. (Refer to speakers. Green Green/Black Violet Violet/Black Subwoofer (4 Ω) 2 10 En Do not connect anything to the speaker leads that are not connected to "Operation Manual".) The subwoofer output of this navigation system. Section 03 Connecting the System Connecting the power cord (1) Yellow...

Installation Manual
Page 17
...video source while driving. External video component (sold separately) To video output To audio outputs When using a rear display connected to rear video output WARNING NEVER install the rear display in a location that enables the driver to "Operation Manual".) En 17 This navigation system's rear video output is necessary to set [AV1 Input] in [AV Settings] to [Video] when connecting the external video component. (For details, refer to watch the video source. Connecting the System When connecting the rear display The navigation unit Section 03 When connecting the external video...
...video source while driving. External video component (sold separately) To video output To audio outputs When using a rear display connected to rear video output WARNING NEVER install the rear display in a location that enables the driver to "Operation Manual".) En 17 This navigation system's rear video output is necessary to set [AV1 Input] in [AV Settings] to [Video] when connecting the external video component. (For details, refer to watch the video source. Connecting the System When connecting the rear display The navigation unit Section 03 When connecting the external video...


