
Owner's Manual
Page 2
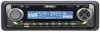
... this unit 3 About this Pioneer product. Please read through these operating instructions so you will know how to operate your unit from theft 4 • Removing the front panel 4 • Attaching the front panel 4 Use and care of the remote control (DEH-340) 5 • Installing the battery 5 • Using the remote control 5 What's what 6 Remote control (DEH-340) 7 Power ON/OFF Turning the unit on 7 Selecting a source 7 Turning the unit off 7 Tuner Listening to the radio 8 Storing and recalling broadcast frequencies 9 Tuning in...
... this unit 3 About this Pioneer product. Please read through these operating instructions so you will know how to operate your unit from theft 4 • Removing the front panel 4 • Attaching the front panel 4 Use and care of the remote control (DEH-340) 5 • Installing the battery 5 • Using the remote control 5 What's what 6 Remote control (DEH-340) 7 Power ON/OFF Turning the unit on 7 Selecting a source 7 Turning the unit off 7 Tuner Listening to the radio 8 Storing and recalling broadcast frequencies 9 Tuning in...
Owner's Manual
Page 3
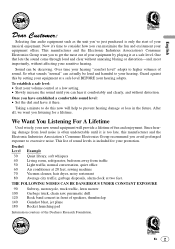
... audio equipment such as the unit you have established a comfortable sound level: • Set the dial and leave it there. One that lets the sound come through loud and clear without distortion. Taking a minute to do this manufacturer and the Electronic Industries Association's Consumer Electronics Group recommend you listening for your new sound equipment will help to higher volumes...
... audio equipment such as the unit you have established a comfortable sound level: • Set the dial and leave it there. One that lets the sound come through loud and clear without distortion. Taking a minute to do this manufacturer and the Electronic Industries Association's Consumer Electronics Group recommend you listening for your new sound equipment will help to higher volumes...

Owner's Manual
Page 4
... operation manual will be erased and must be sure to record this unit. Pioneer Electronics Service, Inc. We recommend that you purchased this page and in other information. After-sales service for after-sales service (including warranty conditions) or any other sections. Important The serial number is especially important that you familiarize yourself with the remote control (DEH-340). U.S.A. It is located...
... operation manual will be erased and must be sure to record this unit. Pioneer Electronics Service, Inc. We recommend that you purchased this page and in other information. After-sales service for after-sales service (including warranty conditions) or any other sections. Important The serial number is especially important that you familiarize yourself with the remote control (DEH-340). U.S.A. It is located...
Owner's Manual
Page 5
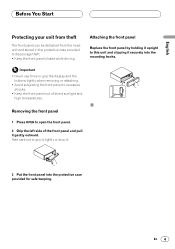
... the front panel into the mounting hooks. Important • Never use force or grip the display and the buttons tightly when removing or attaching. • Avoid subjecting the front panel to open the front panel. 2 Grip the left side of direct sunlight and high temperatures. Deutsch Français Italiano Nederlands En 4 Attaching the front panel Replace the front panel by holding it...
... the front panel into the mounting hooks. Important • Never use force or grip the display and the buttons tightly when removing or attaching. • Avoid subjecting the front panel to open the front panel. 2 Grip the left side of direct sunlight and high temperatures. Deutsch Français Italiano Nederlands En 4 Attaching the front panel Replace the front panel by holding it...

Owner's Manual
Page 6
... minus (-) poles pointing in the proper direction. pose of the battery in your country/area. 5 En CAUTION • Use only one CR2025 (3V) lithium battery. • Remove the battery if the remote control is not to operate. als. • In the event of battery leakage, wipe the remote control completely clean and install a new battery. • When disposing of used for a month or longer. •...
... minus (-) poles pointing in the proper direction. pose of the battery in your country/area. 5 En CAUTION • Use only one CR2025 (3V) lithium battery. • Remove the battery if the remote control is not to operate. als. • In the event of battery leakage, wipe the remote control completely clean and install a new battery. • When disposing of used for a month or longer. •...

Owner's Manual
Page 7
Also used for controlling functions. 6 LOUDNESS button Press to switch loudness function on or off . Press to cycle through all of the available sources. 0 EQ button Press to select among three FM and one AM band and cancel the control mode of functions. 8 1-6 (PRESET TUNING) buttons Press for preset tuning. 9 SOURCE button This unit is switched on by selecting a source. VOLUME Rotate to increase or decrease the volume. = CLOCK button Press to do manual seek tuning, fast forward, reverse and...
Also used for controlling functions. 6 LOUDNESS button Press to switch loudness function on or off . Press to cycle through all of the available sources. 0 EQ button Press to select among three FM and one AM band and cancel the control mode of functions. 8 1-6 (PRESET TUNING) buttons Press for preset tuning. 9 SOURCE button This unit is switched on by selecting a source. VOLUME Rotate to increase or decrease the volume. = CLOCK button Press to do manual seek tuning, fast forward, reverse and...

Owner's Manual
Page 8
... once to pause play. $ TUNER button Press once to select a tuner. % ATT button Press to page 10). Press SOURCE repeatedly to switch between the following sources: Built-in CD player-Tuner Notes • When no disc is set in this product, built-in this unit (refer to quickly lower the volume level, by about the operation of each button with the exception of the head unit is turned on the head unit. button Raise or...
... once to pause play. $ TUNER button Press once to select a tuner. % ATT button Press to page 10). Press SOURCE repeatedly to switch between the following sources: Built-in CD player-Tuner Notes • When no disc is set in this product, built-in this unit (refer to quickly lower the volume level, by about the operation of each button with the exception of the head unit is turned on the head unit. button Raise or...
Owner's Manual
Page 9
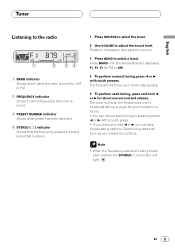
..., AM or FM. 2 FREQUENCY indicator Shows to which frequency the tuner is tuned. 3 PRESET NUMBER indicator Shows what preset has been selected. 4 STEREO () indicator Shows that the frequency selected is being broadcast in stereo. 1 Press SOURCE to select the tuner. 2 Use VOLUME to select a band. Press BAND until a broadcast strong enough for about one second and release. Rotate to increase or decrease the volume. 3 Press BAND to adjust the sound level.
..., AM or FM. 2 FREQUENCY indicator Shows to which frequency the tuner is tuned. 3 PRESET NUMBER indicator Shows what preset has been selected. 4 STEREO () indicator Shows that the frequency selected is being broadcast in stereo. 1 Press SOURCE to select the tuner. 2 Use VOLUME to select a band. Press BAND until a broadcast strong enough for about one second and release. Rotate to increase or decrease the volume. 3 Press BAND to adjust the sound level.
Owner's Manual
Page 10
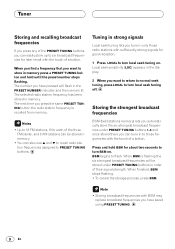
... broadcast frequencies under PRESET TUNING buttons in memory. The selected radio station frequency has been stored in order of their signal strength. Tuning in the PRESET NUMBER indicator and then remain lit. While BSM is recalled from memory. Note • Storing broadcast frequencies with the touch of a button. The number you have pressed will be stored in only those frequencies with BSM may replace broadcast frequencies you have saved using PRESET TUNING...
... broadcast frequencies under PRESET TUNING buttons in memory. The selected radio station frequency has been stored in order of their signal strength. Tuning in the PRESET NUMBER indicator and then remain lit. While BSM is recalled from memory. Note • Storing broadcast frequencies with the touch of a button. The number you have pressed will be stored in only those frequencies with BSM may replace broadcast frequencies you have saved using PRESET TUNING...
Owner's Manual
Page 11
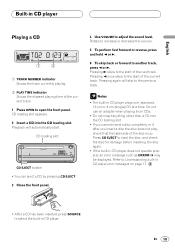
... loading slot CD EJECT button • You can eject a CD by pressing CD EJECT. 3 Close the front panel. 4 Use VOLUME to the start . Pressing 3 skips to adjust the sound level. Notes • The built-in CD player plays one, standard, 12-cm or 8-cm (single) CD at a time. Deutsch Français Italiano Nederlands • After a CD has been inserted, press SOURCE to the...
... loading slot CD EJECT button • You can eject a CD by pressing CD EJECT. 3 Close the front panel. 4 Use VOLUME to the start . Pressing 3 skips to adjust the sound level. Notes • The built-in CD player plays one, standard, 12-cm or 8-cm (single) CD at a time. Deutsch Français Italiano Nederlands • After a CD has been inserted, press SOURCE to the...
Owner's Manual
Page 12
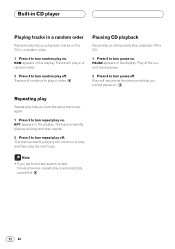
...player Playing tracks in a random order Random play lets you play back tracks on the CD in a random order. 1 Press 4 to turn random play on . Play of the CD. 1 Press 6 to turn pause on . Repeating play Repeat play lets you temporarily stop playback of the current track pauses. 2 Press 6 to turn pause off. Note • If you turned... over again. 1 Press 5 to play and then play off . The track presently playing will play in the display. RDM appears in a random order. 2 Press 4 to play off . Tracks will continue to turn random play in order. Tracks will resume at...
...player Playing tracks in a random order Random play lets you play back tracks on the CD in a random order. 1 Press 4 to turn random play on . Play of the CD. 1 Press 6 to turn pause on . Repeating play Repeat play lets you temporarily stop playback of the current track pauses. 2 Press 6 to turn pause off. Note • If you turned... over again. 1 Press 5 to play and then play off . The track presently playing will play in the display. RDM appears in a random order. 2 Press 4 to play off . Tracks will continue to turn random play in order. Tracks will resume at...
Owner's Manual
Page 13
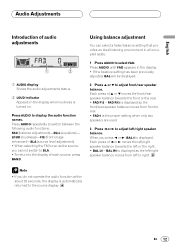
... enhancer)-SLA (source level adjustment) • When selecting the FM tuner as the front/rear speaker balance moves from left to right. Each press of 2 or 3 moves the left /right speaker balance. Using balance adjustment You can select a fader/balance setting that provides an ideal listening environment in the display when loudness is the proper setting when only two speakers are used. 3 Press 2 or 3 to adjust left /right speaker balance towards the front...
... enhancer)-SLA (source level adjustment) • When selecting the FM tuner as the front/rear speaker balance moves from left to right. Each press of 2 or 3 moves the left /right speaker balance. Using balance adjustment You can select a fader/balance setting that provides an ideal listening environment in the display when loudness is the proper setting when only two speakers are used. 3 Press 2 or 3 to adjust left /right speaker balance towards the front...
Owner's Manual
Page 14
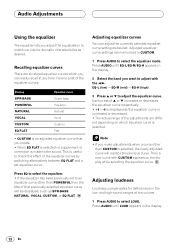
... low volume. 1 Press AUDIO to select the equalizer mode. Then a new curve with the 2/3. Adjusting loudness Loudness compensates for deficiencies in the display. 13 En Recalling equalizer curves There are memorized in the display. 2 Select the band you make adjustments when a curve other than CUSTOM is an adjusted equalizer curve that previously selected equalizer curve will replace the previous curve. Adjusted equalizer curve settings are six stored equalizer curves which equalizer curve...
... low volume. 1 Press AUDIO to select the equalizer mode. Then a new curve with the 2/3. Adjusting loudness Loudness compensates for deficiencies in the display. 13 En Recalling equalizer curves There are memorized in the display. 2 Select the band you make adjustments when a curve other than CUSTOM is an adjusted equalizer curve that previously selected equalizer curve will replace the previous curve. Adjusted equalizer curve settings are six stored equalizer curves which equalizer curve...

Owner's Manual
Page 15
... all frequencies, not just bass sounds. function is deactivated, the rear speakers output sound of enhancing front imaging by press- and high-range frequency output from the rear speakers, limiting their output to cut. Press AUDIO until SLA appears in the display. 3 Press 5 or ∞ to adjust the source volume. Notes • After switching the F.I .E. function OFF when using a 2speaker system. Press AUDIO until FIE appears in volume when switching between sources. • Settings are balanced. • Switch...
... all frequencies, not just bass sounds. function is deactivated, the rear speakers output sound of enhancing front imaging by press- and high-range frequency output from the rear speakers, limiting their output to cut. Press AUDIO until SLA appears in the display. 3 Press 5 or ∞ to adjust the source volume. Notes • After switching the F.I .E. function OFF when using a 2speaker system. Press AUDIO until FIE appears in volume when switching between sources. • Settings are balanced. • Switch...
Owner's Manual
Page 16
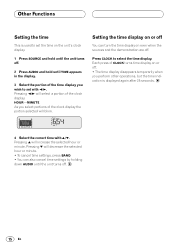
... Functions Setting the time This is displayed again after 25 seconds. 4 Select the correct time with 2/3. Pressing 2/3 will select a portion of CLOCK turns time display on or off . Press CLOCK to set the time on the unit's clock display. 1 Press SOURCE and hold until the unit turns off. 2 Press AUDIO and hold until the unit turns off. 15 En Each press of the clock display: HOUR-MINUTE As you perform other operations, but the time indication is used...
... Functions Setting the time This is displayed again after 25 seconds. 4 Select the correct time with 2/3. Pressing 2/3 will select a portion of CLOCK turns time display on or off . Press CLOCK to set the time on the unit's clock display. 1 Press SOURCE and hold until the unit turns off. 2 Press AUDIO and hold until the unit turns off. 15 En Each press of the clock display: HOUR-MINUTE As you perform other operations, but the time indication is used...

Owner's Manual
Page 17
... clean dirt from the center of direct sunlight and do not expose the discs to high temperatures. • Do not attach labels, write on components inside this CD player due to not operate properly. English Español Additional Information CD player and care • Use only CDs that have the Compact Disc Digital Audio marks as shown below.
... clean dirt from the center of direct sunlight and do not expose the discs to high temperatures. • Do not attach labels, write on components inside this CD player due to not operate properly. English Español Additional Information CD player and care • Use only CDs that have the Compact Disc Digital Audio marks as shown below.

Owner's Manual
Page 18
... Turn the ignition ON and OFF, or switch to a different source, then back to see what the problem is and the suggested method of correcting the problem. Additional Information Understanding built-in CD player error messages When problems occur during CD play an error message may appear on the display refer to the table below to the CD player. ERROR-11, 12, Scratched disc Replace disc...
... Turn the ignition ON and OFF, or switch to a different source, then back to see what the problem is and the suggested method of correcting the problem. Additional Information Understanding built-in CD player error messages When problems occur during CD play an error message may appear on the display refer to the table below to the CD player. ERROR-11, 12, Scratched disc Replace disc...

Owner's Manual
Page 19
... Equalizer): (LOW Level : ±12 dB (MID Level : ±12 dB (HIGH Level : ±12 dB Loudness contour (LOW 3.5 dB (100 Hz), +3 dB (10 kHz) (MID 10 dB (100 Hz), +6.5 dB (10 kHz) (HIGH 11 dB (100 Hz), +11dB (10 kHz) (volume : -30 dB) CD player System Compact disc audio system Usable discs Compact disc Signal format: Sampling frequency ... 44.1 kHz Number of channels .......... 2 (stereo) FM tuner Frequency...
... Equalizer): (LOW Level : ±12 dB (MID Level : ±12 dB (HIGH Level : ±12 dB Loudness contour (LOW 3.5 dB (100 Hz), +3 dB (10 kHz) (MID 10 dB (100 Hz), +6.5 dB (10 kHz) (HIGH 11 dB (100 Hz), +11dB (10 kHz) (volume : -30 dB) CD player System Compact disc audio system Usable discs Compact disc Signal format: Sampling frequency ... 44.1 kHz Number of channels .......... 2 (stereo) FM tuner Frequency...

Other Manual
Page 1
... being used with this unit must be sure to disconnect the ≠ battery cable before beginning installation. • Refer to 8 ohms. Connecting speakers with a 12-volt battery and negative grounding. Connect to CEMA cord colors. This Product Rear output Antenna jack Front output Yellow To terminal always supplied with insulating tape. Front speaker Left Rear speaker Front speaker Right Rear speaker Perform these connections when using a different amp (sold separately) System remote control + Front speaker ≠ Left + Rear speaker...
... being used with this unit must be sure to disconnect the ≠ battery cable before beginning installation. • Refer to 8 ohms. Connecting speakers with a 12-volt battery and negative grounding. Connect to CEMA cord colors. This Product Rear output Antenna jack Front output Yellow To terminal always supplied with insulating tape. Front speaker Left Rear speaker Front speaker Right Rear speaker Perform these connections when using a different amp (sold separately) System remote control + Front speaker ≠ Left + Rear speaker...

Other Manual
Page 4
... connected up properly, and the unit and the system work properly. • Use only the parts included with a groove downwards and attach it .) 2. for the front panel If you do not operate the Detaching and Replacing the Front Panel Function, use of unauthorized parts can be damaged if it overheats, so don't install the unit anywhere hot - Installation Note: • Before finally installing the unit, connect the wiring temporarily, making...
... connected up properly, and the unit and the system work properly. • Use only the parts included with a groove downwards and attach it .) 2. for the front panel If you do not operate the Detaching and Replacing the Front Panel Function, use of unauthorized parts can be damaged if it overheats, so don't install the unit anywhere hot - Installation Note: • Before finally installing the unit, connect the wiring temporarily, making...


