
Operation Manual
Page 2
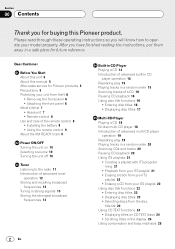
...-CD player operation 19 Repeating play 15 Playing tracks in a random order 15 Scanning tracks of a CD 16 Pausing CD playback 16 Using disc title functions 16 • Entering disc titles 16 • Displaying disc titles 17 Multi-CD Player Playing a CD 18 50-disc multi-CD player 18 Introduction of the remote control 8 • Installing the battery 8 • Using the remote control 9 About the XM READY mark 9 Power ON/OFF Turning the unit...
...-CD player operation 19 Repeating play 15 Playing tracks in a random order 15 Scanning tracks of a CD 16 Pausing CD playback 16 Using disc title functions 16 • Entering disc titles 16 • Displaying disc titles 17 Multi-CD Player Playing a CD 18 50-disc multi-CD player 18 Introduction of the remote control 8 • Installing the battery 8 • Using the remote control 9 About the XM READY mark 9 Power ON/OFF Turning the unit...
Operation Manual
Page 3
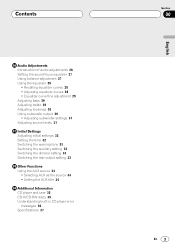
... Adjusting bass 29 Adjusting treble 30 Adjusting loudness 30 Using subwoofer output 30 • Adjusting subwoofer settings 31 Adjusting source levels 31 Initial Settings Adjusting initial settings 32 Setting the time 32 Switching the warning tone 33 Switching the auxiliary setting 33 Switching the dimmer setting 33 Switching the rear output setting 33 Other Functions Using the AUX source 34 • Selecting AUX as the source 34 • Setting the AUX title 34 Additional Information CD player and care 35 CD-R/CD-RW discs 35 Understanding built-in CD player error messages 36 Specifications...
... Adjusting bass 29 Adjusting treble 30 Adjusting loudness 30 Using subwoofer output 30 • Adjusting subwoofer settings 31 Adjusting source levels 31 Initial Settings Adjusting initial settings 32 Setting the time 32 Switching the warning tone 33 Switching the auxiliary setting 33 Switching the dimmer setting 33 Switching the rear output setting 33 Other Functions Using the AUX source 34 • Selecting AUX as the source 34 • Setting the AUX title 34 Additional Information CD player and care 35 CD-R/CD-RW discs 35 Understanding built-in CD player error messages 36 Specifications...

Operation Manual
Page 4
... and harmful to your new sound equipment will help to higher volumes of sound. One that lets the sound come through loud and clear without annoying blaring or distortion-and, most out of your volume control at a low setting. • Slowly increase the sound until it at a safe level BEFORE your protection. Selecting fine audio equipment such as the unit you've just purchased...
... and harmful to your new sound equipment will help to higher volumes of sound. One that lets the sound come through loud and clear without annoying blaring or distortion-and, most out of your volume control at a low setting. • Slowly increase the sound until it at a safe level BEFORE your protection. Selecting fine audio equipment such as the unit you've just purchased...
Operation Manual
Page 5
... sounds outside of the car. • Protect this product from this product's potential and to record this number on this page and in other areas may result in improper reception. In case the necessary information is located on this unit are allocated for Pioneer ...manual handy as a reference for the easiest possible use in other sections. All the functions have been designed for operating procedures and precautions. • Always keep the volume low enough so you begin using this unit. Use in North America. It is disconnected or discharged, the preset memory will help ...
... sounds outside of the car. • Protect this product from this product's potential and to record this number on this page and in other areas may result in improper reception. In case the necessary information is located on this unit are allocated for Pioneer ...manual handy as a reference for the easiest possible use in other sections. All the functions have been designed for operating procedures and precautions. • Always keep the volume low enough so you begin using this unit. Use in North America. It is disconnected or discharged, the preset memory will help ...

Operation Manual
Page 6
.... • If the front panel is not detached from the head unit within five seconds of direct sunlight and high temperatures. 3 Put the front panel into the mounting hooks. 6 En Removing the front panel 1 Press OPEN to this unit and clipping it securely into the protective case provided for safe keeping (DEH-P44). Attaching the front panel Replace the front panel by holding it upright to...
.... • If the front panel is not detached from the head unit within five seconds of direct sunlight and high temperatures. 3 Put the front panel into the mounting hooks. 6 En Removing the front panel 1 Press OPEN to this unit and clipping it securely into the protective case provided for safe keeping (DEH-P44). Attaching the front panel Replace the front panel by holding it upright to...

Operation Manual
Page 7
... used for preset tuning and disc number search when using a multi-CD player. 9 SOURCE button This unit is switched on or off. Press to cycle through all of functions. 8 1-6 (PRESET TUNING) buttons Press for controlling functions. 6 SFEQ button Press to select a natural sound with presence. 7 BAND/ESC button Press to select among three FM or AM bands and cancel the control mode of the available sources. 0 EQ button Press to turn. Rotate to increase or decrease the volume. = CLOCK button...
... used for preset tuning and disc number search when using a multi-CD player. 9 SOURCE button This unit is switched on or off. Press to cycle through all of functions. 8 1-6 (PRESET TUNING) buttons Press for controlling functions. 6 SFEQ button Press to select a natural sound with presence. 7 BAND/ESC button Press to select among three FM or AM bands and cancel the control mode of the available sources. 0 EQ button Press to turn. Rotate to increase or decrease the volume. = CLOCK button...
Operation Manual
Page 9
... nearest authorized Pioneer service station regarding the XM tuner that the Pioneer XM tuner (sold separately) can be controlled using this product. For operation of radio in direct sunlight. • Do not let the remote control fall onto the floor, where it to any other external unit. (Refer to coast. The system will create and package up to 100 channels of digital-quality music, news, sports...
... nearest authorized Pioneer service station regarding the XM tuner that the Pioneer XM tuner (sold separately) can be controlled using this product. For operation of radio in direct sunlight. • Do not let the remote control fall onto the floor, where it to any other external unit. (Refer to coast. The system will create and package up to 100 channels of digital-quality music, news, sports...
Operation Manual
Page 10
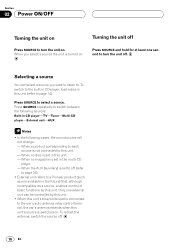
... basic functions by this unit. • When this unit's blue/white lead is connected to the car's auto-antenna relay control terminal, the car's antenna extends when this unit's source is not connected to this unit (refer to page 14). Selecting a source You can be controlled by this unit. - When a product corresponding to each source is switched on. To switch to the built-in CD player, load a disc in CD player-TV-Tuner-Multi-CD player-External unit-AUX...
... basic functions by this unit. • When this unit's blue/white lead is connected to the car's auto-antenna relay control terminal, the car's antenna extends when this unit's source is not connected to this unit (refer to page 14). Selecting a source You can be controlled by this unit. - When a product corresponding to each source is switched on. To switch to the built-in CD player, load a disc in CD player-TV-Tuner-Multi-CD player-External unit-AUX...
Operation Manual
Page 11
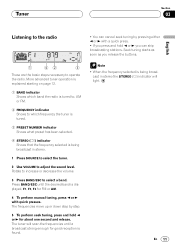
... stereo. 1 Press SOURCE to select the tuner. 2 Use VOLUME to adjust the sound level. More advanced tuner operation is explained starting on page 12. 1 BAND indicator Shows which band the radio is tuned to, AM or FM. 2 FREQUENCY indicator Shows to which frequency the tuner is tuned. 3 PRESET NUMBER indicator Shows what preset has been selected. 4 STEREO () indicator Shows that the frequency selected is being broadcast in stereo the STEREO () indicator will scan the frequencies...
... stereo. 1 Press SOURCE to select the tuner. 2 Use VOLUME to adjust the sound level. More advanced tuner operation is explained starting on page 12. 1 BAND indicator Shows which band the radio is tuned to, AM or FM. 2 FREQUENCY indicator Shows to which frequency the tuner is tuned. 3 PRESET NUMBER indicator Shows what preset has been selected. 4 STEREO () indicator Shows that the frequency selected is being broadcast in stereo the STEREO () indicator will scan the frequencies...
Operation Manual
Page 13
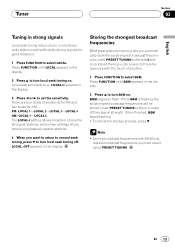
... the strongest stations, while lower settings let you receive progressively weaker stations. 4 When you tune in only those radio stations with the touch of a button. 1 Press FUNCTION to select BSM. There are four levels of their signal strength. BSM begins to set the sensitivity. Deutsch Français Italiano Nederlands En 13 Press FUNCTION until BSM appears in the display. 2 Press 5 to turn BSM on...
... the strongest stations, while lower settings let you receive progressively weaker stations. 4 When you tune in only those radio stations with the touch of a button. 1 Press FUNCTION to select BSM. There are four levels of their signal strength. BSM begins to set the sensitivity. Deutsch Français Italiano Nederlands En 13 Press FUNCTION until BSM appears in the display. 2 Press 5 to turn BSM on...
Operation Manual
Page 14
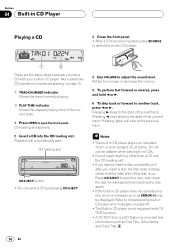
... EJECT. 4 Use VOLUME to the start of the current track. Section 04 Built-in CD Player Playing a CD 3 Close the front panel. • After a CD has been inserted, press SOURCE to select the built-in CD player. 1 2 These are the basic steps necessary to play , check that the label side of the disc is up. Pressing 3 skips to adjust the sound level. Do not use...
... EJECT. 4 Use VOLUME to the start of the current track. Section 04 Built-in CD Player Playing a CD 3 Close the front panel. • After a CD has been inserted, press SOURCE to select the built-in CD player. 1 2 These are the basic steps necessary to play , check that the label side of the disc is up. Pressing 3 skips to adjust the sound level. Do not use...
Operation Manual
Page 18
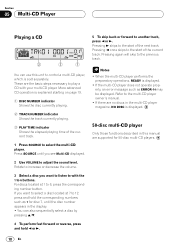
... volume. 3 Select a disc you see Multi-CD displayed. 2 Use VOLUME to the previous track. Pressing again will skip to adjust the sound level. Notes • When the multi-CD player performs the preparatory operations, READY is explained starting on page 19. 1 DISC NUMBER indicator Shows the disc currently playing. 2 TRACK NUMBER indicator Shows the track currently playing. 3 PLAY TIME indicator Shows the elapsed playing time of the current track. 1 Press SOURCE to select...
... volume. 3 Select a disc you see Multi-CD displayed. 2 Use VOLUME to the previous track. Pressing again will skip to adjust the sound level. Notes • When the multi-CD player performs the preparatory operations, READY is explained starting on page 19. 1 DISC NUMBER indicator Shows the disc currently playing. 2 TRACK NUMBER indicator Shows the track currently playing. 3 PLAY TIME indicator Shows the elapsed playing time of the current track. 1 Press SOURCE to select...
Operation Manual
Page 26
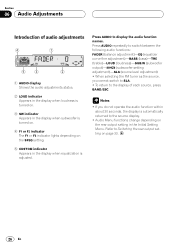
... to display the audio function names. Press AUDIO repeatedly to the source display. • Audio Menu functions change depending on the rear output setting in the display when equalization is automatically returned to switch between the following audio functions: FADER (balance adjustment)-EQ (equalizer curve fine adjustment)-BASS (bass)-TRE (treble)-LOUD (loudness)-SUB.W (subwoofer output)-80HZ0 (subwoofer setting adjustment)-SLA (source level adjustment) • When selecting the FM tuner as the source, you do not operate the audio function within about 30 seconds, the display is...
... to display the audio function names. Press AUDIO repeatedly to the source display. • Audio Menu functions change depending on the rear output setting in the display when equalization is automatically returned to switch between the following audio functions: FADER (balance adjustment)-EQ (equalizer curve fine adjustment)-BASS (bass)-TRE (treble)-LOUD (loudness)-SUB.W (subwoofer output)-80HZ0 (subwoofer setting adjustment)-SLA (source level adjustment) • When selecting the FM tuner as the source, you do not operate the audio function within about 30 seconds, the display is...
Operation Manual
Page 27
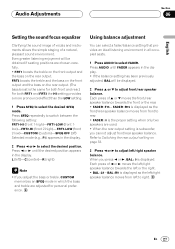
... select a fader/balance setting that provides an ideal listening environment in the display. 2 Press 2 or 3 to select FADER. Each press of 5 or ∞ moves the front/rear speaker balance towards the left /right speaker balance. FRT2 boosts the treble and the bass on the front output and the bass on the rear output. When you press 2 or 3, BAL : 0 is subwoofer, you adjust the bass or treble, CUSTOM memorizes an SFEQ mode...
... select a fader/balance setting that provides an ideal listening environment in the display. 2 Press 2 or 3 to select FADER. Each press of 5 or ∞ moves the front/rear speaker balance towards the left /right speaker balance. FRT2 boosts the treble and the bass on the front output and the bass on the rear output. When you press 2 or 3, BAL : 0 is subwoofer, you adjust the bass or treble, CUSTOM memorizes an SFEQ mode...

Operation Manual
Page 28
... in CD player and Multi-CD player are set equalizer curve. Press EQ to select the equalizer. • If the equalizer has been previously set to an equalizer curve other than POWERFUL then the title of the adjustments are memorized in CUSTOM1 or CUSTOM2. 1 Press AUDIO to select the equalizer mode. Each press of the equalizer curves: Display POWERFUL NATURAL VOCAL CUSTOM1, 2 EQ FLAT SUPER BASS Equalizer curve Powerful Natural Vocal...
... in CD player and Multi-CD player are set equalizer curve. Press EQ to select the equalizer. • If the equalizer has been previously set to an equalizer curve other than POWERFUL then the title of the adjustments are memorized in CUSTOM1 or CUSTOM2. 1 Press AUDIO to select the equalizer mode. Each press of the equalizer curves: Display POWERFUL NATURAL VOCAL CUSTOM1, 2 EQ FLAT SUPER BASS Equalizer curve Powerful Natural Vocal...
Operation Manual
Page 30
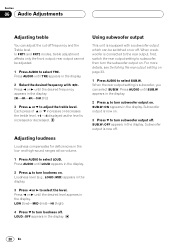
... select TRE. and high-sound ranges at low volume. 1 Press AUDIO to select SUB.W. LOUD :OFF appears in the low- When the rear output setting is increased or decreased. Using subwoofer output This unit is now off frequency and the Treble level. Press AUDIO until the desired frequency appears in the display. 2 Press 5 to turn the subwoofer output on or off. In FRT1 and FRT2 modes, treble adjustment affects only the front output: rear output cannot be switched on . Adjusting...
... select TRE. and high-sound ranges at low volume. 1 Press AUDIO to select SUB.W. LOUD :OFF appears in the low- When the rear output setting is increased or decreased. Using subwoofer output This unit is now off frequency and the Treble level. Press AUDIO until the desired frequency appears in the display. 2 Press 5 to turn the subwoofer output on or off. In FRT1 and FRT2 modes, treble adjustment affects only the front output: rear output cannot be switched on . Adjusting...
Operation Manual
Page 32
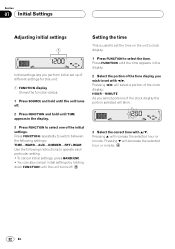
... this unit. 1 FUNCTION display Shows the function status. 1 Press SOURCE and hold until the time appears in the display. 3 Press FUNCTION to select the time. Pressing 5 will decrease the selected hour or minute. 32 En Setting the time This is used to set the time on the unit's clock display. 1 Press FUNCTION to select one of the initial settings. Press FUNCTION repeatedly to switch between the following settings: TIME-WARN-AUX-DIMMER-FRT+REAR Use the following instructions to operate each particular setting...
... this unit. 1 FUNCTION display Shows the function status. 1 Press SOURCE and hold until the time appears in the display. 3 Press FUNCTION to select the time. Pressing 5 will decrease the selected hour or minute. 32 En Setting the time This is used to set the time on the unit's clock display. 1 Press FUNCTION to select one of the initial settings. Press FUNCTION repeatedly to switch between the following settings: TIME-WARN-AUX-DIMMER-FRT+REAR Use the following instructions to operate each particular setting...

Operation Manual
Page 33
Switching the rear output setting This unit's rear output (rear speaker leads output and RCA rear output) can switch dimmer on and off with 5/∞. You can connect a rear speaker lead directly to a subwoofer without using auxiliary equipment connected to this warning tone. 1 Press FUNCTION to the subwoofer then FRT+S/W will be displayed (e.g., DIMMER :ON). Activate the auxiliary setting when using an auxiliary amp. • If you connect a subwoofer to the rear output, set to select WARN. Pressing 5/∞ will switch AUX between on or off and that status will be...
Switching the rear output setting This unit's rear output (rear speaker leads output and RCA rear output) can switch dimmer on and off with 5/∞. You can connect a rear speaker lead directly to a subwoofer without using auxiliary equipment connected to this warning tone. 1 Press FUNCTION to the subwoofer then FRT+S/W will be displayed (e.g., DIMMER :ON). Activate the auxiliary setting when using an auxiliary amp. • If you connect a subwoofer to the rear output, set to select WARN. Pressing 5/∞ will switch AUX between on or off and that status will be...
Operation Manual
Page 34
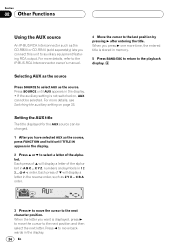
... details, see Switching the auxiliary setting on , AUX cannot be changed. 1 After you connect this unit to move backwards in the display. 2 Press 5 or ∞ to the next position and then select the next letter. C B A order. 3 Press 3 to auxiliary equipment featuring RCA output. Section 08 Other Functions Using the AUX source An IP-BUS-RCA Interconnector such as Z Y X ... Each press of the alphabet in memory. 5 Press BAND...
... details, see Switching the auxiliary setting on , AUX cannot be changed. 1 After you connect this unit to move backwards in the display. 2 Press 5 or ∞ to the next position and then select the next letter. C B A order. 3 Press 3 to auxiliary equipment featuring RCA output. Section 08 Other Functions Using the AUX source An IP-BUS-RCA Interconnector such as Z Y X ... Each press of the alphabet in memory. 5 Press BAND...
Operation Manual
Page 36
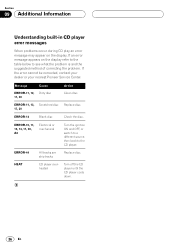
... correcting the problem. If the error cannot be corrected, contact your dealer or your nearest Pioneer Service Center. Section 09 Additional Information Understanding built-in CD player error messages When problems occur during CD play an error message may appear on the display refer to the table below to the CD player. Message Cause ERROR-11, 12, Dirty disc 17, 30 Action Clean disc. Replace disc.
... correcting the problem. If the error cannot be corrected, contact your dealer or your nearest Pioneer Service Center. Section 09 Additional Information Understanding built-in CD player error messages When problems occur during CD play an error message may appear on the display refer to the table below to the CD player. Message Cause ERROR-11, 12, Dirty disc 17, 30 Action Clean disc. Replace disc.


