Owner's Manual
Page 2
... Selection 22 - Eject - Disc Title Input (TITLE IN) Using Multi-CD Players 20 - ITS Programming (ITS) - Selecting Discs by Disc Title List (TITLE LIST) - Disc Loading Slot - Track Search and Fast Forward/Reverse - Disc Title Input (TITLE IN) - Contents Dear Customer 3 Key Finder 4 - Band - Preset Tuning Basic Operation of Tuner 11 - Disc Search - Disc Number Search (for CD TEXT compatible type 27 - Best Stations Memory (BSM) Using the Built-in CD Player 9 - Random Play (RANDOM) - Scan Play...
... Selection 22 - Eject - Disc Title Input (TITLE IN) Using Multi-CD Players 20 - ITS Programming (ITS) - Selecting Discs by Disc Title List (TITLE LIST) - Disc Loading Slot - Track Search and Fast Forward/Reverse - Disc Title Input (TITLE IN) - Contents Dear Customer 3 Key Finder 4 - Band - Preset Tuning Basic Operation of Tuner 11 - Disc Search - Disc Number Search (for CD TEXT compatible type 27 - Best Stations Memory (BSM) Using the Built-in CD Player 9 - Random Play (RANDOM) - Scan Play...
Owner's Manual
Page 3
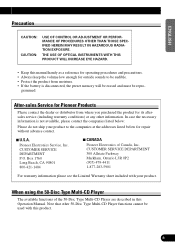
... Subwoofer Setting Adjustment (80HZ 0) - Source Level Adjustment (SLA) Detaching and Replacing the Front Panel 35 Theft Protection 35 - Switching the AUX Mode (AUX) - Detaching the Front Panel - Replacing the Front Panel - AUX Title Input Cellular Telephone Muting 42 CD Player and Care 43 Precaution 43 Built-in CD Player's Error Message 43 Specifications 44 DEUTSCH FRANÇAIS ITALIANO NEDERLANDS 2 Non Fading Output Level Adjustment (NON FAD) - Setting the Rear Speaker Lead and Subwoofer Controller (REAR SP) Other Functions 40 Using the PROGRAM Button...
... Subwoofer Setting Adjustment (80HZ 0) - Source Level Adjustment (SLA) Detaching and Replacing the Front Panel 35 Theft Protection 35 - Switching the AUX Mode (AUX) - Detaching the Front Panel - Replacing the Front Panel - AUX Title Input Cellular Telephone Muting 42 CD Player and Care 43 Precaution 43 Built-in CD Player's Error Message 43 Specifications 44 DEUTSCH FRANÇAIS ITALIANO NEDERLANDS 2 Non Fading Output Level Adjustment (NON FAD) - Setting the Rear Speaker Lead and Subwoofer Controller (REAR SP) Other Functions 40 Using the PROGRAM Button...
Owner's Manual
Page 4
... the future. Over time your musical enjoyment. So what sounds "normal" can maximize the fun and excitement your new sound equipment will help to do this manufacturer and the Electronic Industries Association's Consumer Electronics Group recommend you can actually be deceiving. Selecting fine audio equipment such as the unit you have established a comfortable sound level: • Set the dial and leave...
... the future. Over time your musical enjoyment. So what sounds "normal" can maximize the fun and excitement your new sound equipment will help to do this manufacturer and the Electronic Industries Association's Consumer Electronics Group recommend you can actually be deceiving. Selecting fine audio equipment such as the unit you have established a comfortable sound level: • Set the dial and leave...
Owner's Manual
Page 7
... Player The available functions of Canada, Inc. FRANÇAIS ITALIANO NEDERLANDS 6 Box 1760 Long Beach, CA 90801 800-421-1404 7 CANADA Pioneer Electronics of the 50-Disc Type Multi-CD Player are described in this manual handy as a reference for operating procedures and precautions. • Always keep the volume low enough for outside sounds to be audible. • Protect...
... Player The available functions of Canada, Inc. FRANÇAIS ITALIANO NEDERLANDS 6 Box 1760 Long Beach, CA 90801 800-421-1404 7 CANADA Pioneer Electronics of the 50-Disc Type Multi-CD Player are described in this manual handy as a reference for operating procedures and precautions. • Always keep the volume low enough for outside sounds to be audible. • Protect...
Owner's Manual
Page 8
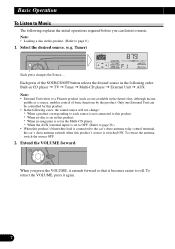
....) • When this product's blue/white lead is switched ON. Basic Operation To Listen to Music The following order: Built-in CD player = TV = Tuner = Multi-CD player = External Unit = AUX Note: • External Unit refers to the car's Auto-antenna relay control terminal, the car's Auto-antenna extends when this product's source is connected to a Pioneer product (such as a source, enables control of the SOURCE/OFF button selects the desired source in the following explains...
....) • When this product's blue/white lead is switched ON. Basic Operation To Listen to Music The following order: Built-in CD player = TV = Tuner = Multi-CD player = External Unit = AUX Note: • External Unit refers to the car's Auto-antenna relay control terminal, the car's Auto-antenna extends when this product's source is connected to a Pioneer product (such as a source, enables control of the SOURCE/OFF button selects the desired source in the following explains...
Owner's Manual
Page 12
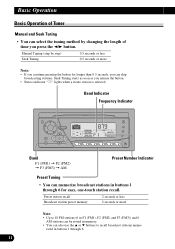
... Frequency Indicator Band F1 (FM1) = F2 (FM2) = F3 (FM3) = AM Preset Number Indicator Preset Tuning • You can skip broadcasting stations. Seek Tuning starts as soon as you can memorize broadcast stations in buttons 1 through 6 for longer than 0.5 seconds, you release the button. • Stereo indicator "" lights when a stereo station is selected. Basic Operation Basic Operation of time you press the 2/3 button. rized in buttons 1 through 6. 11 Preset station recall Broadcast station preset memory...
... Frequency Indicator Band F1 (FM1) = F2 (FM2) = F3 (FM3) = AM Preset Number Indicator Preset Tuning • You can skip broadcasting stations. Seek Tuning starts as soon as you can memorize broadcast stations in buttons 1 through 6 for longer than 0.5 seconds, you release the button. • Stereo indicator "" lights when a stereo station is selected. Basic Operation Basic Operation of time you press the 2/3 button. rized in buttons 1 through 6. 11 Preset station recall Broadcast station preset memory...
Owner's Manual
Page 13
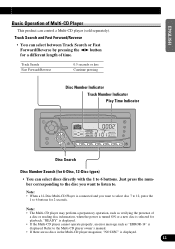
... the power is turned ON or a new disc is displayed. 12 Note: • The Multi-CD player may perform a preparatory operation, such as "ERROR-14" is connected and you want to select disc 7 to 12, press the 1 to the Multi-CD player owner's manual. • If there are no discs in the Multi-CD player magazine, "NO DISC" is selected for 6-Disc, 12-Disc types) • You can select discs directly with...
... the power is turned ON or a new disc is displayed. 12 Note: • The Multi-CD player may perform a preparatory operation, such as "ERROR-14" is connected and you want to select disc 7 to 12, press the 1 to the Multi-CD player owner's manual. • If there are no discs in the Multi-CD player magazine, "NO DISC" is selected for 6-Disc, 12-Disc types) • You can select discs directly with...

Owner's Manual
Page 14
... Function Menu The Function Menu lets you do not perform an operation within about 30 seconds, the Function Menu is lit in the display, it indicates that you are in the Function Menu, Detailed Setting Menu or Initial Setting Menu. You can switch between each source. When you're in the Audio Menu using button x on the head unit. These light to see which of these menus and between different modes in the Audio Menu. Basic Operation...
... Function Menu The Function Menu lets you do not perform an operation within about 30 seconds, the Function Menu is lit in the display, it indicates that you are in the Function Menu, Detailed Setting Menu or Initial Setting Menu. You can switch between each source. When you're in the Audio Menu using button x on the head unit. These light to see which of these menus and between different modes in the Audio Menu. Basic Operation...

Owner's Manual
Page 25
... remain in the Detailed Setting Menu. (Refer to page 15.) Note: • When playing a CD TEXT disc on a CD TEXT compatible Multi-CD player, you easily search for and select a desired disc for play. (You can store ITS program and Disc Title data for up to 100 discs in memory.) 1. Select the Disc Title Input mode (TITLE IN) in memory, even after the disc has been removed from the magazine...
... remain in the Detailed Setting Menu. (Refer to page 15.) Note: • When playing a CD TEXT disc on a CD TEXT compatible Multi-CD player, you easily search for and select a desired disc for play. (You can store ITS program and Disc Title data for up to 100 discs in memory.) 1. Select the Disc Title Input mode (TITLE IN) in memory, even after the disc has been removed from the magazine...
Owner's Manual
Page 29
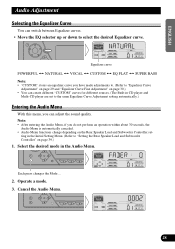
... up or down to "Setting the Rear Speaker Lead and Subwoofer Controller" on page 30.) • You can create different "CUSTOM" curves for different sources. (The Built-in CD player and Multi-CD player are set - Operate a mode. 3. Each press changes the Mode ... 2. ting in the Audio Menu. ENGLISH ESPAÑOL DEUTSCH Audio Adjustment Selecting the Equalizer Curve You can adjust the sound quality. Cancel the Audio Menu. 28 FRANÇAIS...
... up or down to "Setting the Rear Speaker Lead and Subwoofer Controller" on page 30.) • You can create different "CUSTOM" curves for different sources. (The Built-in CD player and Multi-CD player are set - Operate a mode. 3. Each press changes the Mode ... 2. ting in the Audio Menu. ENGLISH ESPAÑOL DEUTSCH Audio Adjustment Selecting the Equalizer Curve You can adjust the sound quality. Cancel the Audio Menu. 28 FRANÇAIS...
Owner's Manual
Page 30
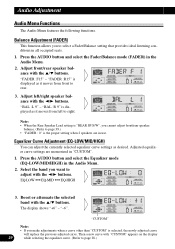
... Rear Speaker Lead setting is "REAR SP:S/W", you make adjustments when a curve other than "CUSTOM" is the proper setting when 2 speakers are memorized in the Audio Menu. 2. Press the AUDIO button and select the Equalizer mode (EQ-LOW/MID/HIGH) in use. "CUSTOM" Note: • If you cannot adjust front/rear speaker balance. (Refer to page 28.) Balance Adjustment (FADER) This function allows you want to adjust with "CUSTOM" appears on the display 29 while selecting...
... Rear Speaker Lead setting is "REAR SP:S/W", you make adjustments when a curve other than "CUSTOM" is the proper setting when 2 speakers are memorized in the Audio Menu. 2. Press the AUDIO button and select the Equalizer mode (EQ-LOW/MID/HIGH) in use. "CUSTOM" Note: • If you cannot adjust front/rear speaker balance. (Refer to page 28.) Balance Adjustment (FADER) This function allows you want to adjust with "CUSTOM" appears on the display 29 while selecting...
Owner's Manual
Page 32
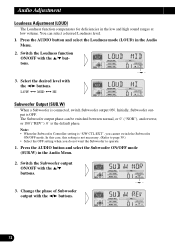
... setting is OFF. Change the phase of Subwoofer output with the 2/3 buttons. LOW += MID += HI "" Subwoofer Output (SUB.W) When a Subwoofer is the default phase. Press the AUDIO button and select the Subwoofer ON/OFF mode (SUB.W) in the Audio Menu. 2. Audio Adjustment Loudness Adjustment (LOUD) The Loudness function compensates for deficiencies in the low and high sound ranges at low volume. Select the desired level with the 2/3 buttons. 31 The Subwoofer output phase can select a desired Loudness level. 1. Switch the Subwoofer output ON...
... setting is OFF. Change the phase of Subwoofer output with the 2/3 buttons. LOW += MID += HI "" Subwoofer Output (SUB.W) When a Subwoofer is the default phase. Press the AUDIO button and select the Subwoofer ON/OFF mode (SUB.W) in the Audio Menu. 2. Audio Adjustment Loudness Adjustment (LOUD) The Loudness function compensates for deficiencies in the low and high sound ranges at low volume. Select the desired level with the 2/3 buttons. 31 The Subwoofer output phase can select a desired Loudness level. 1. Switch the Subwoofer output ON...

Owner's Manual
Page 33
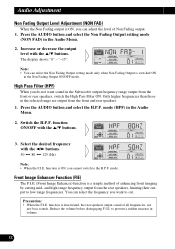
... output through this unit's low pass filter (for the Subwoofer), but is switched ON in the Subwoofer ON/OFF mode. Non Fading Output (NON FAD) When the Non Fading Output setting is ON, the audio signal does not pass through the RCA output. The display shows "+ 6" - Press the AUDIO button and select the Non Fading Output ON/OFF mode (NON FAD) in the Audio Menu. 2. Increase or decrease the output level...
... output through this unit's low pass filter (for the Subwoofer), but is switched ON in the Subwoofer ON/OFF mode. Non Fading Output (NON FAD) When the Non Fading Output setting is ON, the audio signal does not pass through the RCA output. The display shows "+ 6" - Press the AUDIO button and select the Non Fading Output ON/OFF mode (NON FAD) in the Audio Menu. 2. Increase or decrease the output level...
Owner's Manual
Page 34
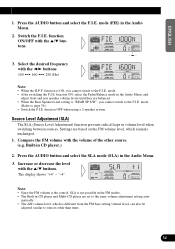
... deactivated, the rear speakers output sound of all frequencies, not just bass sounds. Press the AUDIO button and select the H.P.F. to the H.P.F. Select the desired frequency with the 5/∞ buttons. Reduce the volume before disengaging F.I .E. Note: • You can select the frequency you do not want to low-range frequencies. The display shows "0" - Only higher frequencies than those in the Audio Menu. 2. Switch the H.P.F. Press the AUDIO button and select the Non Fading Output setting mode (NON FAD...
... deactivated, the rear speakers output sound of all frequencies, not just bass sounds. Press the AUDIO button and select the H.P.F. to the H.P.F. Select the desired frequency with the 5/∞ buttons. Reduce the volume before disengaging F.I .E. Note: • You can select the frequency you do not want to low-range frequencies. The display shows "0" - Only higher frequencies than those in the Audio Menu. 2. Switch the H.P.F. Press the AUDIO button and select the Non Fading Output setting mode (NON FAD...
Owner's Manual
Page 35
Select the desired frequency with the 5/∞ buttons. 3. function ON, select the Fader/Balance mode in CD player and Multi-CD player are based on the FM volume level, which is "REAR SP:S/W", you cannot switch to the same volume adjustment setting auto- Settings are set to the F.I .E. function ON/OFF with the 2/3 buttons. 100 += 160 += 250 (Hz) "" Note: • When the H.P.F. Source Level Adjustment (SLA) The SLA (Source Level Adjustment) function prevents radical leaps in CD player.) 2. matically. •...
Select the desired frequency with the 5/∞ buttons. 3. function ON, select the Fader/Balance mode in CD player and Multi-CD player are based on the FM volume level, which is "REAR SP:S/W", you cannot switch to the same volume adjustment setting auto- Settings are set to the F.I .E. function ON/OFF with the 2/3 buttons. 100 += 160 += 250 (Hz) "" Note: • When the H.P.F. Source Level Adjustment (SLA) The SLA (Source Level Adjustment) function prevents radical leaps in CD player.) 2. matically. •...
Owner's Manual
Page 38
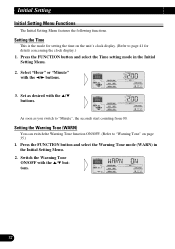
... FUNCTION button and select the Time setting mode in the Initial Setting Menu. 2. Setting the Warning Tone (WARN) You can switch the Warning Tone function ON/OFF. (Refer to "Minute", the seconds start counting from 00. Press the FUNCTION button and select the Warning Tone mode (WARN) in the Initial Setting Menu. 2. Setting the Time This is the mode for details concerning the clock display.) 1. Set as you switch to "Warning Tone" on the unit's clock display...
... FUNCTION button and select the Time setting mode in the Initial Setting Menu. 2. Setting the Warning Tone (WARN) You can switch the Warning Tone function ON/OFF. (Refer to "Minute", the seconds start counting from 00. Press the FUNCTION button and select the Warning Tone mode (WARN) in the Initial Setting Menu. 2. Setting the Time This is the mode for details concerning the clock display.) 1. Set as you switch to "Warning Tone" on the unit's clock display...
Owner's Manual
Page 39
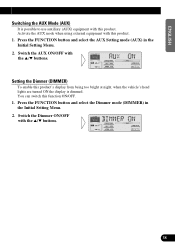
... vehicle's head lights are turned ON the display is possible to use auxiliary (AUX) equipment with this product. 1. You can switch this product. Press the FUNCTION button and select the Dimmer mode (DIMMER) in the Initial Setting Menu. 2. Switch the Dimmer ON/OFF with the 5/∞ buttons. ENGLISH ESPAÑOL DEUTSCH Switching the AUX Mode (AUX) It is dimmed. Activate the AUX mode when using external equipment with this function ON/OFF. 1. Press the FUNCTION button and select the AUX Setting mode (AUX) in...
... vehicle's head lights are turned ON the display is possible to use auxiliary (AUX) equipment with this product. 1. You can switch this product. Press the FUNCTION button and select the Dimmer mode (DIMMER) in the Initial Setting Menu. 2. Switch the Dimmer ON/OFF with the 5/∞ buttons. ENGLISH ESPAÑOL DEUTSCH Switching the AUX Mode (AUX) It is dimmed. Activate the AUX mode when using external equipment with this function ON/OFF. 1. Press the FUNCTION button and select the AUX Setting mode (AUX) in...
Owner's Manual
Page 40
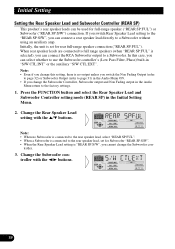
... range speakers (when "REAR SP:FUL" is connected to the factory settings. 1. Initial Setting Setting the Rear Speaker Lead and Subwoofer Controller (REAR SP) This product's rear speaker leads can be used for rear full-range speaker connection ("REAR SP:FUL"). Change the Rear Speaker Lead setting with the 2/3 buttons. 39 troller. 3. If you switch Rear Speaker Lead setting to the "REAR SP:S/W", you can connect the RCA Subwoofer output to a Subwoofer without using an auxiliary amp. Press the FUNCTION button and select the Rear Speaker Lead and Subwoofer Controller setting mode (REAR...
... range speakers (when "REAR SP:FUL" is connected to the factory settings. 1. Initial Setting Setting the Rear Speaker Lead and Subwoofer Controller (REAR SP) This product's rear speaker leads can be used for rear full-range speaker connection ("REAR SP:FUL"). Change the Rear Speaker Lead setting with the 2/3 buttons. 39 troller. 3. If you switch Rear Speaker Lead setting to the "REAR SP:S/W", you can connect the RCA Subwoofer output to a Subwoofer without using an auxiliary amp. Press the FUNCTION button and select the Rear Speaker Lead and Subwoofer Controller setting mode (REAR...
Owner's Manual
Page 41
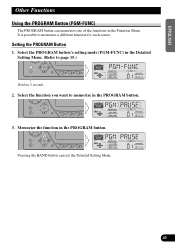
... NEDERLANDS Select the PROGRAM button's setting mode (PGM-FUNC) in the PROGRAM button. 3. Select the function you want to memorize a different function for 2 seconds 2. ENGLISH ESPAÑOL DEUTSCH Other Functions Using the PROGRAM Button (PGM-FUNC) The PROGRAM button can memorize one of the functions in the PROGRAM button. Memorize the function in the Function Menu. It is possible to memorize in the Detailed Setting Menu. (Refer to page 15.) Hold for each source.
... NEDERLANDS Select the PROGRAM button's setting mode (PGM-FUNC) in the PROGRAM button. 3. Select the function you want to memorize a different function for 2 seconds 2. ENGLISH ESPAÑOL DEUTSCH Other Functions Using the PROGRAM Button (PGM-FUNC) The PROGRAM button can memorize one of the functions in the PROGRAM button. Memorize the function in the Function Menu. It is possible to memorize in the Detailed Setting Menu. (Refer to page 15.) Hold for each source.
Owner's Manual
Page 43
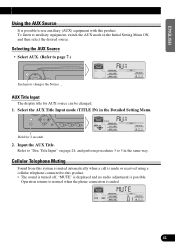
... turned off, "MUTE" is displayed and no audio adjustment is possible. Cellular Telephone Muting Sound from this product. Operation returns to 5 in the same way. Refer to "Disc Title Input" on page 24, and perform procedures 3 to normal when the phone connection is ended. 42 FRANÇAIS ITALIANO NEDERLANDS ENGLISH ESPAÑOL DEUTSCH Using the AUX Source It is possible to auxiliary equipment, switch the AUX mode...
... turned off, "MUTE" is displayed and no audio adjustment is possible. Cellular Telephone Muting Sound from this product. Operation returns to 5 in the same way. Refer to "Disc Title Input" on page 24, and perform procedures 3 to normal when the phone connection is ended. 42 FRANÇAIS ITALIANO NEDERLANDS ENGLISH ESPAÑOL DEUTSCH Using the AUX Source It is possible to auxiliary equipment, switch the AUX mode...


