

Owner's Manual
Page 2
...Subwoofer Output (SUB.W) - Subwoofer Setting Adjustment (80HZ 0) - Preset Tuning - Open - Disc Loading Slot - Erase a Track Program - Title Display Switching - High Pass Filter (HPF) - Track Search and Fast Forward/Reverse - Remote Controller Before Using This Product 5 About This Product 5 About This Manual 5 Important 5 Precaution 6 After-sales Service for Pioneer Products .......... 6 When using the 50-Disc Type Multi-CD Player 6 Remote Controller and Care 7 Using the Remote Controller 7 Battery 7 Basic Operation 8 To Listen to Music 8 Basic Operation of Tuner...
...Subwoofer Output (SUB.W) - Subwoofer Setting Adjustment (80HZ 0) - Preset Tuning - Open - Disc Loading Slot - Erase a Track Program - Title Display Switching - High Pass Filter (HPF) - Track Search and Fast Forward/Reverse - Remote Controller Before Using This Product 5 About This Product 5 About This Manual 5 Important 5 Precaution 6 After-sales Service for Pioneer Products .......... 6 When using the 50-Disc Type Multi-CD Player 6 Remote Controller and Care 7 Using the Remote Controller 7 Battery 7 Basic Operation 8 To Listen to Music 8 Basic Operation of Tuner...
Owner's Manual
Page 3
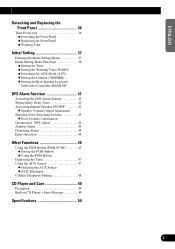
... Replacing the Front Panel 36 Theft Protection 36 - Setting the Warning Tone (WARN) - Setting the Rear Speaker Lead and Subwoofer Controller (REAR SP) DFS Alarm Function 41 Activating the DFS Alarm Feature 41 Setting Entry Delay Time 41 Activating Internal Speaker ON/OFF 42 - Using the PGM Button Displaying the Time 47 Using the AUX Source 47 - Warning Tone Initial Setting 37 Entering the Initial Setting Menu 37 Initial Setting Menu Functions 38 - Setting the Dimmer (DIMMER) - Speaker Volume Output Adjustment Selecting Door Switching Systems 43 - Selecting the AUX Source...
... Replacing the Front Panel 36 Theft Protection 36 - Setting the Warning Tone (WARN) - Setting the Rear Speaker Lead and Subwoofer Controller (REAR SP) DFS Alarm Function 41 Activating the DFS Alarm Feature 41 Setting Entry Delay Time 41 Activating Internal Speaker ON/OFF 42 - Using the PGM Button Displaying the Time 47 Using the AUX Source 47 - Warning Tone Initial Setting 37 Entering the Initial Setting Menu 37 Initial Setting Menu Functions 38 - Setting the Dimmer (DIMMER) - Speaker Volume Output Adjustment Selecting Door Switching Systems 43 - Selecting the AUX Source...
Owner's Manual
Page 7
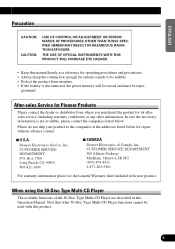
... product for repair without advance contact. 7 U.S.A. In case the necessary information is disconnected, the preset memory will be erased and must be repro- Box 1760 Long Beach, CA 90801 800-421-1404 7 CANADA Pioneer Electronics of the 50-Disc Type Multi-CD Player are described in this Operation Manual. When using the 50-Disc Type Multi-CD Player The available functions of...
... product for repair without advance contact. 7 U.S.A. In case the necessary information is disconnected, the preset memory will be erased and must be repro- Box 1760 Long Beach, CA 90801 800-421-1404 7 CANADA Pioneer Electronics of the 50-Disc Type Multi-CD Player are described in this Operation Manual. When using the 50-Disc Type Multi-CD Player The available functions of...
Owner's Manual
Page 9
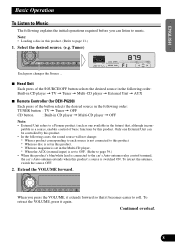
... this product's blue/white lead is connected to the car's Auto-antenna relay control terminal, the car's Auto-antenna extends when this product's source is set in this product. * When no magazine is switched ON. Extend the VOLUME forward. Tuner) Each press changes the Source ... 7 Head Unit Each press of the SOURCE/OFF button selects the desired source in the following order: Built-in CD player = TV = Tuner = Multi-CD player = External Unit = AUX 7 Remote Controller (for DEH-P6200) Each...
... this product's blue/white lead is connected to the car's Auto-antenna relay control terminal, the car's Auto-antenna extends when this product's source is set in this product. * When no magazine is switched ON. Extend the VOLUME forward. Tuner) Each press changes the Source ... 7 Head Unit Each press of the SOURCE/OFF button selects the desired source in the following order: Built-in CD player = TV = Tuner = Multi-CD player = External Unit = AUX 7 Remote Controller (for DEH-P6200) Each...
Owner's Manual
Page 14
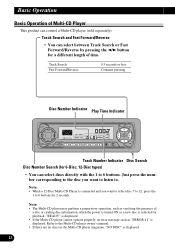
... can control a Multi-CD player (sold separately). Basic Operation Basic Operation of a disc or reading disc information, when the power is turned ON or a new disc is connected and you want to select disc 7 to 12, press the 1 to 6 buttons for 2 seconds. Note: • The Multi-CD player may perform a preparatory operation, such as "ERROR-14" is displayed. 13 Note: • When a 12-Disc Multi-CD Player is selected for...
... can control a Multi-CD player (sold separately). Basic Operation Basic Operation of a disc or reading disc information, when the power is turned ON or a new disc is connected and you want to select disc 7 to 12, press the 1 to 6 buttons for 2 seconds. Note: • The Multi-CD player may perform a preparatory operation, such as "ERROR-14" is displayed. 13 Note: • When a 12-Disc Multi-CD Player is selected for...
Owner's Manual
Page 30
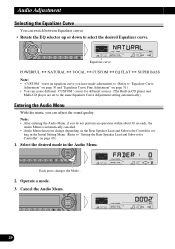
... down to "Setting the Rear Speaker Lead and Subwoofer Controller" on page 40.) 1. Operate a mode. 3. Select the desired mode in the Initial Setting Menu. (Refer to select the desired Equalizer curve. Audio Adjustment Selecting the Equalizer Curve You can create different "CUSTOM" curves for different sources. (The Built-in CD player and Multi-CD player are set - Equalizer curve POWERFUL Ô NATURAL Ô VOCAL Ô CUSTOM Ô EQ FLAT Ô SUPER BASS Note: •...
... down to "Setting the Rear Speaker Lead and Subwoofer Controller" on page 40.) 1. Operate a mode. 3. Select the desired mode in the Initial Setting Menu. (Refer to select the desired Equalizer curve. Audio Adjustment Selecting the Equalizer Curve You can create different "CUSTOM" curves for different sources. (The Built-in CD player and Multi-CD player are set - Equalizer curve POWERFUL Ô NATURAL Ô VOCAL Ô CUSTOM Ô EQ FLAT Ô SUPER BASS Note: •...
Owner's Manual
Page 31
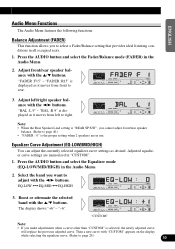
... DEUTSCH Audio Menu Functions The Audio Menu features the following functions. Note: • When the Rear Speaker Lead setting is "REAR SP:S/W", you make adjustments when a curve other than "CUSTOM" is displayed as desired. Adjusted equalizer curve settings are in all occupied seats. 1. Boost or attenuate the selected band with the 5/∞ buttons. Adjust front/rear speaker balance with the 5/∞ buttons. "FADER :R15" is selected, the newly adjusted curve will replace the previous adjusted curve. Equalizer Curve Adjustment...
... DEUTSCH Audio Menu Functions The Audio Menu features the following functions. Note: • When the Rear Speaker Lead setting is "REAR SP:S/W", you make adjustments when a curve other than "CUSTOM" is displayed as desired. Adjusted equalizer curve settings are in all occupied seats. 1. Boost or attenuate the selected band with the 5/∞ buttons. Adjust front/rear speaker balance with the 5/∞ buttons. "FADER :R15" is selected, the newly adjusted curve will replace the previous adjusted curve. Equalizer Curve Adjustment...
Owner's Manual
Page 33
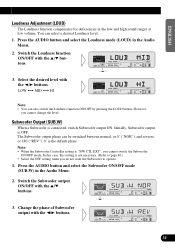
... cannot switch the Subwoofer ON/OFF mode. Note: • When the Subwoofer Controller setting is "S/W CTL:EXT", you cannot change the level. FRANÇAIS ITALIANO NEDERLANDS 32 Press the AUDIO button and select the Subwoofer ON/OFF mode (SUB.W) in the Audio Menu. 2. Press the AUDIO button and select the Loudness mode (LOUD) in the Audio Menu. 2. Change the phase of Subwoofer output with the 2/3 buttons. Switch the Loudness function ON/OFF with the 5/∞ buttons. The Subwoofer output phase...
... cannot switch the Subwoofer ON/OFF mode. Note: • When the Subwoofer Controller setting is "S/W CTL:EXT", you cannot change the level. FRANÇAIS ITALIANO NEDERLANDS 32 Press the AUDIO button and select the Subwoofer ON/OFF mode (SUB.W) in the Audio Menu. 2. Press the AUDIO button and select the Loudness mode (LOUD) in the Audio Menu. 2. Change the phase of Subwoofer output with the 2/3 buttons. Switch the Loudness function ON/OFF with the 5/∞ buttons. The Subwoofer output phase...

Owner's Manual
Page 34
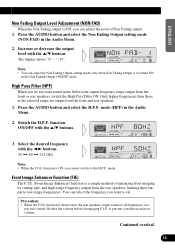
... the AUDIO button and select the Non Fading Output ON/OFF mode (NON FAD) in the Audio Menu. 2. Note: • You can select the Subwoofer setting mode only when Subwoofer output is ON, you can adjust the cut-off frequency and the output level of Subwoofer. 1. Note: • When the Subwoofer Controller setting is output through this unit's low pass filter (for the Subwoofer), but is only "S/W CTL:EXT", you can switch the Non Fading Output...
... the AUDIO button and select the Non Fading Output ON/OFF mode (NON FAD) in the Audio Menu. 2. Note: • You can select the Subwoofer setting mode only when Subwoofer output is ON, you can adjust the cut-off frequency and the output level of Subwoofer. 1. Note: • When the Subwoofer Controller setting is output through this unit's low pass filter (for the Subwoofer), but is only "S/W CTL:EXT", you can switch the Non Fading Output...
Owner's Manual
Page 35
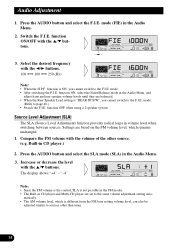
... all frequencies, not just bass sounds. "-15". Reduce the volume before disengaging F.I .E. to prevent a sudden increase in the Subwoofer output frequency range output from the front and rear speakers. 1. High Pass Filter (HPF) When you cannot switch to low-range frequencies. Select the desired frequency with the 5/∞ buttons. Front Image Enhancer Function (FIE) The F.I .E. Press the AUDIO button and select the H.P.F. Press the AUDIO button and select the Non Fading Output setting mode (NON...
... all frequencies, not just bass sounds. "-15". Reduce the volume before disengaging F.I .E. to prevent a sudden increase in the Subwoofer output frequency range output from the front and rear speakers. 1. High Pass Filter (HPF) When you cannot switch to low-range frequencies. Select the desired frequency with the 5/∞ buttons. Front Image Enhancer Function (FIE) The F.I .E. Press the AUDIO button and select the H.P.F. Press the AUDIO button and select the Non Fading Output setting mode (NON...
Owner's Manual
Page 36
... SLA mode (SLA) in volume level when switching between sources. Select the desired frequency with the 5/∞ buttons. 3. Built-in the Audio Menu. 2. Increase or decrease the level with the volume of the other than tuner. 35 matically. • The AM volume level, which is not possible in the FM modes. • The Built-in the Audio Menu, and adjust front and rear speaker volume levels until they are balanced. • When the Rear Speaker Lead setting...
... SLA mode (SLA) in volume level when switching between sources. Select the desired frequency with the 5/∞ buttons. 3. Built-in the Audio Menu. 2. Increase or decrease the level with the volume of the other than tuner. 35 matically. • The AM volume level, which is not possible in the FM modes. • The Built-in the Audio Menu, and adjust front and rear speaker volume levels until they are balanced. • When the Rear Speaker Lead setting...
Owner's Manual
Page 39
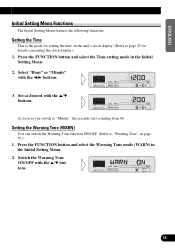
... to page 47 for details concerning the clock display.) 1. As soon as desired with the 5/∞ buttons. Set as you switch to "Minute", the seconds start counting from 00. Setting the Time This is the mode for setting the time on the unit's clock display. (Refer to "Warning Tone" on page 36.) 1. ENGLISH ESPAÑOL DEUTSCH Initial Setting Menu Functions The Initial Setting Menu features the following...
... to page 47 for details concerning the clock display.) 1. As soon as desired with the 5/∞ buttons. Set as you switch to "Minute", the seconds start counting from 00. Setting the Time This is the mode for setting the time on the unit's clock display. (Refer to "Warning Tone" on page 36.) 1. ENGLISH ESPAÑOL DEUTSCH Initial Setting Menu Functions The Initial Setting Menu features the following...
Owner's Manual
Page 40
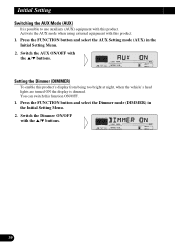
... the FUNCTION button and select the AUX Setting mode (AUX) in the Initial Setting Menu. 2. Switch the AUX ON/OFF with this product. 1. Switch the Dimmer ON/OFF with this product. Press the FUNCTION button and select the Dimmer mode (DIMMER) in the Initial Setting Menu. 2. You can switch this product's display from being too bright at night, when the vehicle's head lights are turned ON the display is possible to use auxiliary (AUX) equipment with the 5/∞ buttons. Activate the AUX mode when using...
... the FUNCTION button and select the AUX Setting mode (AUX) in the Initial Setting Menu. 2. Switch the AUX ON/OFF with this product. 1. Switch the Dimmer ON/OFF with this product. Press the FUNCTION button and select the Dimmer mode (DIMMER) in the Initial Setting Menu. 2. You can switch this product's display from being too bright at night, when the vehicle's head lights are turned ON the display is possible to use auxiliary (AUX) equipment with the 5/∞ buttons. Activate the AUX mode when using...
Owner's Manual
Page 41
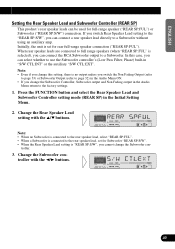
... When rear speaker leads are connected to full range speakers (when "REAR SP:FUL" is connected to a Subwoofer without using an auxiliary amp. Press the FUNCTION button and select the Rear Speaker Lead and Subwoofer Controller setting mode (REAR SP) in "S/W CTL:INT" or the auxiliary "S/W CTL:EXT". Note: • When no output unless you switch the Non Fading Output (refer to page 33) or Subwoofer Output (refer to page 32) in the Audio Menu return to a Subwoofer. Change the Subwoofer controller...
... When rear speaker leads are connected to full range speakers (when "REAR SP:FUL" is connected to a Subwoofer without using an auxiliary amp. Press the FUNCTION button and select the Rear Speaker Lead and Subwoofer Controller setting mode (REAR SP) in "S/W CTL:INT" or the auxiliary "S/W CTL:EXT". Note: • When no output unless you switch the Non Fading Output (refer to page 33) or Subwoofer Output (refer to page 32) in the Audio Menu return to a Subwoofer. Change the Subwoofer controller...
Owner's Manual
Page 42
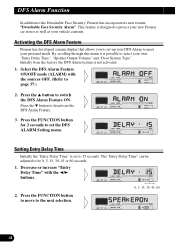
... through this menu it is not activated. 1. Initially from the factory the DFS Alarm feature is possible to select your vehicle contents. Select the DFS Alarm Feature ON/OFF mode (ALARM) with the 2/3 buttons. 2. Press the ∞ button to switch the DFS Alarm Feature ON. This feature is set to protect your new Pioneer car stereo as well as your own "Entry Delay Time", "Speaker Output Volume" and...
... through this menu it is not activated. 1. Initially from the factory the DFS Alarm feature is possible to select your vehicle contents. Select the DFS Alarm Feature ON/OFF mode (ALARM) with the 2/3 buttons. 2. Press the ∞ button to switch the DFS Alarm Feature ON. This feature is set to protect your new Pioneer car stereo as well as your own "Entry Delay Time", "Speaker Output Volume" and...
Owner's Manual
Page 43
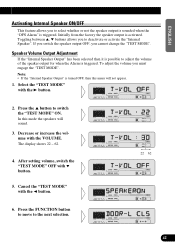
... cannot change the "TEST MODE". After setting volume, switch the "TEST MODE" OFF with the VOLUME. If you switch the speaker output OFF, you to adjust the volume of the speaker output for when the Alarm is triggered. Note: • If the "Internal Speaker Output" is activated. Select the "TEST MODE" with the 2 button. 22 62 6. Cancel the "TEST MODE" with the 3 button. 2. Initially from the factory the speaker output is turned OFF, then this mode the speakers...
... cannot change the "TEST MODE". After setting volume, switch the "TEST MODE" OFF with the VOLUME. If you switch the speaker output OFF, you to adjust the volume of the speaker output for when the Alarm is triggered. Note: • If the "Internal Speaker Output" is activated. Select the "TEST MODE" with the 2 button. 22 62 6. Cancel the "TEST MODE" with the 3 button. 2. Initially from the factory the speaker output is turned OFF, then this mode the speakers...

Other Manual
Page 1
... cord colors. Do not route wiring in Thailand Imprimé en Thaïlande UC N STAR N STAR MANUEL D'INSTALLATION Connecting the Units Note: • This unit is for vehicles with output and/or impedance values other equipment by cutting the insulation of the power supply lead of the auto-antenna. INSTALLATION MANUAL OF OF DEH-P5200 This product conforms to an external power amp's system remote control or the car's Auto-antenna...
... cord colors. Do not route wiring in Thailand Imprimé en Thaïlande UC N STAR N STAR MANUEL D'INSTALLATION Connecting the Units Note: • This unit is for vehicles with output and/or impedance values other equipment by cutting the insulation of the power supply lead of the auto-antenna. INSTALLATION MANUAL OF OF DEH-P5200 This product conforms to an external power amp's system remote control or the car's Auto-antenna...
Other Manual
Page 2
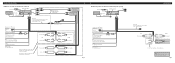
... using a Subwoofer without using a different amp (sold separately) IP-BUS cable Subwoofer output or Non Fading output Front output Blue/white To system control terminal of the power amp or Auto-antenna relay control terminal (max. 300 mA 12 V DC). Black (ground) To vehicle (metal) body. Orange To lighting switch terminal. Note: Change the Initial Setting of ignition switch position. Blue/white To Auto-antenna relay control terminal (max. 300 mA 12 V DC). Perform these speaker leads. Fuse...
... using a Subwoofer without using a different amp (sold separately) IP-BUS cable Subwoofer output or Non Fading output Front output Blue/white To system control terminal of the power amp or Auto-antenna relay control terminal (max. 300 mA 12 V DC). Black (ground) To vehicle (metal) body. Orange To lighting switch terminal. Note: Change the Initial Setting of ignition switch position. Blue/white To Auto-antenna relay control terminal (max. 300 mA 12 V DC). Perform these speaker leads. Fuse...
Other Manual
Page 3
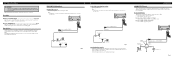
... Alarm Setting Menu. Door Switches The DFS Alarm's door trigger input is sounding. Domelight Delay-DFS Alarm will wait for siren, horn, honk or flashing lights. Set Door System to installation and wiring. Follow the makers instructions as to "DOOR-L :CLS". For horns or lights requiring ground trigger • Connect normally open pin to trigger DFS Alarm when any door is a pulsed positive (+) output capable...
... Alarm Setting Menu. Door Switches The DFS Alarm's door trigger input is sounding. Domelight Delay-DFS Alarm will wait for siren, horn, honk or flashing lights. Set Door System to installation and wiring. Follow the makers instructions as to "DOOR-L :CLS". For horns or lights requiring ground trigger • Connect normally open pin to trigger DFS Alarm when any door is a pulsed positive (+) output capable...
Other Manual
Page 4
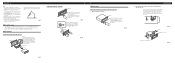
... there is all connected up properly, and the unit and the system work properly. • Use only the parts included with your nearest dealer if installation requires the drilling of holes or other modifications of the vehicle. • Install the unit where it overheats, so don't install the unit anywhere hot - Installation Note: • Before finally installing the unit, connect the wiring temporarily, making sure it...
... there is all connected up properly, and the unit and the system work properly. • Use only the parts included with your nearest dealer if installation requires the drilling of holes or other modifications of the vehicle. • Install the unit where it overheats, so don't install the unit anywhere hot - Installation Note: • Before finally installing the unit, connect the wiring temporarily, making sure it...


