

Owner's Manual
Page 2
... Finder 4 - Remote Controller Before Using This Product 5 About This Product 5 About This Manual 5 Important 5 Precaution 6 After-sales Service for Pioneer Products .......... 6 When using the 50-Disc Type Multi-CD Player 6 Remote Controller and Care 7 Using the Remote Controller 7 Battery 7 Basic ...Pause (PAUSE) - Title Scroll Audio Adjustment 29 Selecting the Equalizer Curve 29 Entering the Audio Menu 29 Audio Menu Functions 30 - Subwoofer Setting Adjustment (80HZ 0) - Non Fading Output (NON FAD) - Track Search and Fast Forward/Reverse - Displaying Disc Title Compression and ...
... Finder 4 - Remote Controller Before Using This Product 5 About This Product 5 About This Manual 5 Important 5 Precaution 6 After-sales Service for Pioneer Products .......... 6 When using the 50-Disc Type Multi-CD Player 6 Remote Controller and Care 7 Using the Remote Controller 7 Battery 7 Basic ...Pause (PAUSE) - Title Scroll Audio Adjustment 29 Selecting the Equalizer Curve 29 Entering the Audio Menu 29 Audio Menu Functions 30 - Subwoofer Setting Adjustment (80HZ 0) - Non Fading Output (NON FAD) - Track Search and Fast Forward/Reverse - Displaying Disc Title Compression and ...
Owner's Manual
Page 3
... Tone (WARN) - Setting the Rear Speaker Lead and Subwoofer Controller (REAR SP) DFS Alarm Function 41 Activating the DFS Alarm Feature 41 Setting Entry Delay Time 41 Activating Internal Speaker ON/OFF 42 - Detaching the Front Panel - Setting the Dimmer (DIMMER) - Setting the PGM Button - Selecting the AUX Source - Setting the Time - Switching... Protection 36 - Replacing the Front Panel - Using the PGM Button Displaying the Time 47 Using the AUX Source 47 - Warning Tone Initial Setting 37 Entering the Initial Setting Menu 37 Initial Setting Menu Functions 38 -
... Tone (WARN) - Setting the Rear Speaker Lead and Subwoofer Controller (REAR SP) DFS Alarm Function 41 Activating the DFS Alarm Feature 41 Setting Entry Delay Time 41 Activating Internal Speaker ON/OFF 42 - Detaching the Front Panel - Setting the Dimmer (DIMMER) - Setting the PGM Button - Selecting the AUX Source - Setting the Time - Switching... Protection 36 - Replacing the Front Panel - Using the PGM Button Displaying the Time 47 Using the AUX Source 47 - Warning Tone Initial Setting 37 Entering the Initial Setting Menu 37 Initial Setting Menu Functions 38 -
Owner's Manual
Page 30
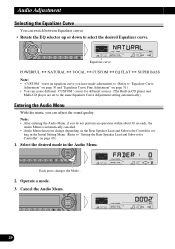
...; You can create different "CUSTOM" curves for different sources. (The Built-in the Initial Setting Menu. (Refer to "Setting the Rear Speaker Lead and Subwoofer Controller" on the Rear Speaker Lead and Subwoofer Controller set to the same Equalizer Curve Adjustment setting automatically.) Entering the Audio Menu With this menu, you do not perform an operation...
...; You can create different "CUSTOM" curves for different sources. (The Built-in the Initial Setting Menu. (Refer to "Setting the Rear Speaker Lead and Subwoofer Controller" on the Rear Speaker Lead and Subwoofer Controller set to the same Equalizer Curve Adjustment setting automatically.) Entering the Audio Menu With this menu, you do not perform an operation...
Owner's Manual
Page 33
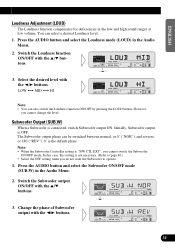
...Note: • When the Subwoofer Controller setting is "S/W CTL:EXT", you do not want the Subwoofer to page 40.) • Select the OFF setting when you cannot switch the Subwoofer ON/OFF mode. In this case, this setting is the default phase. Switch the Subwoofer output ON/OFF with the 2/3... buttons. The Subwoofer output phase can select a desired ...
...Note: • When the Subwoofer Controller setting is "S/W CTL:EXT", you do not want the Subwoofer to page 40.) • Select the OFF setting when you cannot switch the Subwoofer ON/OFF mode. In this case, this setting is the default phase. Switch the Subwoofer output ON/OFF with the 2/3... buttons. The Subwoofer output phase can select a desired ...

Owner's Manual
Page 34
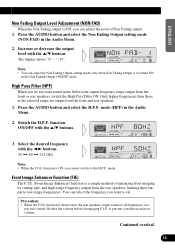
...Press the AUDIO button and select the Non Fading Output ON/OFF mode (NON FAD) in the Audio Menu. 2. Audio Adjustment Subwoofer Setting Adjustment (80HZ 0) When the Subwoofer output is ON, you can switch the Non Fading Output ON/OFF mode. (Refer to 50 Hz, 80 Hz or 125 Hz... 6" - Select the frequency to page 40.) 1. Note: • You can adjust the cut-off frequency and the output level of Subwoofer. 1. Press the AUDIO button and select the Subwoofer setting mode (80HZ 0) in the Audio Menu. 2. Increase or decrease the output level with the 2/3 buttons. 3. Non Fading Output (NON ...
...Press the AUDIO button and select the Non Fading Output ON/OFF mode (NON FAD) in the Audio Menu. 2. Audio Adjustment Subwoofer Setting Adjustment (80HZ 0) When the Subwoofer output is ON, you can switch the Non Fading Output ON/OFF mode. (Refer to 50 Hz, 80 Hz or 125 Hz... 6" - Select the frequency to page 40.) 1. Note: • You can adjust the cut-off frequency and the output level of Subwoofer. 1. Press the AUDIO button and select the Subwoofer setting mode (80HZ 0) in the Audio Menu. 2. Increase or decrease the output level with the 2/3 buttons. 3. Non Fading Output (NON ...
Owner's Manual
Page 35
...mode. Front Image Enhancer Function (FIE) The F.I .E. "-15". function is switched ON in the Audio Menu. 2. You can select the Non Fading Output setting mode only when Non Fading Output is ON, you want sound in volume. High Pass Filter (HPF) When you do not want to cut. Switch... the H.P.F. to prevent a sudden increase in the Subwoofer output frequency range output from the rear speakers, limiting their output to the H.P.F. and high-range frequency output from the front or rear speakers, switch...
...mode. Front Image Enhancer Function (FIE) The F.I .E. "-15". function is switched ON in the Audio Menu. 2. You can select the Non Fading Output setting mode only when Non Fading Output is ON, you want sound in volume. High Pass Filter (HPF) When you do not want to cut. Switch... the H.P.F. to prevent a sudden increase in the Subwoofer output frequency range output from the rear speakers, limiting their output to the H.P.F. and high-range frequency output from the front or rear speakers, switch...
Owner's Manual
Page 41
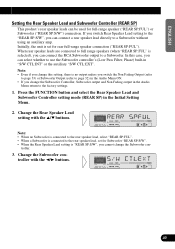
... the auxiliary "S/W CTL:EXT". Change the Subwoofer controller with the 5/∞ buttons. Initially, the unit is set for Subwoofer "REAR SP:S/W". • When the Rear Speaker Lead setting is connected to the rear speaker lead, set for full-range speaker ("REAR SP:FUL") or Subwoofer ("REAR SP:S/W") connection. In this setting, there is selected), you change the...
... the auxiliary "S/W CTL:EXT". Change the Subwoofer controller with the 5/∞ buttons. Initially, the unit is set for Subwoofer "REAR SP:S/W". • When the Rear Speaker Lead setting is connected to the rear speaker lead, set for full-range speaker ("REAR SP:FUL") or Subwoofer ("REAR SP:S/W") connection. In this setting, there is selected), you change the...
Other Manual
Page 2
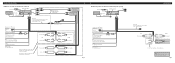
...sold separately) Power amp (sold separately) + Front speaker ≠ Right + Rear speaker ≠ + Front speaker ≠ + Subwoofer ≠ Fig. 2 7 When using a Subwoofer without using a different amp (sold separately) Antenna jack This Product IP-BUS input (Blue) Front output Multi-CD player (sold ...antenna relay control terminal (max. 300 mA 12 V DC). Note: Change the Initial Setting of ignition switch position. Connecting the Units 7 When not connecting a rear speaker lead to a Subwoofer Antenna jack This Product IP-BUS input (Blue) Multi-CD player (sold separately) IP-...
...sold separately) Power amp (sold separately) + Front speaker ≠ Right + Rear speaker ≠ + Front speaker ≠ + Subwoofer ≠ Fig. 2 7 When using a Subwoofer without using a different amp (sold separately) Antenna jack This Product IP-BUS input (Blue) Front output Multi-CD player (sold ...antenna relay control terminal (max. 300 mA 12 V DC). Note: Change the Initial Setting of ignition switch position. Connecting the Units 7 When not connecting a rear speaker lead to a Subwoofer Antenna jack This Product IP-BUS input (Blue) Multi-CD player (sold separately) IP-...


