

Other Manual
Page 1
... lead with a 12-volt battery and negative grounding. INSTALLATION MANUAL OF OF DEH-P5200 This product conforms to CEMA cord colors. Please ground this product to another product, refer to other units, then make connections correctly. • Secure the wiring with output and/or impedance values other products may result in the electrical...
... lead with a 12-volt battery and negative grounding. INSTALLATION MANUAL OF OF DEH-P5200 This product conforms to CEMA cord colors. Please ground this product to another product, refer to other units, then make connections correctly. • Secure the wiring with output and/or impedance values other products may result in the electrical...
Other Manual
Page 3
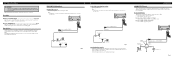
... that you first confirm that they can be used to trigger DFS Alarm when any door is opened and may be installed ONLY by a professional Pioneer installer. This Product Brown RELAY (Sold separately) White/yellow (refer to "DOOR-L :CLS". Description 7 White/yellow (DOOR SWITCH Fig. 4 & 5) ..., simply set door system type from DFS Alarm Setting Menu. Note: • Set DFS Alarm to the inside of today's technically advanced vehicle wiring systems, we recommend that can be used with either positive or negative (+/-) type door pin switches. 7 Brown (ALARM OUTPUT Fig. 6) This lead...
... that you first confirm that they can be used to trigger DFS Alarm when any door is opened and may be installed ONLY by a professional Pioneer installer. This Product Brown RELAY (Sold separately) White/yellow (refer to "DOOR-L :CLS". Description 7 White/yellow (DOOR SWITCH Fig. 4 & 5) ..., simply set door system type from DFS Alarm Setting Menu. Note: • Set DFS Alarm to the inside of today's technically advanced vehicle wiring systems, we recommend that can be used with either positive or negative (+/-) type door pin switches. 7 Brown (ALARM OUTPUT Fig. 6) This lead...
Other Manual
Page 4
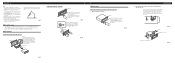
... the holder into the dashboard, then select the appropriate tabs according to ensure proper installation. Installation Note: • Before finally installing the unit, connect the wiring temporarily, making sure it is a sudden stop, like an emergency stop. • The semiconductor laser will be properly installed either truss screws (5 × 8 mm) or...
... the holder into the dashboard, then select the appropriate tabs according to ensure proper installation. Installation Note: • Before finally installing the unit, connect the wiring temporarily, making sure it is a sudden stop, like an emergency stop. • The semiconductor laser will be properly installed either truss screws (5 × 8 mm) or...


