Operation Manual
Page 31
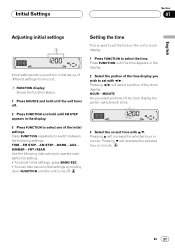
... in the display. 2 Select the portion of the time display you select portions of the clock display the portion selected will select a portion of the clock display: HOUR-MINUTE As you wish to set the time on the unit's clock display. 1 Press FUNCTION to select the time. Pressing 2/3 will blink. 3 Select the correct time...
... in the display. 2 Select the portion of the time display you select portions of the clock display the portion selected will select a portion of the clock display: HOUR-MINUTE As you wish to set the time on the unit's clock display. 1 Press FUNCTION to select the time. Pressing 2/3 will blink. 3 Select the correct time...

Operation Manual
Page 34
... 5 will display a letter in the reverse order, such as the source, press FUNCTION and hold until AUX appears in the display. • If the auxiliary setting is stored in 1 2 3 ... @ # < order. C B A order. 3 Press 3 to select AUX as the CD-RB20 or CD-RB10 (sold separately) lets you have selected AUX as Z Y X...the next character position. X Y Z, numbers and symbols in memory. 5 Press BAND/ESC to return to auxiliary equipment featuring RCA output. Each press of CLOCK turns time display on , AUX cannot be changed. 1 After you connect this unit to the playback display. 34 En Press...
... 5 will display a letter in the reverse order, such as the source, press FUNCTION and hold until AUX appears in the display. • If the auxiliary setting is stored in 1 2 3 ... @ # < order. C B A order. 3 Press 3 to select AUX as the CD-RB20 or CD-RB10 (sold separately) lets you have selected AUX as Z Y X...the next character position. X Y Z, numbers and symbols in memory. 5 Press BAND/ESC to return to auxiliary equipment featuring RCA output. Each press of CLOCK turns time display on , AUX cannot be changed. 1 After you connect this unit to the playback display. 34 En Press...


