

Owner's Manual
Page 2
...Using balance adjustment 21 - Adjusting loudness 23 - Adjusting source levels 24 Initial Settings 25 - Switching the auxiliary setting 26 - Using the remote control 8 Operating this unit 5 After-sales service for a song 19 - Selecting tracks from the file name list 17 Playing songs on disc 17 - Playing all songs in random order 15 - Pausing a song 20 Audio Adjustments 21 - Using the equalizer 21 - Setting the clock 25 - Switching the dimmer setting 26 Removing the front panel 7 - Using subwoofer output 23 - Adjusting initial settings 25 - Installing the battery...
...Using balance adjustment 21 - Adjusting loudness 23 - Adjusting source levels 24 Initial Settings 25 - Switching the auxiliary setting 26 - Using the remote control 8 Operating this unit 5 After-sales service for a song 19 - Selecting tracks from the file name list 17 Playing songs on disc 17 - Playing all songs in random order 15 - Pausing a song 20 Audio Adjustments 21 - Using the equalizer 21 - Setting the clock 25 - Switching the dimmer setting 26 Removing the front panel 7 - Using subwoofer output 23 - Adjusting initial settings 25 - Installing the battery...

Owner's Manual
Page 3
...Bluetooth wireless connection 28 Other Functions 28 - Taking a phone call 42 - Contents English - Setting the rear output and subwoofer controller 26 - Activating the BT Audio source 27 - Using different entertainment displays 29 - Selecting an XM channel directly 33 - Selecting a channel in the channel category 36 - Switching the SIRIUS display 36 - Displaying the Radio ID 34 SIRIUS Satellite Radio tuner 35 - Connecting a Bluetooth audio player 39 - Basic Operations 41 - Setting up for hands-free phoning 41 - Using the AUX source 28 - Turning the clock display...
...Bluetooth wireless connection 28 Other Functions 28 - Taking a phone call 42 - Contents English - Setting the rear output and subwoofer controller 26 - Activating the BT Audio source 27 - Using different entertainment displays 29 - Selecting an XM channel directly 33 - Selecting a channel in the channel category 36 - Switching the SIRIUS display 36 - Displaying the Radio ID 34 SIRIUS Satellite Radio tuner 35 - Connecting a Bluetooth audio player 39 - Basic Operations 41 - Setting up for hands-free phoning 41 - Using the AUX source 28 - Turning the clock display...

Owner's Manual
Page 4
... of a hierarchy 60 - Using preset numbers 48 - Setting the automatic answering 49 - Displaying BD (Bluetooth Device) address 49 - Displaying system version for repair 49 Multi-CD Player 50 - Using disc title functions 52 - Basic Operations 54 - Selecting a folder 54 - Deleting a registered phone 44 - Selecting a track directly 50 - Example of discs and player 58 Dual Discs 59 Compressed audio files 59 - Using CD TEXT functions 53 DVD Player 54 - Introduction of advanced operations 50 - Contents - Using the Call History...
... of a hierarchy 60 - Using preset numbers 48 - Setting the automatic answering 49 - Displaying BD (Bluetooth Device) address 49 - Displaying system version for repair 49 Multi-CD Player 50 - Using disc title functions 52 - Basic Operations 54 - Selecting a folder 54 - Deleting a registered phone 44 - Selecting a track directly 50 - Example of discs and player 58 Dual Discs 59 Compressed audio files 59 - Using CD TEXT functions 53 DVD Player 54 - Introduction of advanced operations 50 - Contents - Using the Call History...

Owner's Manual
Page 6
... http://www.mp3licensing.com. iTunes is short for repair without advance contact. 6 En For supported versions, consult your dealer or nearest authorized Pioneer service station regarding the satellite radio tuner that can control and listen to songs on the front panel indicates that the Satellite Radio Tuner for such use direct satellite-to encode. For satellite radio tuner operation, please refer to iPod update 2004-10-20. About AAC AAC is a trademark...
... http://www.mp3licensing.com. iTunes is short for repair without advance contact. 6 En For supported versions, consult your dealer or nearest authorized Pioneer service station regarding the satellite radio tuner that can control and listen to songs on the front panel indicates that the Satellite Radio Tuner for such use direct satellite-to encode. For satellite radio tuner operation, please refer to iPod update 2004-10-20. About AAC AAC is a trademark...

Owner's Manual
Page 9
... decrease the volume. 3 OPEN button Press to open the front panel. 4 CLOCK button Press to change the channel select mode when XM tuner or SIRIUS tuner is selected as the source. 5 DISPLAY button Press to select different displays. 6 SW button Press to select the subwoofer setting menu. Remote control Operation is the same as MULTI-CONTROL except for controlling functions. Also used for volume control. Press and hold to change to cancel the control mode of functions. Functions are the same as when using the buttons on the head unit. b FUNCTION button Press...
... decrease the volume. 3 OPEN button Press to open the front panel. 4 CLOCK button Press to change the channel select mode when XM tuner or SIRIUS tuner is selected as the source. 5 DISPLAY button Press to select different displays. 6 SW button Press to select the subwoofer setting menu. Remote control Operation is the same as MULTI-CONTROL except for controlling functions. Also used for volume control. Press and hold to change to cancel the control mode of functions. Functions are the same as when using the buttons on the head unit. b FUNCTION button Press...

Owner's Manual
Page 10
... change : - Selecting a source You can operate the preset tuning for the tuner or disc number search for each source. (Refer to Using the PGM button on by about 90%. To switch to off . When the AUX (auxiliary input) is set to the built-in CD player, load a disc in CD player-Multi-CD player- AUX1 is set to the entertainment display. In the following sources: XM tuner-SIRIUS tuner-Tuner-Television-DVD player/Multi-DVD player- Basic Operations Power ON/OFF Turning the unit on % Press SOURCE...
... change : - Selecting a source You can operate the preset tuning for the tuner or disc number search for each source. (Refer to Using the PGM button on by about 90%. To switch to off . When the AUX (auxiliary input) is set to the built-in CD player, load a disc in CD player-Multi-CD player- AUX1 is set to the entertainment display. In the following sources: XM tuner-SIRIUS tuner-Tuner-Television-DVD player/Multi-DVD player- Basic Operations Power ON/OFF Turning the unit on % Press SOURCE...

Owner's Manual
Page 17
... mode. 2 Use MULTI-CONTROL to select the desired track title. Audio CD that does not support disc title functions is CD TEXT. ! The sampling frequency shown in this unit Section 02 English 6 Move the cursor to the last position by pressing and holding DISPLAY. ! Turn to change the track title by pushing MULTI-CONTROL up to 100 discs. ! Notes ! Depending on disc % Press DISPLAY to playback. Operating this unit...
... mode. 2 Use MULTI-CONTROL to select the desired track title. Audio CD that does not support disc title functions is CD TEXT. ! The sampling frequency shown in this unit Section 02 English 6 Move the cursor to the last position by pressing and holding DISPLAY. ! Turn to change the track title by pushing MULTI-CONTROL up to 100 discs. ! Notes ! Depending on disc % Press DISPLAY to playback. Operating this unit...

Owner's Manual
Page 21
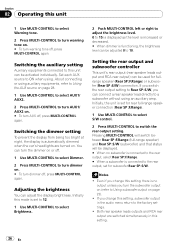
... at any time. Operating this unit Section 02 English Audio Adjustments Introduction of audio adjustments 1 1 Audio display Shows the audio adjustment status. 1 Press MULTI-CONTROL to select. FUNCTION, AUDIO and ENTERTAINMENT appear on page 26. 3 Push MULTI-CONTROL left or right to adjust left /right speaker balance moves from front to change the fader/balance setting so that it can select the Sub W.2 only when subwoofer output is pushed up or down , the front/rear speaker balance moves towards...
... at any time. Operating this unit Section 02 English Audio Adjustments Introduction of audio adjustments 1 1 Audio display Shows the audio adjustment status. 1 Press MULTI-CONTROL to select. FUNCTION, AUDIO and ENTERTAINMENT appear on page 26. 3 Push MULTI-CONTROL left or right to adjust left /right speaker balance moves from front to change the fader/balance setting so that it can select the Sub W.2 only when subwoofer output is pushed up or down , the front/rear speaker balance moves towards...

Owner's Manual
Page 24
...-CD player are set to the same source level adjustment volume automatically. ! Notes ! Each time MULTI-CONTROL is pushed left or right to select cut -off frequency. High pass filter is increased or decreased. The AM tuner volume level can also be displayed instead of each source to prevent radical changes in the selected range are outputted from the front or rear speakers. 1 Use MULTI-CONTROL to select HPF. 2 Press MULTI-CONTROL to turn high...
...-CD player are set to the same source level adjustment volume automatically. ! Notes ! Each time MULTI-CONTROL is pushed left or right to select cut -off frequency. High pass filter is increased or decreased. The AM tuner volume level can also be displayed instead of each source to prevent radical changes in the selected range are outputted from the front or rear speakers. 1 Use MULTI-CONTROL to select HPF. 2 Press MULTI-CONTROL to turn high...

Owner's Manual
Page 25
...instructions to operate each particular setting. # You can also select the function by pressing FUNCTION on the remote control. # BT AUDIO and Pin code input can select the language best suited to your convenience, this unit. # To cancel initial settings, press BAND. You can be selected only when Bluetooth adapter (e.g., CDBTB100) is 30 to put a clock right. AUX1 (auxiliary input 1)-AUX2 (auxiliary input 2)-Dimmer (dimmer)-Brightness (brightness)-S/W control (rear output and subwoofer controller)-Mute (sound muting/ attenuation)-Demonstration (feature demo) -Reverse mode (reverse mode...
...instructions to operate each particular setting. # You can also select the function by pressing FUNCTION on the remote control. # BT AUDIO and Pin code input can select the language best suited to your convenience, this unit. # To cancel initial settings, press BAND. You can be selected only when Bluetooth adapter (e.g., CDBTB100) is 30 to put a clock right. AUX1 (auxiliary input 1)-AUX2 (auxiliary input 2)-Dimmer (dimmer)-Brightness (brightness)-S/W control (rear output and subwoofer controller)-Mute (sound muting/ attenuation)-Demonstration (feature demo) -Reverse mode (reverse mode...
Owner's Manual
Page 26
... using an auxiliary amp. Initially this mode is set for fullrange speaker (Rear SP :F.Range) or subwoofer (Rear SP :S/W) connection. Both rear speaker leads outputs and RCA rear output are turned on. Adjusting the brightness You can be displayed. # When no output unless you change this setting, there is automatically dimmed when the car's headlights are switched simultaneously in the audio menu return to the factory settings. ! Setting the rear output and subwoofer controller This unit's rear output (rear speaker leads output and RCA rear output) can be used for subwoofer Rear...
... using an auxiliary amp. Initially this mode is set for fullrange speaker (Rear SP :F.Range) or subwoofer (Rear SP :S/W) connection. Both rear speaker leads outputs and RCA rear output are turned on. Adjusting the brightness You can be displayed. # When no output unless you change this setting, there is automatically dimmed when the car's headlights are switched simultaneously in the audio menu return to the factory settings. ! Setting the rear output and subwoofer controller This unit's rear output (rear speaker leads output and RCA rear output) can be used for subwoofer Rear...

Owner's Manual
Page 28
... to the PIN code input display, and you can control up to verify the connection. Other Functions Using the AUX source This unit can change the PIN code. When you press MULTI-CONTROL again on your phone to 16 digits), press MULTI-CONTROL. When connected, auxiliary equipments are automatically read in memory. Section 02 Operating this unit Entering PIN code for a connection from your Bluetooth audio player. ! The default code is explained below. With some Bluetooth audio players, you to the installation manual. About...
... to the PIN code input display, and you can control up to verify the connection. Other Functions Using the AUX source This unit can change the PIN code. When you press MULTI-CONTROL again on your phone to 16 digits), press MULTI-CONTROL. When connected, auxiliary equipments are automatically read in memory. Section 02 Operating this unit Entering PIN code for a connection from your Bluetooth audio player. ! The default code is explained below. With some Bluetooth audio players, you to the installation manual. About...

Owner's Manual
Page 39
... connected Bluetooth audio player (or Bluetooth adapter). 1 Press SOURCE to switch between the functions in the following order: Connection open (connection open in the display. 3 Turn MULTI-CONTROL to display the main menu. Turn MULTI-CONTROL to select Bluetooth audio player. # If you cannot display BT Audio, first activate the BT audio source in the initial setting. Disconnect audio (disconnect audio)-Play (Play)-Stop (Stop)-Pause (pause)- Device info. (device information) # If a Bluetooth audio player is cut short from this unit via lower level, only Disconnect audio and Device...
... connected Bluetooth audio player (or Bluetooth adapter). 1 Press SOURCE to switch between the functions in the following order: Connection open (connection open in the display. 3 Turn MULTI-CONTROL to display the main menu. Turn MULTI-CONTROL to select Bluetooth audio player. # If you cannot display BT Audio, first activate the BT audio source in the initial setting. Disconnect audio (disconnect audio)-Play (Play)-Stop (Stop)-Pause (pause)- Device info. (device information) # If a Bluetooth audio player is cut short from this unit via lower level, only Disconnect audio and Device...

Owner's Manual
Page 40
... select Device info. The device name (Pioneer BT Unit) of this unit appears in its accompanying documentation. The system (microprocessor) version of this unit is displayed. # Pushing MULTI-CONTROL left to switch to the BD address. 12-digit hexadecimal string is set ready for Bluetooth wireless connection, the connection to Entering PIN code for the code on page 28. This unit is now diconnected from Bluetooth audio player. Displaying BD (Bluetooth Device) address 1 Use MULTI-CONTROL...
... select Device info. The device name (Pioneer BT Unit) of this unit appears in its accompanying documentation. The system (microprocessor) version of this unit is displayed. # Pushing MULTI-CONTROL left to switch to the BD address. 12-digit hexadecimal string is set ready for Bluetooth wireless connection, the connection to Entering PIN code for the code on page 28. This unit is now diconnected from Bluetooth audio player. Displaying BD (Bluetooth Device) address 1 Use MULTI-CONTROL...

Owner's Manual
Page 41
... establishing a Bluetooth wireless connection between this unit and your phone, registering your phone with this unit, and adjusting the volume level. 1 Connection For detailed instructions on connecting your phone to use these advanced operations, stop your vehicle in battery drainage. ! This section provides brief information on page 49). 7 Clock display Shows the time (if connected with a phone). % Press SOURCE to this unit without running the engine can connect a cellular phone featuring Bluetooth wireless technology to select the...
... establishing a Bluetooth wireless connection between this unit and your phone, registering your phone with this unit, and adjusting the volume level. 1 Connection For detailed instructions on connecting your phone to use these advanced operations, stop your vehicle in battery drainage. ! This section provides brief information on page 49). 7 Clock display Shows the time (if connected with a phone). % Press SOURCE to this unit without running the engine can connect a cellular phone featuring Bluetooth wireless technology to select the...

Owner's Manual
Page 44
... is displayed. Refer to Entering PIN code for Bluetooth wireless connection on page 28. Refer to Entering PIN code for Bluetooth wireless connection on page 28. Using a cellular phone to initiate a connection 1 Use MULTI-CONTROL to select a registration assignment. Completed is not possible. # If you can change this unit. # The link code is set to know the BD (Bluetooth Device) address of the connected phone appears in the function menu. P1 (user phone 1)-P2 (user phone 2)-P3 (user phone 3)-G1 (guest phone...
... is displayed. Refer to Entering PIN code for Bluetooth wireless connection on page 28. Refer to Entering PIN code for Bluetooth wireless connection on page 28. Using a cellular phone to initiate a connection 1 Use MULTI-CONTROL to select a registration assignment. Completed is not possible. # If you can change this unit. # The link code is set to know the BD (Bluetooth Device) address of the connected phone appears in the function menu. P1 (user phone 1)-P2 (user phone 2)-P3 (user phone 3)-G1 (guest phone...

Owner's Manual
Page 54
... to display the main menu. press to the DVD player's or multi-DVD player's operation manual. For details concerning operation, refer to select. You can operate this function only when a multi-DVD player is sold separately. Turn to switch between the functions in the DVD player's or multi-DVD player's operation manual. 1234 Selecting a disc ! FUNCTION, AUDIO and ENTERTAINMENT appear on the display. 3 Turn MULTI-CONTROL to select FUNCTION. The function name appears on the display. 2 Use MULTI-CONTROL to select the function. Turn MULTI-CONTROL to change the menu option...
... to display the main menu. press to the DVD player's or multi-DVD player's operation manual. For details concerning operation, refer to select. You can operate this function only when a multi-DVD player is sold separately. Turn to switch between the functions in the DVD player's or multi-DVD player's operation manual. 1234 Selecting a disc ! FUNCTION, AUDIO and ENTERTAINMENT appear on the display. 3 Turn MULTI-CONTROL to select FUNCTION. The function name appears on the display. 2 Use MULTI-CONTROL to select the function. Turn MULTI-CONTROL to change the menu option...

Owner's Manual
Page 58
Once iPod main menu is displayed, connect the cable again. iPod failure Reset the iPod. Do not use an adapter when playing 8-cm CDs. 58 En Do not use shaped discs. ! ERROR-11, 12, Scratched disc Replace disc. 17, 30 ERROR-10, 11, Electrical or me12, 15, 17, 30, chanical A0 Switch the ignition key, or switch to a different source, then back to record the error message. does not contain any data ERROR-22...
Once iPod main menu is displayed, connect the cable again. iPod failure Reset the iPod. Do not use an adapter when playing 8-cm CDs. 58 En Do not use shaped discs. ! ERROR-11, 12, Scratched disc Replace disc. 17, 30 ERROR-10, 11, Electrical or me12, 15, 17, 30, chanical A0 Switch the ignition key, or switch to a different source, then back to record the error message. does not contain any data ERROR-22...

Other Manual
Page 1
...-BUS connectors are accidentally detached. • Cord function may interfere with a 12-volt battery and negative grounding. - INSTALLATION MANUAL OF OF DEH-P590IB This product conforms to the unit. 3. Printed in a shallow space, use factory supplied mounting sleeve. 2. Install this unit where: - Install the unit as power amp) must be fastened with your dealer if installation requires drilling of the unit until it to the antenna booster power supply terminal. • Never connect blue/white cable...
...-BUS connectors are accidentally detached. • Cord function may interfere with a 12-volt battery and negative grounding. - INSTALLATION MANUAL OF OF DEH-P590IB This product conforms to the unit. 3. Printed in a shallow space, use factory supplied mounting sleeve. 2. Install this unit where: - Install the unit as power amp) must be fastened with your dealer if installation requires drilling of the unit until it to the antenna booster power supply terminal. • Never connect blue/white cable...
Other Manual
Page 2
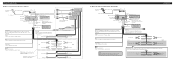
...Power amp (sold separately) ENGLISH Yellow/black If you use an equipment with Mute function, wire this unit. Yellow Connect to a clean, paint-free metal location. Black (chassis ground) Connect to lighting switch terminal. Connecting the Units 7 When not connecting a rear speaker lead to a Subwoofer iPod with Dock Connector Dock connector port Interface cable 2 m (6 ft. 7 in.) Gray Dock connector This product Rear output Front output Antenna jack Subwoofer output Fuse (10 A) 15 cm (57/8 in .) AUX jack (3.5 ø) Use a stereo mini plug cable to connect with auxiliary...
...Power amp (sold separately) ENGLISH Yellow/black If you use an equipment with Mute function, wire this unit. Yellow Connect to a clean, paint-free metal location. Black (chassis ground) Connect to lighting switch terminal. Connecting the Units 7 When not connecting a rear speaker lead to a Subwoofer iPod with Dock Connector Dock connector port Interface cable 2 m (6 ft. 7 in.) Gray Dock connector This product Rear output Front output Antenna jack Subwoofer output Fuse (10 A) 15 cm (57/8 in .) AUX jack (3.5 ø) Use a stereo mini plug cable to connect with auxiliary...


