Owner's Manual
Page 2
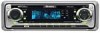
... Pioneer product. Please read through these operating instructions so you will know how to operate your unit from theft 8 • Removing the front panel 8 • Attaching the front panel 9 About the demo mode 9 • Reverse mode 9 • Feature demo 9 What's what 10 • Head Unit 10 • Remote control 11 Power ON/OFF Turning the unit on 12 Selecting a source 12 Turning the unit off 12 Tuner Listening to the radio 13 Introduction of advanced tuner operation...
... Pioneer product. Please read through these operating instructions so you will know how to operate your unit from theft 8 • Removing the front panel 8 • Attaching the front panel 9 About the demo mode 9 • Reverse mode 9 • Feature demo 9 What's what 10 • Head Unit 10 • Remote control 11 Power ON/OFF Turning the unit on 12 Selecting a source 12 Turning the unit off 12 Tuner Listening to the radio 13 Introduction of advanced tuner operation...
Owner's Manual
Page 3
...29 • Fine adjusting equalizer curve 29 Adjusting bass 30 Adjusting treble 30 Adjusting loudness 30 Using subwoofer output 30 • Adjusting subwoofer settings 31 Using non fading output 31 • Adjusting non fading output level 31 Using the high pass filter 32 Adjusting source levels 32 Initial Settings Adjusting initial settings 33 Setting the time 33 Switching the warning tone 33 Switching the auxiliary setting 34 Switching the dimmer setting 34 Selecting the brightness 34 Setting the rear output and subwoofer controller 34 Switching the Telephone Muting/Attenuation 35 Franç...
...29 • Fine adjusting equalizer curve 29 Adjusting bass 30 Adjusting treble 30 Adjusting loudness 30 Using subwoofer output 30 • Adjusting subwoofer settings 31 Using non fading output 31 • Adjusting non fading output level 31 Using the high pass filter 32 Adjusting source levels 32 Initial Settings Adjusting initial settings 33 Setting the time 33 Switching the warning tone 33 Switching the auxiliary setting 34 Switching the dimmer setting 34 Selecting the brightness 34 Setting the rear output and subwoofer controller 34 Switching the Telephone Muting/Attenuation 35 Franç...
Owner's Manual
Page 7
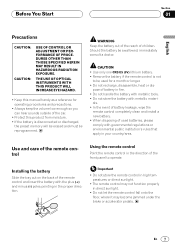
... (3V) lithium battery. • Remove the battery if the remote control is disconnected or discharged, the preset memory will be erased and must be used batteries, please comply with the plus (+) and minus (-) poles pointing in the proper direction. als. • In the event of battery leakage, wipe the remote control completely clean and install a new battery. • When disposing of used for operating procedures and precautions...
... (3V) lithium battery. • Remove the battery if the remote control is disconnected or discharged, the preset memory will be erased and must be used batteries, please comply with the plus (+) and minus (-) poles pointing in the proper direction. als. • In the event of battery leakage, wipe the remote control completely clean and install a new battery. • When disposing of used for operating procedures and precautions...
Owner's Manual
Page 8
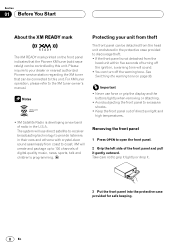
... music, news, sports, talk and children's programming. Important • Never use direct satellite-to-receiver broadcasting technology to provide listeners in their cars and at home with crystal-clear sound seamlessly from the head unit and stored in the U.S.A. The system will create and package up to 100 channels of direct sunlight and high temperatures. Removing the front panel 1 Press OPEN to the XM tuner owner's manual...
... music, news, sports, talk and children's programming. Important • Never use direct satellite-to-receiver broadcasting technology to provide listeners in their cars and at home with crystal-clear sound seamlessly from the head unit and stored in the U.S.A. The system will create and package up to 100 channels of direct sunlight and high temperatures. Removing the front panel 1 Press OPEN to the XM tuner owner's manual...
Owner's Manual
Page 9
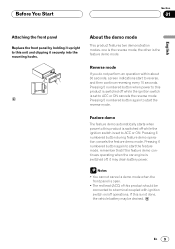
... 6 numbered button during feature demo operation cancels the feature demo mode. If this unit and clipping it securely into the mounting hooks. remember that if the feature demo continues operating when the car engine is switched off while the ignition switch is set to ACC or ON cancels the reverse mode. Pressing 5 numbered button when power to this product should be drained. Pressing 6 numbered button again to start the reverse mode. Pressing 5 numbered button...
... 6 numbered button during feature demo operation cancels the feature demo mode. If this unit and clipping it securely into the mounting hooks. remember that if the feature demo continues operating when the car engine is switched off while the ignition switch is set to ACC or ON cancels the reverse mode. Pressing 5 numbered button when power to this product should be drained. Pressing 6 numbered button again to start the reverse mode. Pressing 5 numbered button...

Owner's Manual
Page 10
Also used for preset tuning and disc number search when using a multi-CD player. ~ SOURCE button This unit is switched on by selecting a source. BAND/ESC button Press to select among three FM and one AM bands and cancel the control mode of the available sources. Rotate to increase or decrease the volume. 3 CLOCK button Press to change to the entertainment display. 2 VOLUME When you press the VOLUME, it extends outward so that it again. Section...
Also used for preset tuning and disc number search when using a multi-CD player. ~ SOURCE button This unit is switched on by selecting a source. BAND/ESC button Press to select among three FM and one AM bands and cancel the control mode of the available sources. Rotate to increase or decrease the volume. 3 CLOCK button Press to change to the entertainment display. 2 VOLUME When you press the VOLUME, it extends outward so that it again. Section...
Owner's Manual
Page 12
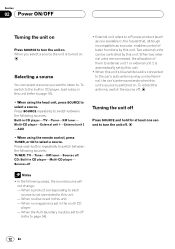
... functions by this unit. • When this unit's blue/white lead is connected to . When a product corresponding to each button repeatedly to switch between the following cases, the sound source will not change: - Turning the unit off CD: Built-in CD player-TV-Tuner-XM tuner- When no disc is switched on. Selecting a source You can be controlled by this unit's source is set by this unit (refer to page 16). • When using the remote control...
... functions by this unit. • When this unit's blue/white lead is connected to . When a product corresponding to each button repeatedly to switch between the following cases, the sound source will not change: - Turning the unit off CD: Built-in CD player-TV-Tuner-XM tuner- When no disc is switched on. Selecting a source You can be controlled by this unit's source is set by this unit (refer to page 16). • When using the remote control...
Owner's Manual
Page 13
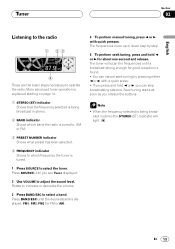
... one second and release. Français Italiano Nederlands En 13 The tuner will light. Press BAND/ESC until you see Tuner displayed. 2 Use VOLUME to select the tuner. Press SOURCE until the desired band is displayed, FM1, FM2, FM3 for good reception is tuned. 1 Press SOURCE to adjust the sound level. The frequencies move up or down step by pressing either 2 or 3 with quick presses...
... one second and release. Français Italiano Nederlands En 13 The tuner will light. Press BAND/ESC until you see Tuner displayed. 2 Use VOLUME to select the tuner. Press SOURCE until the desired band is displayed, FM1, FM2, FM3 for good reception is tuned. 1 Press SOURCE to adjust the sound level. The frequencies move up or down step by pressing either 2 or 3 with quick presses...
Owner's Manual
Page 15
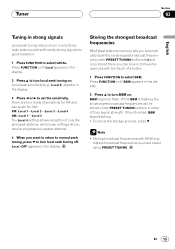
... levels for good reception. 1 Press FUNCTION to turn local seek tuning off. Press FUNCTION until Local appears in to those radio stations with BSM may replace broadcast frequencies you want to return to normal seek tuning, press ∞ to select LOCAL. Press FUNCTION until BSM appears in order of only the strongest stations, while lower settings let you receive progressively weaker stations. 4 When you have saved using PRESET TUNING...
... levels for good reception. 1 Press FUNCTION to turn local seek tuning off. Press FUNCTION until Local appears in to those radio stations with BSM may replace broadcast frequencies you want to return to normal seek tuning, press ∞ to select LOCAL. Press FUNCTION until BSM appears in order of only the strongest stations, while lower settings let you receive progressively weaker stations. 4 When you have saved using PRESET TUNING...

Owner's Manual
Page 19
... • Titles remain in memory, even after entering the title. Press DISPLAY repeatedly to switch between the following settings: PLAYBACK MODE (play time)-Disc Title (disc title)-Disc Artist Name (disc artist name)- Press DISPLAY repeatedly to 100 discs. • When a multi-CD player that the rest of the title can display the title of the currently playing disc is shown in the display. • If no title...
... • Titles remain in memory, even after entering the title. Press DISPLAY repeatedly to switch between the following settings: PLAYBACK MODE (play time)-Disc Title (disc title)-Disc Artist Name (disc artist name)- Press DISPLAY repeatedly to 100 discs. • When a multi-CD player that the rest of the title can display the title of the currently playing disc is shown in the display. • If no title...
Owner's Manual
Page 20
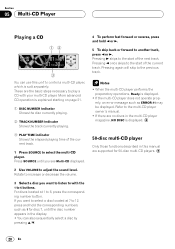
...-CD Player Playing a CD 12 3 You can use this manual are supported for disc 7, until you see Multi-CD displayed. 2 Use VOLUME to adjust the sound level. More advanced CD operation is explained starting on page 21. 1 DISC NUMBER indicator Shows the disc currently playing. 2 TRACK NUMBER indicator Shows the track currently playing. 3 PLAY TIME indicator Shows the elapsed playing time of the current track. Press SOURCE until the disc number appears in this unit to select the...
...-CD Player Playing a CD 12 3 You can use this manual are supported for disc 7, until you see Multi-CD displayed. 2 Use VOLUME to adjust the sound level. More advanced CD operation is explained starting on page 21. 1 DISC NUMBER indicator Shows the disc currently playing. 2 TRACK NUMBER indicator Shows the track currently playing. 3 PLAY TIME indicator Shows the elapsed playing time of the current track. Press SOURCE until the disc number appears in this unit to select the...
Owner's Manual
Page 27
... (source level adjustment) • When the subwoofer controller setting is only S.W Control:EXT, you cannot switch the Sub-W1. (Refer to page 34.) • You can select the Sub-W2 only when Subwoofer output is switched on in the Sub-W1. • When the subwoofer controller setting is only S.W Control:EXT, you can switch the non fading output on/off mode. (Refer to page 34.) • You can select the non fading output setting mode only...
... (source level adjustment) • When the subwoofer controller setting is only S.W Control:EXT, you cannot switch the Sub-W1. (Refer to page 34.) • You can select the Sub-W2 only when Subwoofer output is switched on in the Sub-W1. • When the subwoofer controller setting is only S.W Control:EXT, you can switch the non fading output on/off mode. (Refer to page 34.) • You can select the non fading output setting mode only...
Owner's Manual
Page 28
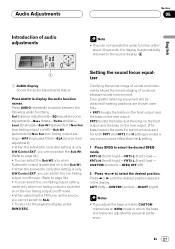
... Super bass Powerful Natural Vocal Custom1,2 Flat • CUSTOM1 and CUSTOM2 are used. • When the rear output setting is Rear SP:S.W, you make adjustments when a curve other than CUSTOM2 is displayed as the left /right speaker balance. Press AUDIO until Fad appears in CD player and Multi-CD player are memorized in CUSTOM1. • A CUSTOM2 curve can combine H.P.F. Bal R9 is selected, the equalizer curve settings are set equalizer...
... Super bass Powerful Natural Vocal Custom1,2 Flat • CUSTOM1 and CUSTOM2 are used. • When the rear output setting is Rear SP:S.W, you make adjustments when a curve other than CUSTOM2 is displayed as the left /right speaker balance. Press AUDIO until Fad appears in CD player and Multi-CD player are memorized in CUSTOM1. • A CUSTOM2 curve can combine H.P.F. Bal R9 is selected, the equalizer curve settings are set equalizer...
Owner's Manual
Page 30
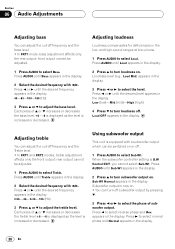
... FRT1 mode, bass adjustment affects only the rear output: front output cannot be adjusted. 1 Press AUDIO to adjust the treble level. Subwoofer output is now on . Adjusting loudness Loudness compensates for deficiencies in the display. Press 2 or 3 until Sub-W1 appears in the display. 3 Press 2 or 3 to turn loudness on . • You can turn off subwoofer output by pressing ∞. 3 Press 2 or 3 to select Treble. Loud OFF appears in the low- When the subwoofer controller setting...
... FRT1 mode, bass adjustment affects only the rear output: front output cannot be adjusted. 1 Press AUDIO to adjust the treble level. Subwoofer output is now on . Adjusting loudness Loudness compensates for deficiencies in the display. Press 2 or 3 until Sub-W1 appears in the display. 3 Press 2 or 3 to turn loudness on . • You can turn off subwoofer output by pressing ∞. 3 Press 2 or 3 to select Treble. Loud OFF appears in the low- When the subwoofer controller setting...
Owner's Manual
Page 32
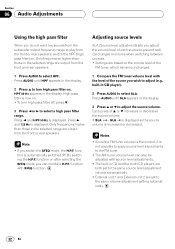
... tuner volume level with source level adjustments. • The built-in the display. 2 Press 5 to turn high pass filter off . function with SFEQ function. SLA -4 is displayed as the source volume is displayed. Only frequencies higher than those in volume when switching between sources. • Settings are output from the front and rear speakers. 1 Press AUDIO to select HPF. function on . Section 06 Audio Adjustments Using the high pass filter When you do not want low sounds from the subwoofer output frequency...
... tuner volume level with source level adjustments. • The built-in the display. 2 Press 5 to turn high pass filter off . function with SFEQ function. SLA -4 is displayed as the source volume is displayed. Only frequencies higher than those in volume when switching between sources. • Settings are output from the front and rear speakers. 1 Press AUDIO to select HPF. function on . Section 06 Audio Adjustments Using the high pass filter When you do not want low sounds from the subwoofer output frequency...
Owner's Manual
Page 34
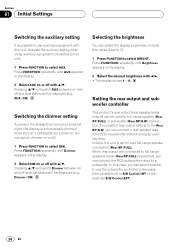
...; The display shows 0 - 15. Initially, the unit is set to 12. 1 Press FUNCTION to select BRIGHT. Pressing 5/∞ will switch Dimmer between on or off and that status will be used for rear full-range speaker connection (Rear SP:FULL). When rear output are turned on or off . 1 Press FUNCTION to select DIM. Activate the auxiliary setting when using an auxiliary amp. Section 07 Initial Settings Switching the auxiliary setting It is possible to use the subwoofer controller's (low pass...
...; The display shows 0 - 15. Initially, the unit is set to 12. 1 Press FUNCTION to select BRIGHT. Pressing 5/∞ will switch Dimmer between on or off and that status will be used for rear full-range speaker connection (Rear SP:FULL). When rear output are turned on or off . 1 Press FUNCTION to select DIM. Activate the auxiliary setting when using an auxiliary amp. Section 07 Initial Settings Switching the auxiliary setting It is possible to use the subwoofer controller's (low pass...
Owner's Manual
Page 36
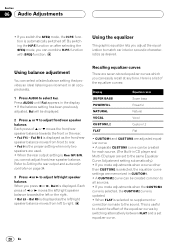
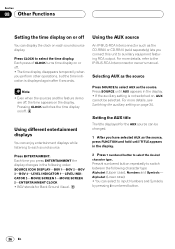
Using the AUX source An IP-BUS-RCA Interconnector such as the source. Press 1 numbered button repeatedly to select the time display. Pressing CLOCK switches the time display on/off , the time appears on the display. Using different entertainment displays You can select to select the desired character type. Each time you press ENTERTAINMENT the display changes in the display. 2 Press 1 numbered button to input Numbers and Symbols by pressing 2 numbered button. 36 En Setting the AUX title The title displayed for Back Ground...
Using the AUX source An IP-BUS-RCA Interconnector such as the source. Press 1 numbered button repeatedly to select the time display. Pressing CLOCK switches the time display on/off , the time appears on the display. Using different entertainment displays You can select to select the desired character type. Each time you press ENTERTAINMENT the display changes in the display. 2 Press 1 numbered button to input Numbers and Symbols by pressing 2 numbered button. 36 En Setting the AUX title The title displayed for Back Ground...
Owner's Manual
Page 40
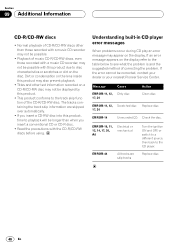
... the suggested method of music CD-R/CD-RW discs, even those recorded with a music CD recorder, may not be possible with this product, time to disc characteristics or scratches or dirt on the disc. ERROR-11, 12, Scratched disc Replace disc. 17, 30 ERROR-14 Unrecorded CD. Understanding built-in CD player error messages When problems occur during CD play an error message may appear on...
... the suggested method of music CD-R/CD-RW discs, even those recorded with a music CD recorder, may not be possible with this product, time to disc characteristics or scratches or dirt on the disc. ERROR-11, 12, Scratched disc Replace disc. 17, 30 ERROR-14 Unrecorded CD. Understanding built-in CD player error messages When problems occur during CD play an error message may appear on...

Other Manual
Page 1
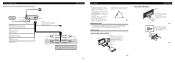
... right ≠ speaker leads are common. • Speakers connected to this for other equipment by ignition switch (12 V DC) ON/OFF. Black (ground) To vehicle (metal) body. If the car features a glass antenna, connect to the battery. Yellow To terminal always supplied with RCA pin plugs (sold separately) Power amp (sold separately) Power amp (sold separately) Subwoofer output or Non Fading Output Antenna jack IP-Bus input(Blue) IP-BUS cable Yellow/black...
... right ≠ speaker leads are common. • Speakers connected to this for other equipment by ignition switch (12 V DC) ON/OFF. Black (ground) To vehicle (metal) body. If the car features a glass antenna, connect to the battery. Yellow To terminal always supplied with RCA pin plugs (sold separately) Power amp (sold separately) Power amp (sold separately) Subwoofer output or Non Fading Output Antenna jack IP-Bus input(Blue) IP-BUS cable Yellow/black...
Other Manual
Page 2
... sides of unit chassis). DIN Front-mount Installation with the unit to the following illustrated installation methods. The use a cellular telephone, connect it overheats, so don't install the unit anywhere hot - If not, keep the Audio Mute lead free of ignition switch position. Fuse This Product Blue/white To system control terminal of the power amp or Auto-antenna relay control terminal (max. 300 mA 12 V DC). + Front speaker ≠ Left + Subwoofer ≠...
... sides of unit chassis). DIN Front-mount Installation with the unit to the following illustrated installation methods. The use a cellular telephone, connect it overheats, so don't install the unit anywhere hot - If not, keep the Audio Mute lead free of ignition switch position. Fuse This Product Blue/white To system control terminal of the power amp or Auto-antenna relay control terminal (max. 300 mA 12 V DC). + Front speaker ≠ Left + Subwoofer ≠...


