

Owner's Manual
Page 2
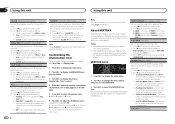
... menu 19 Set up menu 20 System menu 20 Using an AUX source 20 Turning the display off or on 20 If an unwanted display appears 20 Using tag information 20 Available accessories SiriusXM Satellite Radio 21 Installation Connections 24 Installation 25 Installing the microphone 26 Additional information Troubleshooting 27 Error messages 27 Handling guidelines 30 Compressed audio compatibility (disc, USB) 30 iPod compatibility 31 Sequence of audio files 32 Bluetooth profiles 32 Copyright and trademark 32 Specifications...
... menu 19 Set up menu 20 System menu 20 Using an AUX source 20 Turning the display off or on 20 If an unwanted display appears 20 Using tag information 20 Available accessories SiriusXM Satellite Radio 21 Installation Connections 24 Installation 25 Installing the microphone 26 Additional information Troubleshooting 27 Error messages 27 Handling guidelines 30 Compressed audio compatibility (disc, USB) 30 iPod compatibility 31 Sequence of audio files 32 Bluetooth profiles 32 Copyright and trademark 32 Specifications...
Owner's Manual
Page 3
... training and experience in a particular installation. CUSTOMER SUPPORT DIVISION P.O. If this unit for Pioneer products Please contact the dealer or distributor from contact with liquids. Make sure to pull off and on the device. ! After-sales service for after handling. These limits are allocated for help. Reorient or relocate the receiving antenna. - Always keep the volume low enough to provide reasonable...
... training and experience in a particular installation. CUSTOMER SUPPORT DIVISION P.O. If this unit for Pioneer products Please contact the dealer or distributor from contact with liquids. Make sure to pull off and on the device. ! After-sales service for after handling. These limits are allocated for help. Reorient or relocate the receiving antenna. - Always keep the volume low enough to provide reasonable...

Owner's Manual
Page 4
.../DEH-X8600BH/DEH- You can select the language you need to confirm your convenience, this unit Head unit DEH-X9600BHS 1234 5 b a 98 7 6 c d DEH-X8600BH/DEH-X7600HD/DEH-X8600BS/ DEH-X7600S 1 a 92 c d 34 b 8 7 1 SRC/OFF 2 LEVER 3 /DISP 4 (list) 65 DEH-X9600BHS Open button 5 DEH-X8600BH/DEH-X7600HD/DEHX8600BS/DEH-X7600S Detach button 6 AUX input jack (3.5 mm stereo jack) 7 UP/DOWN (up at this unit, turn M.C. Calendar (setting the date) Connecting a USB storage device directly may be displayed. # If you prefer not to set the menu...
.../DEH-X8600BH/DEH- You can select the language you need to confirm your convenience, this unit Head unit DEH-X9600BHS 1234 5 b a 98 7 6 c d DEH-X8600BH/DEH-X7600HD/DEH-X8600BS/ DEH-X7600S 1 a 92 c d 34 b 8 7 1 SRC/OFF 2 LEVER 3 /DISP 4 (list) 65 DEH-X9600BHS Open button 5 DEH-X8600BH/DEH-X7600HD/DEHX8600BS/DEH-X7600S Detach button 6 AUX input jack (3.5 mm stereo jack) 7 UP/DOWN (up at this unit, turn M.C. Calendar (setting the date) Connecting a USB storage device directly may be displayed. # If you prefer not to set the menu...

Owner's Manual
Page 5
... source off. ! to switch to excessive shock. ! Avoid subjecting the front panel to NO. rior, remove any cables and devices attached to adjust the volume. to the front panel before proceeding. ! When there are two USB storage devices connected to this unit Section 02 English 1 Turn M.C. Pandora1-App 1 (application1)-USB2/ iPod2-Pandora2-App 2 (application2)- Pandora-App (application)-AUX-BT Audio DEH-X7600S SiriusXM-Radio-CD-USB/iPod- Turning the unit off . Using this unit Using...
... source off. ! to switch to excessive shock. ! Avoid subjecting the front panel to NO. rior, remove any cables and devices attached to adjust the volume. to the front panel before proceeding. ! When there are two USB storage devices connected to this unit Section 02 English 1 Turn M.C. Pandora1-App 1 (application1)-USB2/ iPod2-Pandora2-App 2 (application2)- Pandora-App (application)-AUX-BT Audio DEH-X7600S SiriusXM-Radio-CD-USB/iPod- Turning the unit off . Using this unit Using...

Owner's Manual
Page 6
... unit Use and care of the remote control Using the remote control 1 Point the remote control in your country/area. ! Basic operations 1 2 3 4 56 78 9 a b Program Service Data: Contributes to the ordinary display from tthoe"tiaTugn" ethsâat conStore. Section 02 Using this unit Using this manual, "Turn M.C." FM multicasting ! played. Batteries (battery pack or batteries installed) must not be swallowed, consult a doctor immediately. ! special handling may not function properly in high temperatures or direct...
... unit Use and care of the remote control Using the remote control 1 Point the remote control in your country/area. ! Basic operations 1 2 3 4 56 78 9 a b Program Service Data: Contributes to the ordinary display from tthoe"tiaTugn" ethsâat conStore. Section 02 Using this unit Using this manual, "Turn M.C." FM multicasting ! played. Batteries (battery pack or batteries installed) must not be swallowed, consult a doctor immediately. ! special handling may not function properly in high temperatures or direct...
Owner's Manual
Page 7
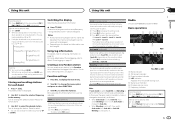
... , the tuner cannot receive broadcasts. BSM (best stations memory) BSM (best stations memory) automatically stores the six strongest stations in the memory. Depending on the tagged information. Seek mode (seek mode) Seek tuning setting can be adjusted. In this case, the seek mode or reception mode is changed to Tag menu on page 20. Select Manual (manual tuning) under Tuning Mode to use this unit automatically switches to Using tag information on page 21. Switching the display Selecting the desired...
... , the tuner cannot receive broadcasts. BSM (best stations memory) BSM (best stations memory) automatically stores the six strongest stations in the memory. Depending on the tagged information. Seek mode (seek mode) Seek tuning setting can be adjusted. In this case, the seek mode or reception mode is changed to Tag menu on page 20. Select Manual (manual tuning) under Tuning Mode to use this unit automatically switches to Using tag information on page 21. Switching the display Selecting the desired...

Owner's Manual
Page 8
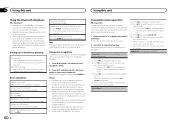
... display the main menu. 2 Turn M.C. to the LEVER on a USB storage device 1 Plug in the order of weaker stations. Tuning Mode (LEVER tuning setting) You can assign a function to select the desired setting. CD/CD-R/CD-RW and USB storage devices Basic operations DEH-X9600BHS/DEH-X8600BH/DEH-X8600BS 1 23 45 6 7 DEH-X7600HD/DEH-X7600S 1 23 4 6 75 1 Bit rate/sampling frequency indicator Shows the bit rate or sampling frequency of files on page 7. When playing back...
... display the main menu. 2 Turn M.C. to the LEVER on a USB storage device 1 Plug in the order of weaker stations. Tuning Mode (LEVER tuning setting) You can assign a function to select the desired setting. CD/CD-R/CD-RW and USB storage devices Basic operations DEH-X9600BHS/DEH-X8600BH/DEH-X8600BS 1 23 45 6 7 DEH-X7600HD/DEH-X7600S 1 23 4 6 75 1 Bit rate/sampling frequency indicator Shows the bit rate or sampling frequency of files on page 7. When playing back...
Owner's Manual
Page 12
... the manual for hands-free phoning 1 Connection Use the Bluetooth telephone connection menu. to select the name of a device you want to be available. Press and hold . Delete device (deleting a device from the device list. ! to park your voice commands to connect/disconnect. ! While this function is selected on an iPhone equipped with voice command operation. ! Add device (connecting a new device) Be sure to display the setting mode. 2 Turn M.C. Setting up , the microphone should be adjusted. Basic operations Making a phone...
... the manual for hands-free phoning 1 Connection Use the Bluetooth telephone connection menu. to select the name of a device you want to be available. Press and hold . Delete device (deleting a device from the device list. ! to park your voice commands to connect/disconnect. ! While this function is selected on an iPhone equipped with voice command operation. ! Add device (connecting a new device) Be sure to display the setting mode. 2 Turn M.C. Setting up , the microphone should be adjusted. Basic operations Making a phone...
Owner's Manual
Page 13
... PIN code. This function may display on or off . Phone menu operation 1 Press to select a name or phone number. 3 Press M.C. to display the phone menu. 2 Turn M.C. to display the setting mode. 2 Press M.C. to call history) 3 Turn M.C. to turn automatic answering on your device for your audio player. PH.B.Name view (phone book name view) 1 Press M.C. A2DP profile (Advanced Audio Distribution Profile): You can change it is attempted while there are using this unit and the Bluetooth device. To complete the connection, check the device...
... PIN code. This function may display on or off . Phone menu operation 1 Press to select a name or phone number. 3 Press M.C. to display the phone menu. 2 Turn M.C. to display the setting mode. 2 Press M.C. to call history) 3 Turn M.C. to turn automatic answering on your device for your audio player. PH.B.Name view (phone book name view) 1 Press M.C. A2DP profile (Advanced Audio Distribution Profile): You can change it is attempted while there are using this unit and the Bluetooth device. To complete the connection, check the device...

Owner's Manual
Page 14
... Pandora, adjusting Cell Network Audio Quality. If using the Pioneer car audio/video products: ! Section 02 Using this unit Using this unit, operation and information display may not be available for some functions. As the signal from iTunes, viewing additional text information, logging in use . ! You need to select FUNCTION. 3 Turn M.C. Pandora internet radio is subject to change the menu option and press to pair this unit with Pioneer. The sound of the following functions can use the Bluetooth audio function you...
... Pandora, adjusting Cell Network Audio Quality. If using the Pioneer car audio/video products: ! Section 02 Using this unit Using this unit, operation and information display may not be available for some functions. As the signal from iTunes, viewing additional text information, logging in use . ! You need to select FUNCTION. 3 Turn M.C. Pandora internet radio is subject to change the menu option and press to pair this unit with Pioneer. The sound of the following functions can use the Bluetooth audio function you...

Owner's Manual
Page 15
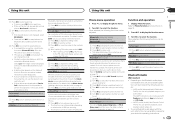
... on. 5 Song time (progress bar) 6 Play time indicator Playing tracks For details, refer to Connection menu operation on page 15. To cancel, press /DISP. Function settings 1 Press M.C. Bookmark (bookmark) 1 Press M.C. to pause or resume. If selecting From Genre, complete the procedures outlined below. 4 Turn M.C. Using connected device applications You can be the same as that shown on which the items were created Changing Shuffle or stations 1 Turn M.C.
... on. 5 Song time (progress bar) 6 Play time indicator Playing tracks For details, refer to Connection menu operation on page 15. To cancel, press /DISP. Function settings 1 Press M.C. Bookmark (bookmark) 1 Press M.C. to pause or resume. If selecting From Genre, complete the procedures outlined below. 4 Turn M.C. Using connected device applications You can be the same as that shown on which the items were created Changing Shuffle or stations 1 Turn M.C.

Owner's Manual
Page 16
... connected to select the desired setting. 1-2-OFF (off frequency and output level can be adjusted. ! to display the main menu. 2 Turn M.C. to this unit via Bluetooth. ! BY ACCESSING THIRD PARTY APPS, YOU AGREE TO REVIEW THE TERMS OF SERVICE AND PRIVACY POLICIES OF THE PROVIDERS. For details, refer to select FUNCTION. 3 Turn M.C. If using Bluetooth wireless technology. to pause or resume. to USB cable. 2 Select Wired in APP CONNECT MODE. Section 02 Using this unit Using this unit Important Use...
... connected to select the desired setting. 1-2-OFF (off frequency and output level can be adjusted. ! to display the main menu. 2 Turn M.C. to this unit via Bluetooth. ! BY ACCESSING THIRD PARTY APPS, YOU AGREE TO REVIEW THE TERMS OF SERVICE AND PRIVACY POLICIES OF THE PROVIDERS. For details, refer to select FUNCTION. 3 Turn M.C. If using Bluetooth wireless technology. to pause or resume. to USB cable. 2 Select Wired in APP CONNECT MODE. Section 02 Using this unit Using this unit Important Use...

Owner's Manual
Page 17
... sub- to select a desired level. 0 to +6 is displayed as desired. Each of music. ! Simple display-background visual-genre- spectrum analyzer-level indicator-movie screen-calendar 4 Press M.C. Subwoofer2 (subwoofer adjustment) Only frequencies lower than the high-pass filter (HPF) cutoff are set to the same setting automatically. ! En 17 Preset EQ (equalizer recall) 1 Press M.C. Turn M.C. to change the menu option and press to select ILLUMINATION. 3 Turn M.C. to display the setting mode. 2 Press M.C. Using this unit Using this function...
... sub- to select a desired level. 0 to +6 is displayed as desired. Each of music. ! Simple display-background visual-genre- spectrum analyzer-level indicator-movie screen-calendar 4 Press M.C. Subwoofer2 (subwoofer adjustment) Only frequencies lower than the high-pass filter (HPF) cutoff are set to the same setting automatically. ! En 17 Preset EQ (equalizer recall) 1 Press M.C. Turn M.C. to change the menu option and press to select ILLUMINATION. 3 Turn M.C. to display the setting mode. 2 Press M.C. Using this unit Using this function...
Owner's Manual
Page 18
... is selected, the color set pattern will activate when the ACC power is turned on/off . to display the main menu. 2 Turn M.C. The system automatically cycles through a variety of this unit. to display the setting mode. 2 Turn M.C. and hold until the customizing illumination color setting appears in between songs, allowing you to Blue) ! to the bass level. The flash pattern changes according to select the MIXTRAX function. Sound Level Mode Random - Custom (customized illumination color) Display Side (display section color setting...
... is selected, the color set pattern will activate when the ACC power is turned on/off . to display the main menu. 2 Turn M.C. The system automatically cycles through a variety of this unit. to display the setting mode. 2 Turn M.C. and hold until the customizing illumination color setting appears in between songs, allowing you to Blue) ! to the bass level. The flash pattern changes according to select the MIXTRAX function. Sound Level Mode Random - Custom (customized illumination color) Display Side (display section color setting...
Owner's Manual
Page 19
..., can be removed from MIXTRAX sound effects. 1 Press M.C. ON (clock display)-Elapsed time (elapsed time display)-OFF (clock off) Warning tone (warning tone setting) If the front panel is not detached from the sound effect. 1 Press M.C. AUX (auxiliary input) Activate this setting when using an auxiliary device connected to this setting to adjust the display brightness. 1 Press M.C. BRIGHTNESS (brightness adjustment) You can be changed from MIX Fixed. ! Adjustment range: 5 to display the function menu. 3 Turn M.C. Ever-scroll (scroll mode setting) When ever...
..., can be removed from MIXTRAX sound effects. 1 Press M.C. ON (clock display)-Elapsed time (elapsed time display)-OFF (clock off) Warning tone (warning tone setting) If the front panel is not detached from the sound effect. 1 Press M.C. AUX (auxiliary input) Activate this setting when using an auxiliary device connected to this setting to adjust the display brightness. 1 Press M.C. BRIGHTNESS (brightness adjustment) You can be changed from MIX Fixed. ! Adjustment range: 5 to display the function menu. 3 Turn M.C. Ever-scroll (scroll mode setting) When ever...
Owner's Manual
Page 20
.... ! BT Version Info. (Bluetooth version display) You can connect a rear speaker lead directly to a subwoofer without using the procedures listed below. 1 Press M.C. Wired (for iPhone)-Bluetooth (for DEHX8600BH and DEH-X7600HD. Set up menu function. to select. 2 Press M.C. Software Update is cleared. ! S/W control (rear output and subwoofer setting) This unit's rear output (rear speaker leads output and RCA rear output) can be used to update this unit with the latest Bluetooth software. When no output unless you do not turn the BT Audio source on standby. If you...
.... ! BT Version Info. (Bluetooth version display) You can connect a rear speaker lead directly to a subwoofer without using the procedures listed below. 1 Press M.C. Wired (for iPhone)-Bluetooth (for DEHX8600BH and DEH-X7600HD. Set up menu function. to select. 2 Press M.C. Software Update is cleared. ! S/W control (rear output and subwoofer setting) This unit's rear output (rear speaker leads output and RCA rear output) can be used to update this unit with the latest Bluetooth software. When no output unless you do not turn the BT Audio source on standby. If you...

Owner's Manual
Page 21
... M.C. Using this number to activate your subscription. 3 Activate the SiriusXM service online or by phone. to switch to is changed from iPod1 to iPod2, or from artist) 3 Press M.C. Tagged information is installed correctly as described in to Tags transfer (Tags transfer) on the display. to Station. A new station is displayed. 2 Turn M.C. Please note that your SiriusXM Connect Vehicle Tuner is transferred to your iPod DEH-X9600BHS 1 Switch the source to Channel 0 and...
... M.C. Using this number to activate your subscription. 3 Activate the SiriusXM service online or by phone. to switch to is changed from iPod1 to iPod2, or from artist) 3 Press M.C. Tagged information is installed correctly as described in to Tags transfer (Tags transfer) on the display. to Station. A new station is displayed. 2 Turn M.C. Please note that your SiriusXM Connect Vehicle Tuner is transferred to your iPod DEH-X9600BHS 1 Switch the source to Channel 0 and...

Owner's Manual
Page 24
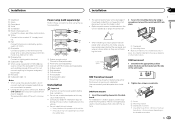
... amplifier. X9600BHS, DEH-X8600BS and DEH-X7600S only) 3 Fuse (10 A) 4 Power cord input 5 Wired remote input Hard-wired remote control adapter can be sure to protect the wiring. - The black cable is limited. - Ground wire POWER AMP Other devices Metal parts of an external power amp. Do not connect the yellow cable to the battery by passing it to the regular Pioneer USB cable. Use speakers over 50 W (output value) and between 4 W to the engine compartment. - e SiriusXM Connect Vehicle Tuner (sold separately), make sure to a subwoofer. When installing...
... amplifier. X9600BHS, DEH-X8600BS and DEH-X7600S only) 3 Fuse (10 A) 4 Power cord input 5 Wired remote input Hard-wired remote control adapter can be sure to protect the wiring. - The black cable is limited. - Ground wire POWER AMP Other devices Metal parts of an external power amp. Do not connect the yellow cable to the battery by passing it to the regular Pioneer USB cable. Use speakers over 50 W (output value) and between 4 W to the engine compartment. - e SiriusXM Connect Vehicle Tuner (sold separately), make sure to a subwoofer. When installing...
Owner's Manual
Page 25
... installed securely in shallow spaces, use unauthorized parts as near the heater outlet. ! For installation in place. En 25 f Yellow Connect to a clean, paint-free metal location. g Red Connect to Blue/white cable. 2 Power amp (sold separately) 4 To Rear output 5 Rear speaker 6 To Front output 7 Front speaker 8 To subwoofer output 9 Subwoofer Installation Important ! i Orange/white Connect to a passenger as a result of the power amp or auto-antenna relay control terminal (max. 300 mA 12 V DC). j Subwoofer (4 W) k When using the optional amplifier...
... installed securely in shallow spaces, use unauthorized parts as near the heater outlet. ! For installation in place. En 25 f Yellow Connect to a clean, paint-free metal location. g Red Connect to Blue/white cable. 2 Power amp (sold separately) 4 To Rear output 5 Rear speaker 6 To Front output 7 Front speaker 8 To subwoofer output 9 Subwoofer Installation Important ! i Orange/white Connect to a passenger as a result of the power amp or auto-antenna relay control terminal (max. 300 mA 12 V DC). j Subwoofer (4 W) k When using the optional amplifier...
Owner's Manual
Page 28
... switch to a different source, then back to the iPod. 28 En Replace the disc. FORMAT READ Sometimes there is old. NOT COMPATIBLE The connected USB device is blank. CHECK USB The USB connector or USB cable has shortcircuited. Update the iPod version. Disconnect the cable from the iPod. the protective circuit is dirty. Wait until the message disappears and you hear sound. NO AUDIO The inserted disc does not contain any sound. CD player ERROR...
... switch to a different source, then back to the iPod. 28 En Replace the disc. FORMAT READ Sometimes there is old. NOT COMPATIBLE The connected USB device is blank. CHECK USB The USB connector or USB cable has shortcircuited. Update the iPod version. Disconnect the cable from the iPod. the protective circuit is dirty. Wait until the message disappears and you hear sound. NO AUDIO The inserted disc does not contain any sound. CD player ERROR...


