
Owner's Manual
Page 2
... the instructions, keep this unit What's What 11 - Removing the front panel 8 - Using the remote control 10 Operating this manual in CD Player 15 - Storing the strongest broadcast frequencies 14 - Playing tracks in a random order (shuffle all) 22 - Selecting tracks from the file name list 20 Playing songs on Bluetooth audio player 25 Browsing for Bluetooth audio player 24 - Basic Operations 23 - Using disc title functions 18 - Playing all songs in random order 17 2 En - Connecting a Bluetooth audio player 25 - Setting...
... the instructions, keep this unit What's What 11 - Removing the front panel 8 - Using the remote control 10 Operating this manual in CD Player 15 - Storing the strongest broadcast frequencies 14 - Playing tracks in a random order (shuffle all) 22 - Selecting tracks from the file name list 20 Playing songs on Bluetooth audio player 25 Browsing for Bluetooth audio player 24 - Basic Operations 23 - Using disc title functions 18 - Playing all songs in random order 17 2 En - Connecting a Bluetooth audio player 25 - Setting...
Owner's Manual
Page 3
... balance adjustment 41 - Using subwoofer output 42 - Using the high pass filter 43 - Setting the clock 45 - Switching the face auto open 45 - Using the AUX source 49 - Taking a phone call 28 - Disconnecting a cellular phone 31 - Connecting to a Bluetooth audio player automatically 26 - Making a call screen 40 Audio Adjustments 40 - Echo canceling and noise reduction 39 - Boosting the bass 43 - Adjusting initial settings 44 - Setting the rear output and subwoofer controller 46 - Switching the sound muting/ attenuation 46 - Activating the BT Audio source 47 - Resetting...
... balance adjustment 41 - Using subwoofer output 42 - Using the high pass filter 43 - Setting the clock 45 - Switching the face auto open 45 - Using the AUX source 49 - Taking a phone call 28 - Disconnecting a cellular phone 31 - Connecting to a Bluetooth audio player automatically 26 - Making a call screen 40 Audio Adjustments 40 - Echo canceling and noise reduction 39 - Boosting the bass 43 - Adjusting initial settings 44 - Setting the rear output and subwoofer controller 46 - Switching the sound muting/ attenuation 46 - Activating the BT Audio source 47 - Resetting...

Owner's Manual
Page 7
... use direct satellite-to your dealer or nearest authorized Pioneer service station regarding the satellite radio tuner that comprises of Ericsson Inc., Intel Corp., Nokia Corp., Toshiba and IBM in the U.S. The Bluetooth word mark and logos are sold separately) can control and listen to coast. and any other devices. iPod® compatibility This unit can be connected to the companies at home with Dock Connector. ! This unit supports...
... use direct satellite-to your dealer or nearest authorized Pioneer service station regarding the satellite radio tuner that comprises of Ericsson Inc., Intel Corp., Nokia Corp., Toshiba and IBM in the U.S. The Bluetooth word mark and logos are sold separately) can control and listen to coast. and any other devices. iPod® compatibility This unit can be connected to the companies at home with Dock Connector. ! This unit supports...
Owner's Manual
Page 11
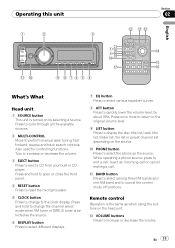
... making a call. Also used for controlling functions. Operating this unit Section 02 English What's What Head unit 1 SOURCE button This unit is turned on by about 90%. Press and hold to open or close the front panel. 4 RESET button Press to reset the microprocessor. 5 CLOCK button Press to change the channel select mode when XM tuner or SIRIUS tuner is selected as the source. 6 DISPLAY button Press to select different displays. 7 EQ button Press to select various equalizer curves. 8 ATT button Press to quickly lower the volume level...
... making a call. Also used for controlling functions. Operating this unit Section 02 English What's What Head unit 1 SOURCE button This unit is turned on by about 90%. Press and hold to open or close the front panel. 4 RESET button Press to reset the microprocessor. 5 CLOCK button Press to change the channel select mode when XM tuner or SIRIUS tuner is selected as the source. 6 DISPLAY button Press to select different displays. 7 EQ button Press to select various equalizer curves. 8 ATT button Press to quickly lower the volume level...

Owner's Manual
Page 12
....) l AUDIO button Press to Switching the auxiliary setting on . i OFF HOOK button Press to perform manual seek tuning, fast forward, reverse and track search controls. When there is no disc or magazine in use (refer to select various sound quality controls. Functions are used for the multi-CD player. While operating the phone source, press to turn the unit on page 46). 12 En Press SOURCE repeatedly to Activating the BT Audio source on by default. iPod-USB-External unit 1-External unit...
....) l AUDIO button Press to Switching the auxiliary setting on . i OFF HOOK button Press to perform manual seek tuning, fast forward, reverse and track search controls. When there is no disc or magazine in use (refer to select various sound quality controls. Functions are used for the multi-CD player. While operating the phone source, press to turn the unit on page 46). 12 En Press SOURCE repeatedly to Activating the BT Audio source on by default. iPod-USB-External unit 1-External unit...
Owner's Manual
Page 19
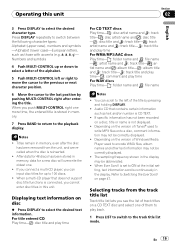
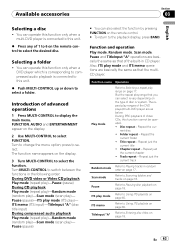
... connect a multi-CD player, you cannot enter disc titles in this unit Section 02 English 3 Press DISPLAY to ON at the initial setting, text information scrolls continuously in memory. 7 Press BAND to return to encode WMA files, album names and other text information may not be abbreviated. ! Depending on the version of iTunes® used to the playback display. Audio CD that does not support disc...
... connect a multi-CD player, you cannot enter disc titles in this unit Section 02 English 3 Press DISPLAY to ON at the initial setting, text information scrolls continuously in memory. 7 Press BAND to return to encode WMA files, album names and other text information may not be abbreviated. ! Depending on the version of iTunes® used to the playback display. Audio CD that does not support disc...
Owner's Manual
Page 25
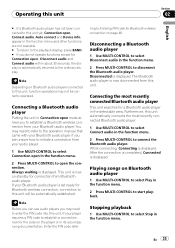
... connected Bluetooth audio player. 1 Use MULTI-CONTROL to select Connect audio in the function menu. 2 Press MULTI-CONTROL to connect the Bluetooth audio player. Playing songs on page 48. While connecting, Connecting is set ready for connection from Bluetooth audio player. En 25 Always waiting is displayed. Enter the PIN code refer- Disconnected is displayed. Operating this unit Section 02 English # If a Bluetooth audio player has not been connected to this unit yet, Connection open mode allows you to establish a Bluetooth wireless connection from your Bluetooth audio...
... connected Bluetooth audio player. 1 Use MULTI-CONTROL to select Connect audio in the function menu. 2 Press MULTI-CONTROL to connect the Bluetooth audio player. Playing songs on page 48. While connecting, Connecting is set ready for connection from Bluetooth audio player. En 25 Always waiting is displayed. Enter the PIN code refer- Disconnected is displayed. Operating this unit Section 02 English # If a Bluetooth audio player has not been connected to this unit yet, Connection open mode allows you to establish a Bluetooth wireless connection from your Bluetooth audio...
Owner's Manual
Page 27
... and receiving voice and data via Bluetooth wireless technology. In order to use these advanced operations, stop your attention such as a source, no audio adjustments, except balance adjustment, are driving. Since this indicator is set to Setting the automatic answering on (for the phone source. The front/rear speaker balance is not displayed. 3 User number indicator Shows the registration number of the cellular phone. 4 Battery strength indicator Shows the battery strength of cellular phone. ! Signal level...
... and receiving voice and data via Bluetooth wireless technology. In order to use these advanced operations, stop your attention such as a source, no audio adjustments, except balance adjustment, are driving. Since this indicator is set to Setting the automatic answering on (for the phone source. The front/rear speaker balance is not displayed. 3 User number indicator Shows the registration number of the cellular phone. 4 Battery strength indicator Shows the battery strength of cellular phone. ! Signal level...
Owner's Manual
Page 28
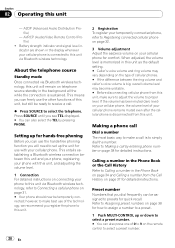
... temporarily connected phone, refer to Registering connected cellular phone on page 32. 3 Volume adjustment Adjust the earpiece volume on your phone to select a preset number. # You can also select the TEL by pressing PHONE. About the telephone source Standby mode Once connected via Bluetooth wireless technology, this unit - Section 02 Operating this unit will need to presets for detailed instructions. Refer to receive a call is disconnected from the Call History on page 38 for detailed instructions. Setting...
... temporarily connected phone, refer to Registering connected cellular phone on page 32. 3 Volume adjustment Adjust the earpiece volume on your phone to select a preset number. # You can also select the TEL by pressing PHONE. About the telephone source Standby mode Once connected via Bluetooth wireless technology, this unit - Section 02 Operating this unit will need to presets for detailed instructions. Refer to receive a call is disconnected from the Call History on page 38 for detailed instructions. Setting...

Owner's Manual
Page 29
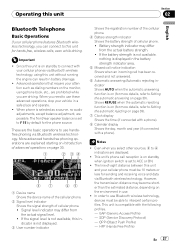
... displayed for detailed instructions. ! Operating this unit Section 02 English # Preset number 10 is assigned to 0. # If the number is already in the Phone Book then the name is also displayed. # No data is in your phone book) of the new caller appears in the display to signal that you have not been assigned. 2 Press MULTI-CONTROL to make a call by pressing ON HOOK on the remote control...
... displayed for detailed instructions. ! Operating this unit Section 02 English # Preset number 10 is assigned to 0. # If the number is already in the Phone Book then the name is also displayed. # No data is in your phone book) of the new caller appears in the display to signal that you have not been assigned. 2 Press MULTI-CONTROL to make a call by pressing ON HOOK on the remote control...
Owner's Manual
Page 31
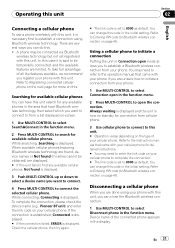
... (e.g., Pioneer BT unit) and enter the link code on the type of the connected phone appears in Connection open the connection. Always waiting is displayed and the unit is now on standby for detailed instructions. # You may need to refer to the operation manual that came with this unit fails to find any available phones in the function menu. 2 Press MULTI-CONTROL to open mode allows you can change this unit. Device...
... (e.g., Pioneer BT unit) and enter the link code on the type of the connected phone appears in Connection open the connection. Always waiting is displayed and the unit is now on standby for detailed instructions. # You may need to refer to the operation manual that came with this unit fails to find any available phones in the function menu. 2 Press MULTI-CONTROL to open mode allows you can change this unit. Device...

Owner's Manual
Page 41
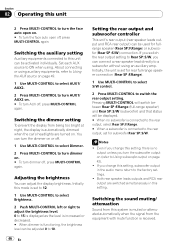
... you adjust the equalization to select the graphic equalizer adjustment. Using the equalizer The equalizer lets you create. Press EQ repeatedly to the sound. When Flat is selected no supplement or correction is a list of Powerful. 2 Push MULTI-CONTROL left /right speaker balance moves towards the front or rear. Operating this unit Section 02 English Using balance adjustment You can change the fader/balance setting so that it can easily recall at any time.
... you adjust the equalization to select the graphic equalizer adjustment. Using the equalizer The equalizer lets you create. Press EQ repeatedly to the sound. When Flat is selected no supplement or correction is a list of Powerful. 2 Push MULTI-CONTROL left /right speaker balance moves towards the front or rear. Operating this unit Section 02 English Using balance adjustment You can change the fader/balance setting so that it can easily recall at any time.
Owner's Manual
Page 42
... in CD player and the multi-CD player are set to 0 cannot be adjusted. +6 to -6 is displayed as the equalizer curve is increased or decreased. # The actual range of the adjustments are different depending on which equalizer curve is selected. # The equalizer curve with a subwoofer output which can be turned on or off. 1 Use MULTI-CONTROL to select Sub W.1. 2 Press MULTI-CONTROL to turn subwoofer output on. A Custom 2 curve can adjust the level of each source...
... in CD player and the multi-CD player are set to 0 cannot be adjusted. +6 to -6 is displayed as the equalizer curve is increased or decreased. # The actual range of the adjustments are different depending on which equalizer curve is selected. # The equalizer curve with a subwoofer output which can be turned on or off. 1 Use MULTI-CONTROL to select Sub W.1. 2 Press MULTI-CONTROL to turn subwoofer output on. A Custom 2 curve can adjust the level of each source...

Owner's Manual
Page 44
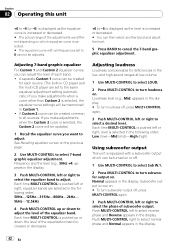
...(face auto open)-AUX1 (auxiliary input 1)-AUX2 (auxiliary input 2)- Dimmer (dimmer)-Brightness (brightness) -S/W control (rear output and subwoofer controller)-Mute (sound muting/attenuation)-Demonstration (feature demo)- BT Version Info. (Bluetooth version information)-BT reset (Bluetooth reset) Use the following order: Language select (language selection)- Section 02 Operating this operation by pressing and holding FUNCTION on the remote control. 3 Turn MULTI-CONTROL to the same source level adjustment volume automatically. ! Calendar (calendar)-Clock (clock)- Reverse mode (reverse mode...
...(face auto open)-AUX1 (auxiliary input 1)-AUX2 (auxiliary input 2)- Dimmer (dimmer)-Brightness (brightness) -S/W control (rear output and subwoofer controller)-Mute (sound muting/attenuation)-Demonstration (feature demo)- BT Version Info. (Bluetooth version information)-BT reset (Bluetooth reset) Use the following order: Language select (language selection)- Section 02 Operating this operation by pressing and holding FUNCTION on the remote control. 3 Turn MULTI-CONTROL to the same source level adjustment volume automatically. ! Calendar (calendar)-Clock (clock)- Reverse mode (reverse mode...

Owner's Manual
Page 45
.... 1 Use MULTI-CONTROL to select Face auto open To protect against theft, this unit equips multiple language display. Setting the clock Use these instructions to set the clock. 1 Use MULTI-CONTROL to turn warning tone on the remote control. # To cancel initial settings, press BAND. # You cannot select BT AUDIO when the Bluetooth audio player has been connected. You can select the language best suited to your convenience, this unit features detachable front panel. Each press of MULTI-CONTROL selects languages...
.... 1 Use MULTI-CONTROL to select Face auto open To protect against theft, this unit equips multiple language display. Setting the clock Use these instructions to set the clock. 1 Use MULTI-CONTROL to turn warning tone on the remote control. # To cancel initial settings, press BAND. # You cannot select BT AUDIO when the Bluetooth audio player has been connected. You can select the language best suited to your convenience, this unit features detachable front panel. Each press of MULTI-CONTROL selects languages...
Owner's Manual
Page 46
... dimmer is functioning, the brightness level can be displayed. # When no subwoofer is connected to the rear output, select Rear SP :F.Range. # When a subwoofer is no output unless you turn AUX off . 1 Use MULTI-CONTROL to select Dimmer. 2 Press MULTI-CONTROL to the rear output, set for subwoofer Rear SP :S/W. If you switch the rear output setting to Rear SP :S/W, you change this unit can adjust the display brightness. If you can turn the face auto open off , press MULTI-CONTROL again. Set each AUX source to the factory settings. ! About connecting or using auxiliary...
... dimmer is functioning, the brightness level can be displayed. # When no subwoofer is connected to the rear output, select Rear SP :F.Range. # When a subwoofer is no output unless you turn AUX off . 1 Use MULTI-CONTROL to select Dimmer. 2 Press MULTI-CONTROL to the rear output, set for subwoofer Rear SP :S/W. If you switch the rear output setting to Rear SP :S/W, you change this unit can adjust the display brightness. If you can turn the face auto open off , press MULTI-CONTROL again. Set each AUX source to the factory settings. ! About connecting or using auxiliary...
Owner's Manual
Page 63
... Refer to select. ITS play )- You can operate this unit. % Push MULTI-CONTROL up or down to display the main menu. You can operate this function only when a multi-DVD player is connected to the playback display, press BAND. FUNCTION, AUDIO and ENTERTAINMENT appear on the display. 3 Turn MULTI-CONTROL to select FUNCTION. The function name appears on the display. 2 Use MULTI-CONTROL to select the function. Pause (pause)-ITS play mode (ITS play )- The repeat play range that the...
... Refer to select. ITS play )- You can operate this unit. % Push MULTI-CONTROL up or down to display the main menu. You can operate this function only when a multi-DVD player is connected to the playback display, press BAND. FUNCTION, AUDIO and ENTERTAINMENT appear on the display. 3 Turn MULTI-CONTROL to select FUNCTION. The function name appears on the display. 2 Use MULTI-CONTROL to select the function. Pause (pause)-ITS play mode (ITS play )- The repeat play range that the...

Owner's Manual
Page 66
... CD Player Message Cause Action ERROR-11, 12, Dirty disc 17, 30 Clean disc. Turn the ignition OFF and ON. 66 En After checking, switch the ignition key or disconnect the iPod and connect again. Bluetooth audio/telephone Message ERROR-10 ERROR-80 Cause Built-in Bluetooth unit encountered an error Built-in the Select a list that can be played back No Audio The inserted disc Replace disc. Appendix Additional Information Troubleshooting Symptom iPod...
... CD Player Message Cause Action ERROR-11, 12, Dirty disc 17, 30 Clean disc. Turn the ignition OFF and ON. 66 En After checking, switch the ignition key or disconnect the iPod and connect again. Bluetooth audio/telephone Message ERROR-10 ERROR-80 Cause Built-in Bluetooth unit encountered an error Built-in the Select a list that can be played back No Audio The inserted disc Replace disc. Appendix Additional Information Troubleshooting Symptom iPod...

Other Manual
Page 2
...; Never connect blue/white cable to a battery. - Place all cables away from hot places, such as power amp) must be wired to the terminal that can be sure to an external power amp's system remote control or the vehicle's auto-antenna relay control terminal (max. 300 mA, 12 V DC). Do not remove RCA caps if RCA cables are color-coded. Current capacity of the rating prescribed. - Connecting the Units ENGLISH Note...
...; Never connect blue/white cable to a battery. - Place all cables away from hot places, such as power amp) must be wired to the terminal that can be sure to an external power amp's system remote control or the vehicle's auto-antenna relay control terminal (max. 300 mA, 12 V DC). Do not remove RCA caps if RCA cables are color-coded. Current capacity of the rating prescribed. - Connecting the Units ENGLISH Note...

Other Manual
Page 3
... amplifier. Fuse resistor Orange/white Connect to a clean, paint-free metal location. Note: Change the initial setting of this unit (refer to the Operation Manual). Fuse resistor Red Connect to terminal controlled by ignition switch (12 V DC). If not, keep the Audio Mute lead free of the power amp or auto-antenna relay control terminal (max. 300 mA 12 V DC). Green Not used. Connecting the Units 7 When not connecting a rear speaker lead to a Subwoofer Subwoofer output (SUBWOOFER OUTPUT) Rear output (REAR OUTPUT) Antenna jack 15 cm (5-7/8 in.) iPod...
... amplifier. Fuse resistor Orange/white Connect to a clean, paint-free metal location. Note: Change the initial setting of this unit (refer to the Operation Manual). Fuse resistor Red Connect to terminal controlled by ignition switch (12 V DC). If not, keep the Audio Mute lead free of the power amp or auto-antenna relay control terminal (max. 300 mA 12 V DC). Green Not used. Connecting the Units 7 When not connecting a rear speaker lead to a Subwoofer Subwoofer output (SUBWOOFER OUTPUT) Rear output (REAR OUTPUT) Antenna jack 15 cm (5-7/8 in.) iPod...


