Operation Manual
Page 2
... model 5 About this unit What's What 9 - Attaching the front panel 8 About the demo mode 8 Use and care of advanced operations 13 - Remote control 10 - Adjusting the volume 12 Tuner 12 - Tuning in strong signals 13 Built-in a random order (shuffle) 21 - Using disc title functions 17 Playing songs on iPod 20 - Selecting files from theft 7 - Contents Thank you for future reference. After you have finished reading the instructions, keep this manual...
... model 5 About this unit What's What 9 - Attaching the front panel 8 About the demo mode 8 Use and care of advanced operations 13 - Remote control 10 - Adjusting the volume 12 Tuner 12 - Tuning in strong signals 13 Built-in a random order (shuffle) 21 - Using disc title functions 17 Playing songs on iPod 20 - Selecting files from theft 7 - Contents Thank you for future reference. After you have finished reading the instructions, keep this manual...
Operation Manual
Page 3
...audio player 34 - Connecting to 6 keys 31 - Adjusting subwoofer settings 25 Using the high pass filter 26 Boosting the bass 26 Adjusting source levels 26 Initial Settings Adjusting initial settings 27 Setting the clock 27 Switching the warning tone 27 Switching the auxiliary setting 27 Switching the dimmer setting 27 Setting the rear output and subwoofer controller 28 Switching the feature demo 28 Switching the Ever Scroll 28 Activating the BT AUDIO source 28 Entering PIN code for Bluetooth wireless connection 29 Displaying system version of advanced operations 36 - Basic operation...
...audio player 34 - Connecting to 6 keys 31 - Adjusting subwoofer settings 25 Using the high pass filter 26 Boosting the bass 26 Adjusting source levels 26 Initial Settings Adjusting initial settings 27 Setting the clock 27 Switching the warning tone 27 Switching the auxiliary setting 27 Switching the dimmer setting 27 Setting the rear output and subwoofer controller 28 Switching the feature demo 28 Switching the Ever Scroll 28 Activating the BT AUDIO source 28 Entering PIN code for Bluetooth wireless connection 29 Displaying system version of advanced operations 36 - Basic operation...
Operation Manual
Page 4
... bass emphasis 46 - About iPod settings 54 Compressed audio files on the disc 54 - Introduction of discs and player 51 Dual Discs 52 Compressed audio compatibility 52 USB audio player/USB memory 52 - Contents - Storing and recalling broadcast stations 41 - Storing and recalling broadcast stations 49 - Making a call by entering phone number 40 - Storing and recalling broadcast stations 43 - Using CD TEXT functions 45 - About handling the iPod 54 - USB audio player/USB memory 53 iPod 54 - Displaying the Radio ID 42 SIRIUS Satellite Radio tuner...
... bass emphasis 46 - About iPod settings 54 Compressed audio files on the disc 54 - Introduction of discs and player 51 Dual Discs 52 Compressed audio compatibility 52 USB audio player/USB memory 52 - Contents - Storing and recalling broadcast stations 41 - Storing and recalling broadcast stations 49 - Making a call by entering phone number 40 - Storing and recalling broadcast stations 43 - Using CD TEXT functions 45 - About handling the iPod 54 - USB audio player/USB memory 53 iPod 54 - Displaying the Radio ID 42 SIRIUS Satellite Radio tuner...
Operation Manual
Page 6
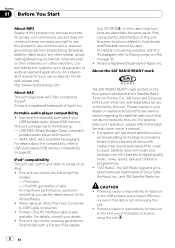
... about your USB portable audio player/USB memory. iPod nano - For details, consult your dealer or nearest authorized Pioneer service station regarding the satellite radio tuner that the Satellite Radio Tuner for Pioneer (i.e., XM tuner and Sirius satellite tuner which are essentially the same as pay-audio or audio-on page 32. ! iPod is a registered trademark of Apple Inc. For satellite radio tuner operation, please refer to USB audio player/USB memory compatibility on page 52. This unit can control previous generations iPod models with a Pioneer iPod adapter (e.g. In this...
... about your USB portable audio player/USB memory. iPod nano - For details, consult your dealer or nearest authorized Pioneer service station regarding the satellite radio tuner that the Satellite Radio Tuner for Pioneer (i.e., XM tuner and Sirius satellite tuner which are essentially the same as pay-audio or audio-on page 32. ! iPod is a registered trademark of Apple Inc. For satellite radio tuner operation, please refer to USB audio player/USB memory compatibility on page 52. This unit can control previous generations iPod models with a Pioneer iPod adapter (e.g. In this...
Operation Manual
Page 9
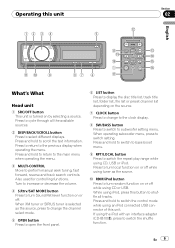
... preset channel list depending on by selecting a source. When XM tuner or SIRIUS tuner is turned on the source. 7 CLOCK button Press to change to the clock display. 8 SW/BASS button Press to switch to scroll the text information. If using tuner as the source, press to change the channel select mode. 5 OPEN button Press to open the front panel. 6 LIST button Press to switch the shuffle function. Operating this unit. Press to perform manual seek tuning, fast forward, reverse and track search controls...
... preset channel list depending on by selecting a source. When XM tuner or SIRIUS tuner is turned on the source. 7 CLOCK button Press to change to the clock display. 8 SW/BASS button Press to switch to scroll the text information. If using tuner as the source, press to change the channel select mode. 5 OPEN button Press to open the front panel. 6 LIST button Press to switch the shuffle function. Operating this unit. Press to perform manual seek tuning, fast forward, reverse and track search controls...
Operation Manual
Page 12
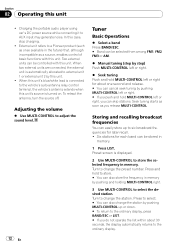
Section 02 Operating this unit's source is turned on. Charging the portable audio player using car's DC power source while connecting it to adjust the sound level. When this unit's blue/white lead is connected to the ordinary display. 12 En Tuner Basic Operations % Select a band Press BAND/ESC. # Band can be selected from among FM1, FM2, FM3 or AM. % Manual tuning (step by step) Push MULTI-CONTROL left or right. % Seek tuning Push and hold MULTI...
Section 02 Operating this unit's source is turned on. Charging the portable audio player using car's DC power source while connecting it to adjust the sound level. When this unit's blue/white lead is connected to the ordinary display. 12 En Tuner Basic Operations % Select a band Press BAND/ESC. # Band can be selected from among FM1, FM2, FM3 or AM. % Manual tuning (step by step) Push MULTI-CONTROL left or right. % Seek tuning Push and hold MULTI...
Operation Manual
Page 23
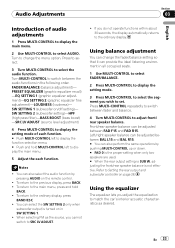
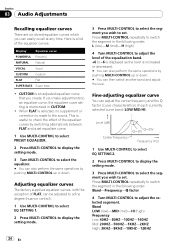
... car's interior acoustic characteristics as the source, you do not operate functions within about 30 seconds, the display automatically returns to adjust front/ rear speaker balance. You can change the menu option. You can also perform the same operations by pressing AUDIO on in all occupied seats. 1 Use MULTI-CONTROL to select FADER/BALANCE. 2 Press MULTI-CONTROL to display the setting mode. 3 Press MULTI-CONTROL to select the segment you adjust the equalization to set. FADER/BALANCE (balance adjustment)- PRESET EQUALIZER...
... car's interior acoustic characteristics as the source, you do not operate functions within about 30 seconds, the display automatically returns to adjust front/ rear speaker balance. You can change the menu option. You can also perform the same operations by pressing AUDIO on in all occupied seats. 1 Use MULTI-CONTROL to select FADER/BALANCE. 2 Press MULTI-CONTROL to display the setting mode. 3 Press MULTI-CONTROL to select the segment you adjust the equalization to set. FADER/BALANCE (balance adjustment)- PRESET EQUALIZER...
Operation Manual
Page 24
...) 1 Use MULTI-CONTROL to select EQ SETTING 2. 2 Press MULTI-CONTROL to display the setting mode. 3 Press MULTI-CONTROL to select the segment you can also perform the same operations by pushing MULTI-CONTROL up or down . Press MULTI-CONTROL repeatedly to switch the segment in the following order: Band-Frequency-Q factor 4 Turn MULTI-CONTROL to adjust the selected segement. Display Equalizer curve POWERFUL Powerful NATURAL Natural VOCAL Vocal CUSTOM Custom FLAT Flat SUPER BASS...
...) 1 Use MULTI-CONTROL to select EQ SETTING 2. 2 Press MULTI-CONTROL to display the setting mode. 3 Press MULTI-CONTROL to select the segment you can also perform the same operations by pushing MULTI-CONTROL up or down . Press MULTI-CONTROL repeatedly to switch the segment in the following order: Band-Frequency-Q factor 4 Turn MULTI-CONTROL to adjust the selected segement. Display Equalizer curve POWERFUL Powerful NATURAL Natural VOCAL Vocal CUSTOM Custom FLAT Flat SUPER BASS...
Operation Manual
Page 25
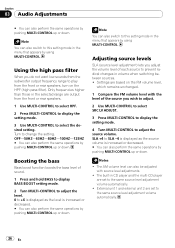
... off frequency 50HZ-63HZ-80HZ-100HZ-125HZ Level +6 to -24 is displayed as the level is on /off setting) setting mode-SW SETTING 2 (subwoofer setting) setting mode 2 Select SW SETTING 1 setting mode. 3 Turn MULTI-CONTROL to this setting mode in the menu that appears by pushing MULTI-CONTROL up or down. Turn to switch between the subwoofer setting modes in the following order. Press SW repeatedly to change the setting. Note You can also switch to select the desired setting. Using subwoofer output This unit is...
... off frequency 50HZ-63HZ-80HZ-100HZ-125HZ Level +6 to -24 is displayed as the level is on /off setting) setting mode-SW SETTING 2 (subwoofer setting) setting mode 2 Select SW SETTING 1 setting mode. 3 Turn MULTI-CONTROL to this setting mode in the menu that appears by pushing MULTI-CONTROL up or down. Turn to switch between the subwoofer setting modes in the following order. Press SW repeatedly to change the setting. Note You can also switch to select the desired setting. Using subwoofer output This unit is...
Operation Manual
Page 26
... want low sounds from the subwoofer output frequency range to play from the front or rear speakers. 1 Use MULTI-CONTROL to select HPF. 2 Press MULTI-CONTROL to display the setting mode. 3 Use MULTI-CONTROL to the same source level adjustment volume automatically. ! External unit 1 and external unit 2 are output from the front or rear speakers, turn on the HPF (high pass filter). OFF-50HZ-63HZ-80HZ-100HZ-125HZ # You can also perform the same operations by pushing...
... want low sounds from the subwoofer output frequency range to play from the front or rear speakers. 1 Use MULTI-CONTROL to select HPF. 2 Press MULTI-CONTROL to display the setting mode. 3 Use MULTI-CONTROL to the same source level adjustment volume automatically. ! External unit 1 and external unit 2 are output from the front or rear speakers, turn on the HPF (high pass filter). OFF-50HZ-63HZ-80HZ-100HZ-125HZ # You can also perform the same operations by pushing...

Operation Manual
Page 27
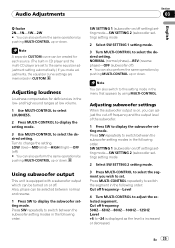
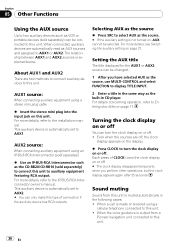
... dimmer setting To prevent the display from the head unit within four seconds of turning off the ignition, a warning tone sounds. En 27 SW CONTROL (rear output and subwoofer controller)-DEMO MODE (feature demo)- Setting the clock Use these instructions to set . Set each AUX source to ON when using auxiliary devices, refer to Using the AUX source on page 30. 1 Use MULTI-CONTROL to select AUX1/ AUX2. 2 Press MULTI-CONTROL to turn AUX1/ AUX2 on. # To turn the dimmer on . Switching the auxiliary setting Auxiliary devices connected to this unit. You can turn AUX...
... dimmer setting To prevent the display from the head unit within four seconds of turning off the ignition, a warning tone sounds. En 27 SW CONTROL (rear output and subwoofer controller)-DEMO MODE (feature demo)- Setting the clock Use these instructions to set . Set each AUX source to ON when using auxiliary devices, refer to Using the AUX source on page 30. 1 Use MULTI-CONTROL to select AUX1/ AUX2. 2 Press MULTI-CONTROL to turn AUX1/ AUX2 on. # To turn the dimmer on . Switching the auxiliary setting Auxiliary devices connected to this unit. You can turn AUX...
Operation Manual
Page 28
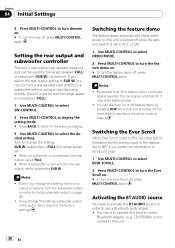
.... Switching the feature demo The feature demo automatically starts when power to ON, recorded text information scrolls continuously in the audio menu return to the factory settings. Turn to change this unit is connected to the rear output, set to this function when Bluetooth adapter (e.g. Initially, the unit is turned off, it may drain battery power. ! Notes ! If you can be used for rear full-range speaker connection (FULL). 1 Use MULTI-CONTROL to select SW CONTROL. 2 Press MULTI-CONTROL to display the setting mode...
.... Switching the feature demo The feature demo automatically starts when power to ON, recorded text information scrolls continuously in the audio menu return to the factory settings. Turn to change this unit is connected to the rear output, set to this function when Bluetooth adapter (e.g. Initially, the unit is turned off, it may drain battery power. ! Notes ! If you can be used for rear full-range speaker connection (FULL). 1 Use MULTI-CONTROL to select SW CONTROL. 2 Press MULTI-CONTROL to display the setting mode...
Operation Manual
Page 29
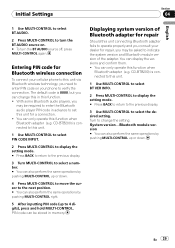
... for repair Should this function when Bluetooth adapter (e.g. Entering PIN code for a connection. ! CD-BTB200) is connected to this unit for Bluetooth wireless connection To connect your cellular phone to this function when Bluetooth adapter (e.g. You can only operate this unit connecting Bluetooth adapter fails to operate properly and you need to enter PIN code on . # To turn the BT AUDIO source off, press MULTI-CONTROL again. Turn to change this in advance to set this unit. 1 Use MULTI-CONTROL to select PIN CODE INPUT. 2 Press MULTI-CONTROL to display the setting mode...
... for repair Should this function when Bluetooth adapter (e.g. Entering PIN code for a connection. ! CD-BTB200) is connected to this unit for Bluetooth wireless connection To connect your cellular phone to this function when Bluetooth adapter (e.g. You can only operate this unit connecting Bluetooth adapter fails to operate properly and you need to enter PIN code on . # To turn the BT AUDIO source off, press MULTI-CONTROL again. Turn to change this in advance to set this unit. 1 Use MULTI-CONTROL to select PIN CODE INPUT. 2 Press MULTI-CONTROL to display the setting mode...
Operation Manual
Page 30
... sources is automatically set to AUX2. # You can only make this unit is output from this type of CLOCK turns the clock display on page 27. This auxiliary device is explained below. Selecting AUX as the source % Press SRC to select AUX as the CD-RB20/CD-RB10 (sold separately) % Use an IP-BUS-RCA Interconnector such as the source. # If the auxiliary setting is made or received using a stereo mini plug cable % Insert the stereo mini plug into the input...
... sources is automatically set to AUX2. # You can only make this unit is output from this type of CLOCK turns the clock display on page 27. This auxiliary device is explained below. Selecting AUX as the source % Press SRC to select AUX as the CD-RB20/CD-RB10 (sold separately) % Use an IP-BUS-RCA Interconnector such as the source. # If the auxiliary setting is made or received using a stereo mini plug cable % Insert the stereo mini plug into the input...
Operation Manual
Page 34
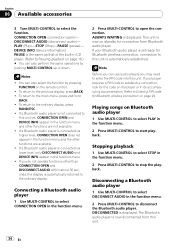
You can also perform the same operations by pressing FUNCTION on the remote control. ! Connecting a Bluetooth audio player 1 Use MULTI-CONTROL to select CONNECTION OPEN in its accompanying documentation. ALWAYS WAITING is displayed. If your player requires a PIN code to establish a connection, look for Bluetooth wireless connection, connection to Entering PIN code for connection from this unit is connected via higher level, CONNECTION OPEN does not appear in CD player. (Refer to the ordinary display. DEVICE INFO (device information) PAUSE is automatically...
You can also perform the same operations by pressing FUNCTION on the remote control. ! Connecting a Bluetooth audio player 1 Use MULTI-CONTROL to select CONNECTION OPEN in its accompanying documentation. ALWAYS WAITING is displayed. If your player requires a PIN code to establish a connection, look for Bluetooth wireless connection, connection to Entering PIN code for connection from this unit is connected via higher level, CONNECTION OPEN does not appear in CD player. (Refer to the ordinary display. DEVICE INFO (device information) PAUSE is automatically...
Operation Manual
Page 35
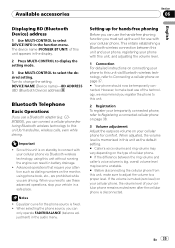
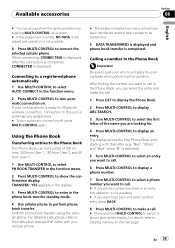
...-CONTROL to display the setting mode. 3 Use MULTI-CONTROL to a proper level. When adjusted, the volume level is memorized in the function menu. When selecting the phone source, you can use the hands-free phoning function you must set up the unit for hands-free, wireless calls, even while driving. En 35 Important ! Available accessories Section 06 English Displaying BD (Bluetooth Device) address 1 Use MULTI-CONTROL to select DEVICE INFO in this unit as dialing numbers on the monitor, using this unit, make best use a Bluetooth adapter (e.g. DEVICE NAME (Device...
...-CONTROL to display the setting mode. 3 Use MULTI-CONTROL to a proper level. When adjusted, the volume level is memorized in the function menu. When selecting the phone source, you can use the hands-free phoning function you must set up the unit for hands-free, wireless calls, even while driving. En 35 Important ! Available accessories Section 06 English Displaying BD (Bluetooth Device) address 1 Use MULTI-CONTROL to select DEVICE INFO in this unit as dialing numbers on the monitor, using this unit, make best use a Bluetooth adapter (e.g. DEVICE NAME (Device...

Operation Manual
Page 37
... on the remote control. ! You can change this code in the initial setting. En 37 To return to the main menu, press and hold BACK. ! While searching, SEARCHING flashes. CONNECTION OPEN (connection open ) ! SET PHONE (registering phone) Notes ! SET PHONE (registering phone) ! tooth audio. (Refer to this unit via Bluetooth wireless technology with HSP (Head Set Profile), CLEAR MEMORY and NUMBER DIAL cannot be obtained) is displayed. # If this unit. # The link code is set to...
... on the remote control. ! You can change this code in the initial setting. En 37 To return to the main menu, press and hold BACK. ! While searching, SEARCHING flashes. CONNECTION OPEN (connection open ) ! SET PHONE (registering phone) Notes ! SET PHONE (registering phone) ! tooth audio. (Refer to this unit via Bluetooth wireless technology with HSP (Head Set Profile), CLEAR MEMORY and NUMBER DIAL cannot be obtained) is displayed. # If this unit. # The link code is set to...
Operation Manual
Page 39
... phone. Connecting to a registered phone automatically 1 Use MULTI-CONTROL to select AUTO CONNECT in the function menu. 2 Press MULTI-CONTROL to show the confirmation display. After finding the number you want to go back and select another entry, press BACK. 8 Press MULTI-CONTROL to make the call . # Press and hold a total of the name you are looking for Bluetooth wireless connection, connection to this unit is automatically established. # To turn automatic connection...
... phone. Connecting to a registered phone automatically 1 Use MULTI-CONTROL to select AUTO CONNECT in the function menu. 2 Press MULTI-CONTROL to show the confirmation display. After finding the number you want to go back and select another entry, press BACK. 8 Press MULTI-CONTROL to make the call . # Press and hold a total of the name you are looking for Bluetooth wireless connection, connection to this unit is automatically established. # To turn automatic connection...
Operation Manual
Page 50
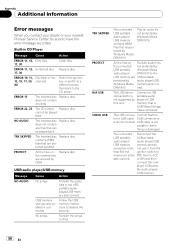
... the USB memory are secured by this unit. OFF, then to iPod. ERROR-11, 12, Scratched disc Replace disc. 17, 30 ERROR-10, 11, Electrical or me12, 15, 17, 30, chanical A0 Switch the ignition key, or switch to a different source, then back to the USB portable audio player/USB memory and connect. USB audio player/USB memory Message NO AUDIO Cause Action No songs Transfer the audio files to the CD player. DRM 9/10 nect. Turn...
... the USB memory are secured by this unit. OFF, then to iPod. ERROR-11, 12, Scratched disc Replace disc. 17, 30 ERROR-10, 11, Electrical or me12, 15, 17, 30, chanical A0 Switch the ignition key, or switch to a different source, then back to the USB portable audio player/USB memory and connect. USB audio player/USB memory Message NO AUDIO Cause Action No songs Transfer the audio files to the CD player. DRM 9/10 nect. Turn...
Operation Manual
Page 54
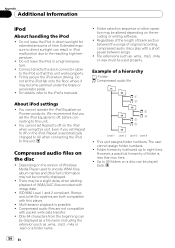
Do not leave the iPod in iPod malfunction due to this unit. ! Connect directly the dock connector cable to the iPod so that you set Repeat to encode WMA files, album names and other operation may not be correctly displayed. ! You cannot operate the iPod Equalizer on the disc ! There may become jammed under the brake or accelerator pedal. ! Compressed audio files are both compatible with packet write...
Do not leave the iPod in iPod malfunction due to this unit. ! Connect directly the dock connector cable to the iPod so that you set Repeat to encode WMA files, album names and other operation may not be correctly displayed. ! You cannot operate the iPod Equalizer on the disc ! There may become jammed under the brake or accelerator pedal. ! Compressed audio files are both compatible with packet write...


